ChatGPT
 Perplexity
 Claude
 Grok
Grok Google AI Mode
Welcome emails are often the first real conversation your Shopify brand has with a new subscriber or customer, and that moment carries more weight than most marketers realize.
When someone joins your list, they're curious, attentive, and interested in hearing from you. Over the years creating content for ecommerce teams, I've seen how a well-written welcome email can turn that curiosity into trust, and trust into a meaningful first step in the customer journey.
GetResponse's 2024 Email Marketing Benchmarks report, based on 2023 data, shows that welcome emails achieve an average open rate of 83.63% and a click-through rate of 16.60%, and the report calls welcome emails "your most effective email marketing campaign", because people expect and want this message after subscribing. Read the open rate loosely: since Apple's Mail Privacy Protection arrived in 2021, many opens are counted automatically, so clicks are the sturdier signal.
Below, I'll walk you through how to create a Shopify welcome email using Shopify Messaging (the app was called Shopify Email until December 2025), and how to make it feel warm, human, and aligned with your brand, not just another automated message. My goal is to help you build a welcome experience that feels intentional, friendly, and authentic: the kind of message that makes people feel they've joined a brand, not just a mailing list.
What you'll need:
- A Shopify store on the Basic plan or higher
- The Shopify Messaging app installed, plus the Shopify Flow app, which Shopify asks for to get full automation functionality
- A desktop browser: on a phone, Shopify only lets you create the three abandonment automations
- Subscribers who accepted email marketing, because Shopify's welcome automations only send to them
💌 What is a Shopify Welcome Email?
A Shopify welcome email is the first automated message a subscriber receives after joining your email list or creating an account in your store. In many ways, it functions as your brand's digital handshake: a friendly introduction that helps people understand who you are, what you offer, and why they should stay connected.
This touchpoint matters most in ecommerce, because the subscriber is actively waiting for something: a confirmation, the discount you promised, or next-step guidance after signing up.
A strong welcome email usually focuses on:
- Reassuring the subscriber that they made the right decision
- Setting expectations about your brand's tone, values, and communication style
- Offering something helpful, such as a discount, resource, or quick-start path
- Guiding them toward a meaningful first action on your store
When a welcome email feels warm, relevant, and human, rather than robotic, it does more than deliver information. It creates the beginning of a relationship.
Understanding Shopify Welcome Emails
When you're setting up a welcome email in Shopify, you might get a bit confused because there are two ways to do it:
📌 Method One: It involves creating automation using Shopify's marketing automations and allows you to create a series of emails based on customer behavior. Since March 24, 2026, this lives in the Shopify Messaging app (Apps > Messaging > Automations). Before that it sat under Marketing > Automations, which is where most older guides still send you. And today, we focus on this method.
📌 Method Two: Uses the Customer account welcome email in Settings > Notifications. This is a one-time email Shopify sends when a customer creates an account in your store. It goes to account holders, not to newsletter subscribers who never make an account, and you edit it as an HTML and Liquid template rather than in the Messaging email editor.
Why We Focus on the Automated Email Series: Sending your new subscribers a series of welcome emails rather than a single welcome email in the first few days after they join your list allows you to build a stronger connection with them. A welcome series is a small drip campaign: a fixed set of emails sent on a schedule after one trigger, here the signup.
▶️ Shopify Messaging offers two welcome templates:
- Welcome new subscribers with a discount email: With this template, you can send a simple, one-time email with a discount to welcome your new subscribers.
- Welcome new subscribers with a discount series: You can start a sequence of emails offering a discount to new subscribers, with room for more than one message before their first purchase.
The brand-story series that older guides describe (the 2024 version of this one included) is no longer a separate template. You can still send one: tell your story in the first email of the discount series, or build your own workflow in Shopify Flow.
Here's how the ways to send a welcome email compare:
| Route | Who gets it | How many emails | Where you set it up |
|---|---|---|---|
| Shopify Messaging welcome automation | Customers subscribed to email marketing | One email or a series | Apps > Messaging > Automations |
| Customer account welcome notification | Customers who create an account | One | Settings > Notifications |
| Shopify Flow workflow or your email platform's Shopify app | Whoever matches the trigger you choose | As many as you build | Shopify Flow, or the platform's app |
| Popupsmart Email Autoresponder | Visitors who subscribe through one Popupsmart popup | One | Popupsmart's Shopify app, Publish step |
Types of emails a Shopify store sends
A Shopify store sends four types of email: transactional notifications, account emails, automated marketing emails and campaigns. The welcome email is an automated marketing email, and it's the first one a new subscriber gets.
| Type | Examples | Where you set it up |
|---|---|---|
| Transactional notifications | Order confirmation, shipping confirmation, refund | Settings > Notifications |
| Account emails | Customer account welcome | Settings > Notifications |
| Automated marketing emails | Welcome, abandoned checkout, cart and product browse, thank-you and upsell, win-back, birthday, VIP | Apps > Messaging > Automations, or Shopify Flow |
| Campaigns | Newsletters, launches, sales | Apps > Messaging |
Transactional and account emails go to every customer who triggers them. Marketing emails, the welcome email included, go to customers who accepted email marketing. If you want the next automation after the welcome email, Shopify cart abandonment emails are the usual second one to set up.
How to Create Email Automation to Welcome New Customers?
To create a welcome automation in Shopify, install Shopify Messaging, go to Apps > Messaging > Automations, click Create automation, choose a welcome template, edit and test its emails, and turn it on. The ten steps below follow Shopify's own setup order, checked October 2026.
Step 1: Enter the “Automations” Section
- Log into your Shopify admin.
- Click Apps in the sidebar menu and open Messaging.
- From the Messaging page, select Automations.
Step 2: Begin Automation Setup
- In the Automations section, find and click the “Create automation” button to start.
Step 3: Select the Welcome Email Template
- Shopify Messaging has 2 ready-made templates for welcoming new subscribers: Welcome new subscribers with a discount email and Welcome new subscribers with a discount series. You can go with one of the two and then adjust it to fit your flow.
- Pick the single email if one clear hello with a code is enough. Pick the series if you want room for your story and your best sellers before the discount.
🌟 Note: The screenshots in the remaining steps show the 2024 “Welcome email series (discount with reminder)” flow.
Step 4: Choose the Email Channel
- Shopify Messaging automations can send email or SMS. Choose Email for a welcome email. SMS automations are charged per message sent.
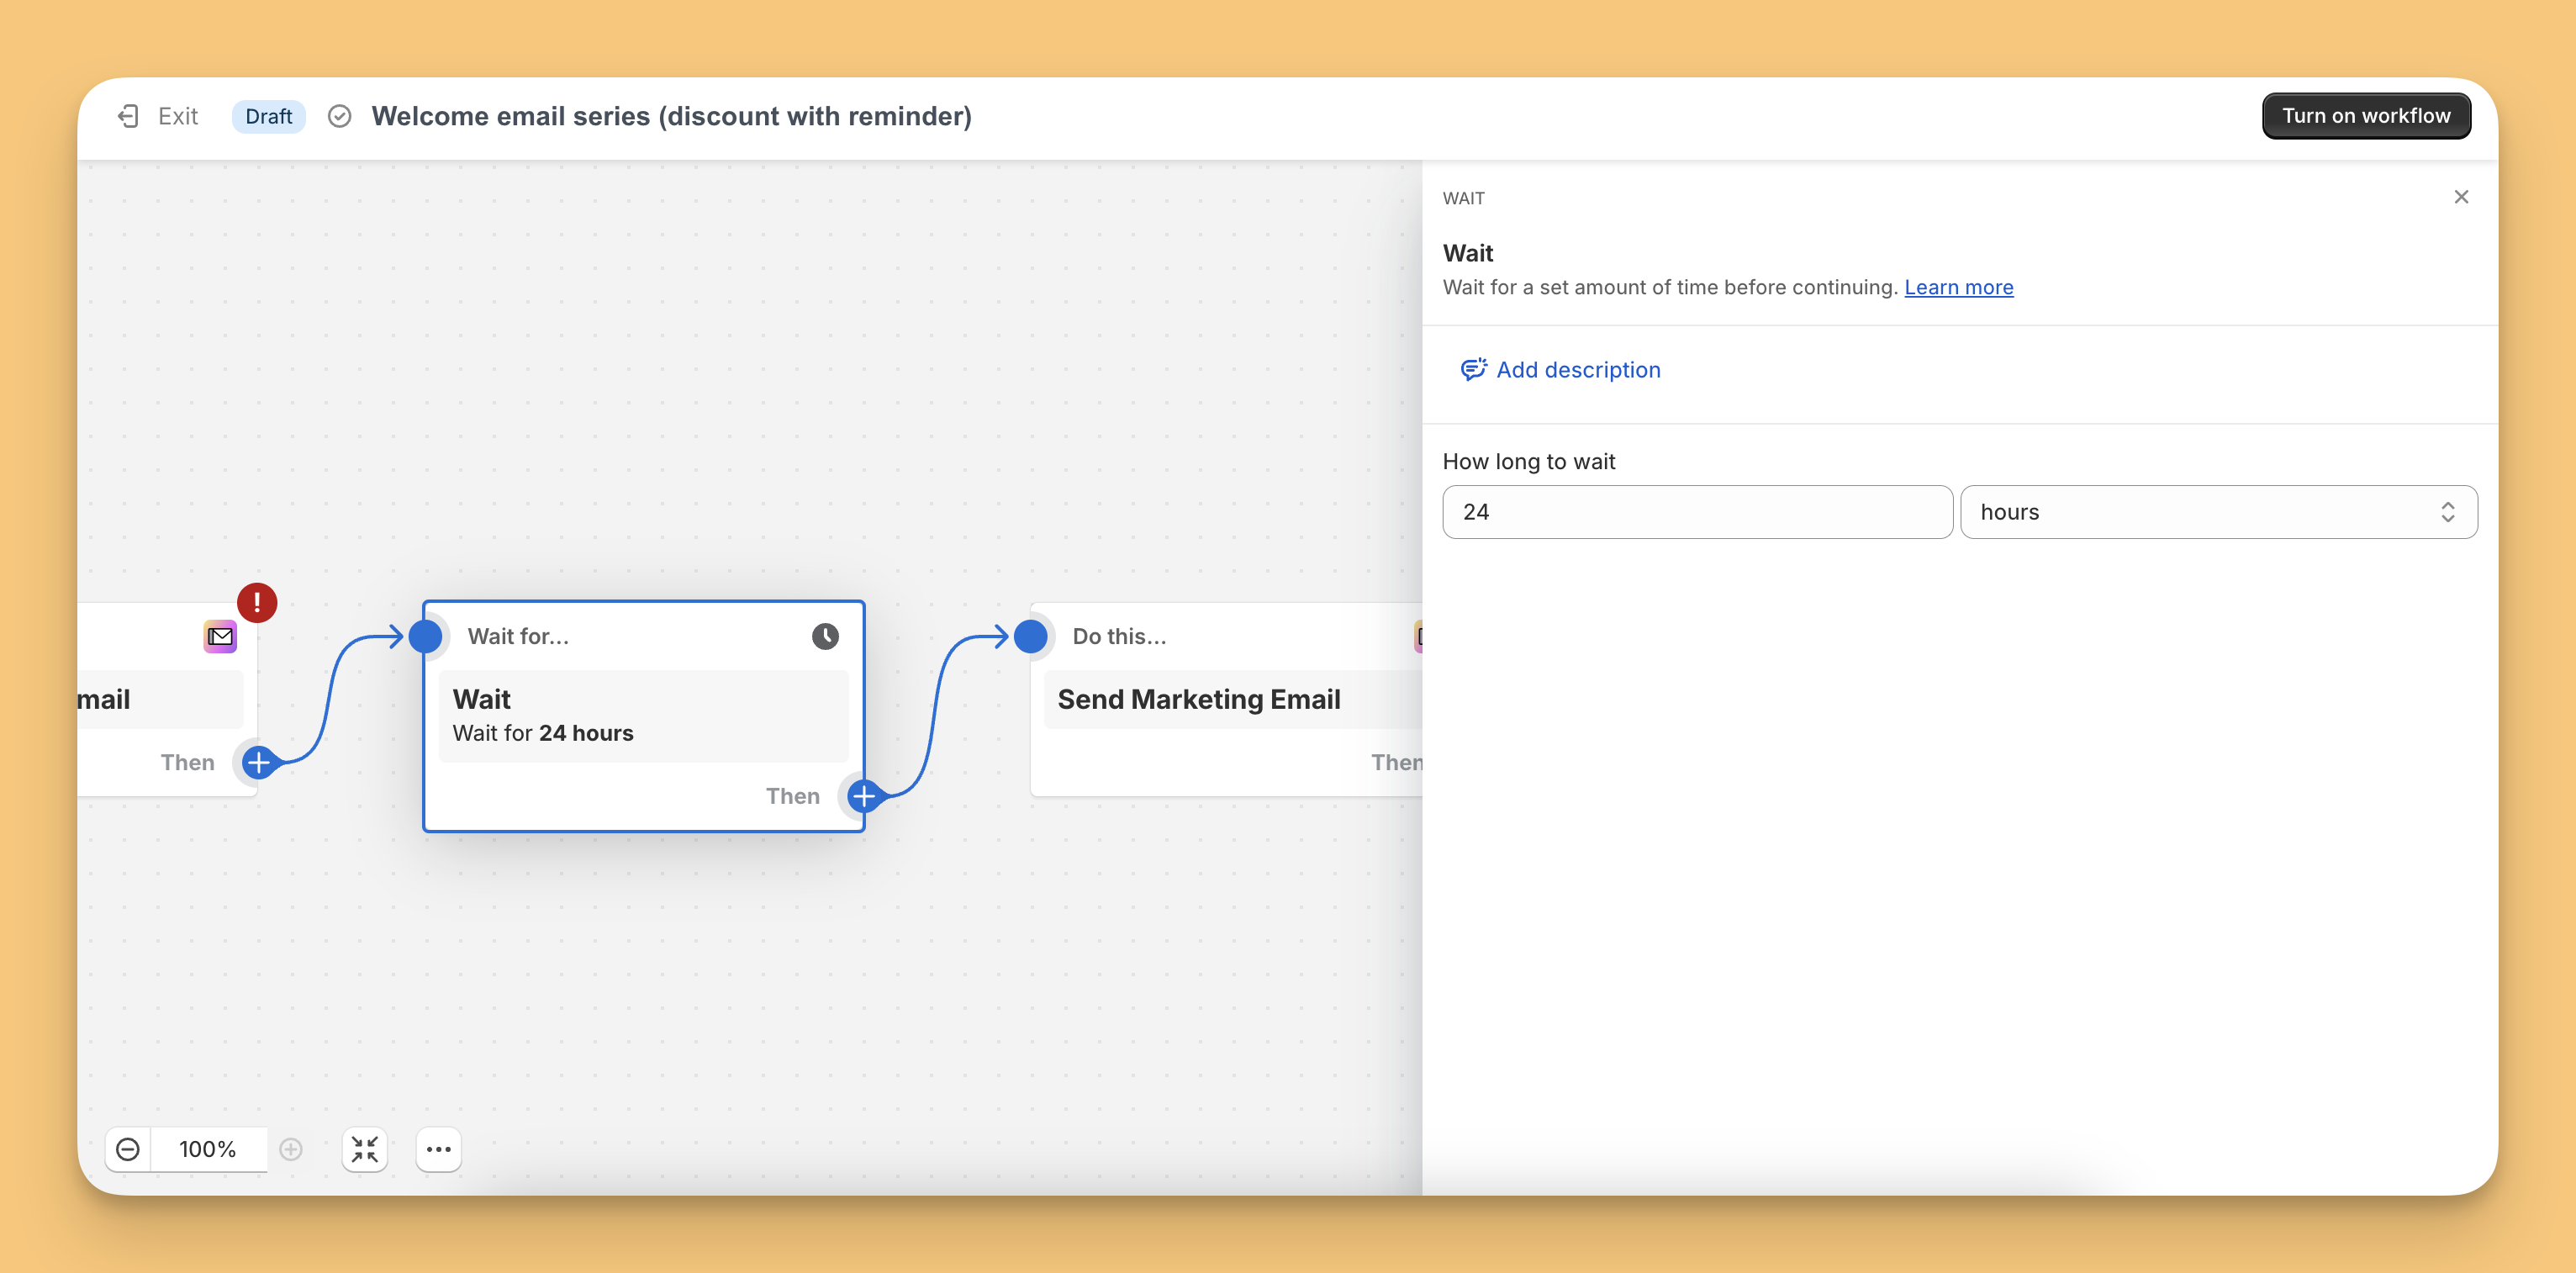
Step 5: Configure the Flow (Triggers & Wait Times)
- The trigger is the customer subscribing to email marketing.
- Adjust the triggers, such as subscription actions, and set up wait times between emails for a paced communication sequence like the image below:
Step 6: Edit the Welcome Email Content
- On the workflow page, there should be an “Edit email” option. Click this to modify the draft email.
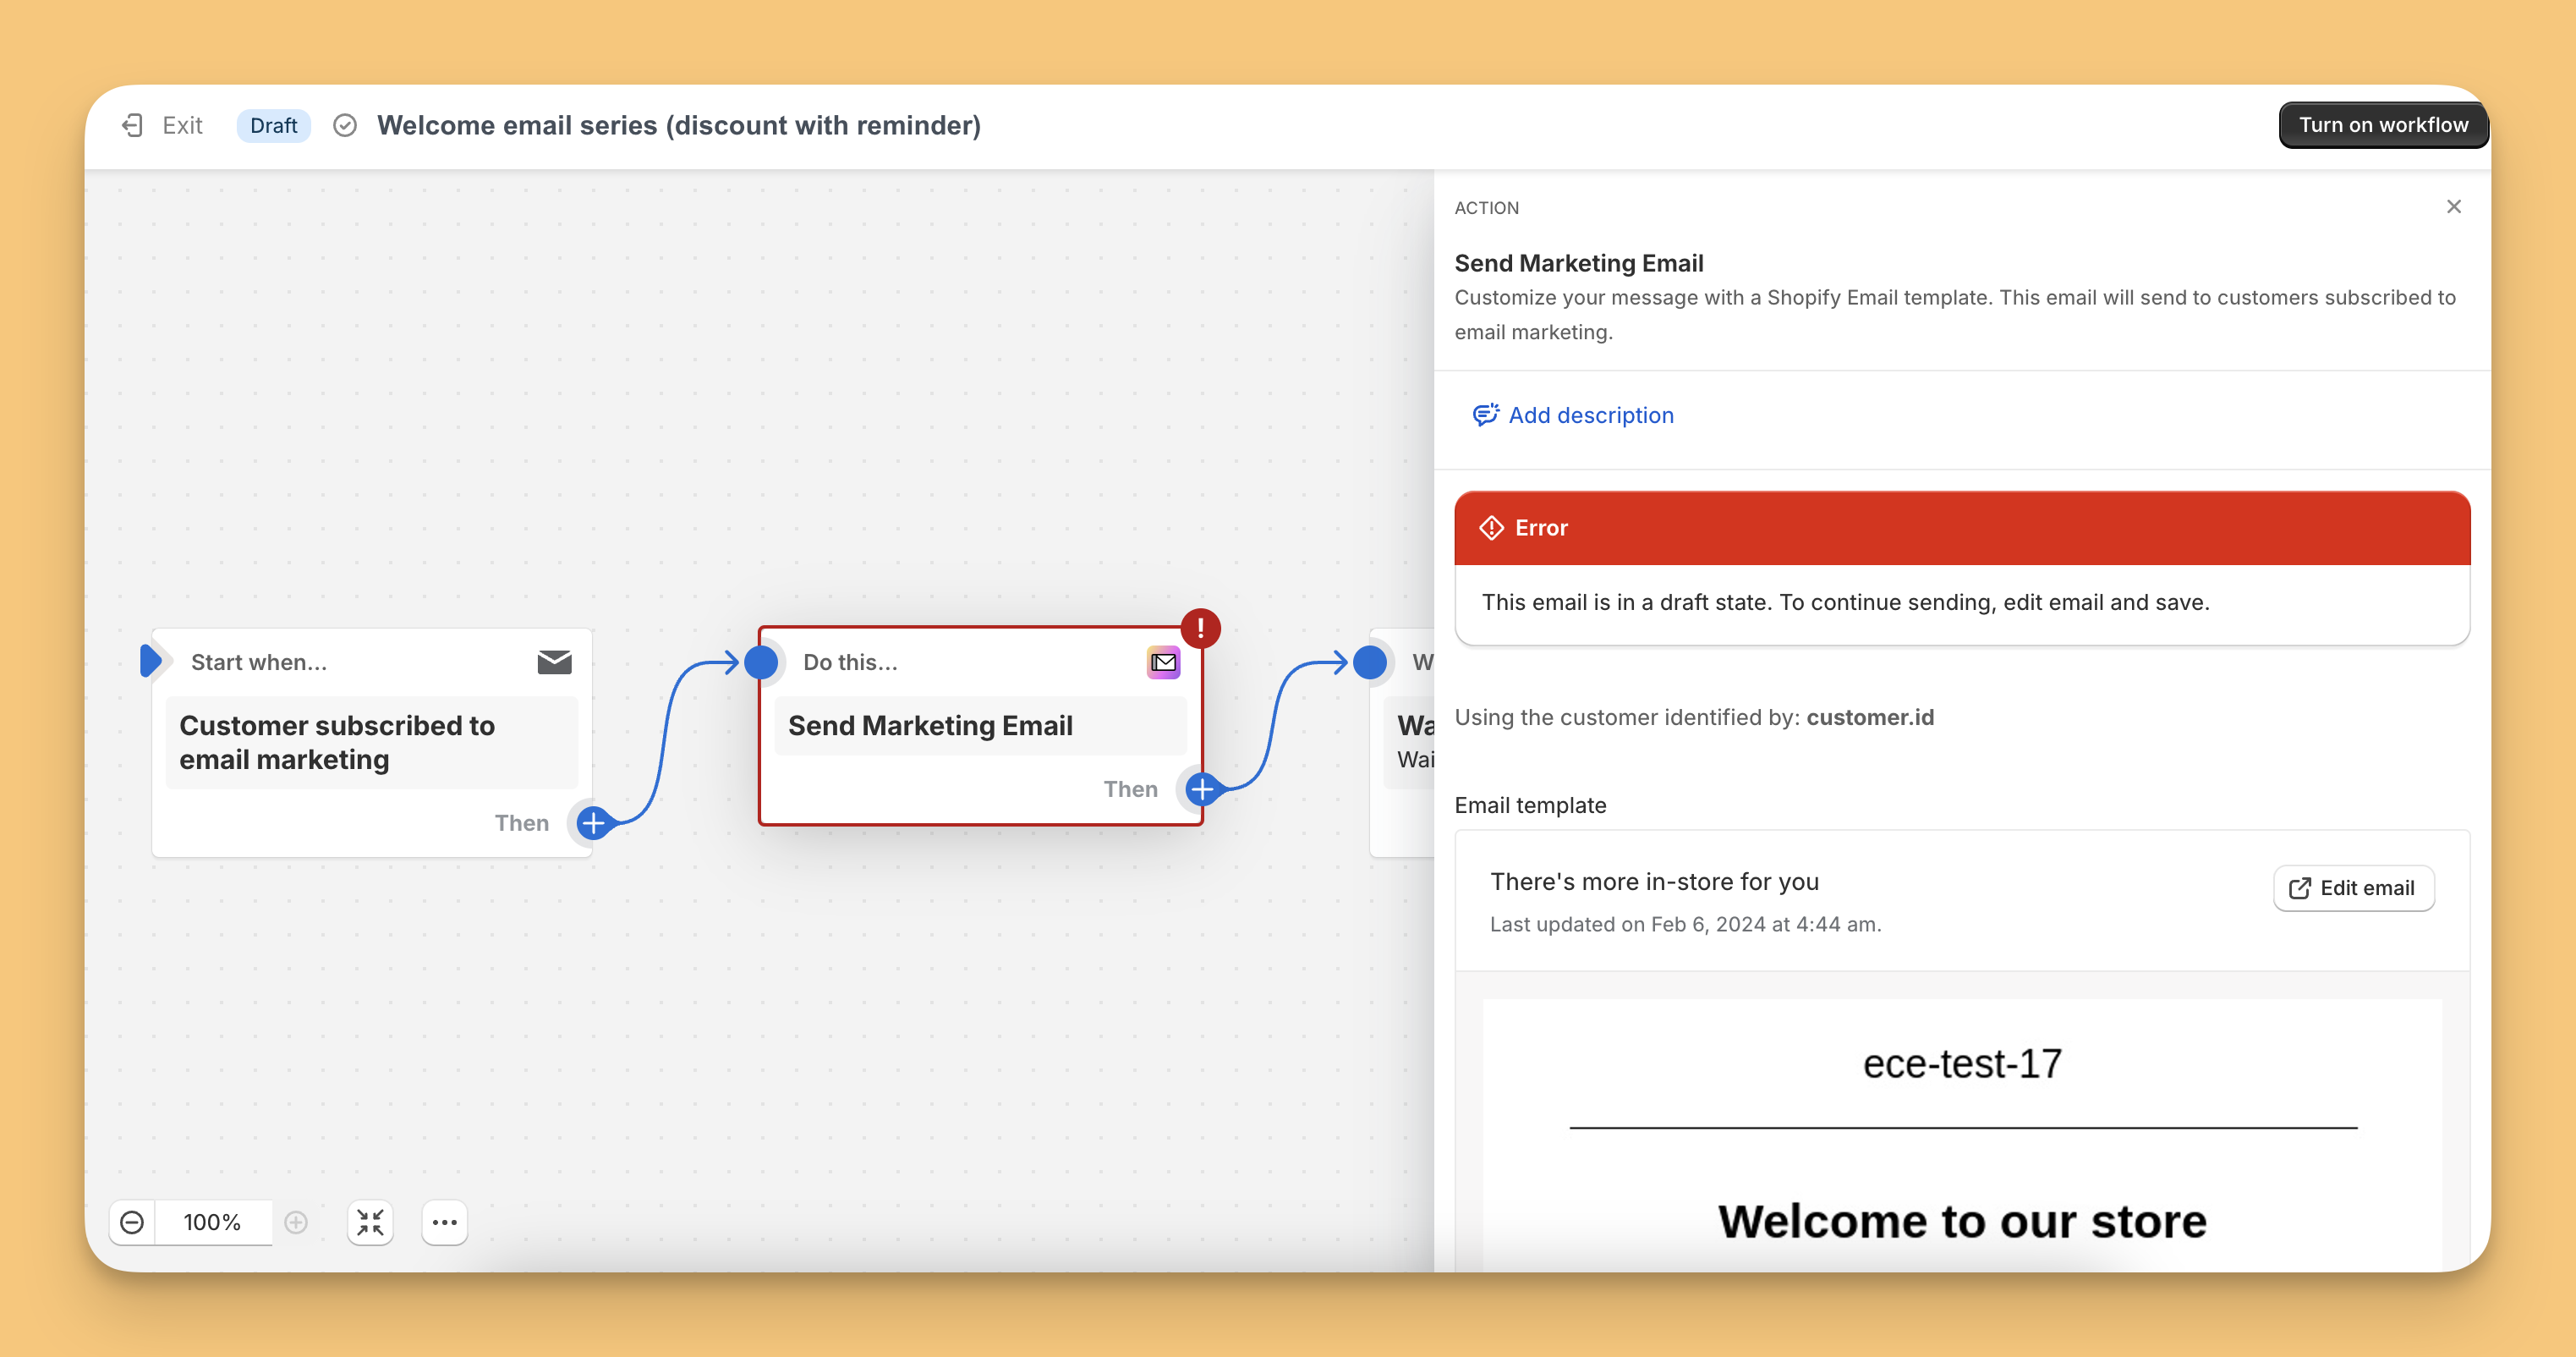
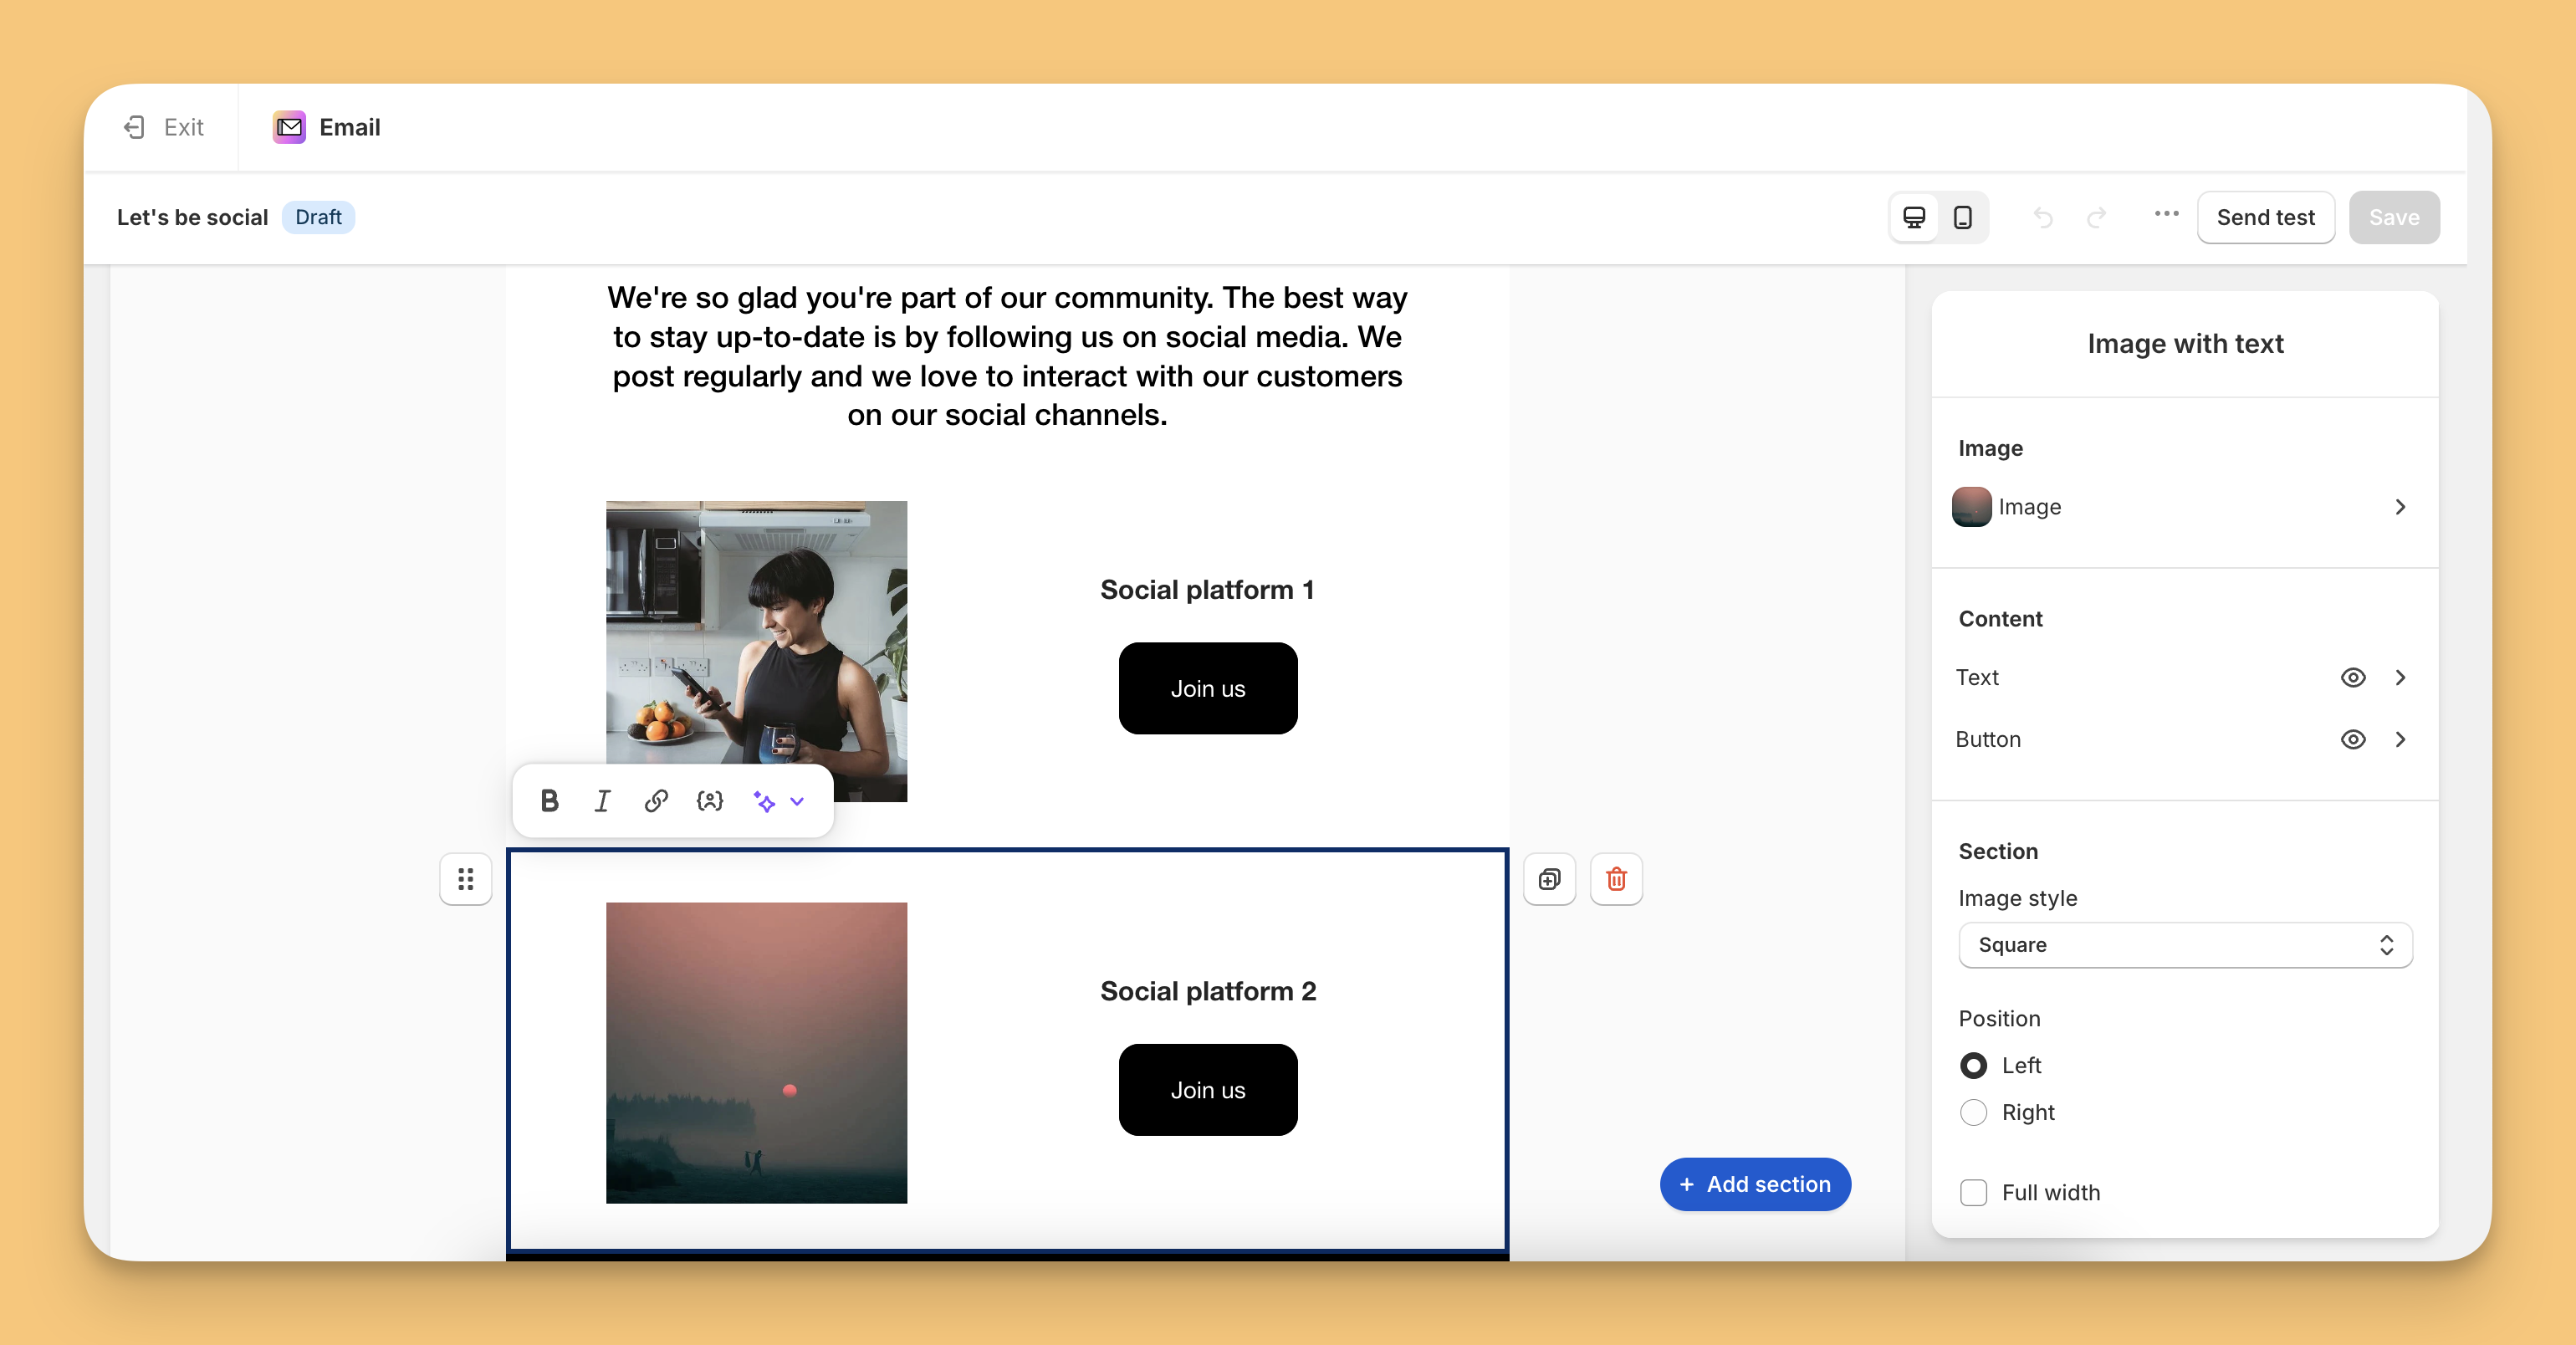
- You can edit each of your emails. For example, after 24 hours have passed, you can send a community builder email to your customers with your social media accounts.
Step 7: Tailor the Email Details
- To: Shopify will only send it to “customers subscribed to email marketing.”
- Subject Line: If you want to edit the line from “Welcome aboard! Enjoy an exclusive discount” to “Cheers to new beginnings! Claim your welcome discount now!”.
- Preview Text: Add a teaser like “Your complimentary shipping is on us. 🌟”.
- From: Edit the sender's email address for brand consistency.
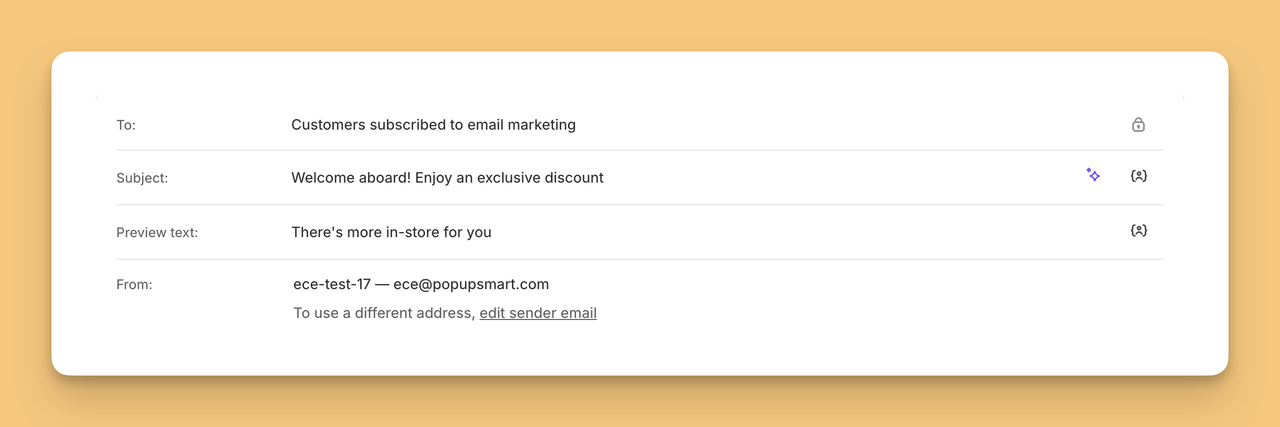
Step 8: Customize the Email Design
- In the email editor, adjust design elements to reflect your brand's identity. You can reorganize sections, change colors and fonts.
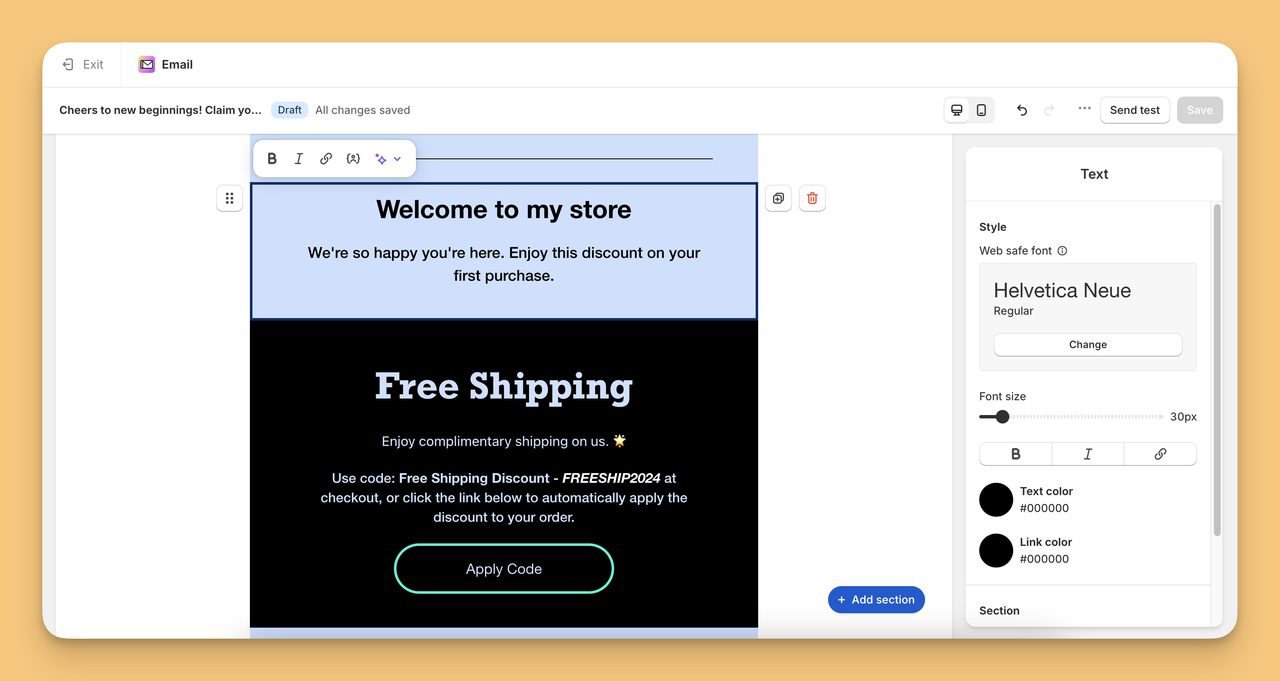
- And if you want, you can even expand your email by adding a new section:
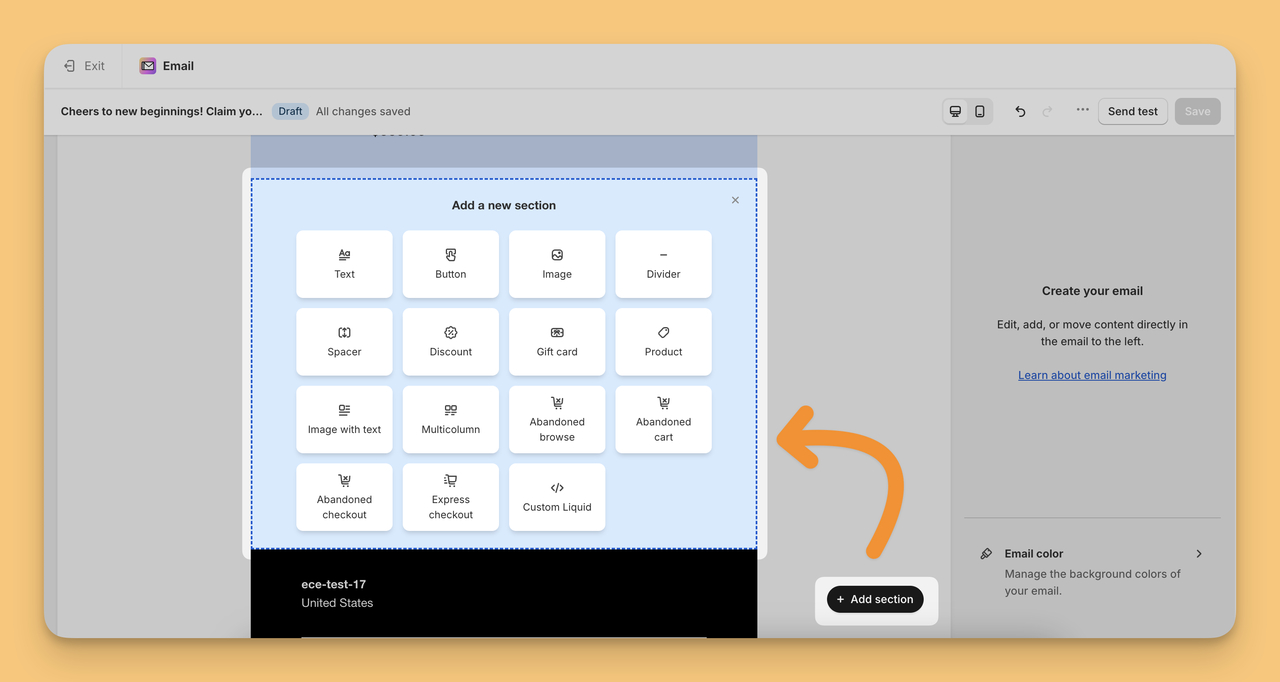
Step 9: Preview and Save
- Use the “Send test” function to review the email's appearance in your own inbox: enter your own address and click “Send”.
- If everything looks good, keep the changes. To finish later, choose “Save without turning on”.
Step 10: Activate the Automated Emails
- Finalize the process by turning on the automation: click “Turn on”. From then on, every new email subscriber gets your welcome email or series.
How to welcome popup subscribers with Popupsmart's Shopify app
Shopify's welcome automation only greets people who are already on your list, so the list has to come from somewhere: Shopify's own signup forms, the checkout checkbox, or a popup. Popupsmart's Shopify app collects subscribers with a popup and gives you two ways to welcome them.
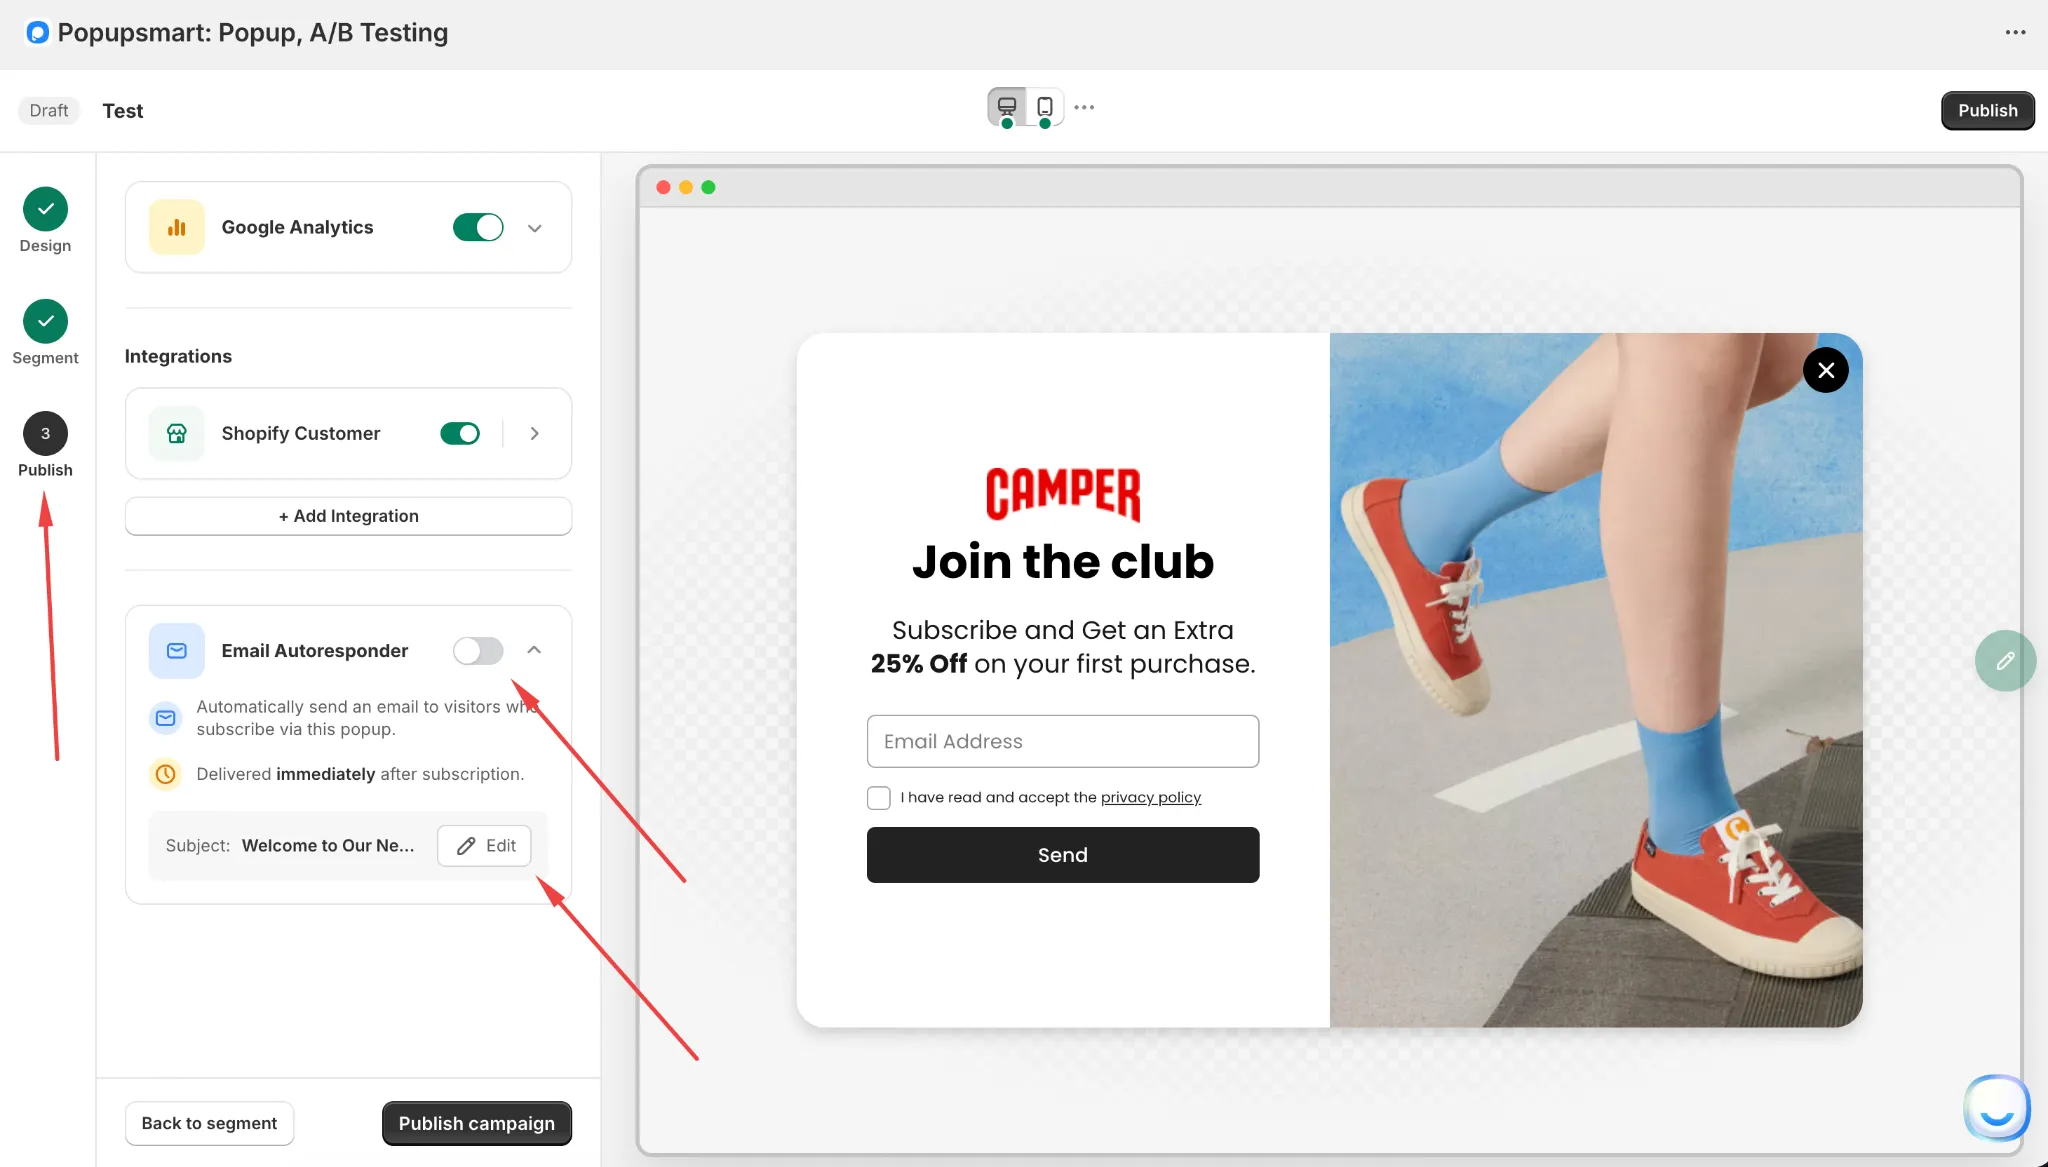
- Sync them to Shopify Customers. Turn on the Shopify Customer toggle in the popup's Publish step and map the email field, as the help center shows in sending Popupsmart leads to Shopify Customers. Before you rely on Shopify's welcome automation for these contacts, open one test signup under Customers and check that it shows as subscribed to email marketing, because that automation only sends to subscribers.
- Send one Email Autoresponder email. The Email Autoresponder in Popupsmart's Shopify app sends one automatic email to each visitor who subscribes through that popup, immediately or after a delay you set in minutes or hours. Stores use it for a welcome, a coupon code or a confirmation.
Here's a brief guide on how you can use the autoresponder for your welcome email:
- Go to the Shopify App Store and install Popupsmart’s Shopify App, then open your popup and go to the Publish step.
- Find Email Autoresponder below the Integrations section, switch it on and click Edit.
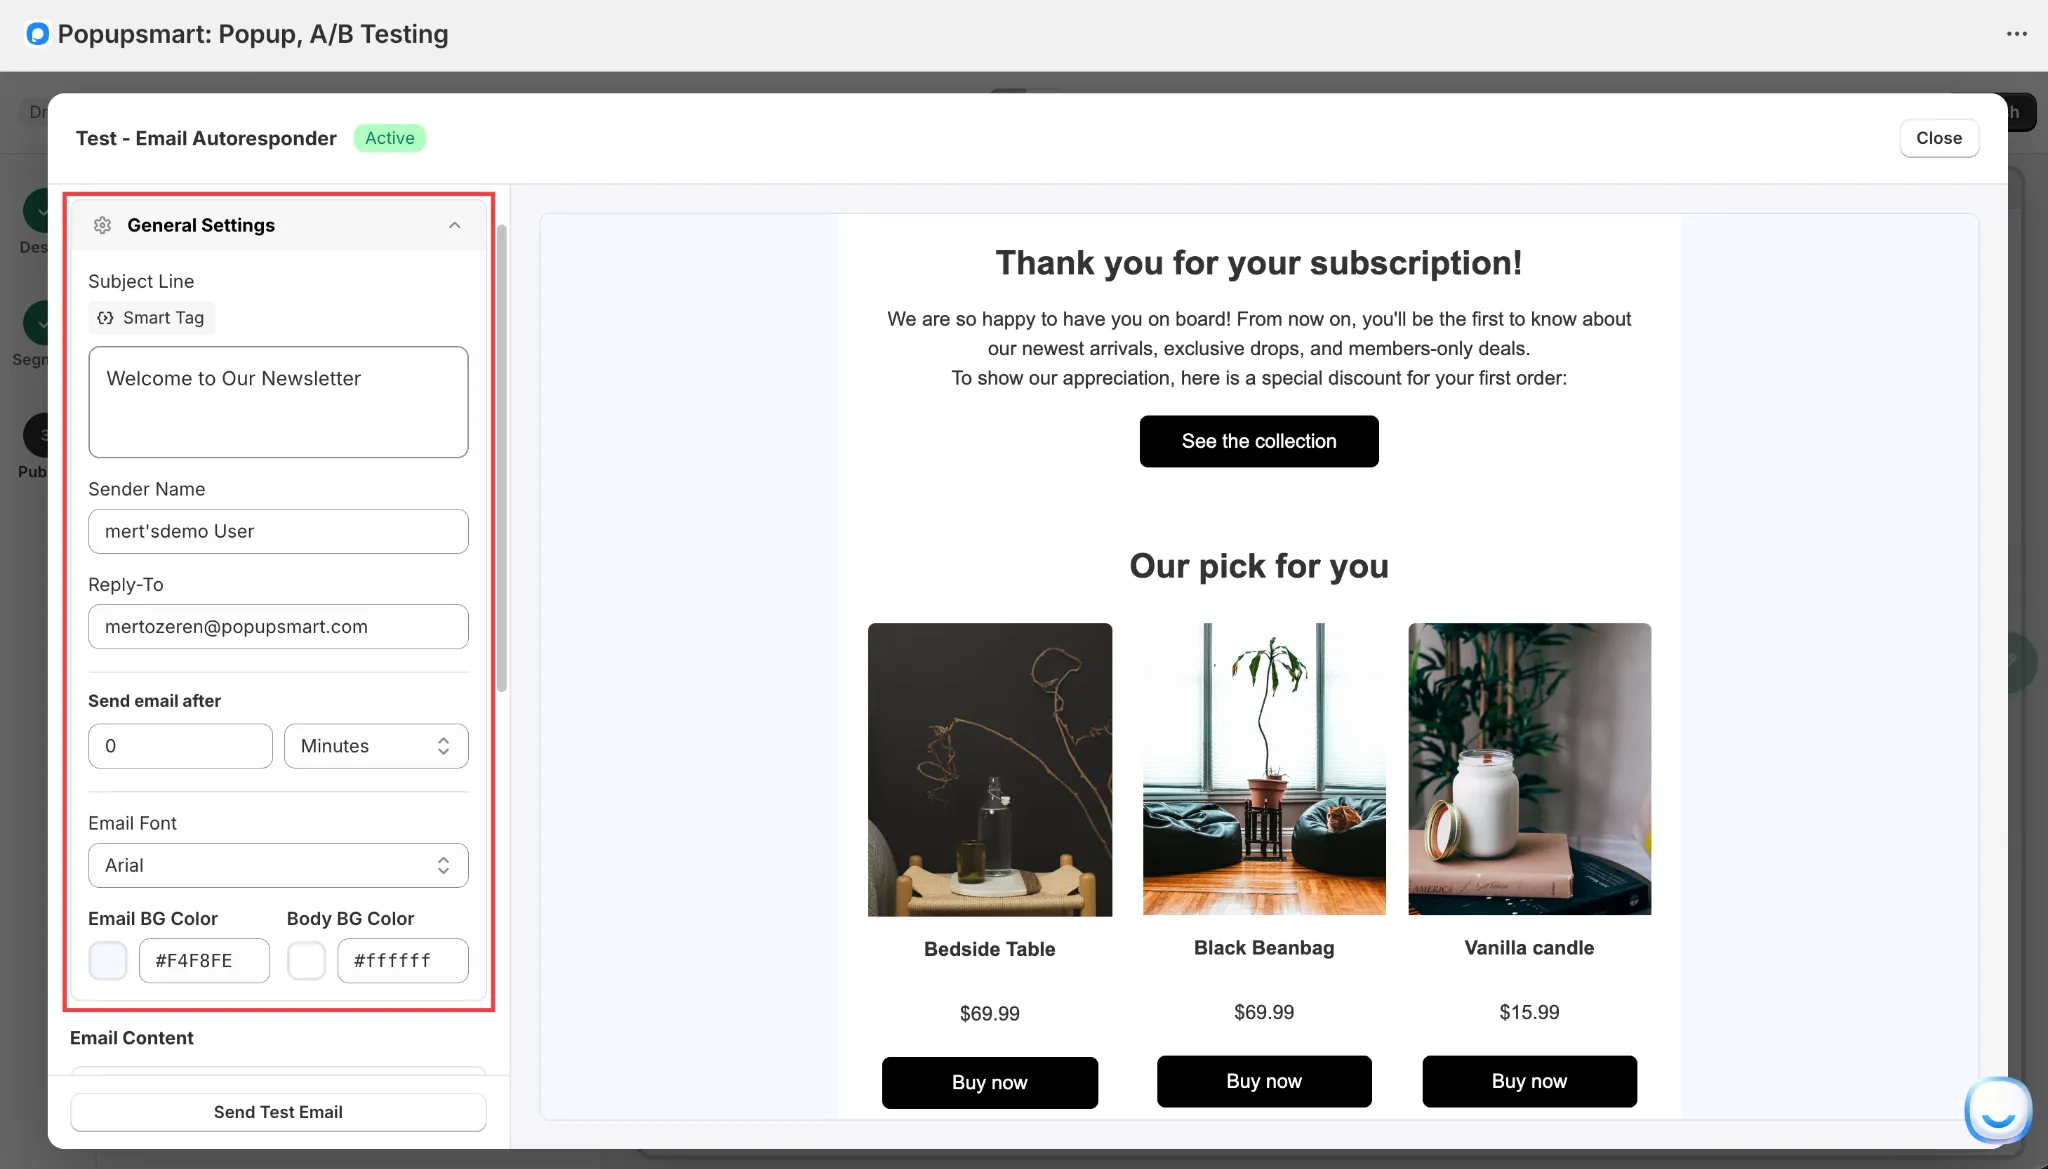
- Under General Settings, set the Subject Line, Sender Name and Reply-To address. Then select when to send your email: set a delay time in Send email after so that the email is sent exactly when you want it to, for example five minutes after signup. With 0 minutes, an email is sent as soon as the visitor fills out the popup form.
- Then, customize your welcome email by editing the design to fit your brand’s aesthetic, using the content sections: Header, Image, Headline, Body, Button, Coupon Code, Social Links and Product Cards. The footer with your company name, privacy policy link and unsubscribe link is added automatically.
- Click Send Test Email and check it on desktop and mobile. Once the timing and content of your email are just right, click "Save" and make sure the popup is Activated.
If your welcome email delivers a discount, say so in the popup. In Popupsmart's 2026 benchmark, signup popups that offer a discount code convert 1.46% vs 0.75% for signup popups without one (median campaign, leads per popup display). The autoresponder's Coupon Code section can carry the same code the popup shows, so the promise and the email match. For offer wording, these discount popup examples are a good start. If the idea of creating a popup piques your interest, these welcome popup examples and tips show what the signup popup itself can look like.
You're all set: your Shopify store now has a tailored, timely welcome email ready to greet each new subscriber from that popup. The autoresponder is one email per popup, though. For a welcome series, keep the series in Shopify Messaging, Shopify Flow or your email platform, and let the popup do the collecting.
Shopify Store’s Welcome Email Examples to Inspire Your Own
These welcome emails come from real Shopify stores and were captured in February 2024. Both stores still trade and still invite newsletter signups in October 2026.
- Methodical Coffee | Welcome Email Example
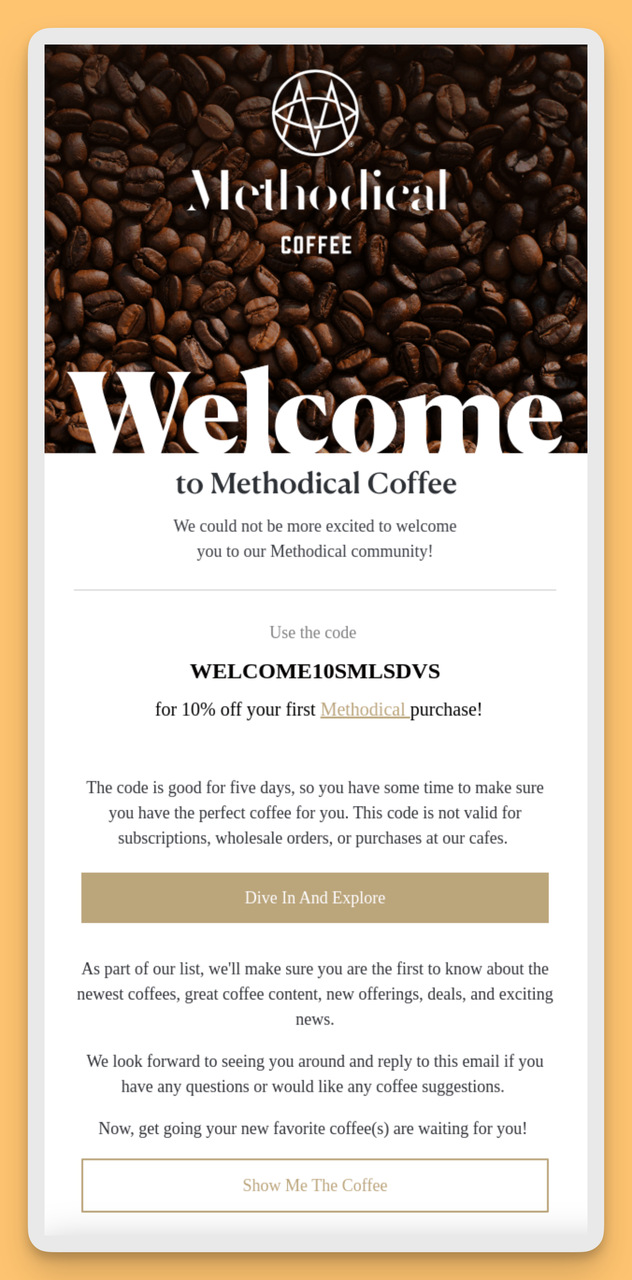
In addition to its logo, Methodical Coffee uses coffee beans as their background, instantly connecting the viewer to the product. ▶️ So, if you sell handmade soaps, a natural-ingredient background will align with your brand's values.
Also, the discount code is highlighted early in the email, grabbing attention and encouraging a purchase. ▶️ Ensure your offer is visible and enticing to drive sales.
And their CTA button, "Dive In And Explore," is action-oriented and invites interaction. ▶️ You can use CTAs that prompt immediate engagement with your store.
- Lead with the code, then feature best sellers
▶️ It's also smart to add the discount rate and code at the beginning of your email. In this way, it is impossible for your customer to miss the discount :)
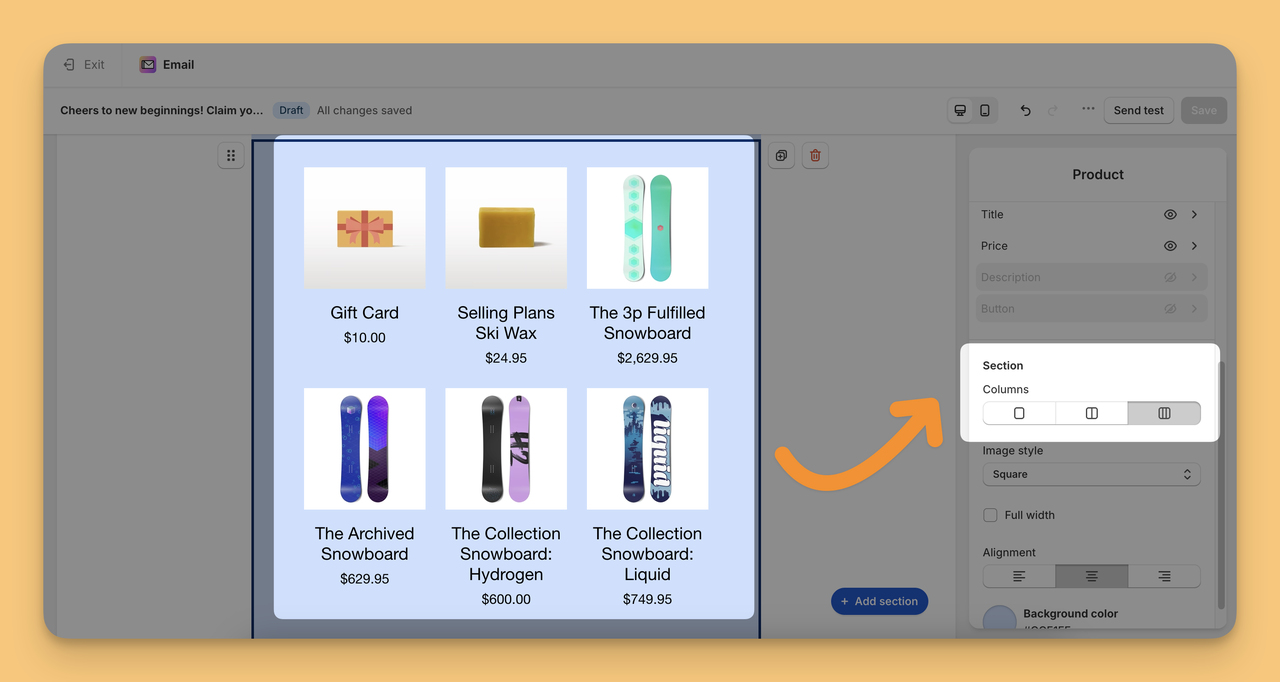
Then highlight your best sellers, giving new subscribers a curated starting point for shopping. ▶️ Feature products that represent your brand well and are popular among customers.
You can add more than one of your bestsellers to the section with the layout you want. Here's exactly how:
- Pulp & Press | Welcome Email Example
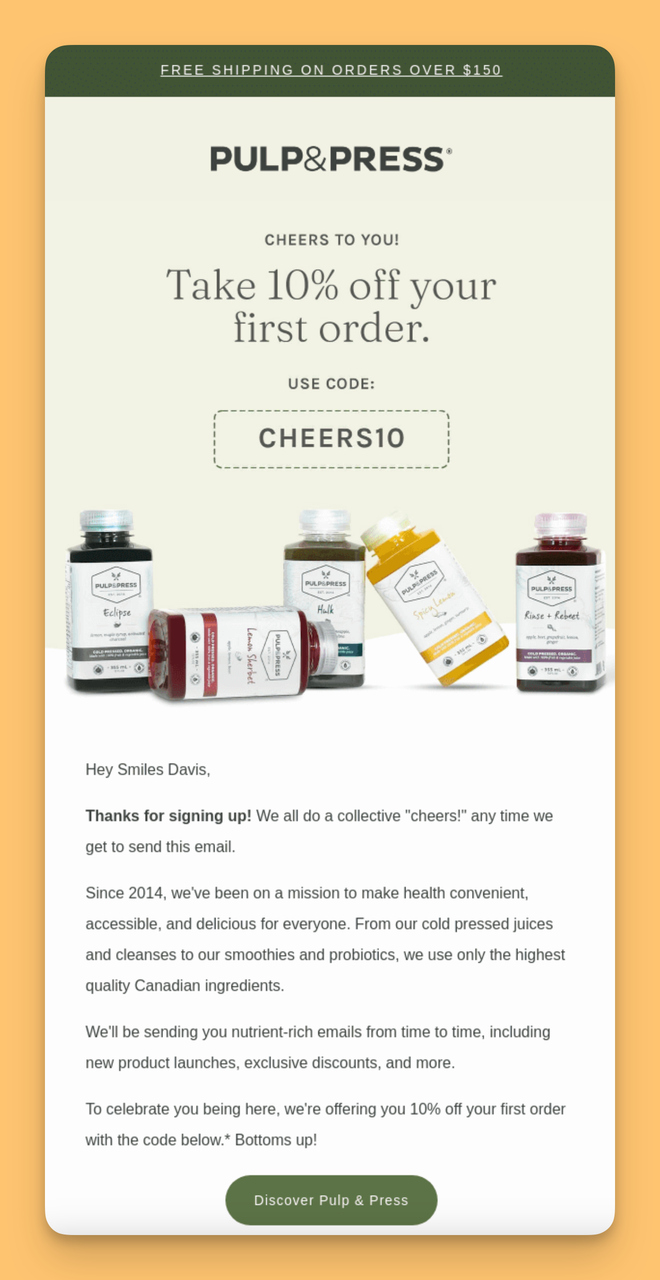
The email leads with a banner offering free shipping on orders over a certain amount, which is a great incentive. ▶️ You could feature a similar banner that aligns with your promotions.
Prominently placed at the top, the discount code is hard to miss. ▶️ And as we said before, place your discount offer front and center to grab attention immediately. Pulp & Press still promises a code for 10% off to new subscribers in October 2026.
There's a brief introduction to the brand's mission and values. ▶️ Consider sharing your brand's story or mission to help customers understand and connect with your brand.
Shopify's 2024 brand-story template did exactly this. Today you'd tell the story in the first email of the discount series, or build the series in Shopify Flow.
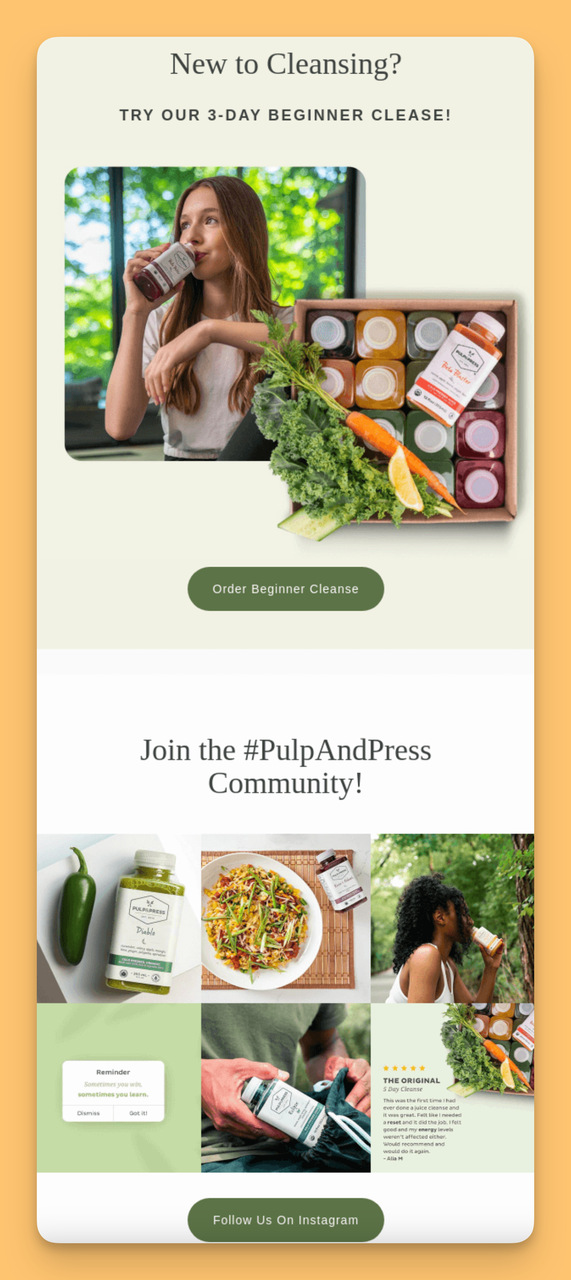
Looking at the continuation of the Pulp & Press welcome email, here are some additional pointers for your own welcome email:
In February 2024 they were educating new customers on their offerings with a '3-Day Beginner Cleanse'; the cleanse range carries different names today. ▶️ Your email could similarly introduce new customers to your products with an educational angle or starter pack.
They also encourage joining their community with a hashtag and social media links. ▶️ Highlighting your community can encourage engagement and build your brand's social presence.
🧪 Should You A/B Test Your Shopify Welcome Email?
Yes, testing your welcome email can be very valuable, especially if you have growing traffic or a larger subscriber base. Even small changes in subject lines, timing, or wording can influence how people respond. In my experience, brands that experiment thoughtfully with their welcome email often gain useful insights into tone, expectations, and audience behavior, insights that later improve other email campaigns too.
Common elements worth testing include:
- Different subject line styles
- Timing of delivery (immediate vs. short delay)
- Email length and messaging focus
- Presence or absence of an incentive
Testing doesn't mean redesigning your email every month. It helps you refine what already works, so your welcome experience becomes clearer, more intentional, and better aligned with your audience over time.
🎬 Conclusion — Make Your Shopify Welcome Email Count
A welcome email may seem like a small step in your Shopify marketing workflow, but it plays a big role in how new subscribers experience your brand for the very first time. When this message feels warm, intentional, and thoughtfully written, it does more than confirm a signup. It helps people feel acknowledged, reassured, and confident about staying connected with you over time.
Throughout this guide, we've looked at how welcome emails work, where to set them up now that Shopify runs them from the Messaging app, what they should include, and why timing, tone, and clarity matter so much, especially in that first moment after someone joins your list. In my experience, brands that treat the welcome email as a relationship-building moment (rather than just a transactional touchpoint) see stronger engagement, deeper trust, and more meaningful long-term interactions.
If you haven't revisited your welcome email in a while, this is a great time to refresh it: refine the tone, simplify the structure, and make sure it reflects who you are as a brand.
Now it's your turn: open your welcome automation, send yourself a test, and read it the way a new subscriber would.
Frequently Asked Questions
What Is The Difference Between A Welcome Email And An Onboarding Email?
Welcome emails are friendly greetings to new subscribers or customers, expressing thanks and setting the tone for future communications. It might include a special offer.
Onboarding emails guide new users through your product or service and offer detailed instructions and tips to ensure they get the most value. It's educational and aimed at enhancing user experience.
What's The Difference Between Setting Up Automated Welcome Emails Through Shopify's Marketing Automations And The Notifications Settings?
Marketing automations, which moved into the Shopify Messaging app in March 2026 (Apps > Messaging > Automations), send one welcome email or a series to customers who subscribed to email marketing, with wait times between emails. The Notifications route (Settings > Notifications, the Customer account welcome email) sends one email when a customer creates an account. Use automations for newsletter subscribers and the notification for account holders.
What Is The Best Email Provider For Shopify?
It depends on how much you need beyond a welcome series. Shopify Messaging is built into the Shopify admin and includes 10,000 free emails a month. Omnisend and Mailchimp both have official Shopify apps with free plans, and add SMS and more automation options. Popupsmart is not an email provider: it collects subscribers with popups, can sync them to Shopify Customers and can send one Email Autoresponder email per popup.
What automated emails can Shopify send?
Shopify Messaging has automation templates for welcoming new subscribers, recovering abandoned checkouts, carts and product browses, thanking and upselling customers after a purchase, winning back customers, celebrating birthdays and welcoming VIP customers. Shopify also sends transactional notifications, such as order and shipping confirmations, from Settings > Notifications. For a custom automation or one that uses a third-party app, Shopify points you to Shopify Flow.
Can I add a discount code to a Shopify welcome email?
Yes. Both of Shopify Messaging's welcome templates include a discount: one sends a single welcome email with a discount, the other a discount series. If subscribers join through a Popupsmart popup, the Email Autoresponder has a Coupon Code section that can carry the same code the popup promised, so the offer and the email match.