How to Use E-commerce Trust Badges in 2026: 6 Tips
Trust badges (site seals) signal security and legitimacy, helping reduce cart abandonment and boost conversions in ecommerce. Place them on the homepage, popups, product pages, emails, checkout, and footer; common types include security, endorsement, shipping, guarantee, and payment.
E-commerce trust badges are visual indicators of legitimacy that reduce checkout anxiety and lift conversion rates. According to Consumer's Digest, shoppers are 17% more likely to complete a transaction when a trust badge is present during checkout. These six placement strategies help e-commerce managers turn hesitant browsers into paying customers.

Summary of all 6 tips to use e-commerce trust badges:
1. Add trust badges to your homepage — set the right first impression within the first 50 milliseconds of a visit
2. Display trust badges in popups — reinforce security at high-friction moments like exit intent and cart addition
3. Place guarantee badges on product pages — reduce purchase hesitation right next to the buy button
4. Use endorsement seals in email footers — build ongoing credibility across every marketing touchpoint
5. Stack security badges on the checkout page — address the #1 reason shoppers abandon carts
6. Show payment badges in your site footer — signal legitimacy on every page, sitewide
What Are E-commerce Trust Badges?
Trust badges (also called site seals or trust signals) are small icons placed on e-commerce websites to communicate security, reliability, and credibility. They range from SSL certificate seals and payment processor logos to third-party endorsements and satisfaction guarantees.
![]()
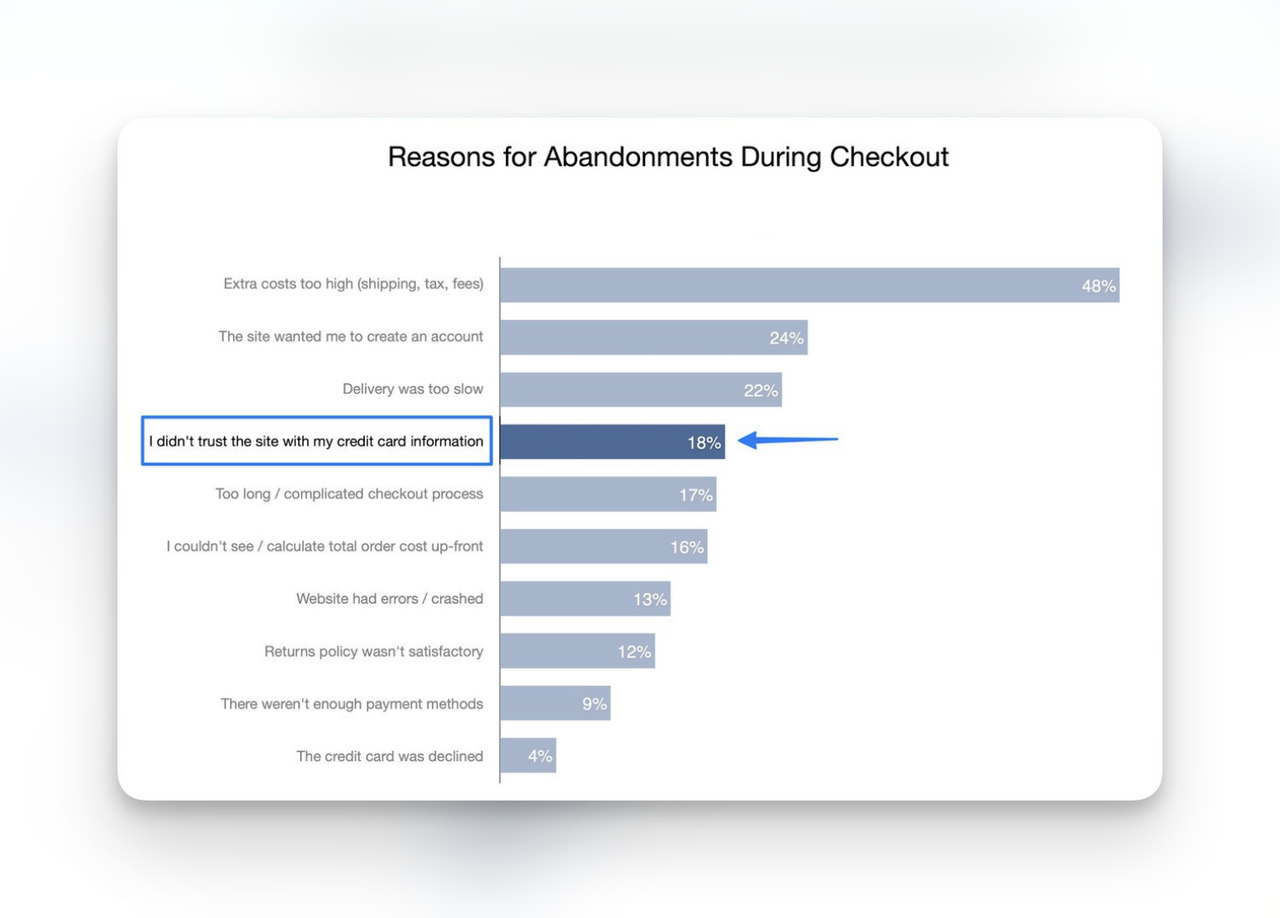
Why do they matter? A Baymard Institute study found that 18% of consumers abandon their online purchases because of security concerns. That's a large slice of revenue lost to a problem trust badges directly address.
Cart abandonment rates have hovered around 70-80% for years, and security anxiety is a consistent driver. Trust badges won't fix bad pricing or poor UX, but they remove one of the most common psychological barriers between a shopper and the checkout button.
Why Should You Use Trust Badges in E-commerce?
Trust badges serve multiple functions beyond just "looking secure." Here's what they actually do for your bottom line:
• Reduce transaction anxiety: SSL seals and payment gateway logos (PayPal, Visa, MasterCard) visually confirm that financial data is encrypted during checkout
• Lower cart abandonment: According to YouGov, an Actualinsights study found over 60% of consumers didn't complete a purchase simply because there were no trust badges on the site
• Build first-visit credibility: New visitors have zero brand familiarity. A verified merchant seal or industry endorsement badge gives them a reason to stay
• Lift conversion rates: One CRO case study showed that adding trust badges and credit card icons lifted conversions by 12.6%
• Support repeat purchasing: Guarantee badges like "30-Day Money-Back" don't just close the first sale. They make customers comfortable enough to return
Types of E-commerce Trust Badges
Not all trust badges serve the same purpose. Choosing the right type depends on where your customers feel the most friction. Here are the five main categories:
| Badge Type | What It Signals | Common Examples | Best Placement |
|---|---|---|---|
| Security badges | Data encryption and site safety | Norton Secured, McAfee, SSL certificate seals | Checkout page, footer |
| Payment badges | Accepted payment methods | Visa, MasterCard, PayPal, Apple Pay, Stripe | Footer, checkout page |
| Endorsement badges | Third-party validation | BBB Accredited, Google Customer Reviews, TrustPilot | Homepage, product pages |
| Guarantee badges | Risk reversal for the buyer | Money-back guarantee, satisfaction guarantee, free returns | Product pages, checkout |
| Shipping badges | Delivery reliability | Free shipping, fast delivery, tracked shipping | Product pages, cart page |
The most effective approach is to mix badge types based on page context. A checkout page needs security and payment badges. A product page benefits from guarantee and endorsement badges. Your homepage should carry a broad trust signal like a BBB seal or Google Customer Reviews widget.
1. Add Trust Badges to Your Homepage: Set the First Impression
Homepage trust badges are security seals, endorsement icons, or verified merchant stamps placed above the fold or in the hero section of your e-commerce site. They target the very first moment a visitor evaluates your legitimacy.
How to implement
1. Pick 2-3 trust badges that match your brand's actual credentials. If you have an SSL certificate, display the seal. If you're BBB-accredited, use that badge. Don't display badges you haven't earned.
2. Place them in the header area or directly below your hero section. They should be visible without scrolling on both desktop and mobile.
3. Keep badge sizes consistent (40-60px height works well) and align them with your site's color palette. Badges that clash with your design look fake, which defeats the purpose.
4. Make sure badges link to their verification page when applicable. A Norton seal that links to Norton's verification lookup is more credible than a static image.
![]()
What to expect
A TrustGrade case study found that adding their A+ badge achieved a 39.5% higher conversion rate and a 40.8% increase in total sales, with results statistically significant at the 98% confidence level. That said, homepage badges alone won't produce those numbers. They work best as part of a full-site trust strategy that reinforces confidence at every stage of the buyer journey. Expect measurable impact within 2-4 weeks if your site gets 5,000+ monthly visitors.
2. Display Trust Badges in Popups: Reinforce Security at High-Friction Moments
Popup-based trust badges appear at critical decision points, like when a shopper is about to leave the site, adds an item to the cart, or reaches the checkout page. Unlike static page badges, popups demand attention. They interrupt the abandonment pattern and give hesitant shoppers a reason to reconsider. Popups convert because they target behavior rather than page position.
How to implement
1. Use a popup builder to create a campaign with specific trigger rules. Set the trigger to "Exit Intent" for payment or checkout pages.
2. Design 3-4 popup variations, each featuring a different badge type:
• Safe checkout badge — trigger when the customer proceeds to checkout
• Fast delivery badge — display on product pages or during cart review
• Free shipping badge — trigger when items are added to cart
• Secure payment options badge — show Visa, MasterCard, PayPal logos at the payment step
3. Add a "100% Money-Back Guarantee" badge inside an exit-intent popup on your payment page. This gives abandoning shoppers a safety net.
4. Run an A/B split test between badge variations to find which converts best for your audience. Test for at least 14 days with 1,000+ visitors per variant.
5. Set frequency caps to 1 impression per visitor per 7 days. Showing the same popup repeatedly annoys users and kills conversion rates.
What to expect
Social proof statistics consistently show that trust signals displayed at the right moment lift conversions more than static page elements. In our experience running trust badge popups across e-commerce campaigns, exit-intent popups with guarantee badges reduce checkout abandonment by compared to pages with no popup intervention. You should see meaningful data within 2-3 weeks if you're splitting at least 500 visitors per variant.
3. Place Guarantee Badges on Product Pages: Remove the Purchase Barrier
Guarantee trust badges on product pages — like "30-Day Money-Back Guarantee" or "Cruelty Free" — sit directly below the "Add to Cart" or "Buy Now" button. They answer the shopper's unspoken question: "What if this isn't what I expected?" Unlike security badges that address data fears, guarantee badges address product-quality fears. That distinction matters because each page in your funnel has a different anxiety profile.
How to implement
1. Identify the top concern for your product category. Beauty products need "cruelty free" or "dermatologist tested." Electronics need warranty badges. Apparel needs "free returns."
2. Place the badge directly below the CTA button, not in the sidebar or footer. Eye-tracking data shows shoppers look at the area immediately surrounding the buy button before clicking.
3. Use brief supporting text next to the badge. "30-Day Money-Back Guarantee — No questions asked" is more persuasive than the icon alone.
4. If you sell across categories, use conditional logic to display relevant badges per product type. A supplements store should show "GMP Certified" on supplements and "Free Returns" on apparel.
5. Test badge placement above vs. below the CTA button over a 4-week period. We've seen both positions win depending on the product price point, with below-button working better for items under $50 and above-button for higher-ticket products.
What to expect
Skincare brand Tower 28 features seals of acceptance from the National Eczema Association on their product pages. According to Shopify, founder Amy Liu noted that endorsement badges carry persuasive value with customers who need assurance about product safety. For standard e-commerce stores, product page guarantee badges typically improve add-to-cart rates by 5-10%. The impact is strongest on products priced above $30, where buyer hesitation is higher.
4. Use Endorsement Seals in Email Footers: Build Trust Beyond Your Website
An endorsement or review trust badge in your email footer extends your credibility signal beyond the website itself. Every marketing email, transactional confirmation, and newsletter becomes a trust-building touchpoint. This is especially effective for e-commerce brands running email marketing campaigns where recipients may not have visited the site recently and need a reminder of your legitimacy.
How to implement
1. Choose 1-2 endorsement badges that carry the most weight in your industry. For e-commerce, TrustPilot ratings, Google Customer Reviews, or BBB accreditation work well.
2. Add the badge to your email footer template, keeping it at 30-40px height. It should be noticeable but not dominate the footer layout.
3. Link the badge to your review profile page so recipients can verify the rating themselves. A TrustPilot badge linking to your TrustPilot page is far more convincing than a static image.
4. Update the badge quarterly to reflect current ratings. A badge showing "4.8/5 on TrustPilot (2,300+ reviews)" is more specific and persuasive than a generic TrustPilot logo.
5. Include badges in both promotional and transactional emails. Transactional emails (order confirmation, shipping updates) have 4-5x higher open rates than marketing emails, so they're prime real estate for trust signals.
What to expect
According to Agility PR, brands willing to display transparent ratings — including three-star reviews alongside five-star reviews — signal confidence that increases buyer trust. Email footer badges won't produce dramatic overnight conversion lifts, but they compound over time. Expect a 2-5% improvement in email click-through rates within the first 60 days, with a stronger impact on repeat purchase rates as subscribers grow more familiar with your brand's trust signals.
5. Stack Security Badges on the Checkout Page: Address the #1 Abandonment Reason
Checkout page trust badges are security seals (SSL, Norton, McAfee) and payment method icons placed directly on the page where shoppers enter their credit card information. This is the highest-anxiety point in the buying process, and it's where trust badges have the single biggest impact. According to CommerceGurus, 18% of shoppers don't trust stores with their credit card information — a problem checkout badges address head-on.
![]()
How to implement
1. Place your SSL certificate seal directly below or beside the credit card input fields. Shoppers look at this area while typing their card number, so the badge hits them at the exact moment of highest anxiety.
2. Add a "Secure Checkout" text label paired with a lock icon. The combination of icon + text outperforms either one alone because different people process trust signals differently.
3. Display accepted payment method logos (Visa, MasterCard, PayPal, Apple Pay) near the payment form. These aren't just trust badges — they also answer the practical question "Can I pay with my preferred method?"
4. Include a "Free Shipping" badge if applicable. Unexpected shipping costs are the #1 reason for cart abandonment overall, so confirming free shipping at checkout removes two barriers at once.
5. For Shopify checkout optimization, add badges via the checkout extensibility API rather than theme hacks. This keeps them stable across theme updates.
What to expect
Baymard Institute's research, cited by Envive, confirms that e-commerce sites can gain a 35.26% increase in conversion rate through better checkout design and trust elements. The checkout page is where trust badges deliver the highest per-page ROI because it's the final friction point before revenue. Stores with 10,000+ monthly visitors should see statistically significant lift within 3-4 weeks of implementing checkout badges.
6. Show Payment Badges in Your Site Footer: Sitewide Legitimacy Signal
Footer payment badges are accepted-method logos (Visa, MasterCard, PayPal, American Express) and security seals placed in the global footer that appears on every page of your site. Unlike page-specific badges, footer placement means every single page a visitor lands on carries a baseline trust signal. This is especially valuable for visitors who enter through blog posts, category pages, or landing pages rather than your homepage.
How to implement
1. Select the payment methods you actually accept — don't display logos for methods you don't support. That creates a worse trust problem than having no badges at all.
2. Group payment badges together in a single row near the bottom of your footer, after navigation links but before the copyright line.
3. Add an SSL seal next to the payment logos if you have one. The combination "We accept [payment icons] | SSL Secured" communicates both convenience and safety.
4. Use grayscale or muted versions of payment logos that match your footer's design. Bright, colorful logos in a dark footer look out of place and can undermine the professional feel.
5. Keep the footer consistent across desktop and mobile. On mobile, stack badges in two rows rather than shrinking them to an unreadable size. Badges people can't read don't build trust.
What to expect
Footer badges are a low-effort, low-risk move. They won't produce the dramatic lifts you get from checkout page badges, but they set a foundation of credibility that supports every other trust signal on your site. For e-commerce optimization, footer badges are table stakes — their absence raises more questions than their presence answers. Expect footer badges to contribute to a 2-3% sitewide conversion improvement when combined with the other five strategies in this guide.
Best E-commerce Trust Badge Placement Strategies for Maximum Impact
![]()
Knowing which badges to use is half the equation. Where you place them determines whether they actually influence buying behavior. Here's a prioritized breakdown:
| Page | Badge Type | Placement | Impact Level |
|---|---|---|---|
| Checkout page | Security + payment | Near credit card fields | Highest |
| Product pages | Guarantee + endorsement | Below CTA button | High |
| Homepage | Endorsement + security | Above the fold | Medium-high |
| Popups | Guarantee + shipping | Exit-intent trigger | Medium-high |
| Email footer | Endorsement + review | Footer template | Medium |
| Site footer | Payment + SSL | Global footer | Medium |
The general rule: the closer a badge is to a payment decision, the higher its impact. Checkout badges beat product page badges, which beat homepage badges. But the compounding effect of trust signals across every touchpoint is greater than any single placement.
A common mistake is overloading one page with badges while leaving others bare. A shopper who sees five trust badges on the homepage but zero on the checkout page will still hesitate at the moment that matters most.
Where to Start with E-commerce Trust Badges
| Priority | Strategy | Effort | Impact | Best For |
|---|---|---|---|---|
| 1 | Checkout page security badges | Low | High | Any store with cart abandonment issues |
| 2 | Product page guarantee badges | Low | High | Stores selling $30+ products |
| 3 | Homepage trust badges | Low | Medium | New brands building credibility |
| 4 | Trust badges in popups | Medium | High | Stores with high exit rates |
| 5 | Site footer payment badges | Low | Medium | All e-commerce sites |
| 6 | Email footer endorsement seals | Medium | Medium | Brands with active email lists |
Start with strategies 1 and 2. They take 30 minutes to implement and address the highest-friction points in the buying process. Move to popups and footer badges once you've established your baseline metrics.
How to Measure the ROI of Trust Badges
Adding badges without tracking their performance is guesswork. Here's what to measure:
• Conversion rate before vs. after: Track overall and per-page conversion rates for at least 30 days before and after badge implementation
• Cart abandonment rate: Compare the percentage of shoppers who add items but don't complete checkout
• A/B test results: Run controlled tests with badge vs. no-badge variants. You need at least 1,000 conversions per variant for statistical significance
• Bounce rate on key pages: A drop in bounce rate on product or checkout pages suggests badges are keeping visitors engaged
• Revenue per visitor: The most complete metric — it captures both conversion rate and average order value changes
For A/B testing trust badges on your conversion rate optimization pages, test one variable at a time. Don't change badge type, placement, and page design simultaneously — you won't know which change drove the result.
Common Mistakes to Avoid with Trust Badges
Trust badges can backfire when used incorrectly. These are the pitfalls we see most often:
Displaying badges you haven't earned. Showing a Norton Secured seal without an actual Norton subscription is deceptive. If a visitor clicks it and there's no verification page, you've just destroyed the trust you were trying to build.
Overloading pages with too many badges. Five or six badges clustered together look desperate. Pick 2-3 that matter most for each page's context and give them room to breathe.
Using low-resolution badge images. Blurry or pixelated badges look unprofessional and can trigger fraud suspicions. Always use the official badge assets provided by the issuing organization.
Ignoring mobile placement. Badges that are visible on desktop but hidden below the fold on mobile miss a huge portion of your traffic. As of 2026, mobile e-commerce accounts for over 60% of online transactions.
Never testing badge performance. What works for one store may not work for yours. Audience demographics, product categories, and price points all affect which badges resonate. Use trust badge tools for Shopify or your platform's built-in A/B testing to find what actually moves the needle.
Create Your Trust Badge Popup in Less Than 5 Minutes
If you want to test trust badges in popups without writing code, here's a walkthrough using Popupsmart. The entire process takes under 5 minutes.
1. Create a Popupsmart account or sign in.
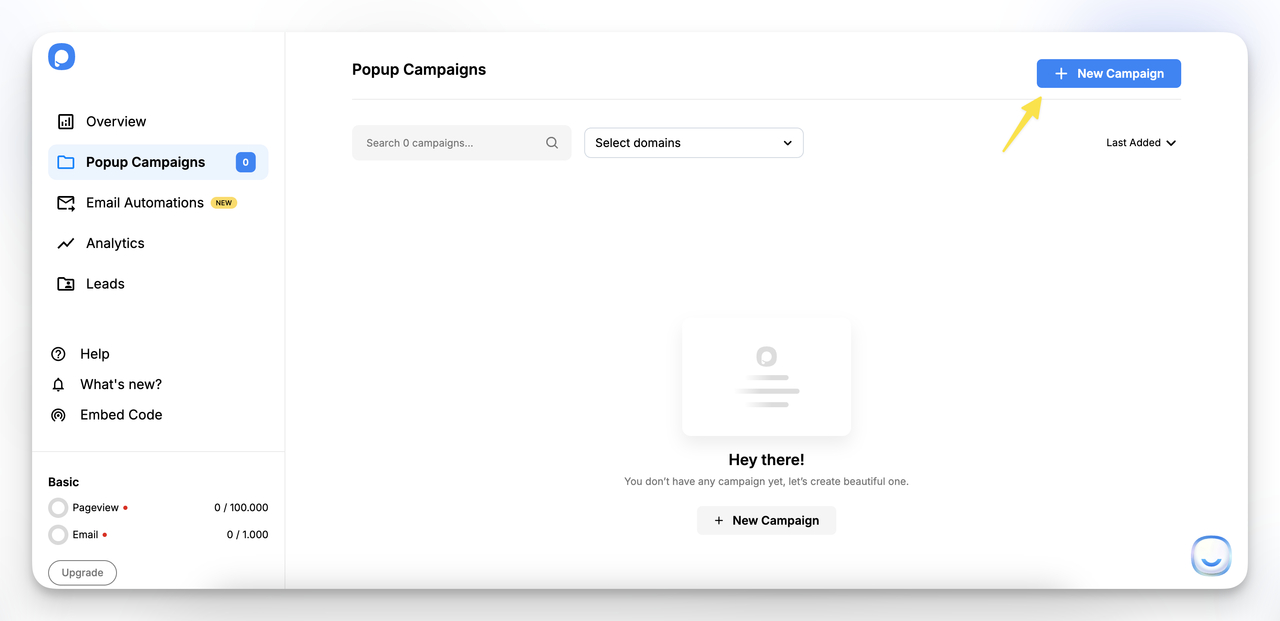
2. Click "+ New Campaign" and select your business objective. For trust badge popups, "Grow Your Email List" or "Increase Sales" are the best starting points.
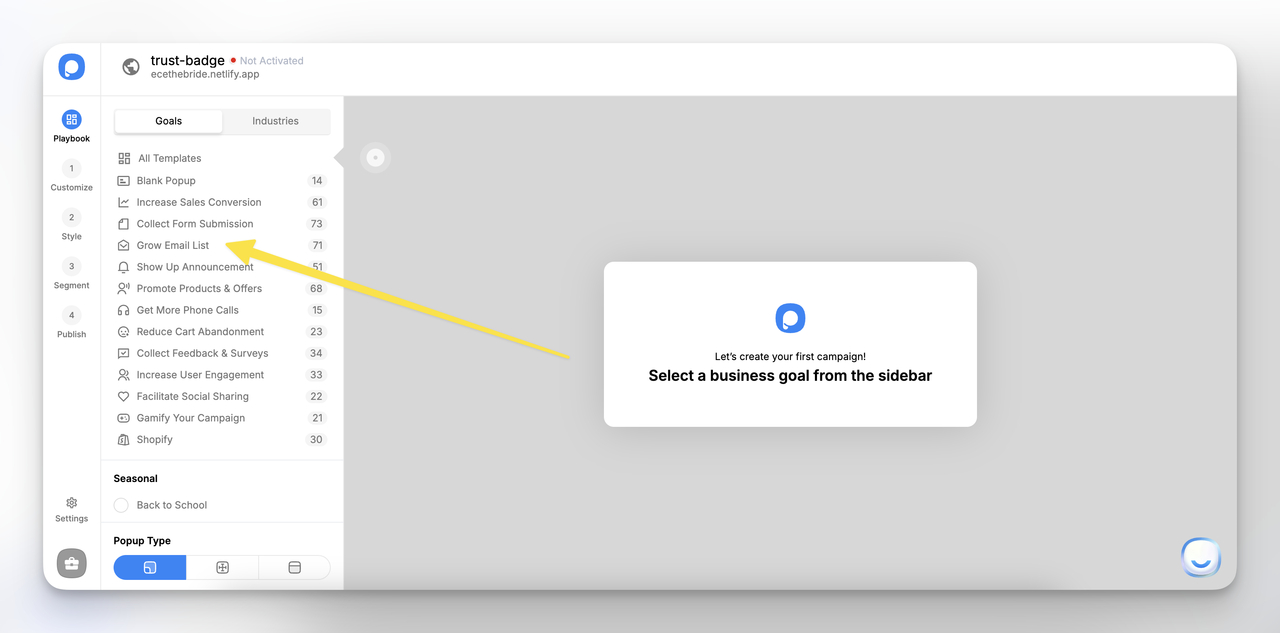
3. Choose a template that fits your brand's style from the template gallery.
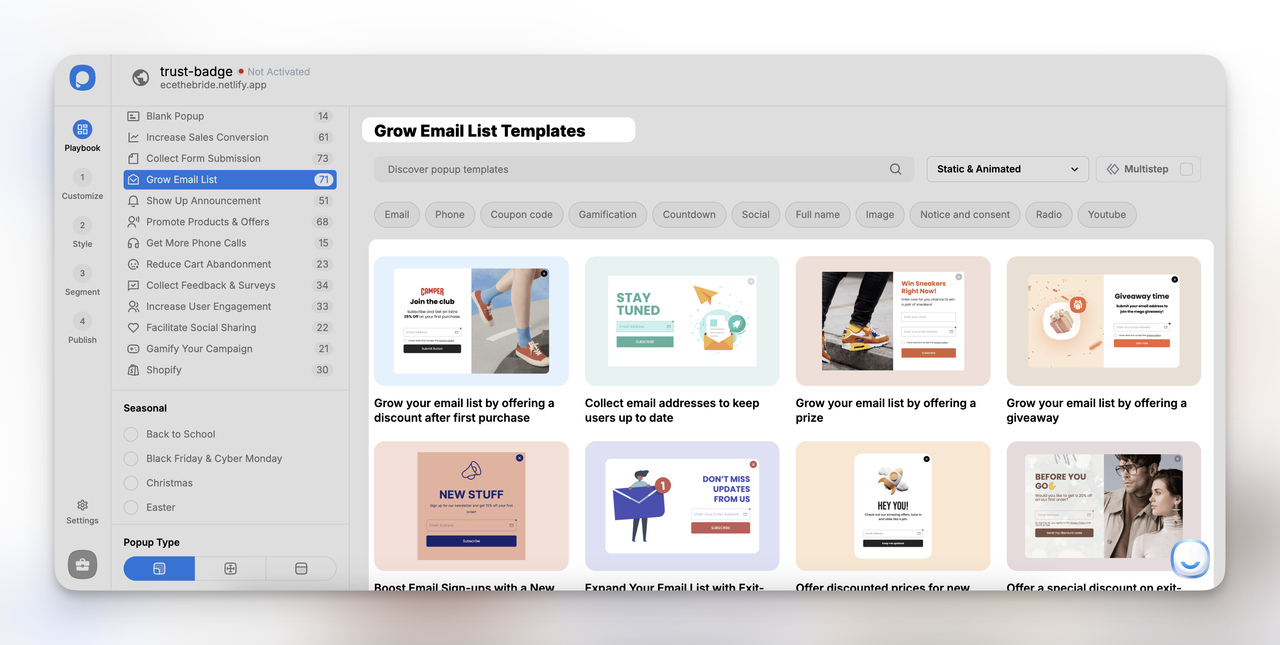
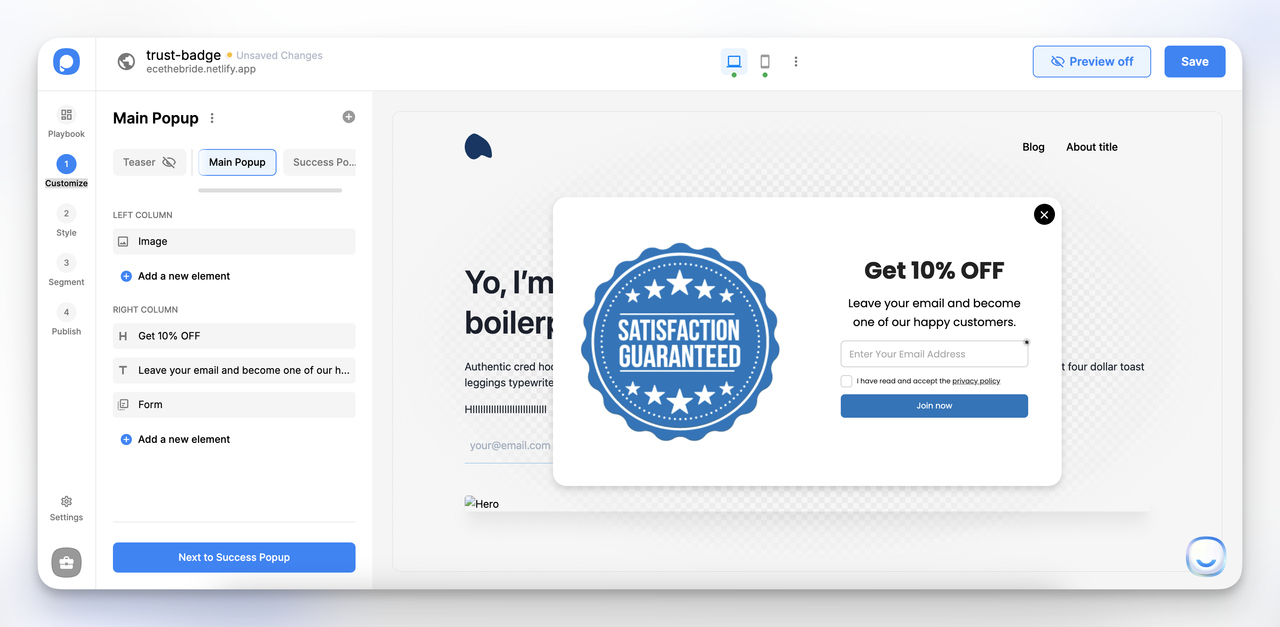
4. Click "Next to Customize" and add your trust badge image. Edit the headline, description, and CTA to match your trust message.
5. Style the popup to match your brand colors, adjust padding, and set background preferences.
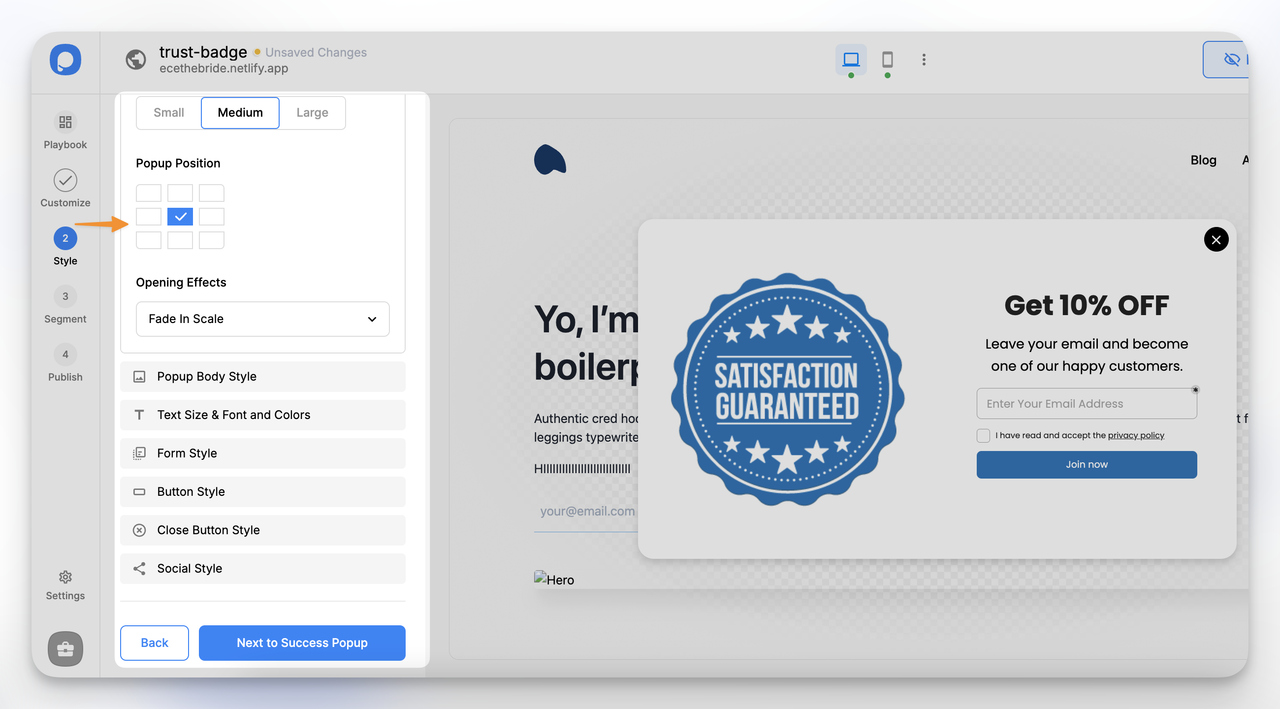
6. In the "Segment" section, configure targeting: visitor behavior, device type, and audience filters like operating system, new vs. returning visitors, browser language, and geolocation.

7. Click "Next to Publish", configure your publishing options, and hit "Save & Publish."
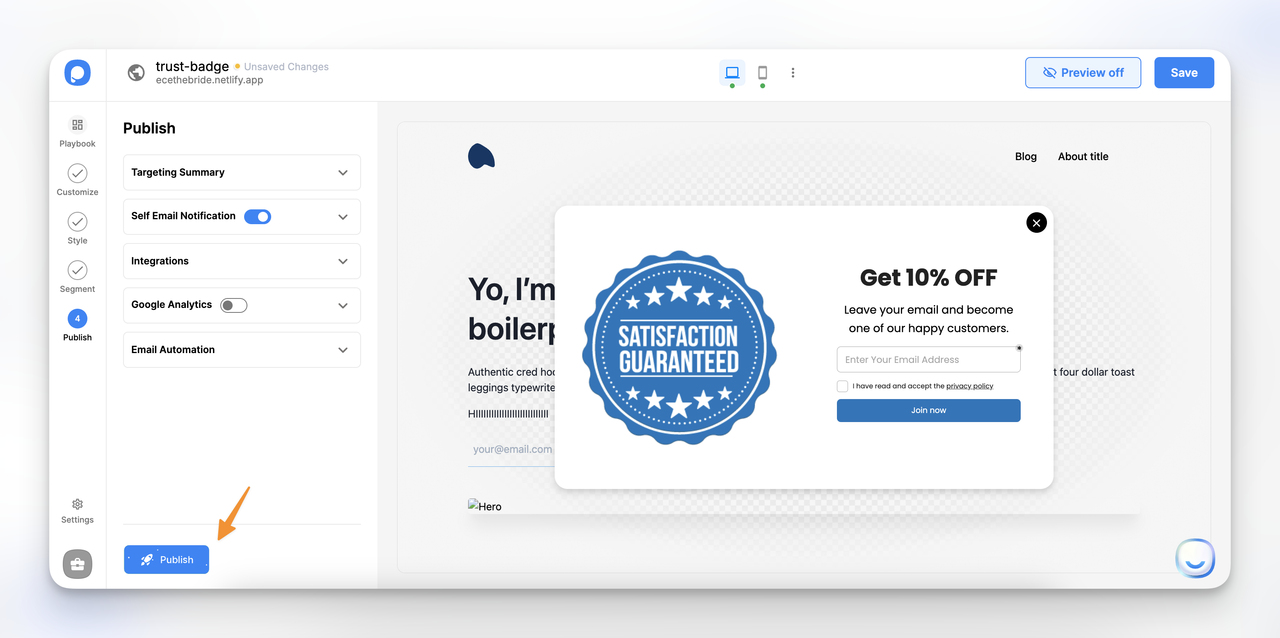
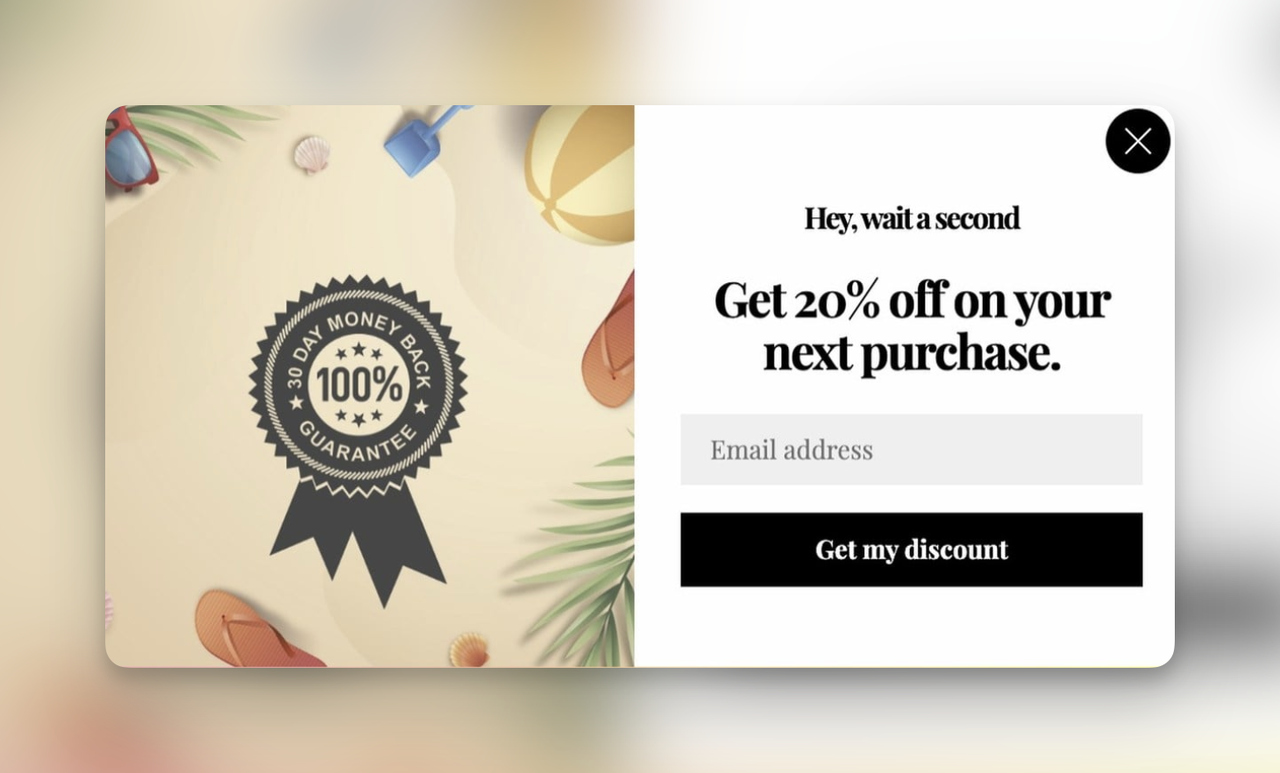
Here's the final result, a clean popup with a satisfaction guaranteed trust badge:
![]()
Start Building Trust Today
You don't need to implement all six strategies at once. Start where the friction is highest.
If your e-commerce CRO audit shows high cart abandonment, begin with checkout page badges. If first-time visitors bounce quickly, focus on homepage and product page badges. If you're running email campaigns with low click-through rates, add endorsement badges to your footer template.
The data is clear: shoppers who see trust signals at the right moments buy more often. Each badge you add is a small investment that compounds across thousands of visitor sessions.
Ready to test trust badges in popups? Create a free Popupsmart account and build your first trust badge popup in under 5 minutes.
Frequently Asked Questions
Do trust badges actually increase sales?
Yes, with measurable evidence behind them. A TrustGrade A/B test showed a 40.8% increase in total sales after adding trust badges, with 98% statistical confidence. However, results vary by store, product category, and existing trust level. New and lesser-known brands tend to see larger lifts than established brands where trust is already high.
Where should I place trust badges on my website?
Prioritize placement based on decision proximity. The checkout page should carry security and payment badges near the credit card fields. Product pages need guarantee badges below the buy button. Your homepage benefits from endorsement badges above the fold. The site footer should display payment method logos sitewide. And cart recovery popups with trust badges can catch abandoning shoppers at the exit point.
What are the best trust badges for e-commerce sites?
The best badges depend on your store's specific friction points. For checkout anxiety, Norton Secured and SSL seals are most recognized. For payment trust, Visa, MasterCard, and PayPal logos are standard. For product confidence, money-back guarantee badges and industry-specific endorsements (like lead generation forms with trust badges) perform well. Google Customer Reviews and TrustPilot badges carry weight for overall credibility.
How do trust badges reduce cart abandonment?
Cart abandonment driven by security concerns happens because shoppers don't feel safe entering payment information. Trust badges address this by providing visual proof that the site uses data encryption (SSL badges), partners with recognized payment processors (payment badges), and offers buyer protections (guarantee badges).
Can trust badges improve SEO for e-commerce?
Trust badges don't directly affect search rankings, but they improve behavioral signals that Google's ranking systems measure. When badges reduce bounce rates and increase time on site, those engagement signals feed into NavBoost — one of Google's strongest ranking factors. Better conversion optimization for small business websites also means more repeat visitors and lower pogo-sticking, both of which correlate with higher rankings over time.
Here are also some more related topics for you to read:

How would you rate your experience with this article? 😊