How to Remove Add to Cart Button on Shopify in 2026
Explains Shopify’s “Add to Cart” button, why a store might remove it (launch hype, out-of-stock, exclusivity, lead gen), 5 removal methods (theme/Liquid, CSS, apps, conditional logic, unpublish), impacts, alternatives, and best practices.
You can remove the add to cart button on Shopify by editing your theme's Liquid code, adding a CSS override, using a Shopify app, applying conditional logic for specific products, or setting products as unavailable. The right method depends on whether you want a store-wide change or product-specific control, and most options take under 10 minutes.
What you'll need:
• Access to your Shopify admin panel (store owner or staff permissions)
• A backup of your current theme (always duplicate before editing code)
• Basic familiarity with Shopify's theme editor (no coding required for Methods 3 and 5)
• Time estimate: 5-15 minutes per method
• Skill level: Beginner-friendly (Methods 3, 5) to Intermediate (Methods 1, 2, 4)
Quick look at all five methods:
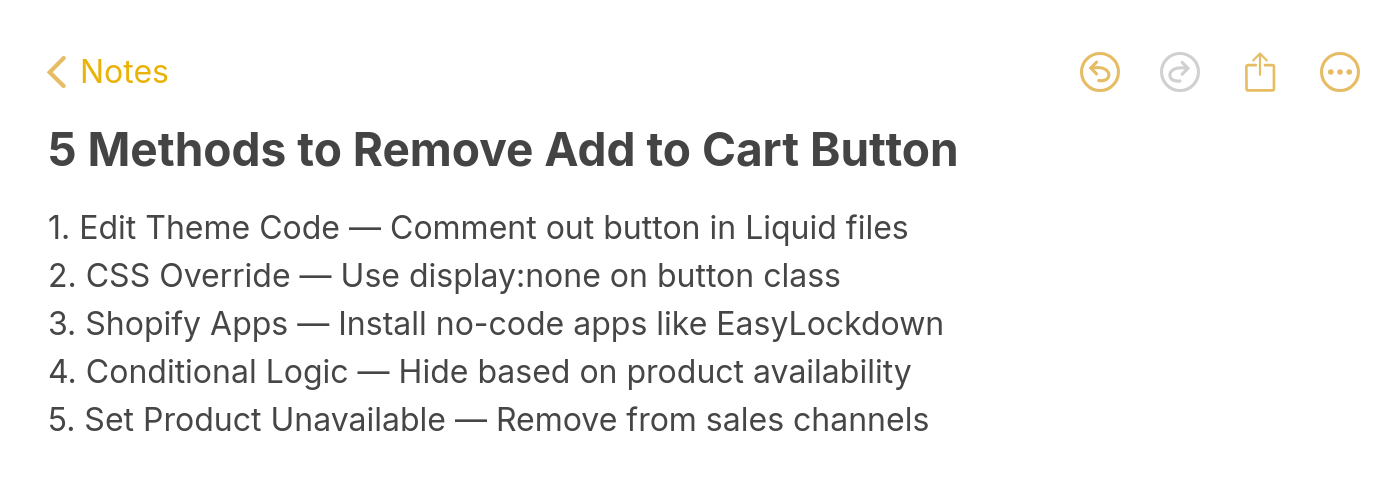
5 Methods to Remove the Add to Cart Button on Shopify
1. Edit Theme Code (Liquid) — Comment out the button element in your theme's Liquid template for a permanent, store-wide removal.
2. CSS Override — Add a single CSS rule to hide the button visually without touching Liquid files.
3. Install a Shopify App — Use a no-code app from the Shopify App Store to hide or replace the button.
4. Conditional Logic in Liquid — Show or hide the button based on product availability, tags, or other criteria.
5. Mark Products as Unavailable — Remove products from sales channels so the button never appears.
Why Would You Want to Remove the Add to Cart Button?
Removing the "Add to Cart" button from a Shopify store sounds counterintuitive, but several real business scenarios make it the right call. I've examined Shopify stores across B2B wholesale, luxury retail, and lead generation verticals, and the reasons keep coming back to a few common patterns.
Lead generation over direct sales. If your Shopify store is a catalog or showroom, you may want visitors to request a quote or fill out a contact form instead of buying immediately. Replacing the cart button with a "Request a Quote" or "Contact Us" CTA shifts the customer journey toward your sales team. According to Meetanshi's Shopify theme analysis, 32.97% of stores already use custom themes, and many of those customizations involve modifying purchase flows.
Inventory and out-of-stock management. When products sell out faster than expected, leaving a dead "Add to Cart" button frustrates shoppers. Hiding it and showing a "Notify Me" option keeps interest alive without creating a broken checkout experience.
Exclusive or members-only access. Stores selling wholesale, limited-edition, or membership-gated products need to restrict purchasing to qualified buyers. Removing the button for non-members creates a sense of exclusivity while protecting your pricing structure.
Coming-soon product launches. Displaying upcoming products without a cart button builds anticipation. Pair the product page with an email capture popup to collect leads before the launch date.
Custom or made-to-order products. Products that require configuration, sizing consultations, or custom pricing don't fit a standard cart workflow. Removing the button and redirecting to an inquiry form prevents order confusion.
Method 1: Edit Your Theme's Liquid Code to Remove the Button
Editing the Liquid template gives you the most control over how the "Add to Cart" button is removed. This method comments out the button element directly in your theme code, which means it won't render at all rather than just being hidden visually. The change persists through theme updates as long as you're editing the correct template file.
Step-by-Step Instructions:
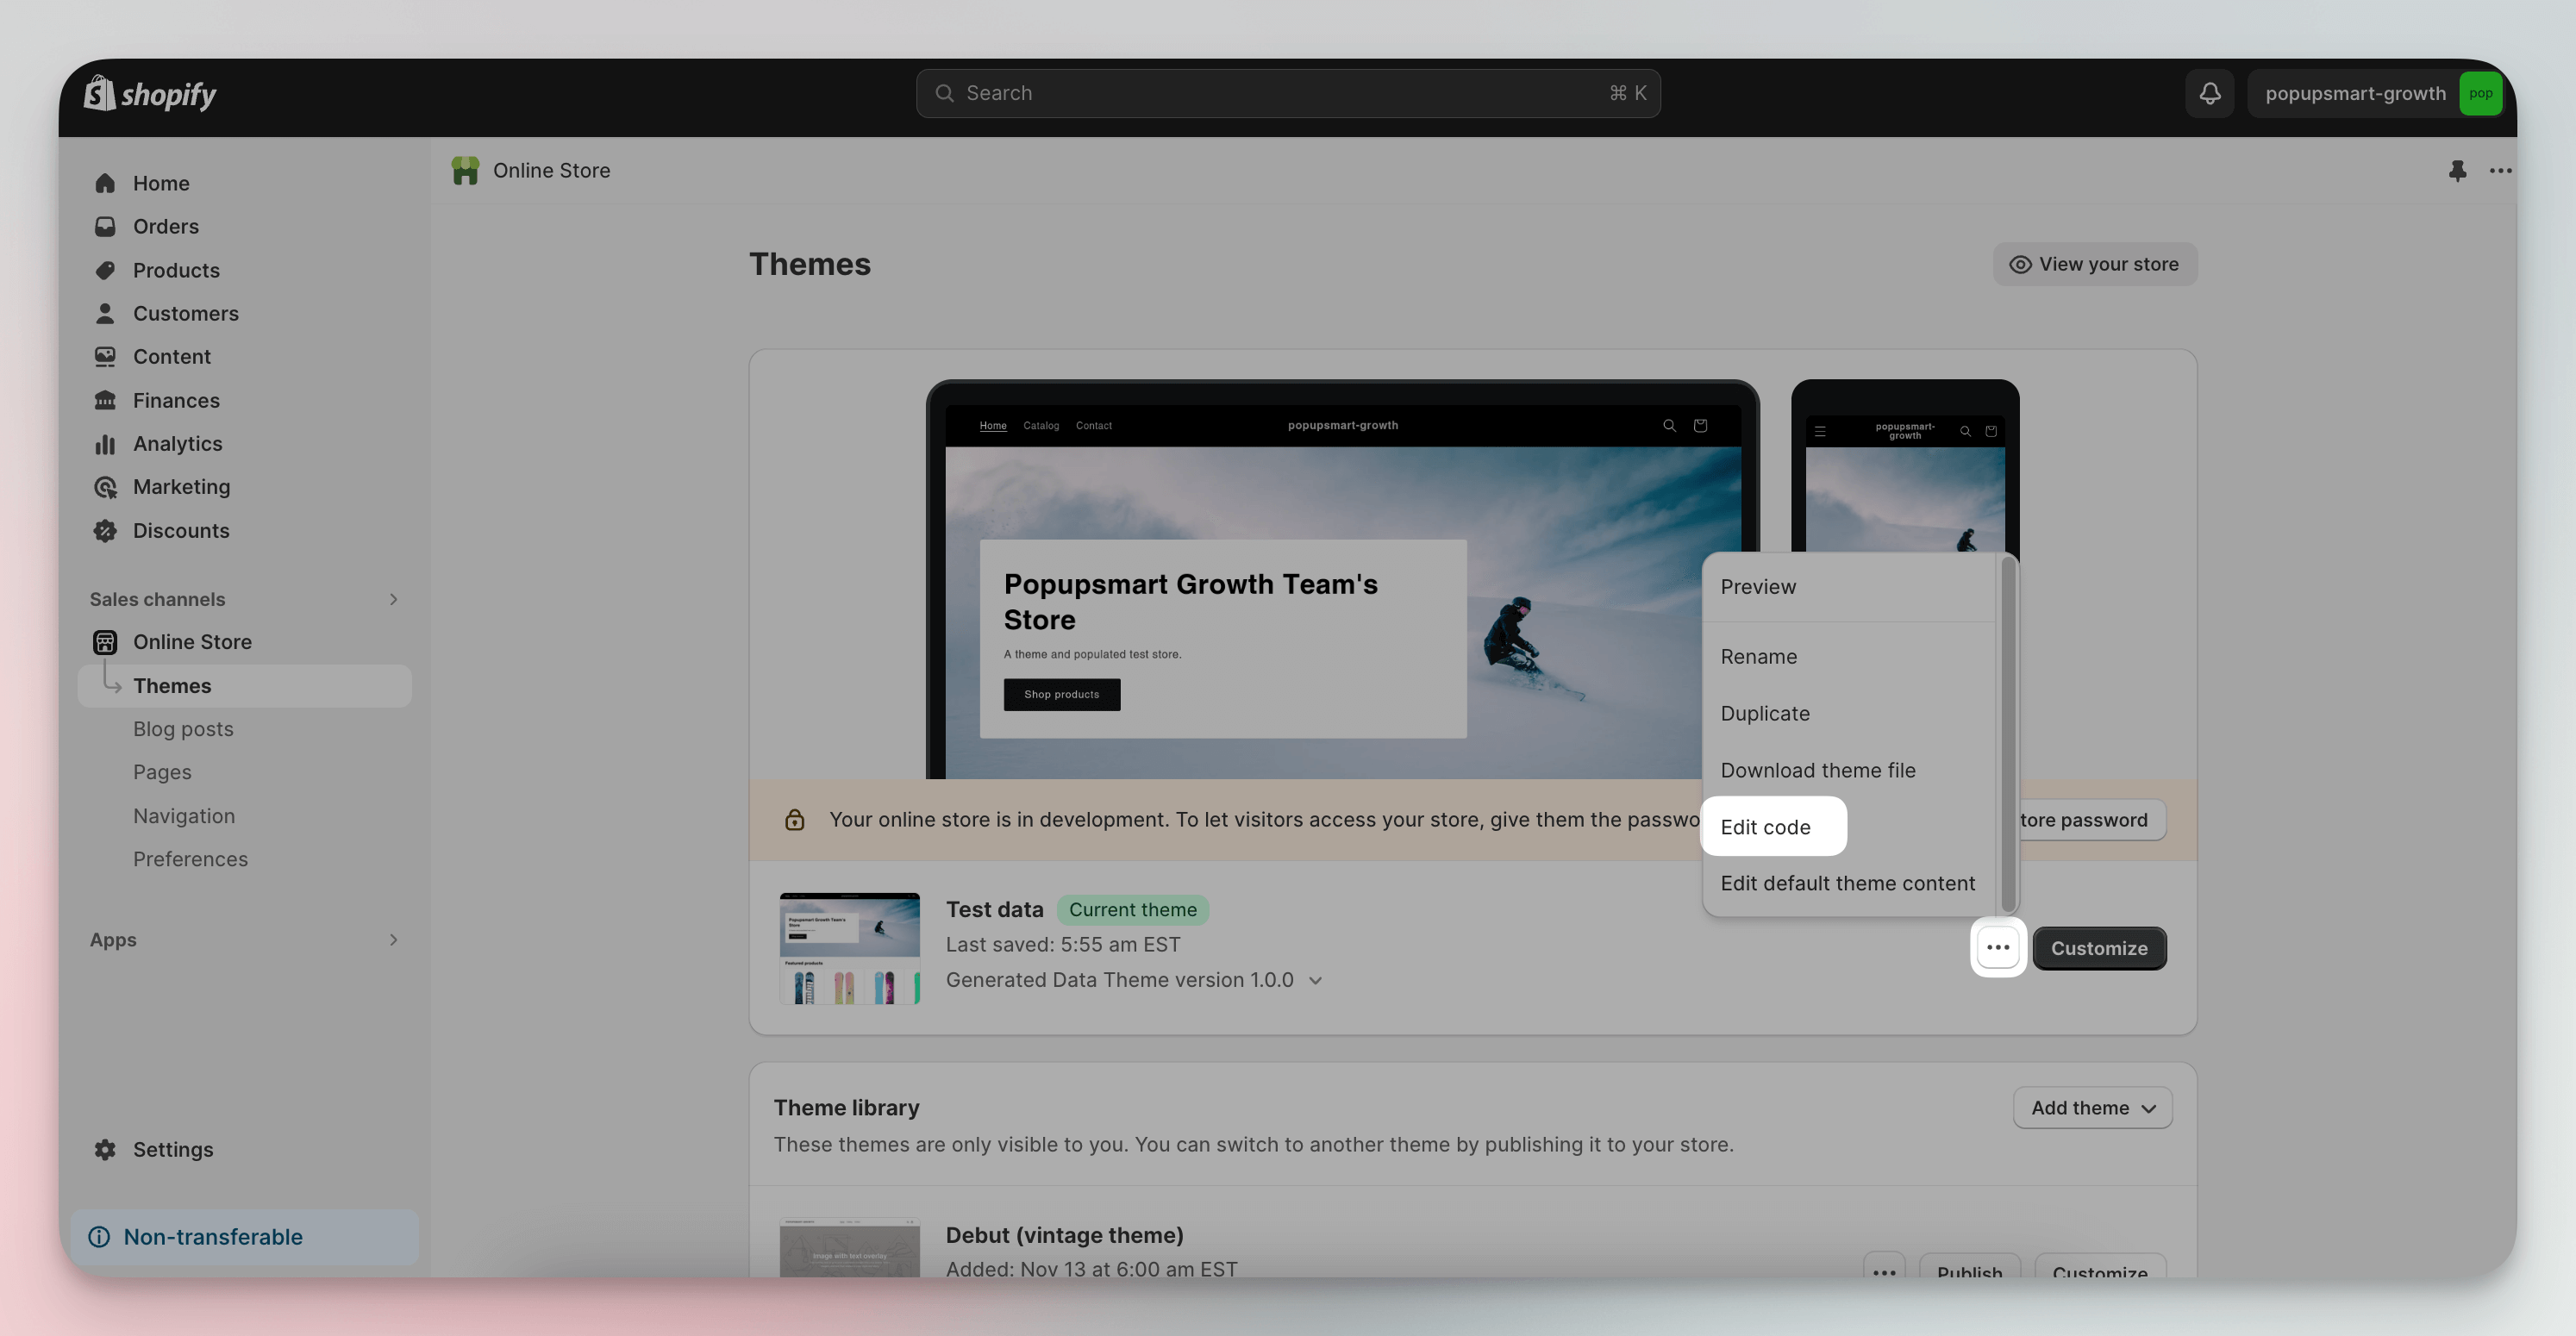
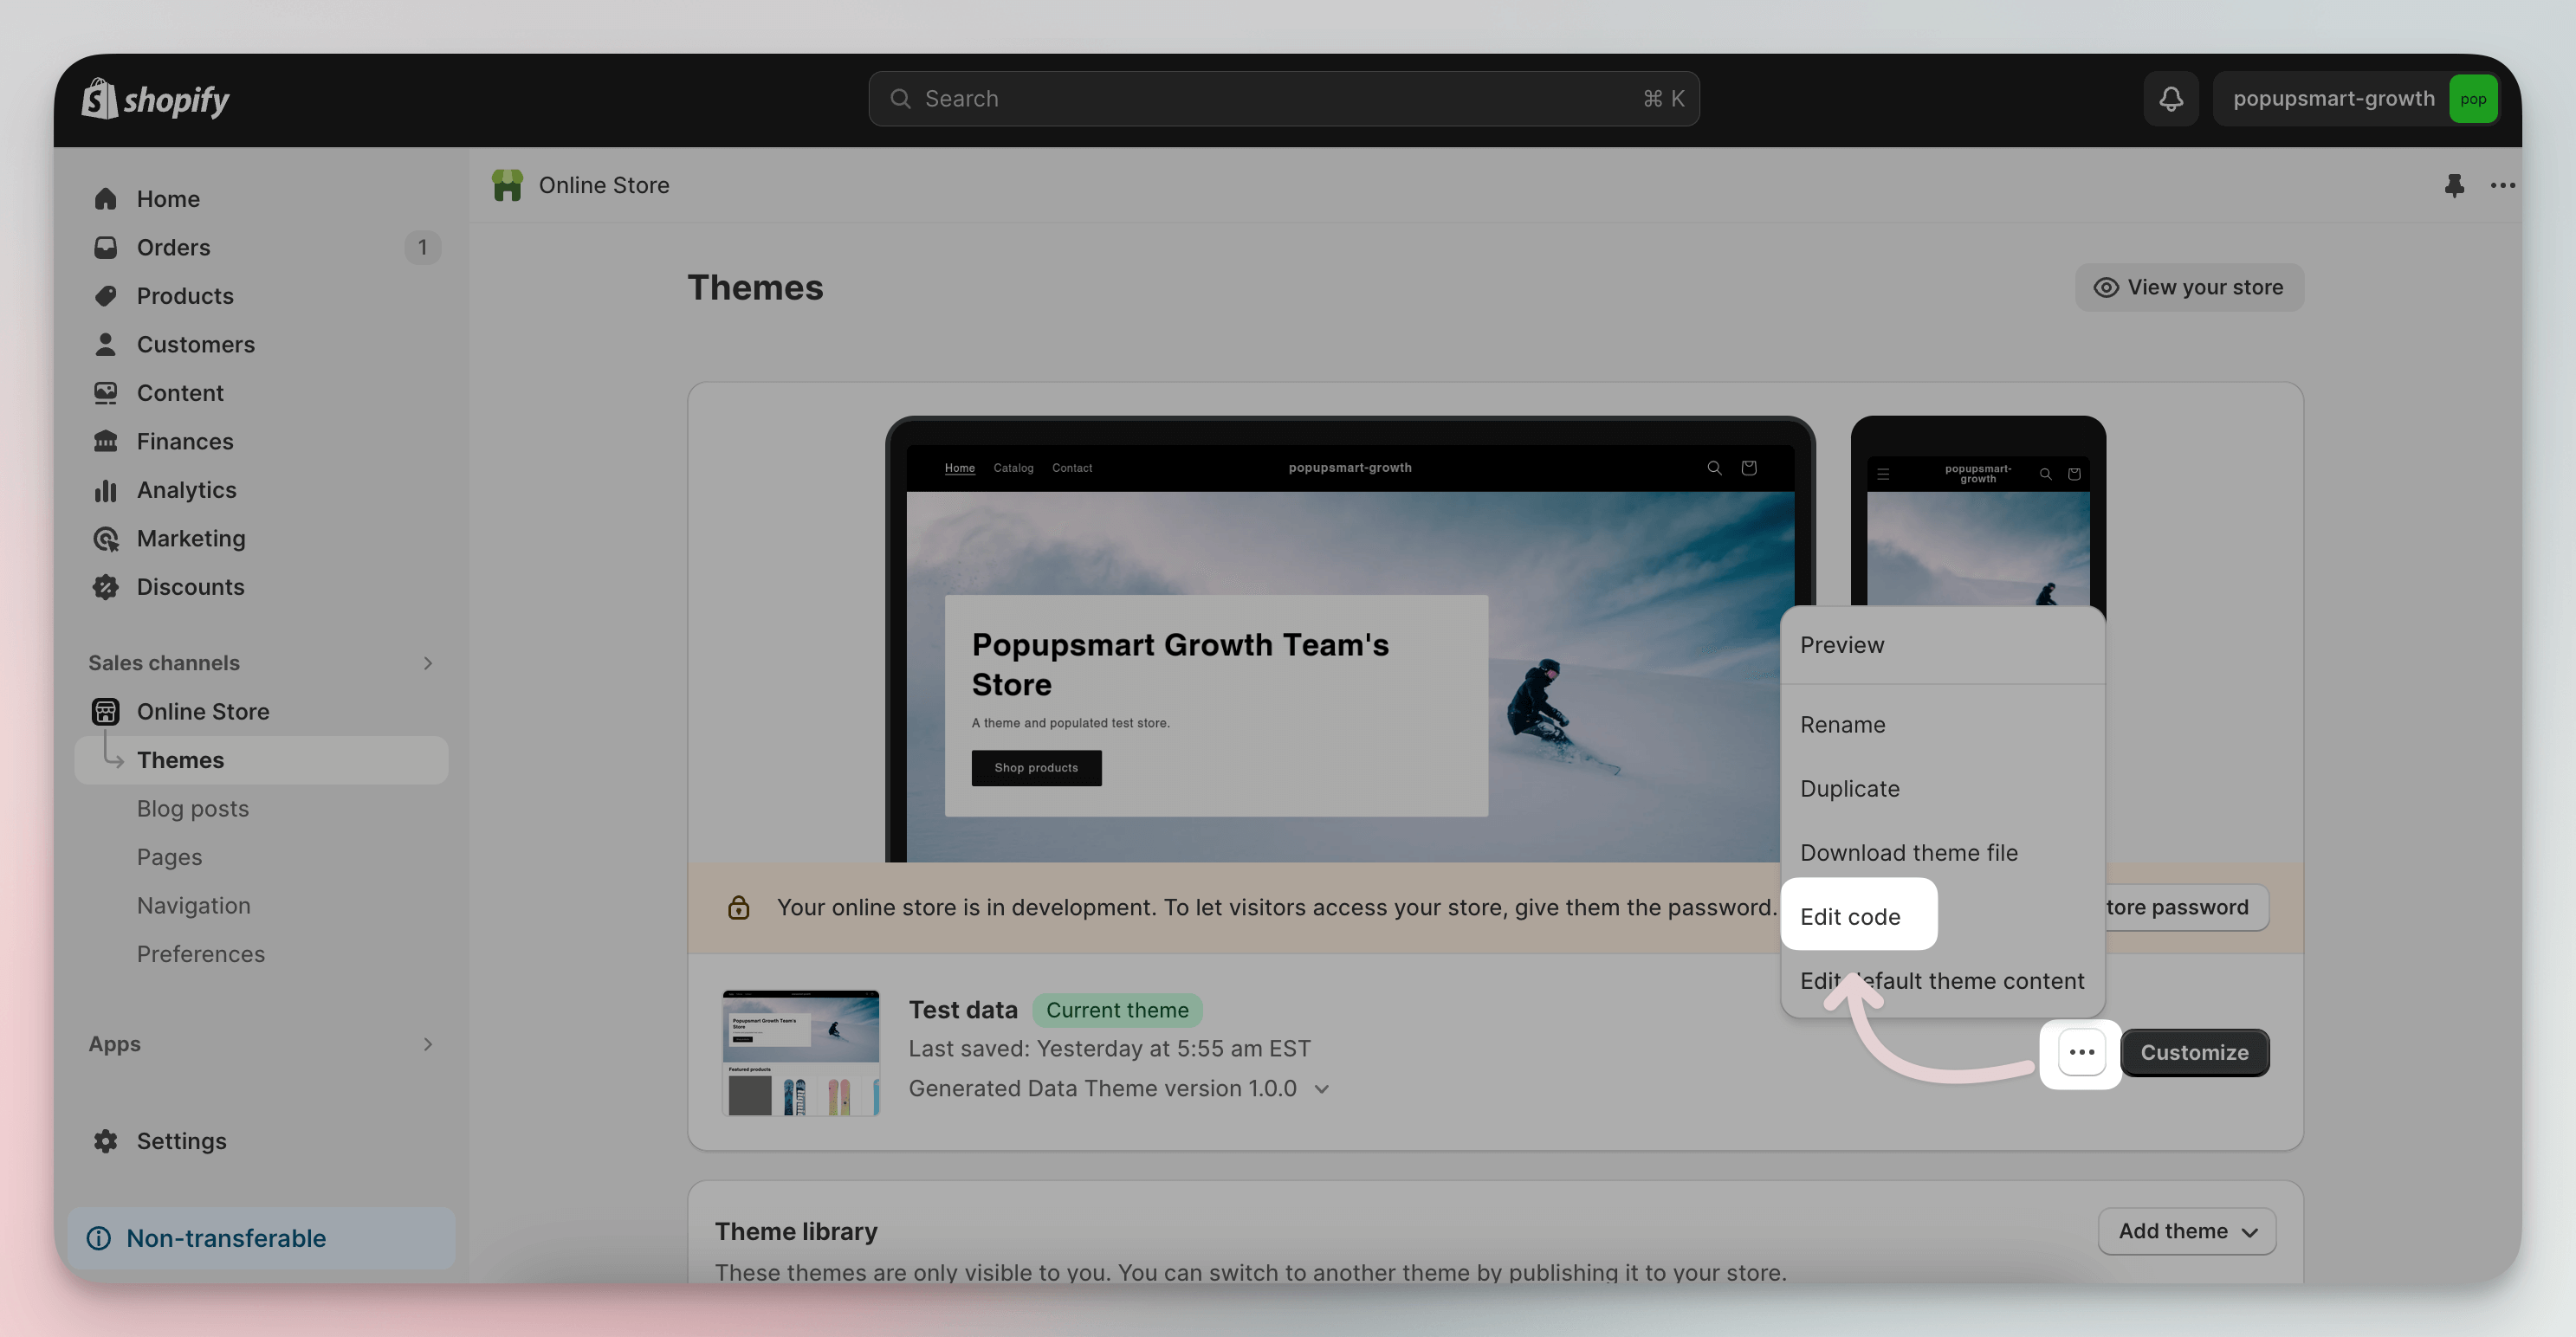
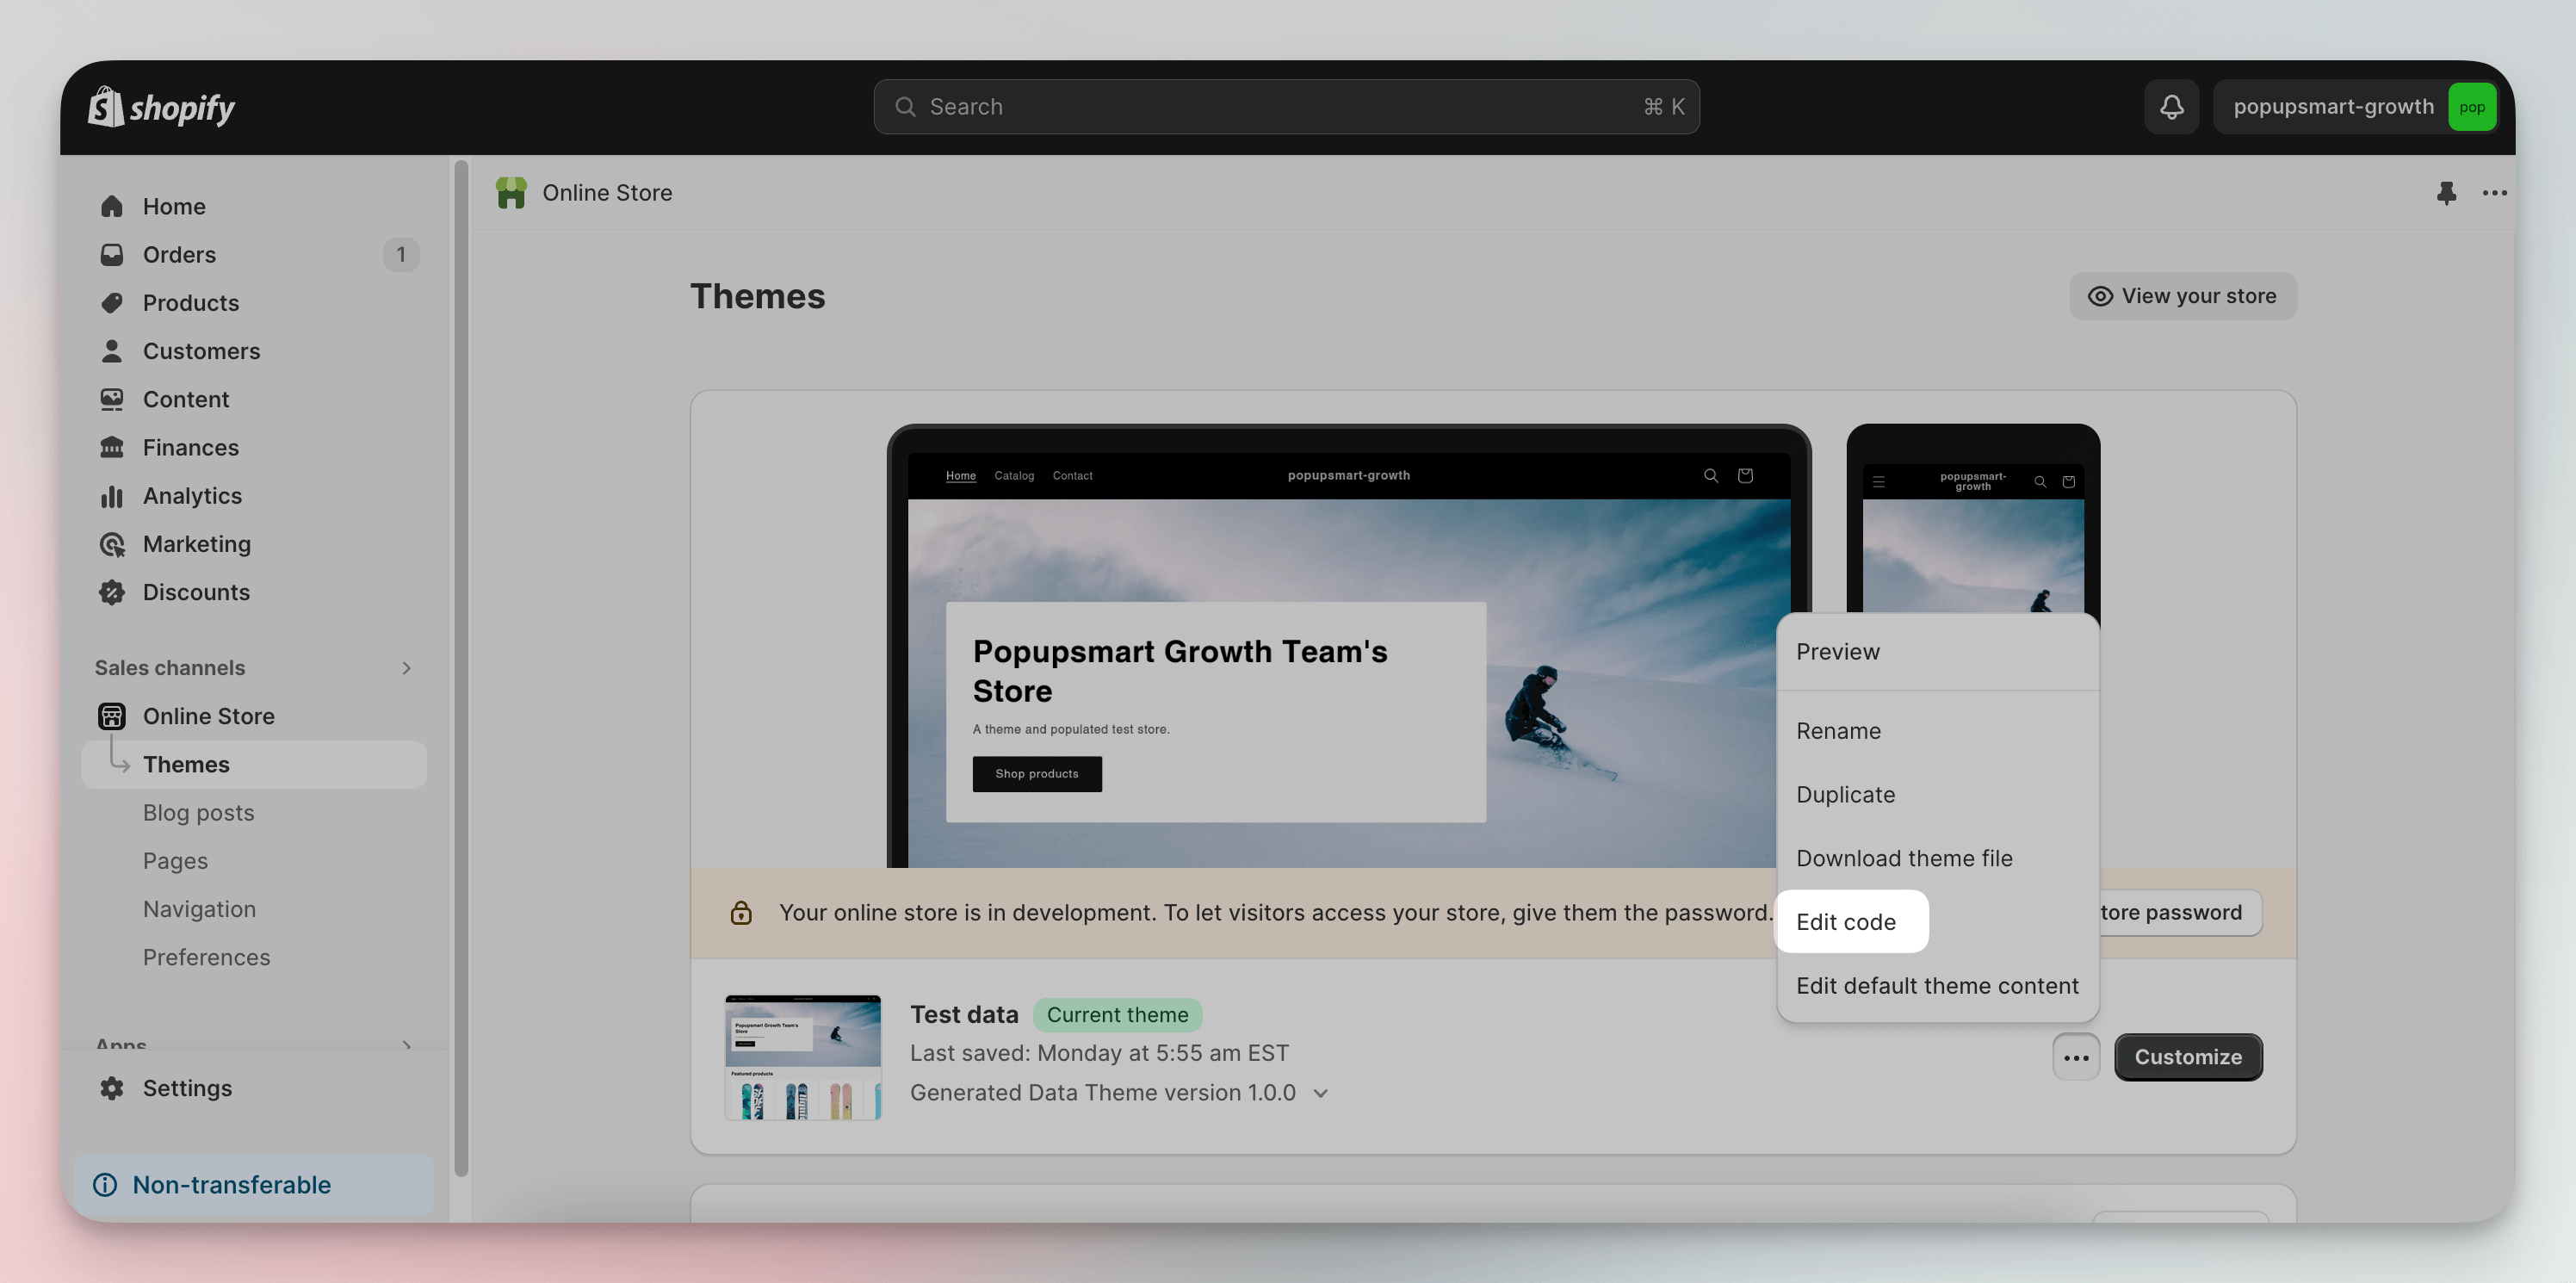
1. In your Shopify Admin, go to Online Store > Themes. Find your active theme and click the three-dot menu.
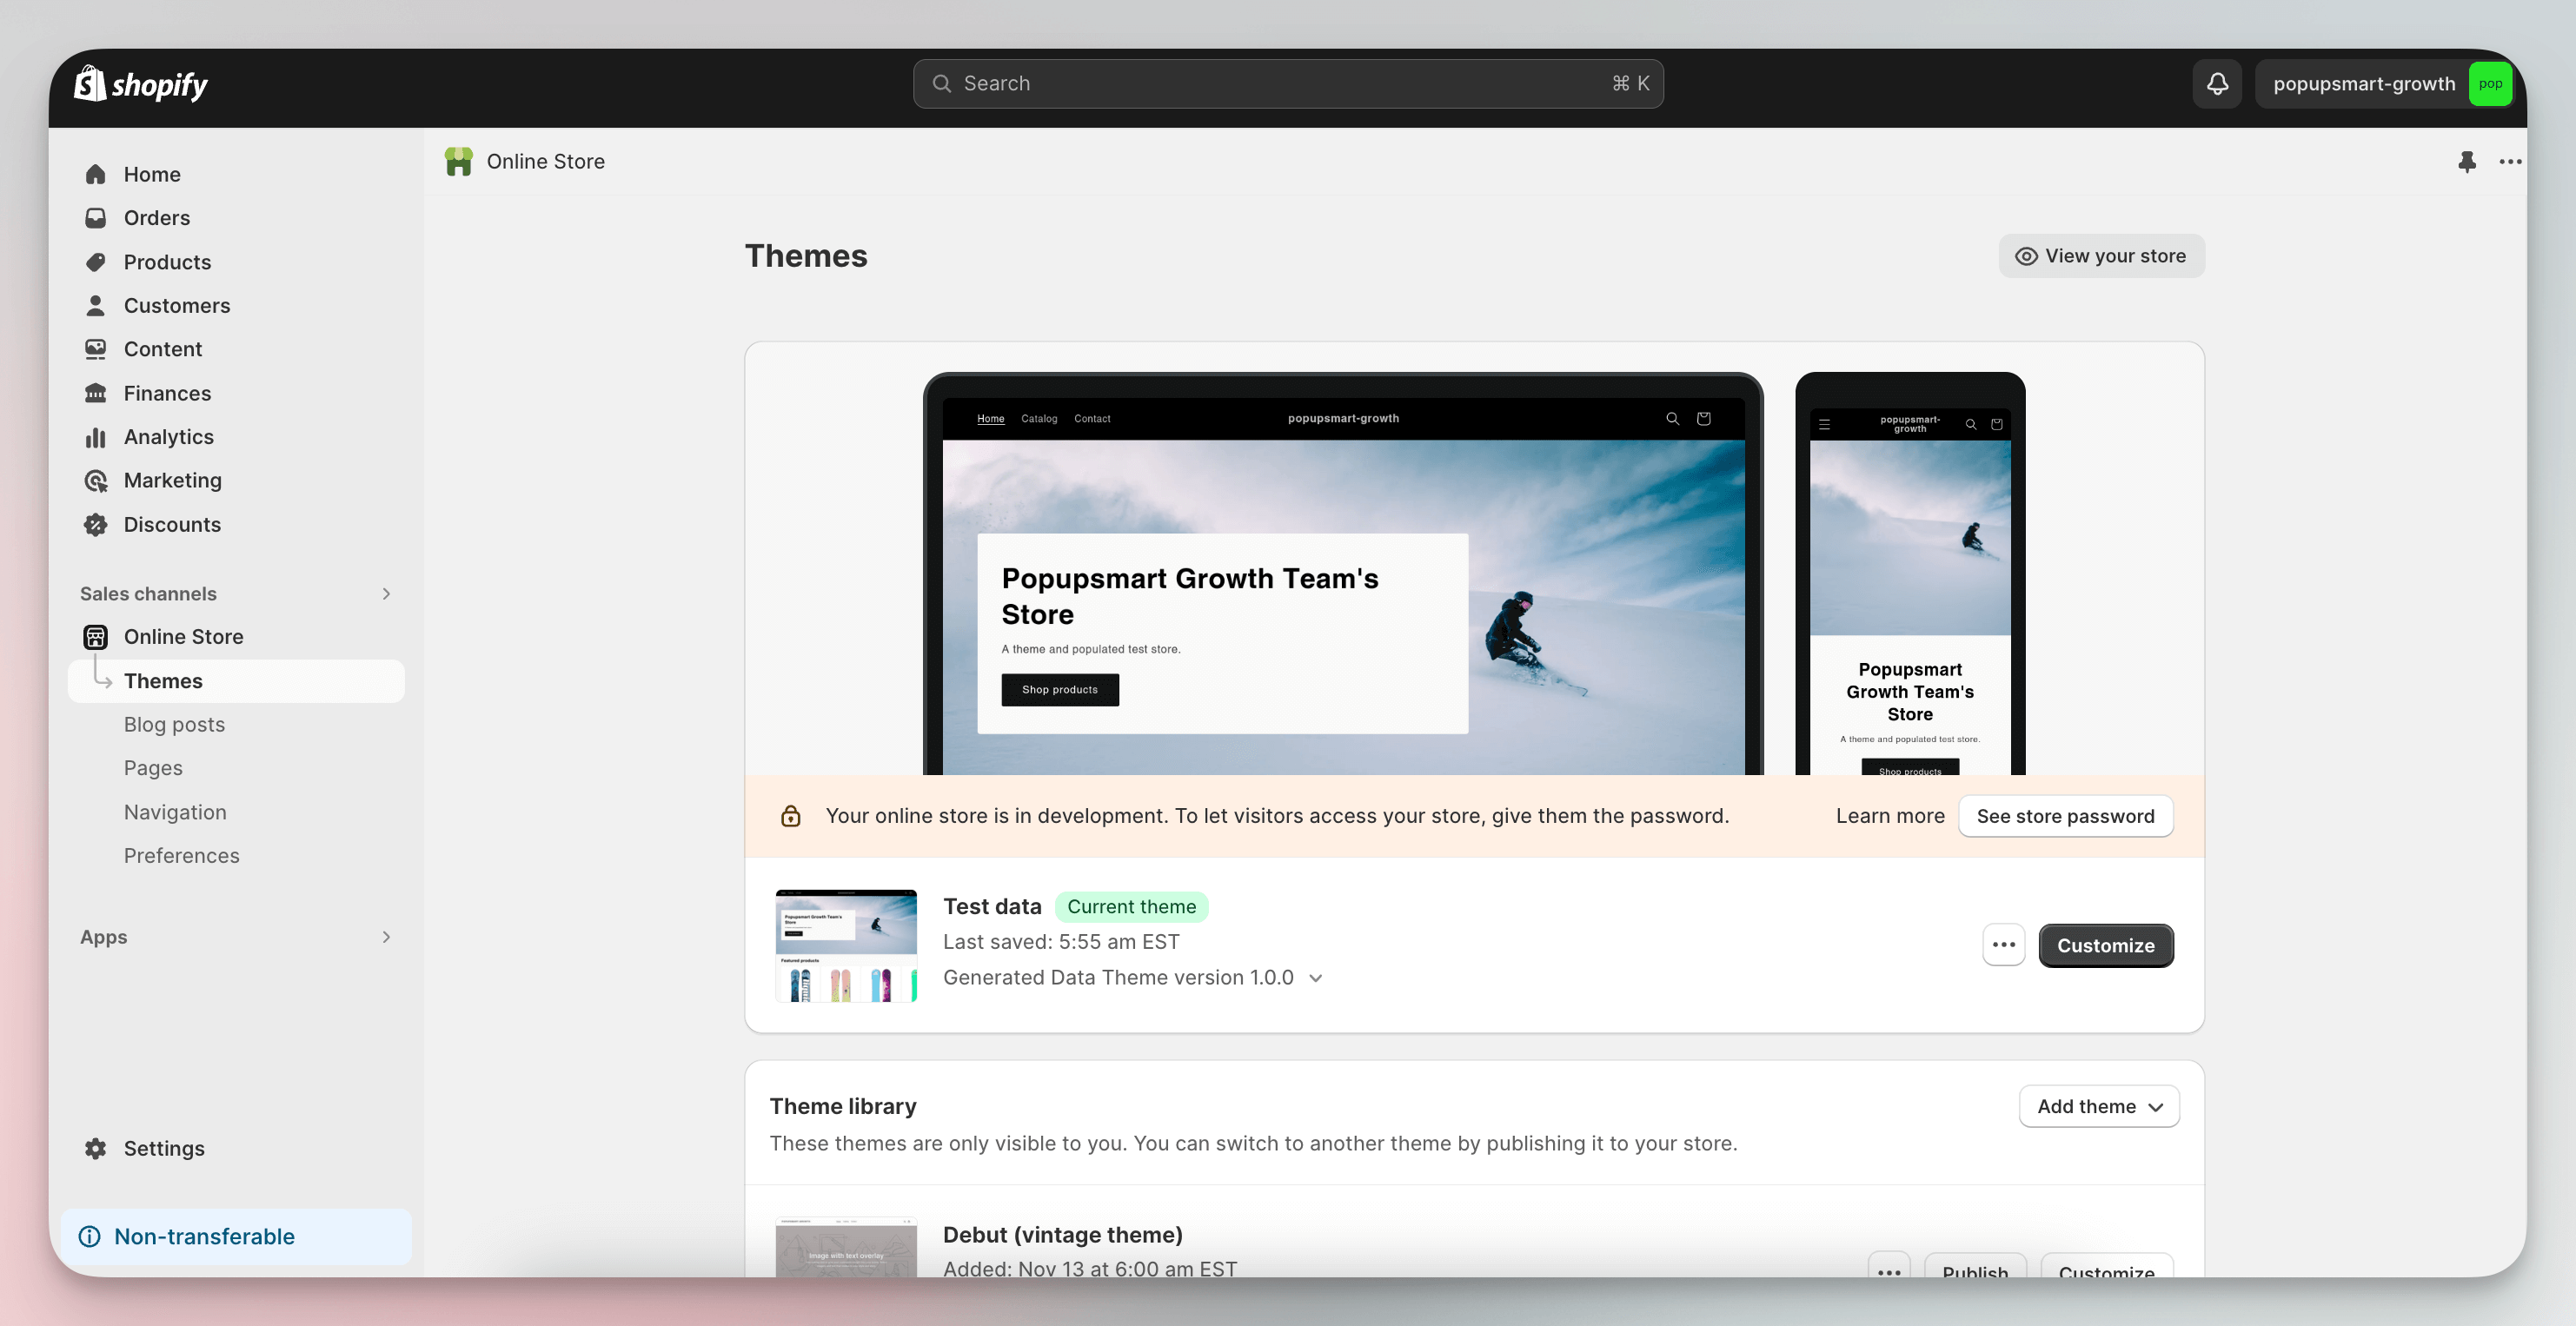
2. Select Edit code from the dropdown menu. This opens the theme code editor.
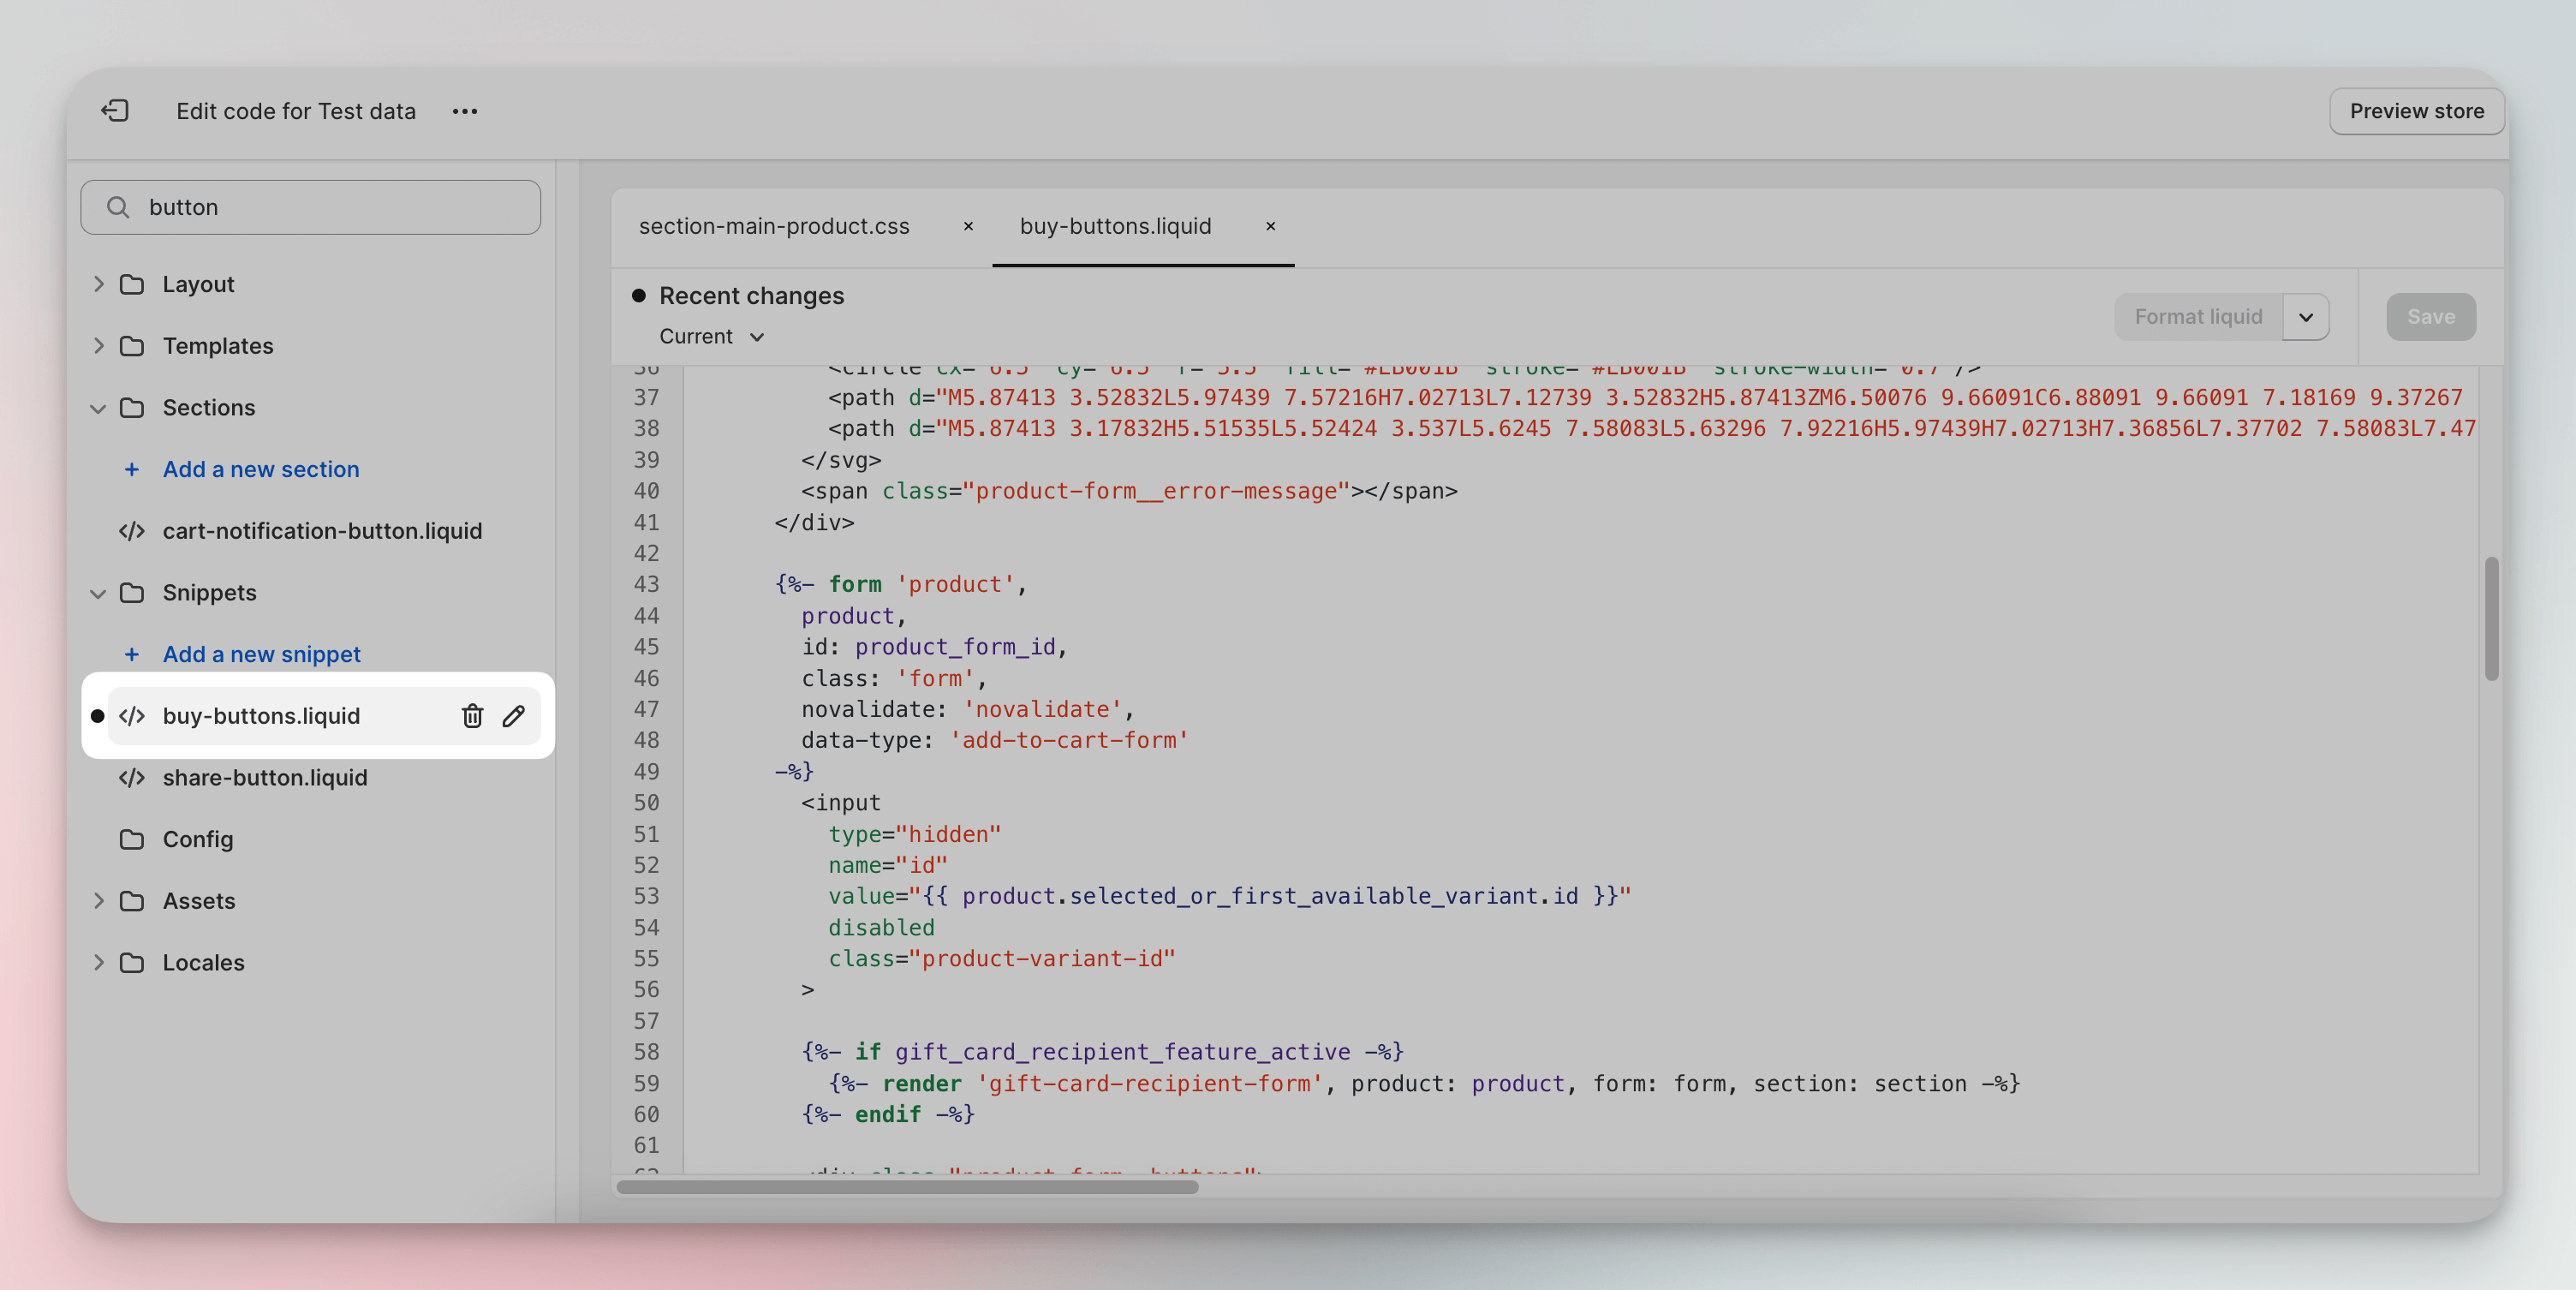
3. In the file browser on the left, search for the file containing your add to cart button. Common file names include product-template.liquid, main-product.liquid, buy-buttons.liquid, or product-form.liquid. In Dawn and other OS 2.0 themes, look under the Sections folder. For older themes (Vintage), check the Templates folder.
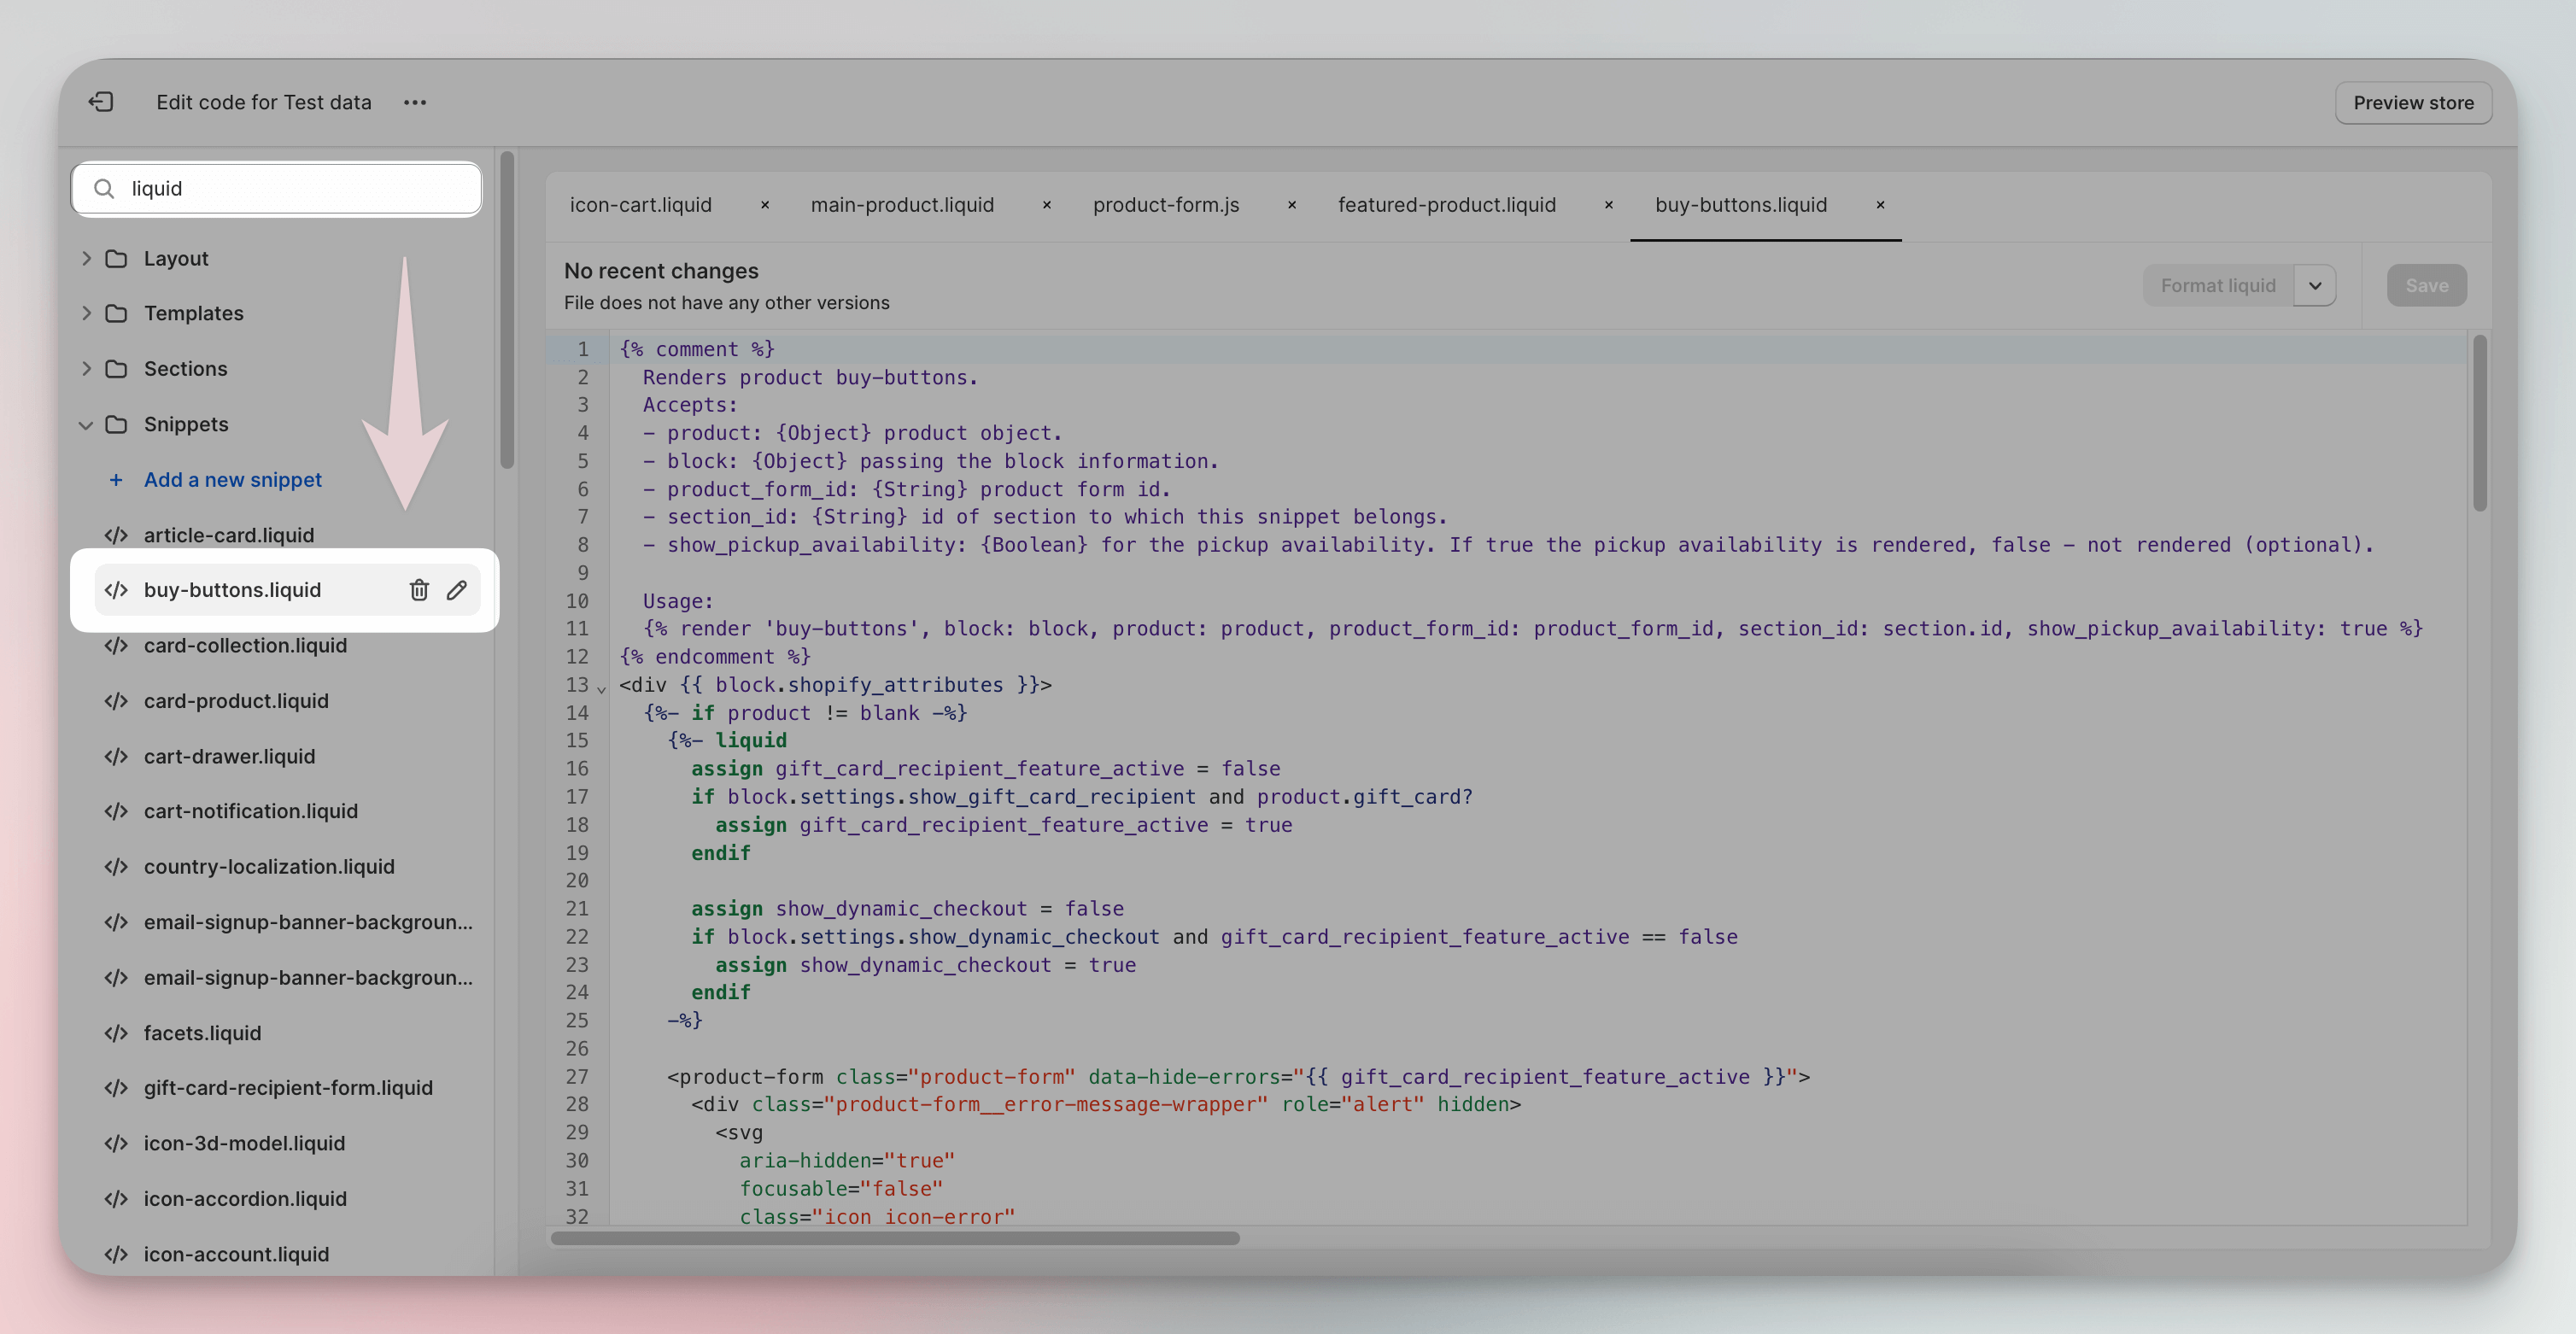
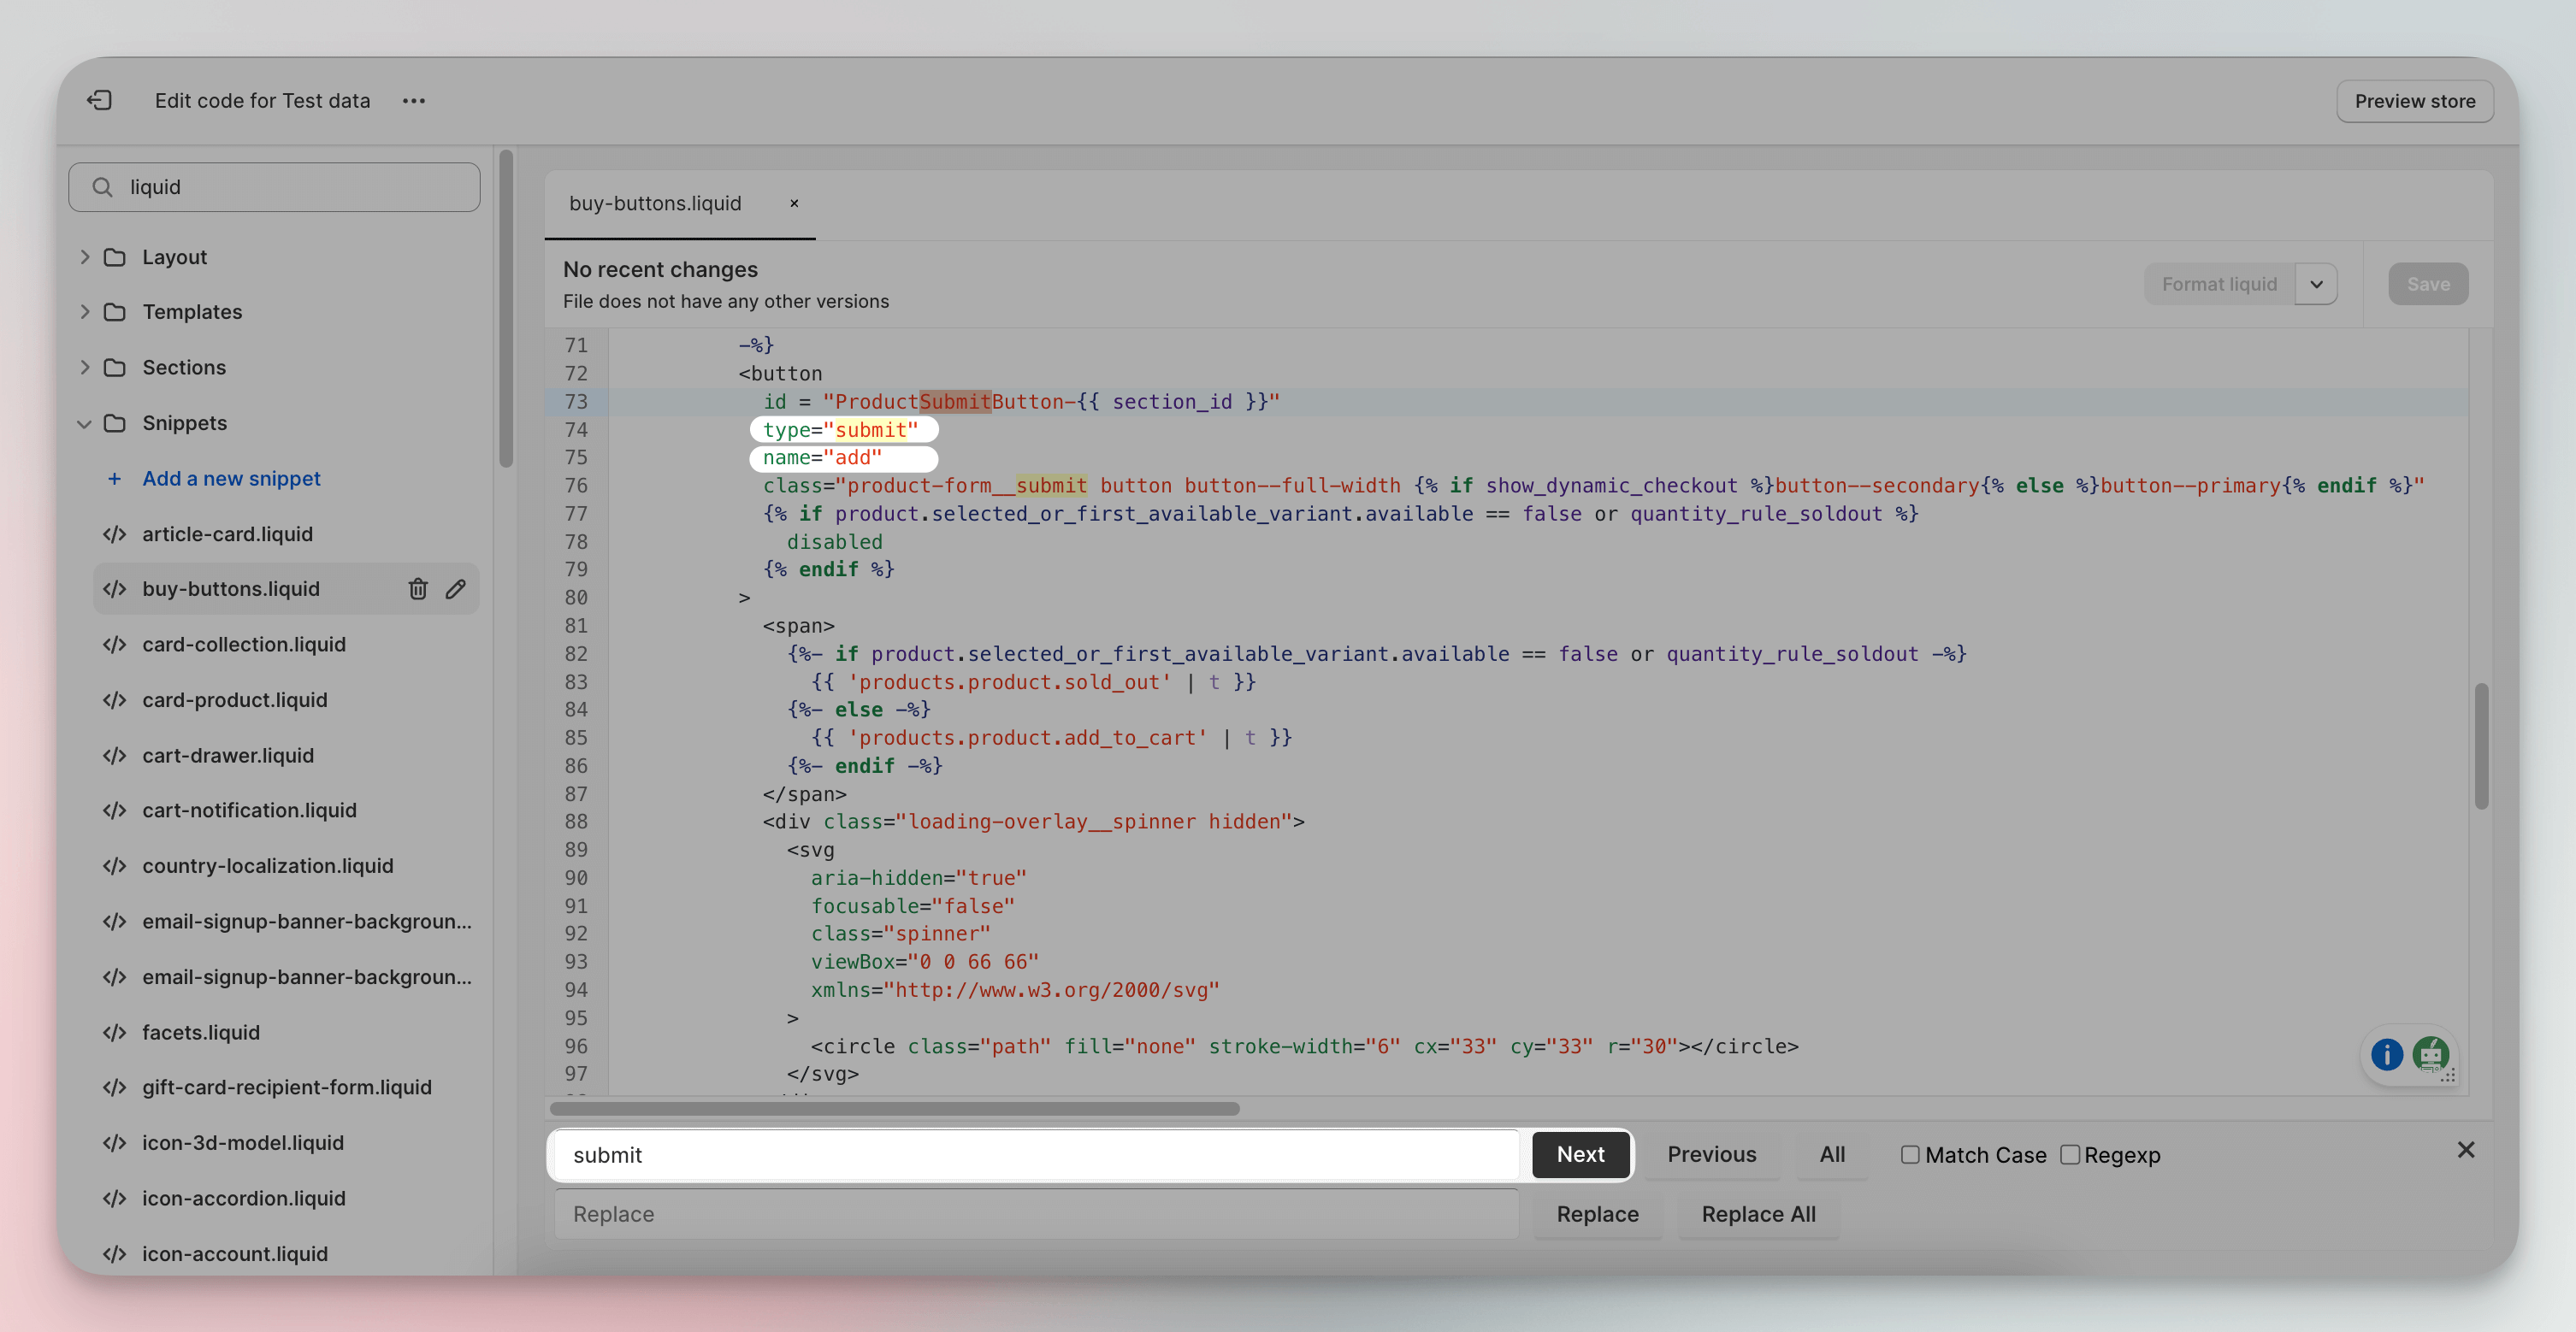
4. Once you've opened the right file, use Ctrl+F (or Cmd+F on Mac) to search for the button element. Look for code that resembles:
<button type="submit" name="add" id="AddToCart">...</button>
Some themes wrap this in a <form> element with the class product-form. You may also find it inside a section block labeled "Buy buttons" or similar.
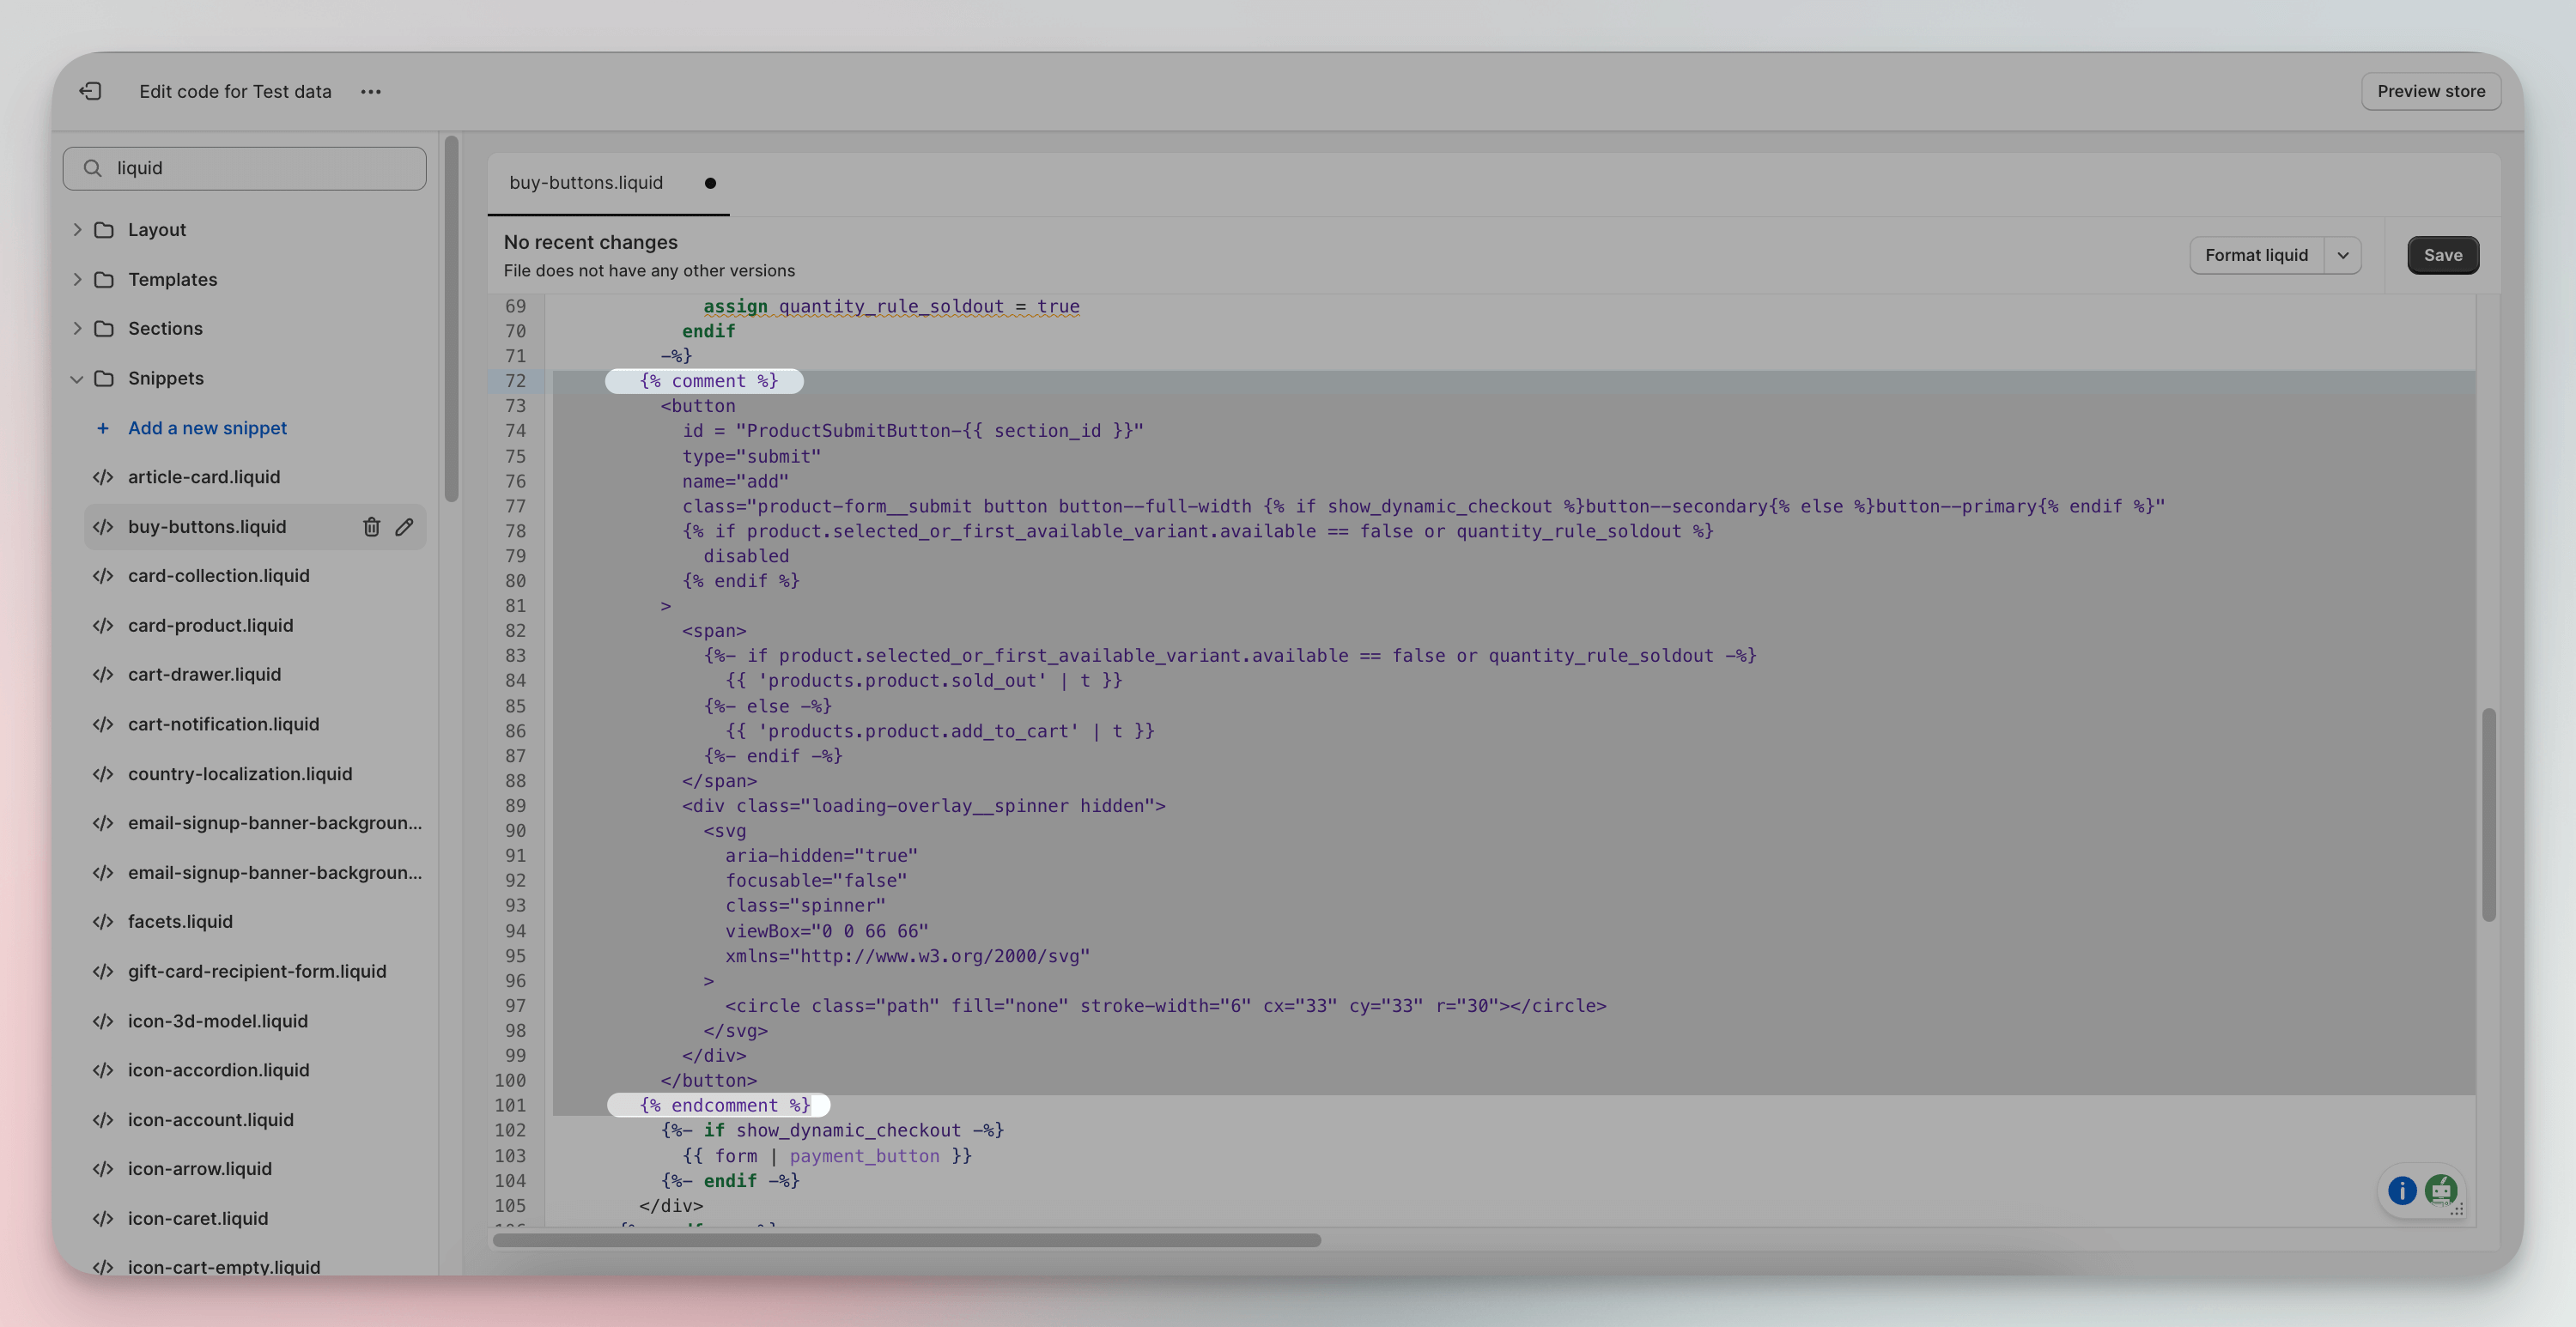
5. Wrap the button code with Liquid comment tags to hide it:
{% comment %} <button type="submit" name="add" id="AddToCart">...</button> {% endcomment %}
This tells Shopify's Liquid engine to skip rendering that block entirely.
6. Click Save in the top right corner, then open your store's product page in a new tab to confirm the button is gone.
You'll know it's working when: The product page loads without any "Add to Cart" or "Buy it now" button. The product title, description, price, and images should all appear normally. If the entire product form disappears (including quantity selectors), you may have commented out too much code.
Watch out for:
• Commenting out the wrong element: Some themes have multiple button instances (for quick-add modals, collection pages, featured product sections). Search the entire codebase for "AddToCart" or "add-to-cart" to find all instances. I once fixed a store where the client only removed the product page button but left the quick-add modal untouched, and customers were still completing purchases through collection pages.
• Theme updates overwriting your changes: When Shopify pushes a theme update, your edits get preserved only if you're using a customized copy. Always duplicate your theme before editing. Go to Online Store > Themes > Actions > Duplicate first.
• Breaking the product form: If you accidentally remove the closing {% endcomment %} tag or comment out the entire form element instead of just the button, the page may throw a Liquid rendering error. Preview the page before publishing.
Method 2: Use a CSS Override to Hide the Add to Cart Button
A CSS override hides the button visually without modifying any Liquid template files. This is the fastest approach and the easiest to reverse. The button still exists in the page's HTML source, but browsers won't display it. This method works well for quick changes or when you don't want to touch theme code directly.
Step-by-Step Instructions:
1. Open your Shopify admin. Go to Online Store > Themes, click the three-dot menu on your active theme, and select Edit code.
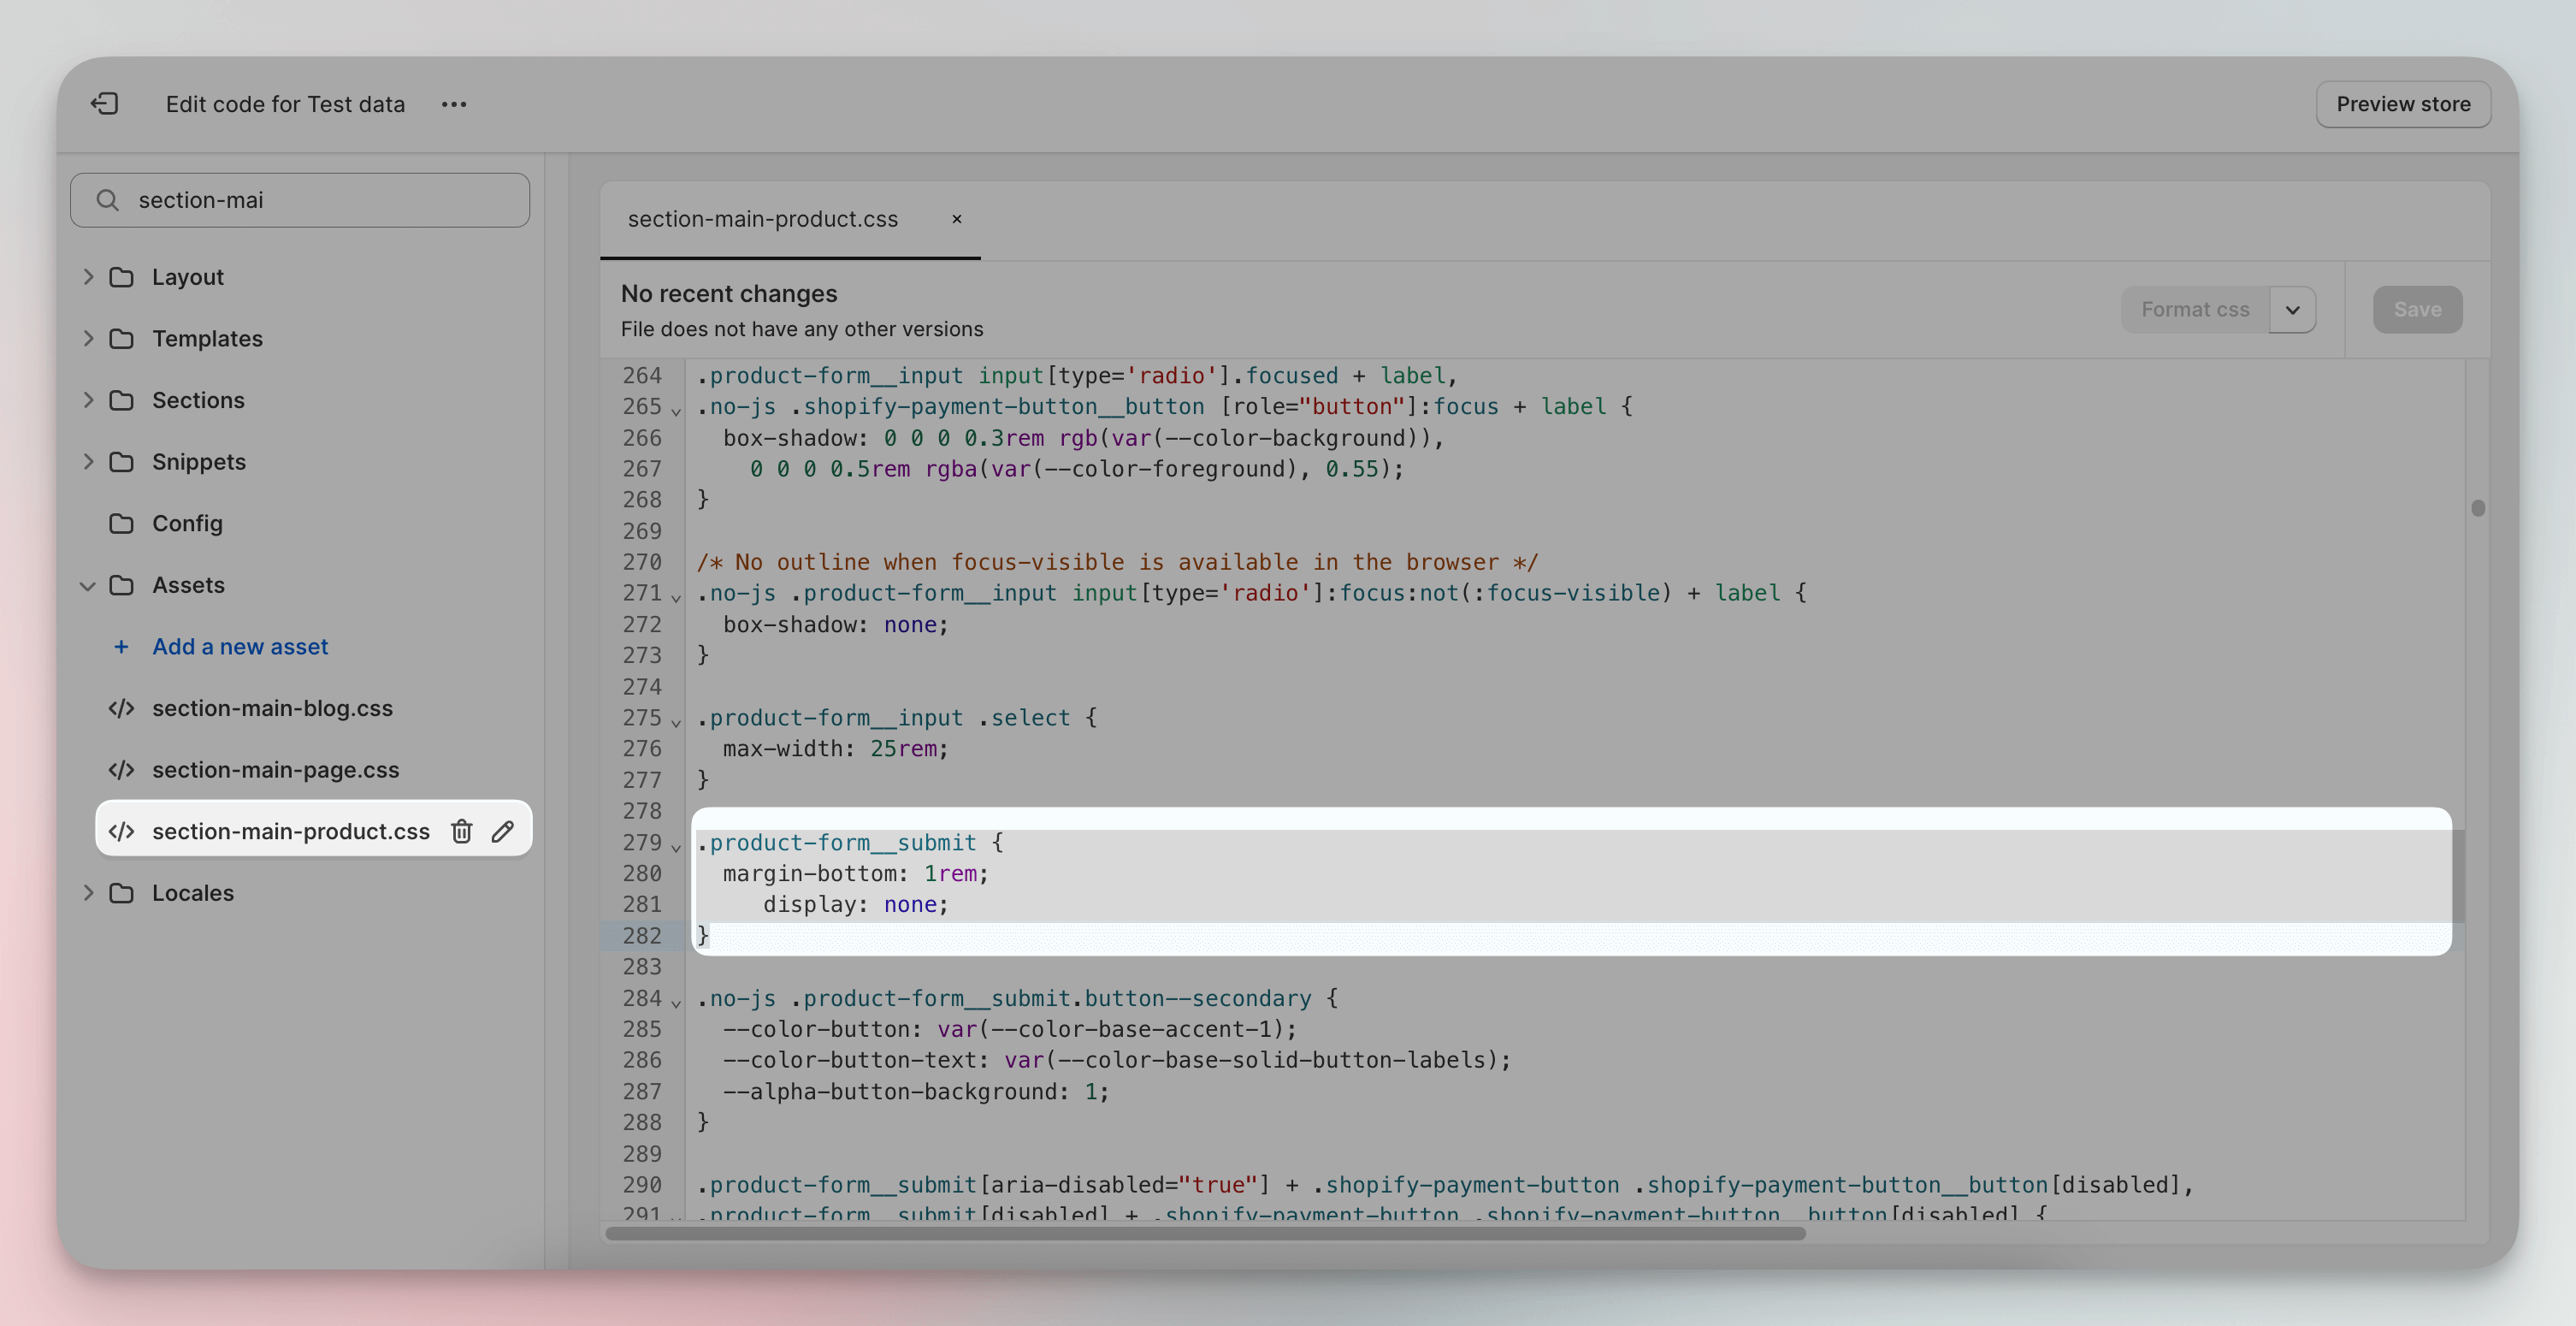
2. In the code editor, navigate to the Assets folder. Open your theme's main CSS file. Common names include base.css, theme.scss.liquid, styles.css.liquid, or section-main-product.css.
3. Scroll to the bottom of the CSS file and add the following rule:
.product-form__cart-submit { display: none; }
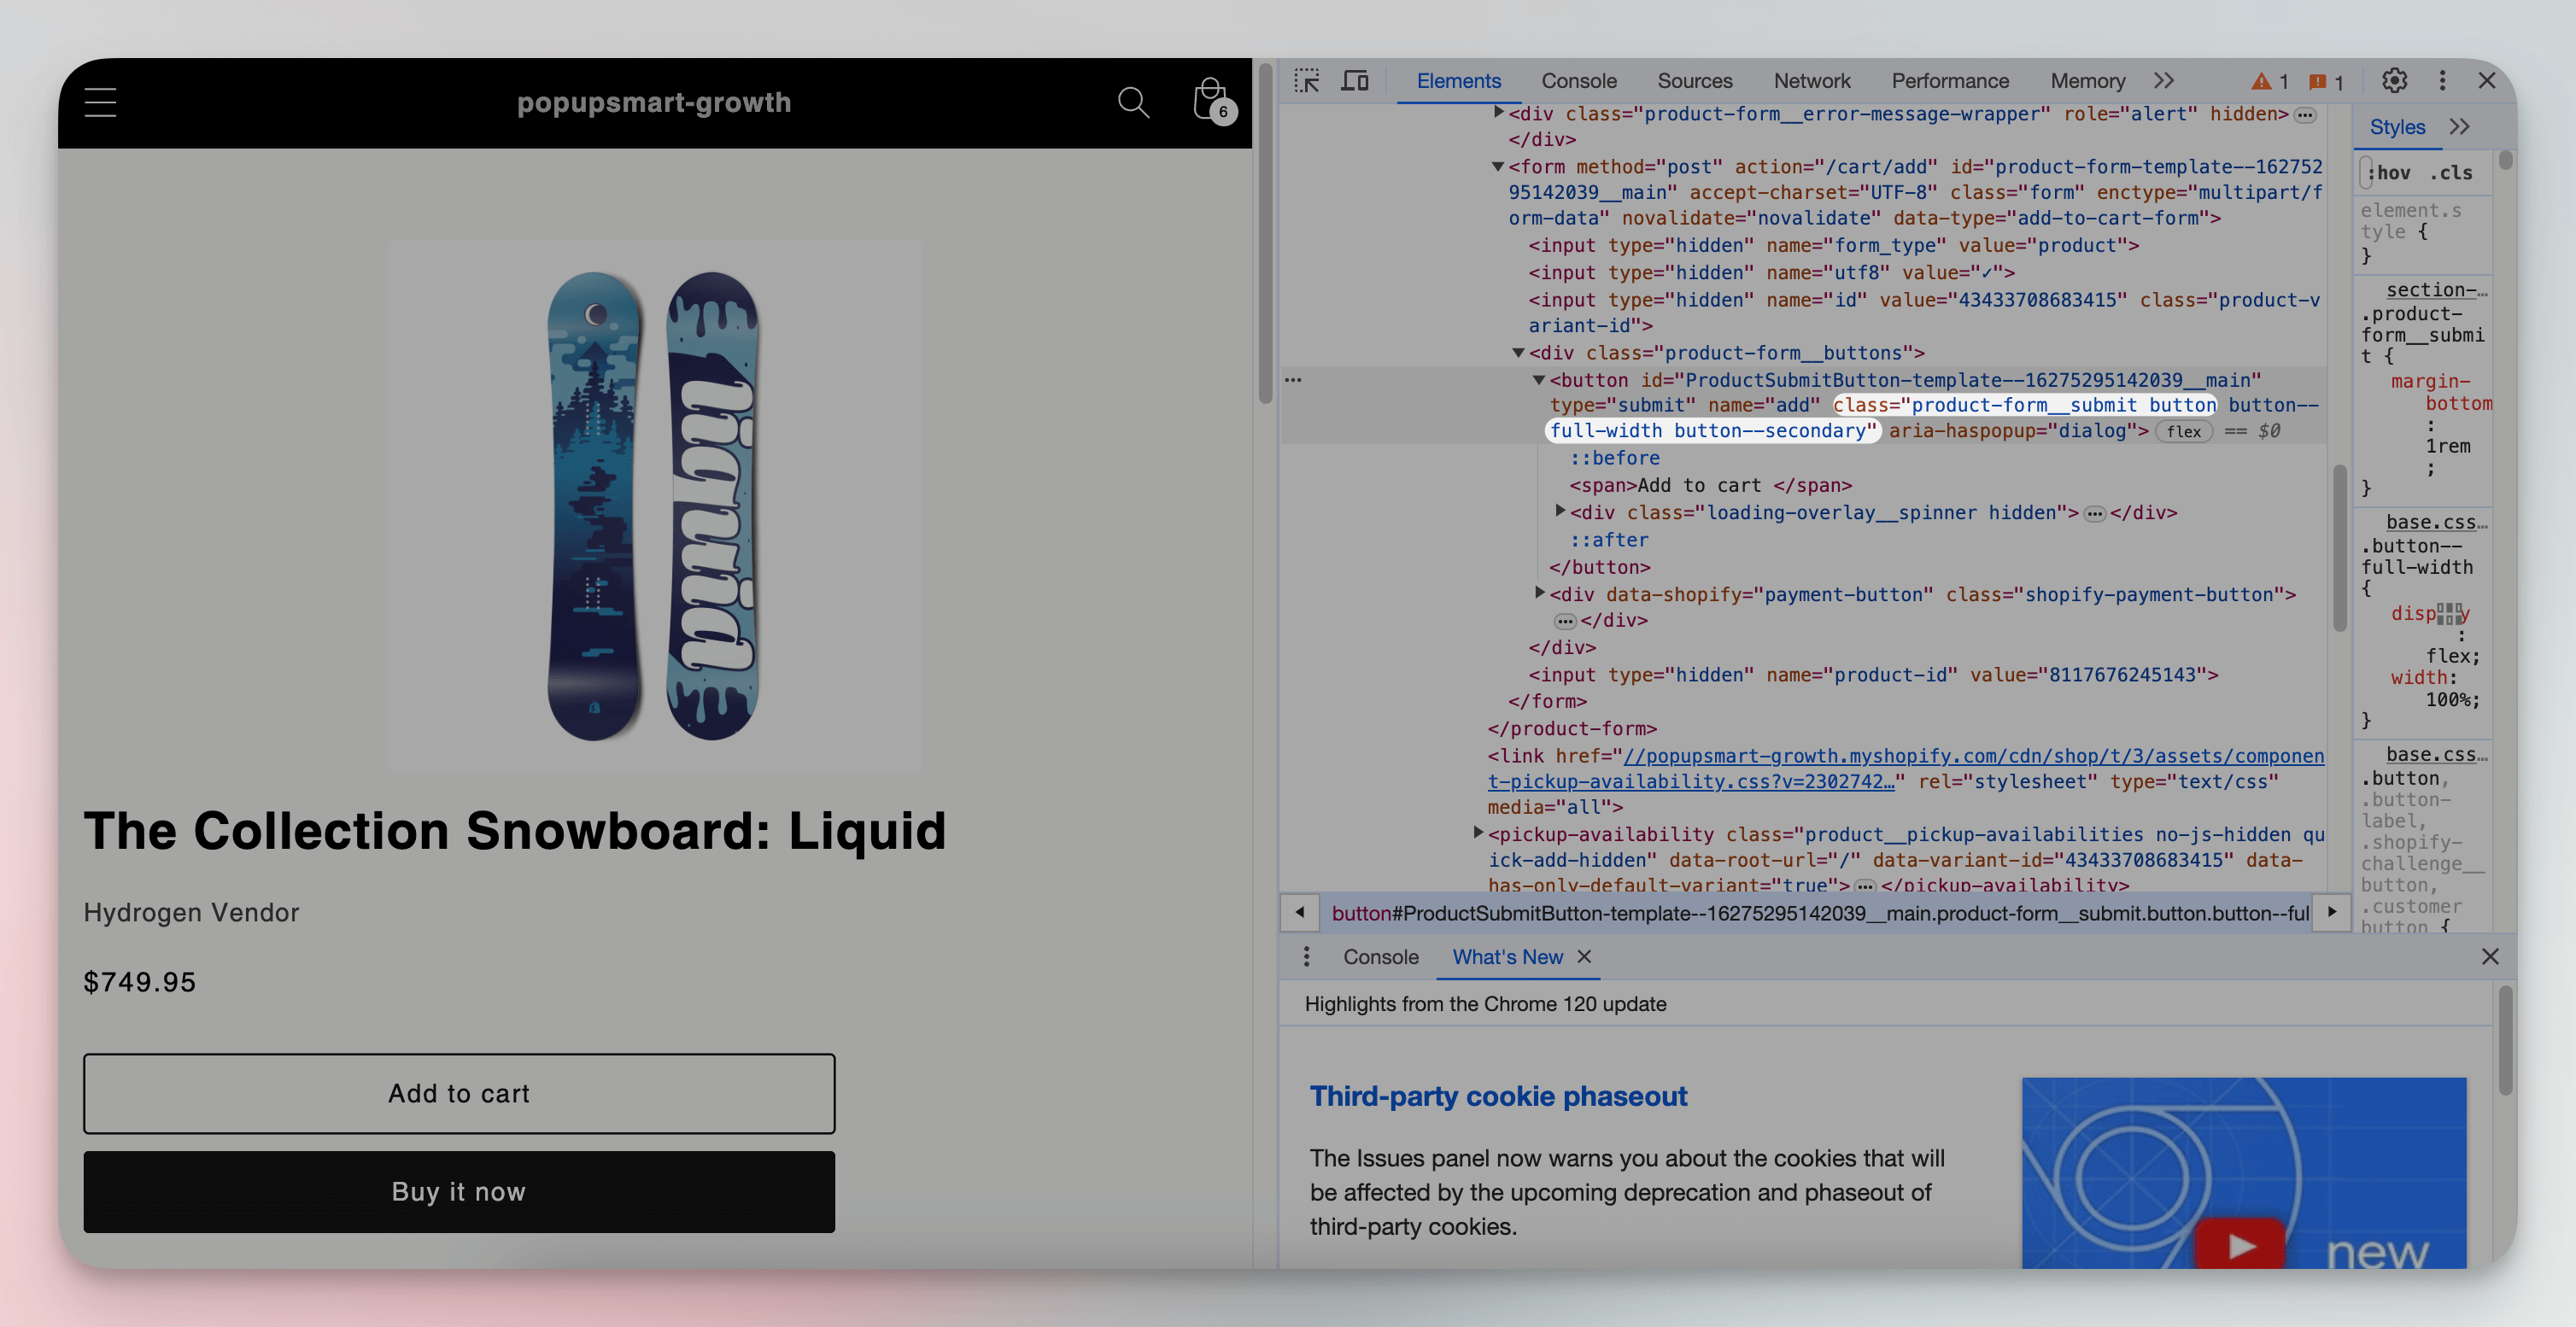
4. If the button doesn't disappear after saving, the class name in your theme may differ. Right-click the "Add to Cart" button on your product page and select Inspect (or Inspect Element) to find the exact class name.
Common class names across popular Shopify themes:
| Theme | Button Class Name |
|---|---|
| Dawn | .product-form__submit |
| Debut | .product-form__cart-submit |
| Minimal | .btn--add-to-cart |
| Brooklyn | .add-to-cart |
| Custom themes | Use Inspect Element to find yours |
5. Click Save, then refresh your product page to verify the button is hidden.
You'll know it's working when: The "Add to Cart" button is invisible on product pages. The rest of the product form (price, quantity selector, variant picker) should remain unchanged. Check both desktop and mobile views since some themes use different CSS for mobile breakpoints.
Watch out for:
• The button reappearing on mobile: Some themes apply separate stylesheets or media queries for mobile views. If the button shows on phones but not desktop, add the same display: none rule inside the theme's mobile media query, or use !important to force the override: .product-form__submit { display: none !important; }
• Hiding the "Buy it now" button separately: Shopify's dynamic checkout button ("Buy it now") usually has its own class, like .shopify-payment-button. You'll need a second CSS rule to hide it: .shopify-payment-button { display: none; }
Method 3: Install a Shopify App to Remove the Button (No Code)
If you'd rather not edit any code, several Shopify apps handle button removal through a point-and-click interface. This is the safest option for store owners without technical skills. Most apps also offer extra features like replacing the button with custom CTAs, managing access by customer tags, or scheduling when buttons appear and disappear.
Step-by-Step Instructions:
1. From your Shopify Admin, click Apps in the left sidebar, then select Shopify App Store (or go directly to apps.shopify.com).
2. Search for terms like "hide add to cart," "remove buy button," or "disable add to cart." You'll find several options. Here are two proven apps:
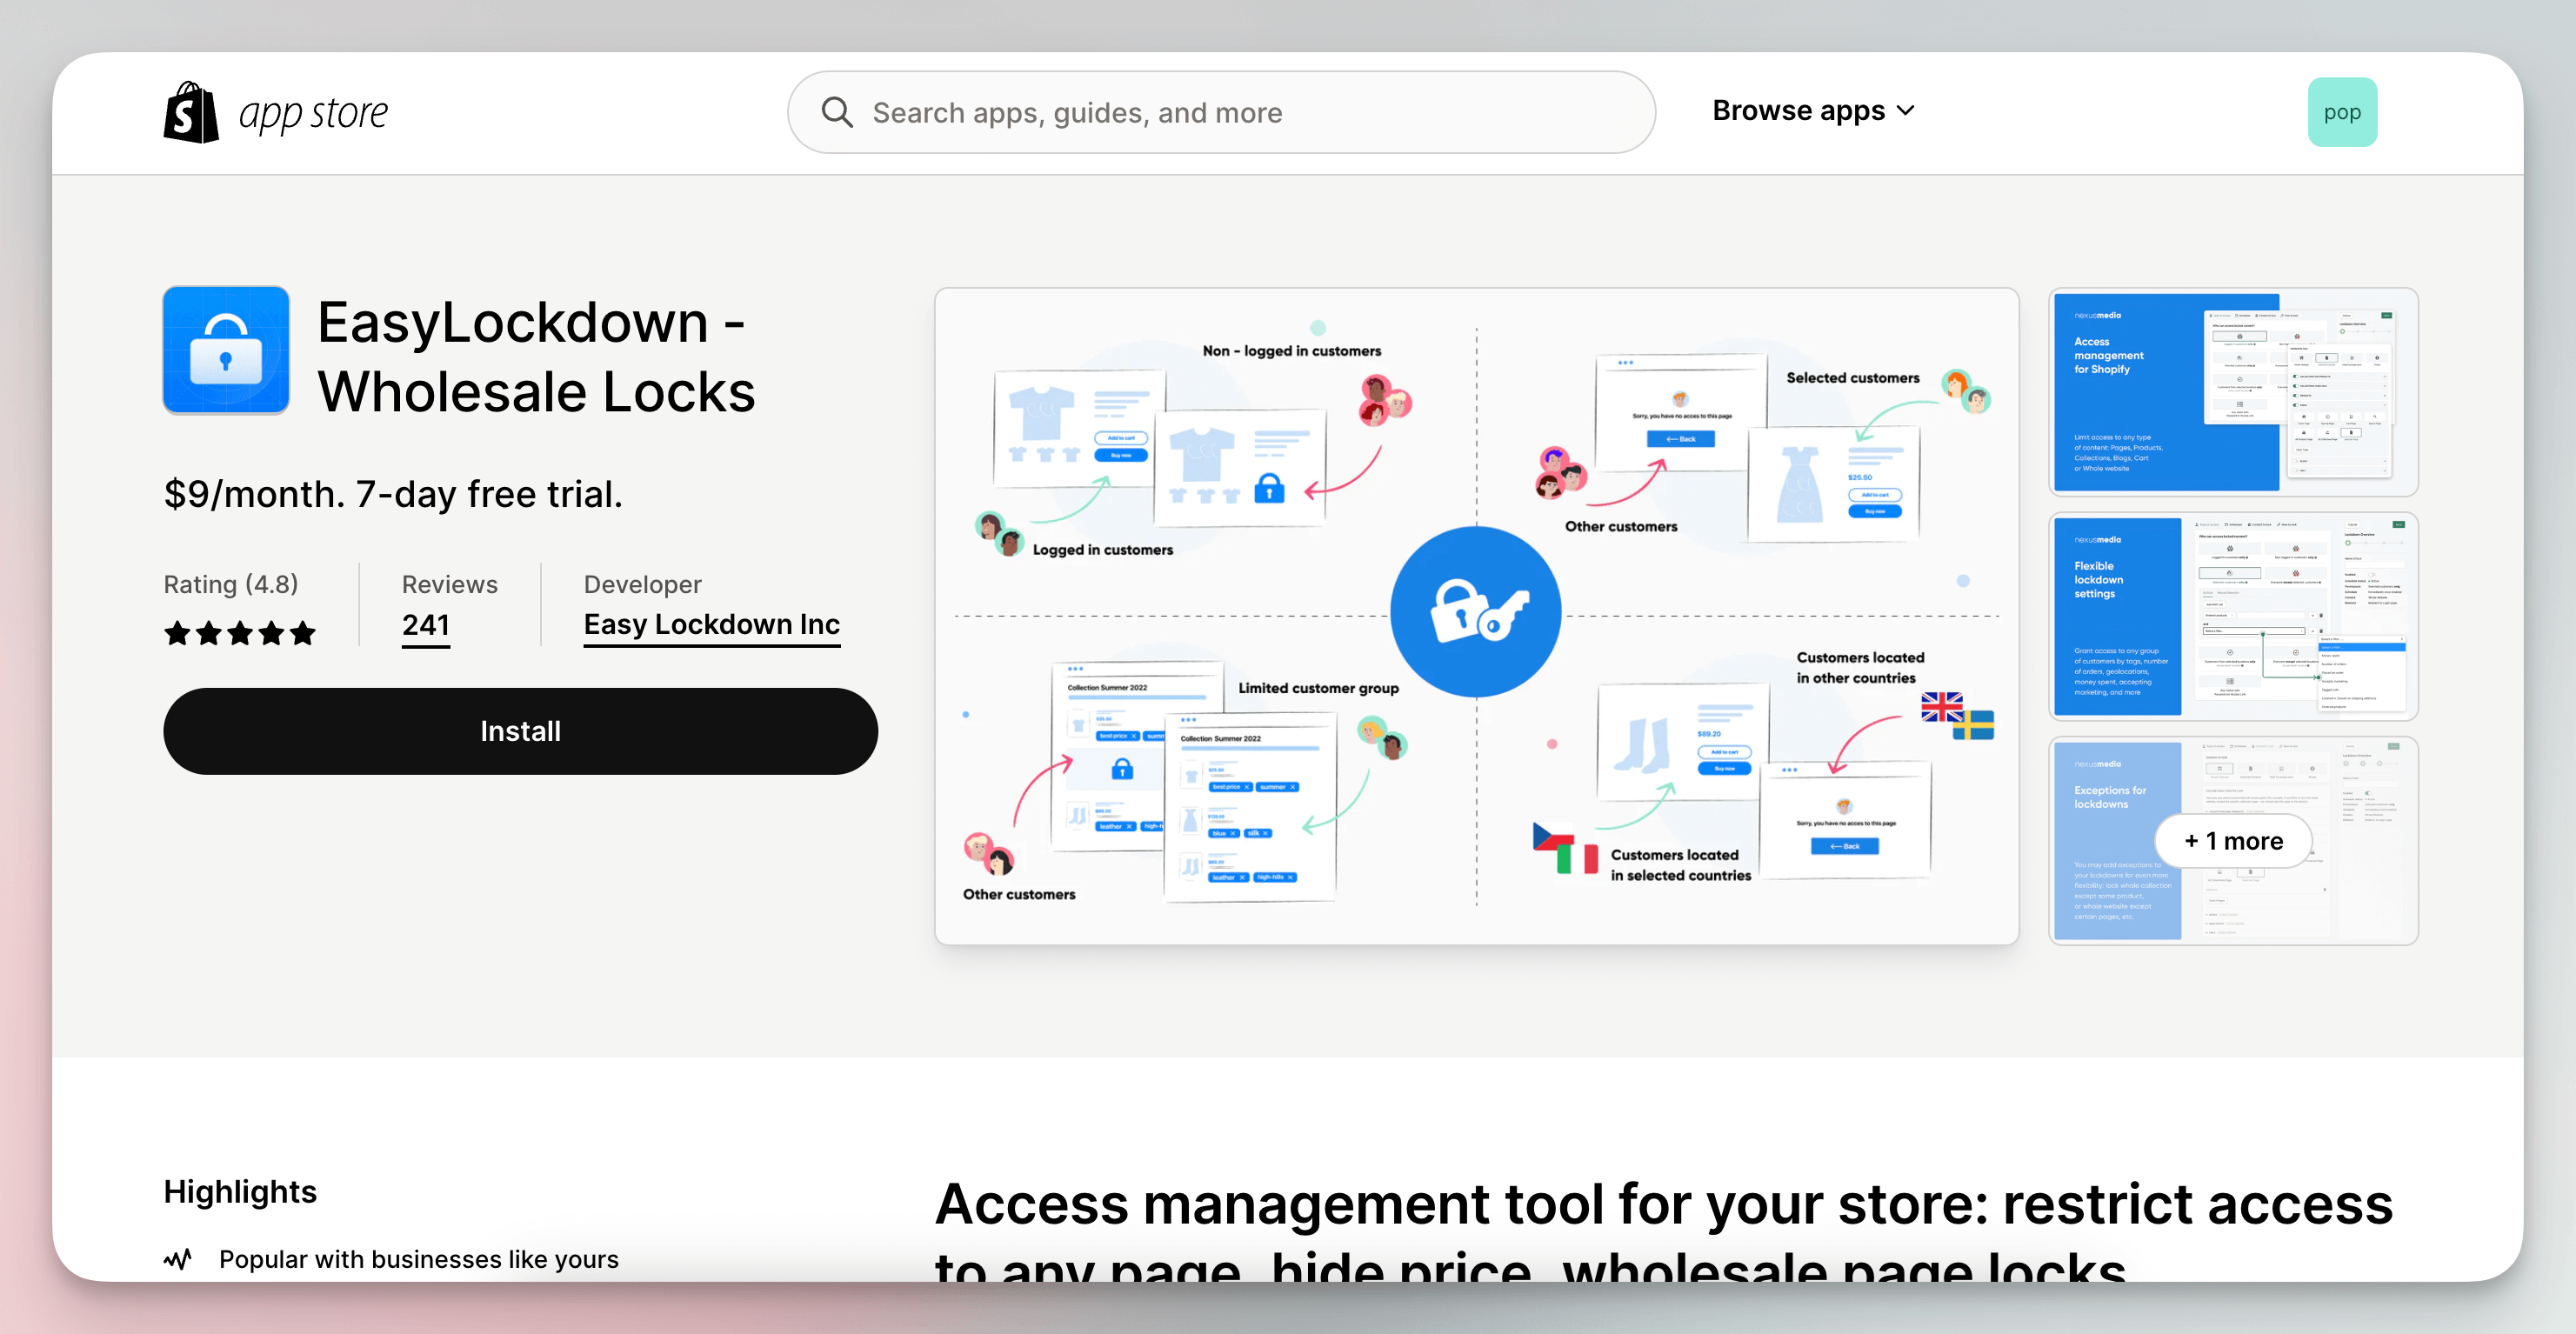
EasyLockdown – Wholesale Lock Manager: Hides the "Add to Cart" button and can lock entire products, collections, or your whole store behind access rules. Useful for wholesale or members-only setups.
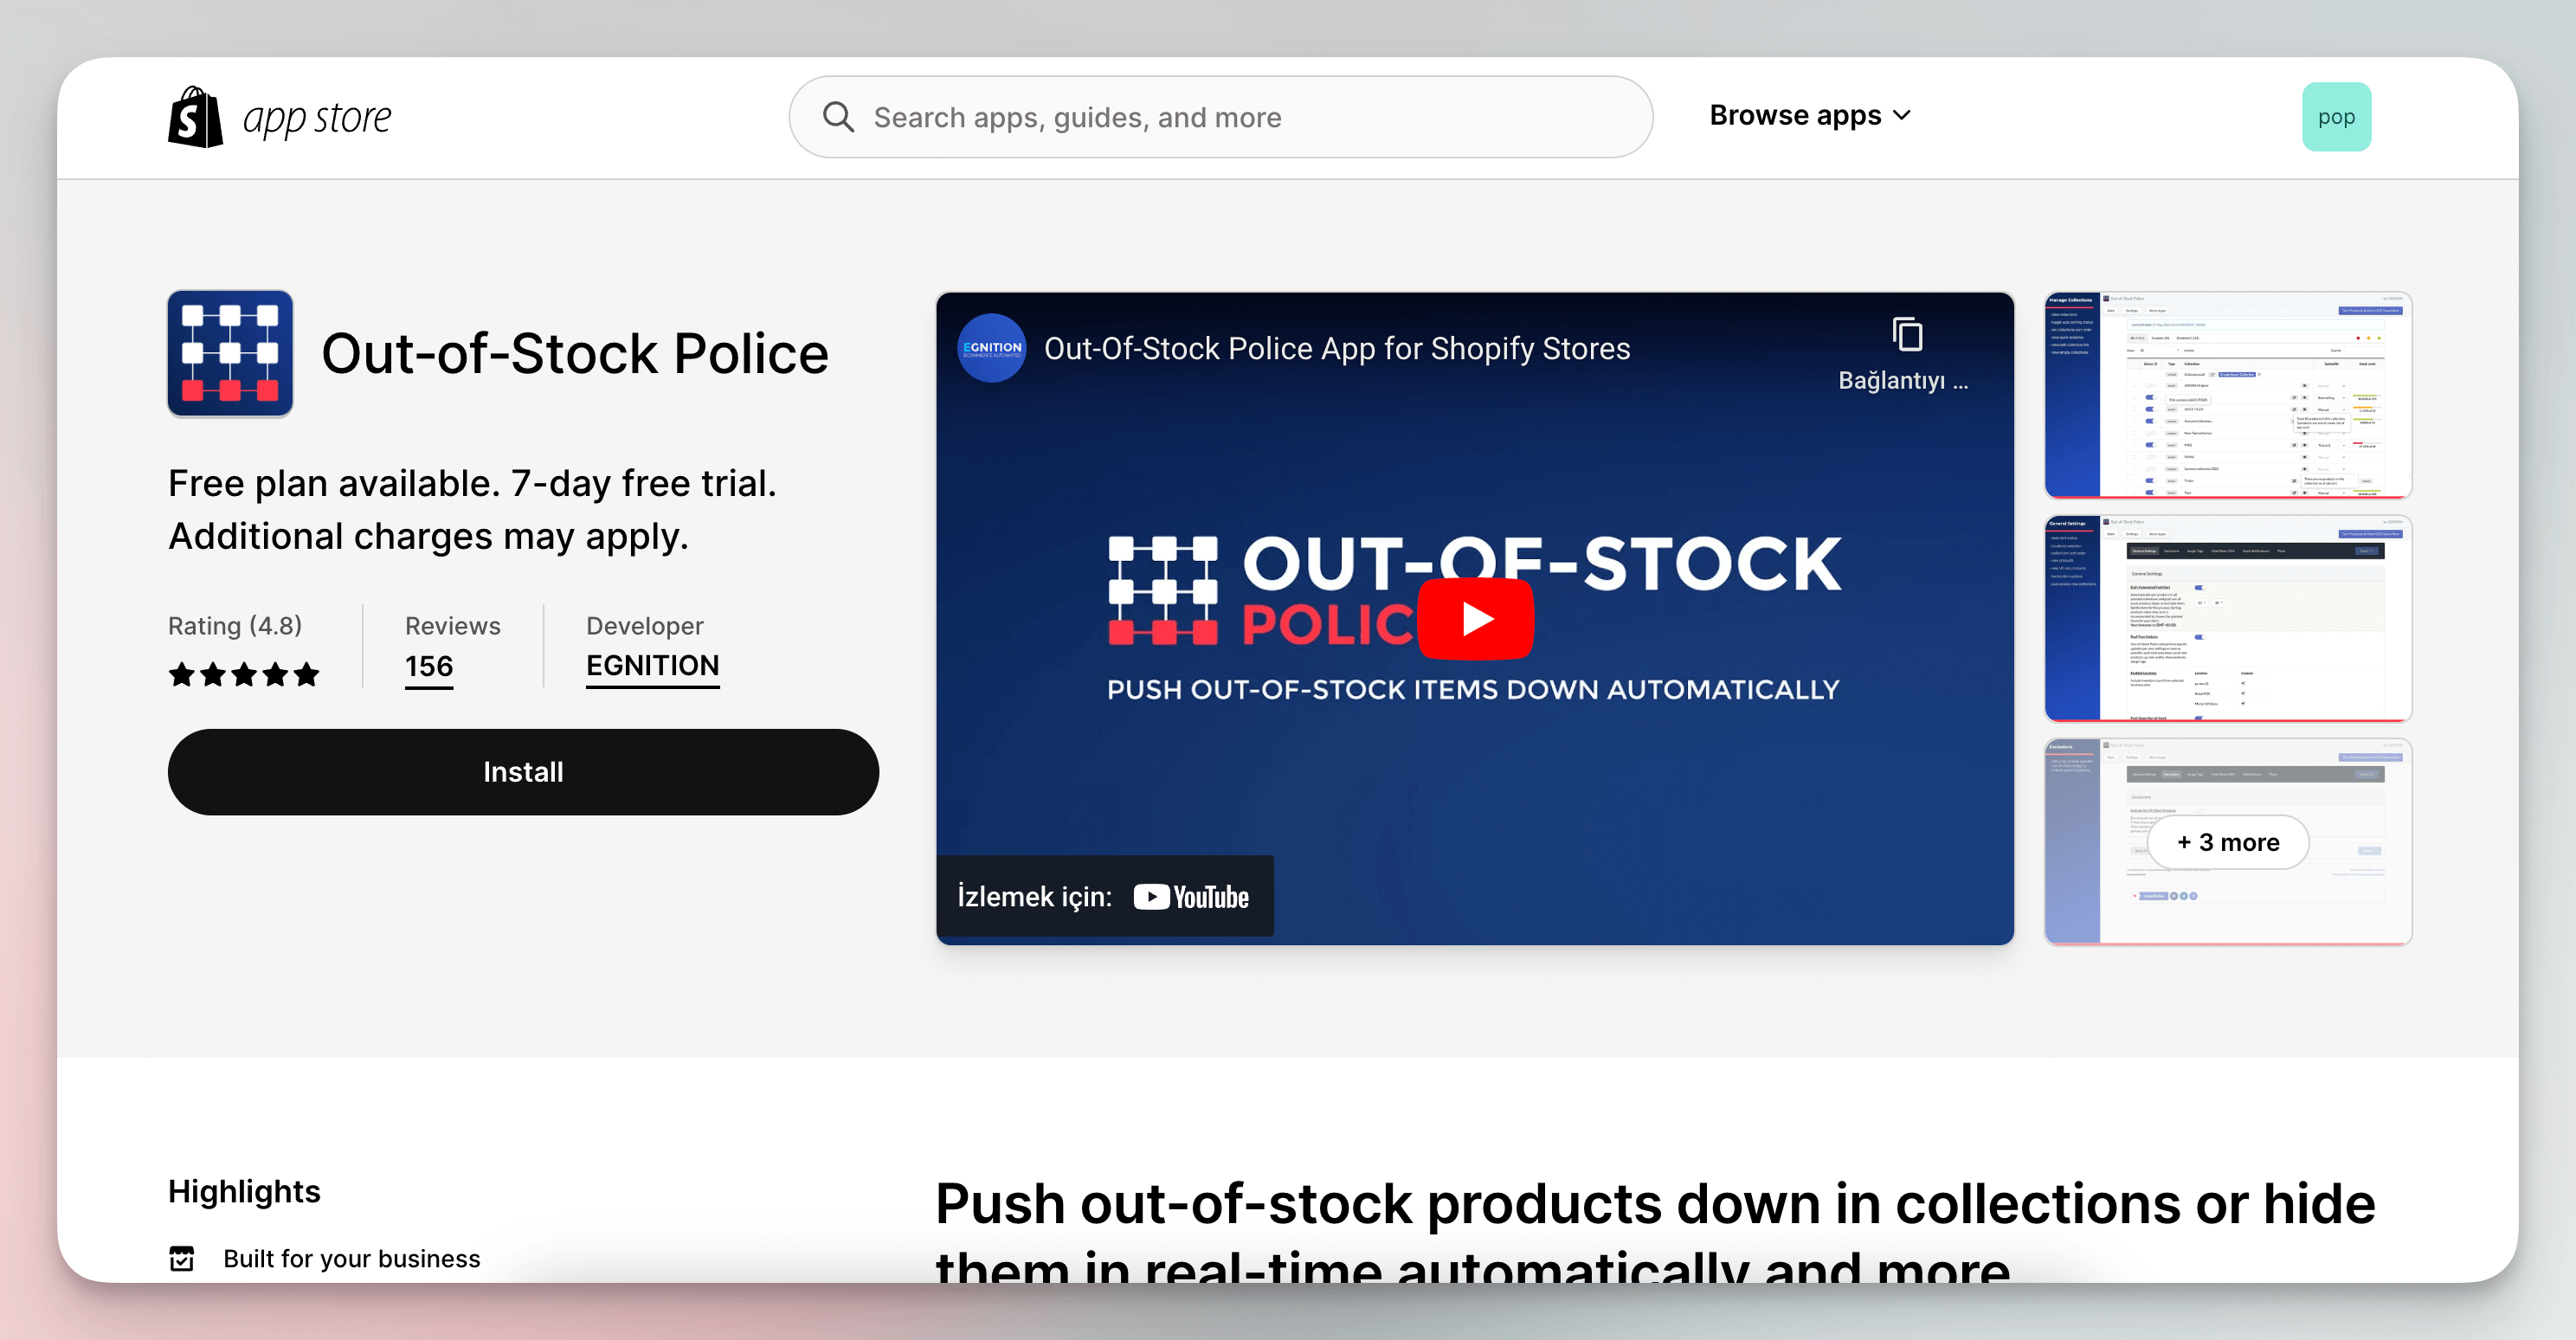
Out of Stock Police: Automatically hides or disables the "Add to Cart" button for out-of-stock items, then pushes those products down in collection pages. Good for stores with large, frequently-changing inventories.
3. Click Add app, then follow the installation prompts. Most apps will ask for permissions to access your theme and product data.
4. Open the app's settings dashboard and configure which products, collections, or pages should have the button hidden. Most apps let you target by product tag, product type, collection, or vendor.
5. Save your settings and preview a product page to confirm the button is hidden.
You'll know it's working when: The targeted product pages no longer show the "Add to Cart" button. Check a few different products to make sure the rules are applying correctly. Some apps show a status indicator in their dashboard confirming which products are affected.
Watch out for:
• App conflicts with your theme: Some apps inject JavaScript that can conflict with custom themes or other apps. If the button doesn't hide after installation, check for JavaScript errors in your browser console (Right-click > Inspect > Console tab). Contact the app developer's support if issues persist.
• Monthly subscription costs: Free apps exist, but many charge $5-$15/month. Before committing, check whether a simple CSS override (Method 2) would accomplish the same thing for free. Apps make sense when you need conditional logic, scheduling, or customer-group targeting that code edits can't handle easily.
Pro tip: I always test apps on a duplicate theme first, never on the live store. Go to Online Store > Themes > Duplicate, install the app, then preview the duplicate. If everything looks right, publish it.
Method 4: Apply Conditional Logic in Liquid for Specific Products
Conditional logic lets you show the "Add to Cart" button on some products and hide it on others. This is the most flexible approach because you can target products based on availability, tags, product type, vendor, or any other Liquid variable. If you need different behavior for different parts of your catalog, this is the method to use.
Step-by-Step Instructions:
1. Open your Shopify admin. Go to Online Store > Themes, click the three-dot menu, and select Edit code.
2. Navigate to the file containing your "Add to Cart" button (same files as Method 1:product-template.liquid, main-product.liquid, or buy-buttons.liquid).
3. Find the "Add to Cart" button code, then wrap it with a Liquid conditional statement. Here are the most common conditions:
Hide when product is out of stock:
{% if product.available %}
<button type="submit" name="add">Add to Cart</button>
{% endif %}

Hide for products with a specific tag (e.g., "hide-cart"):
{% unless product.tags contains 'hide-cart' %}
<button type="submit" name="add">Add to Cart</button>
{% endunless %}
Hide for a specific product type (e.g., "Coming Soon"):
{% if product.type != 'Coming Soon' %}
<button type="submit" name="add">Add to Cart</button>
{% endif %}
4. Click Save, then test by viewing a product that matches your condition.
You'll know it's working when: Products matching your condition (out of stock, tagged "hide-cart," or the correct product type) no longer display the "Add to Cart" button, while all other products continue showing it normally. Test at least two products: one that should have the button and one that shouldn't.
Watch out for:
• Forgetting the closing tag: Every {% if %} needs a matching {% endif %}, and every {% unless %} needs {% endunless %}. A missing closing tag will break your entire product template with a Liquid syntax error, usually displayed as a blank page or an error message like "Liquid error: Unknown tag 'endif'".
• Tag case sensitivity: Liquid tag comparisons are case-sensitive. If you tag a product "Hide-Cart" but your code checks for "hide-cart," the condition won't match. Always use lowercase tags and match them exactly in your code.
• Variant-level availability: The product.available check returns true if ANY variant is in stock. If you need to hide the button only when a specific variant is unavailable, you'll need to check variant.available inside the variant loop instead.
Method 5: Set Products as Unavailable to Remove the Button
This is the simplest method and requires zero code changes. By removing a product from all sales channels, Shopify automatically hides the "Add to Cart" button because the product isn't available for purchase anywhere. The catch: the product page itself becomes inaccessible to customers unless you keep it available on at least one channel.
Step-by-Step Instructions:
1. In your Shopify Admin, go to Products and click the product you want to modify.
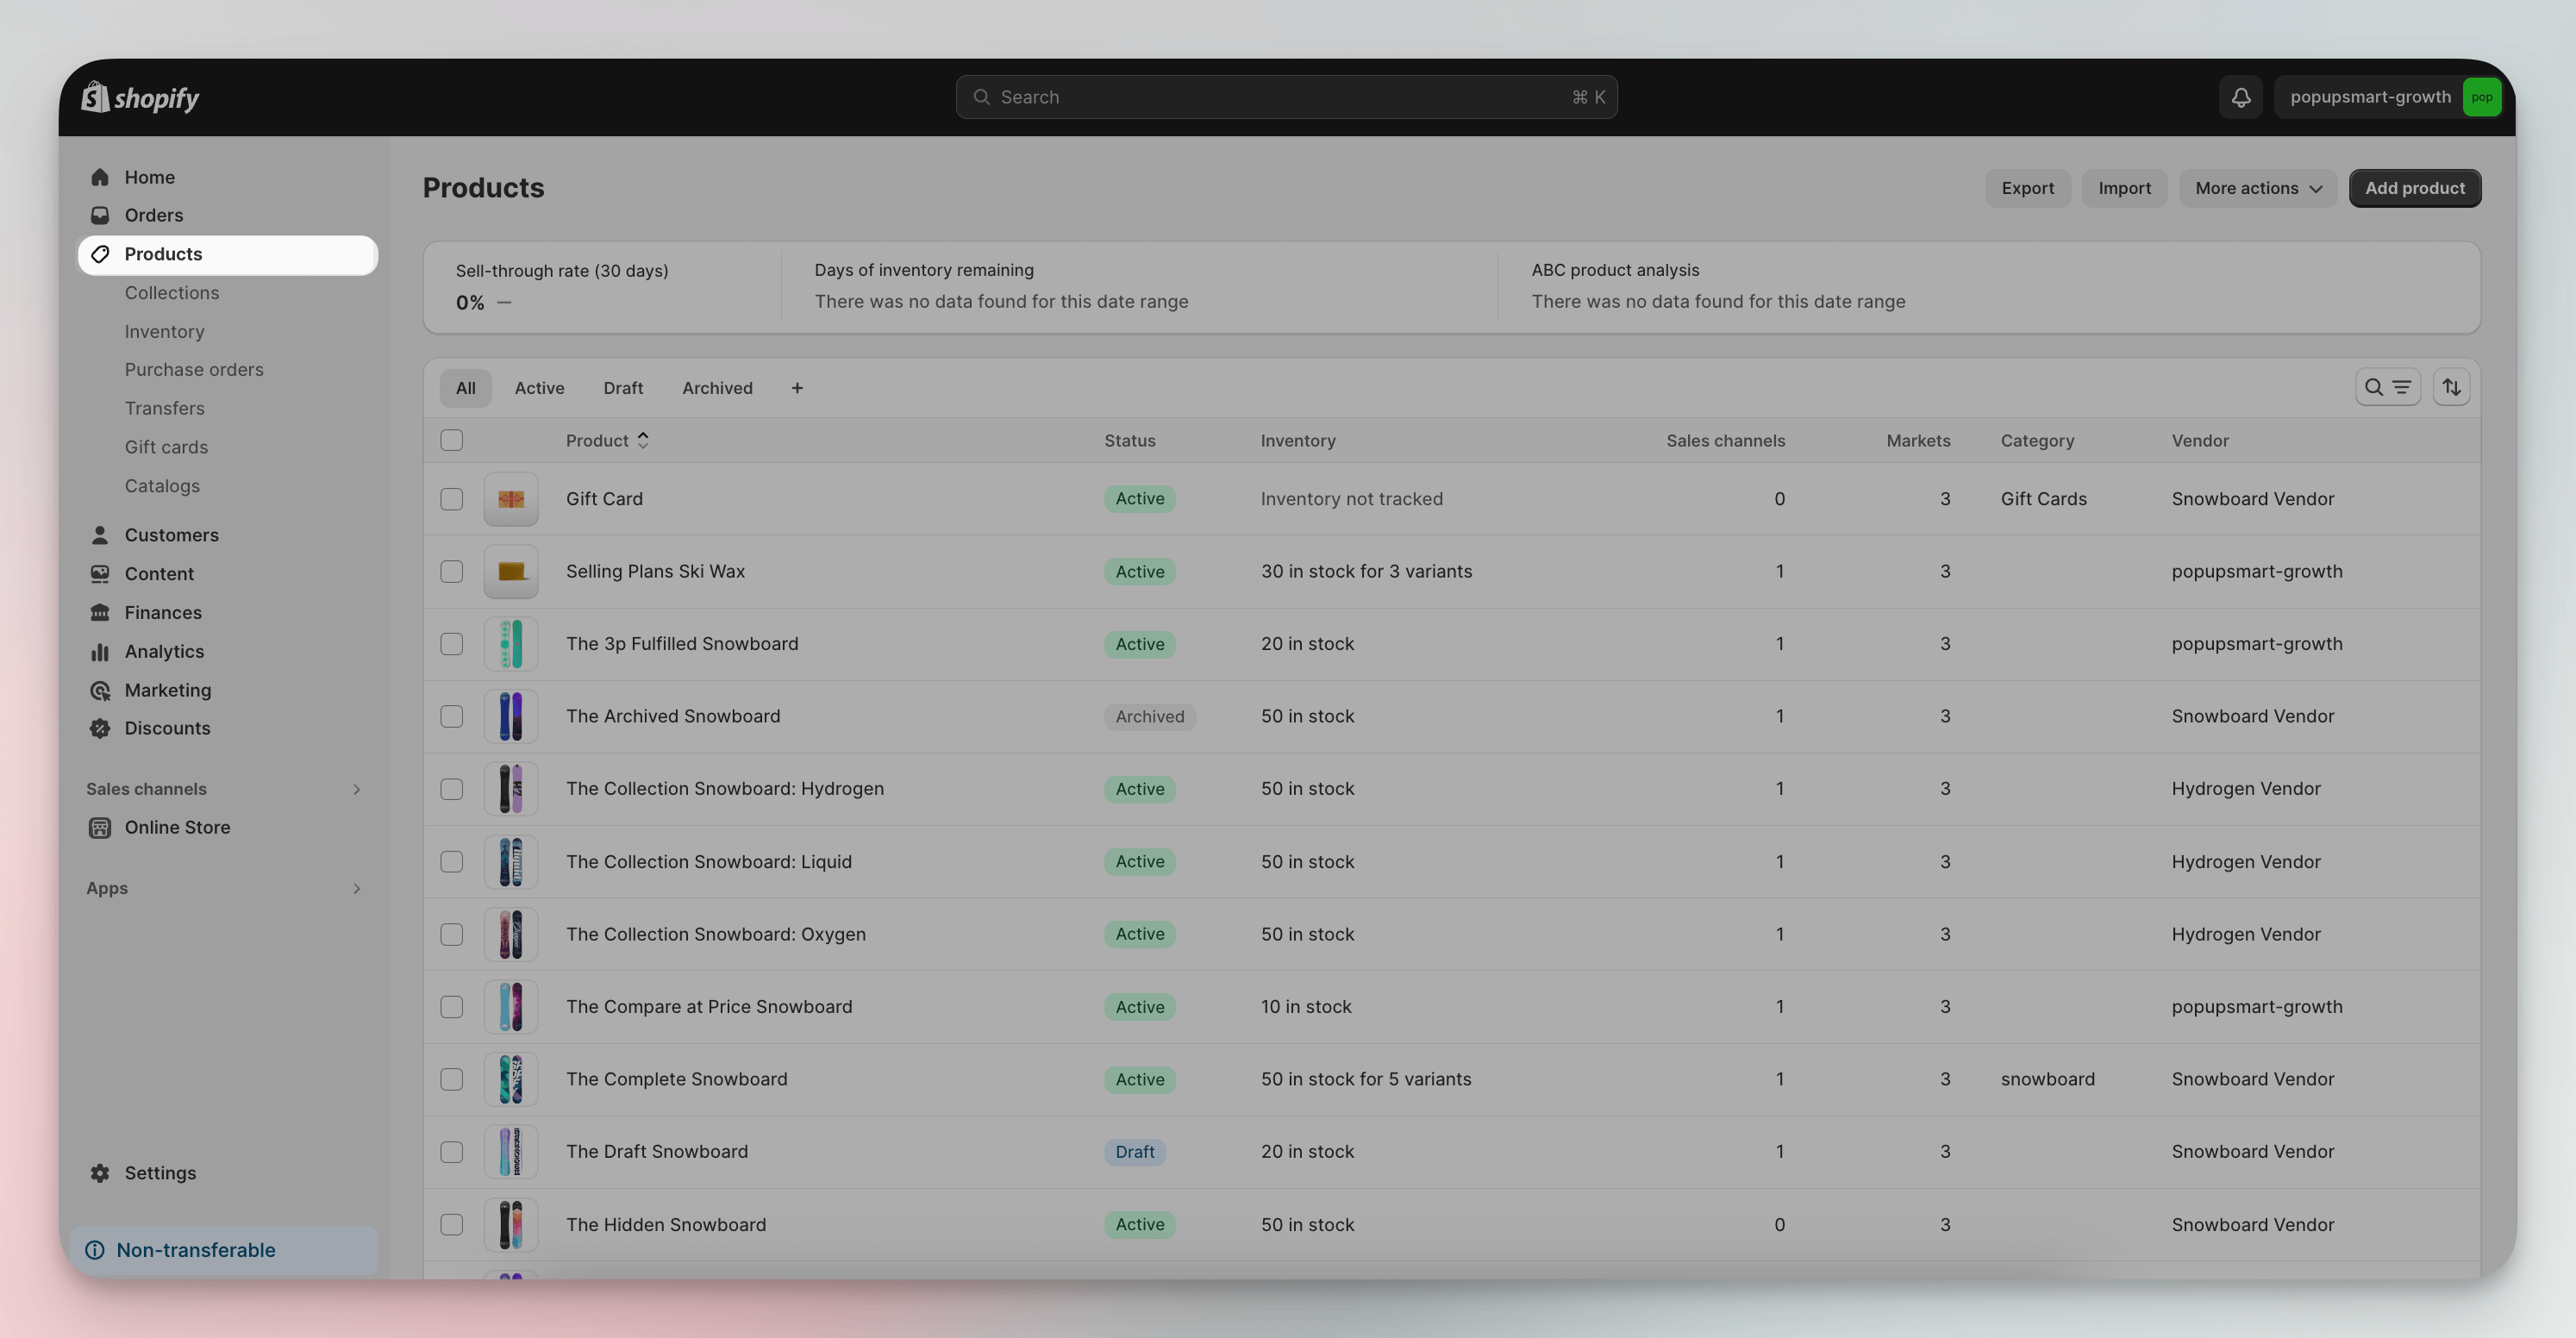
2. Click the product name to open its detail page.
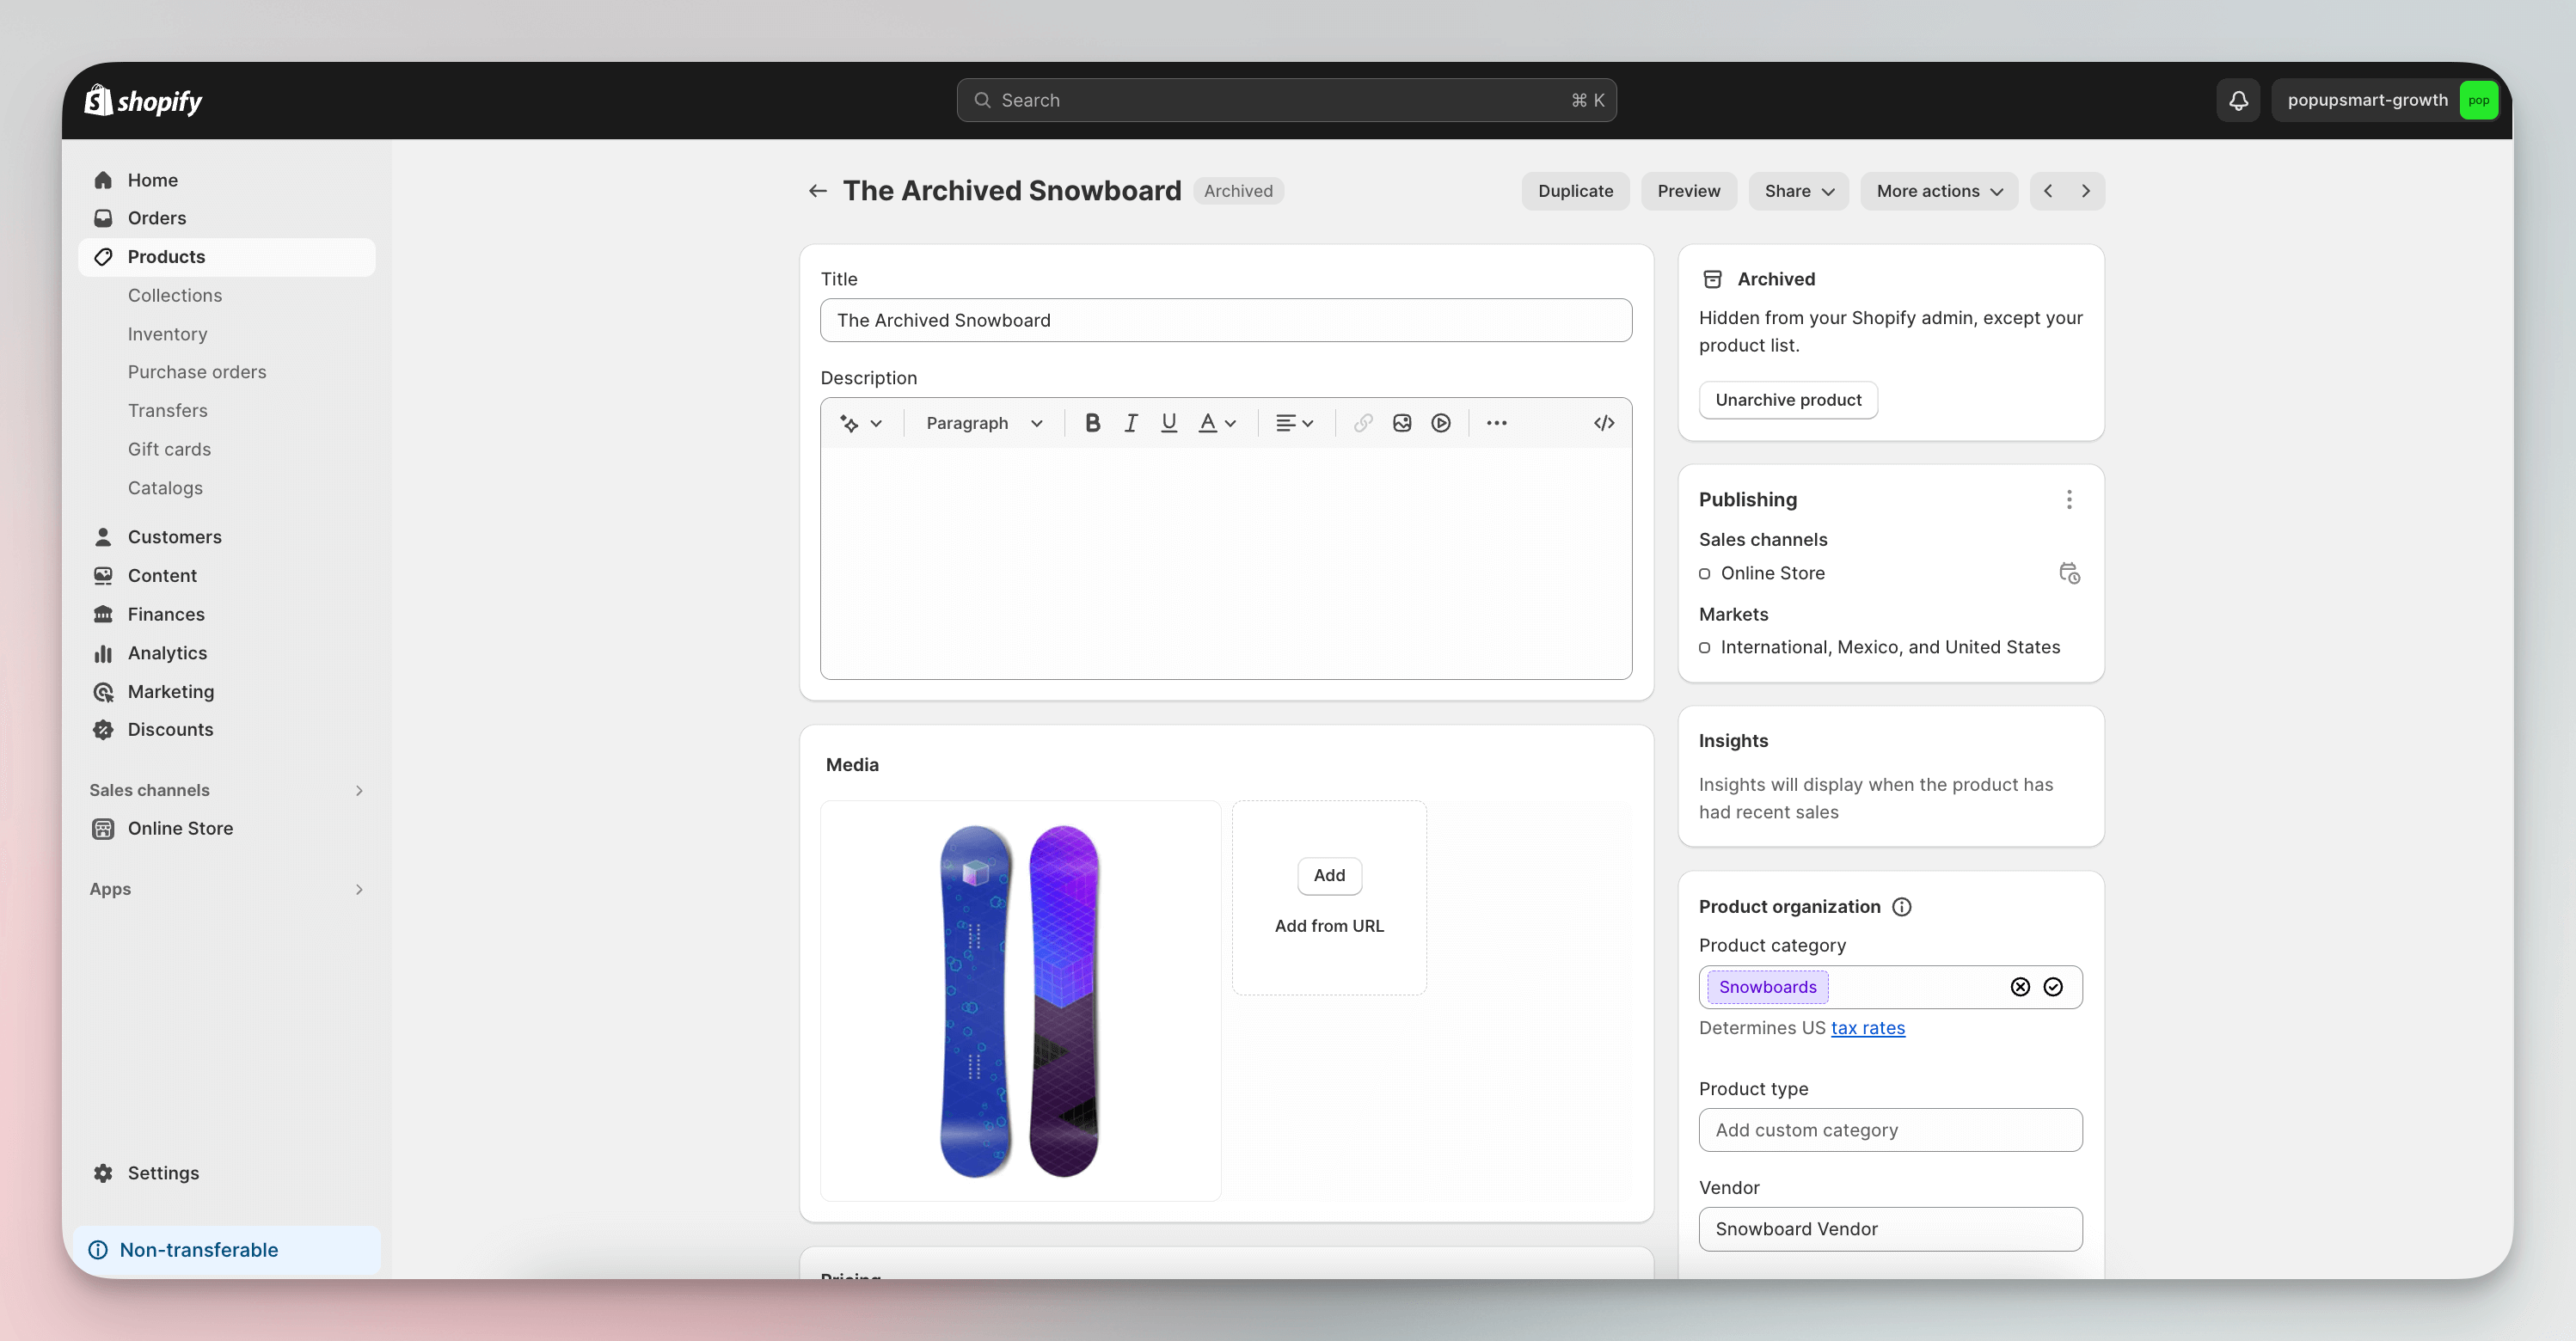
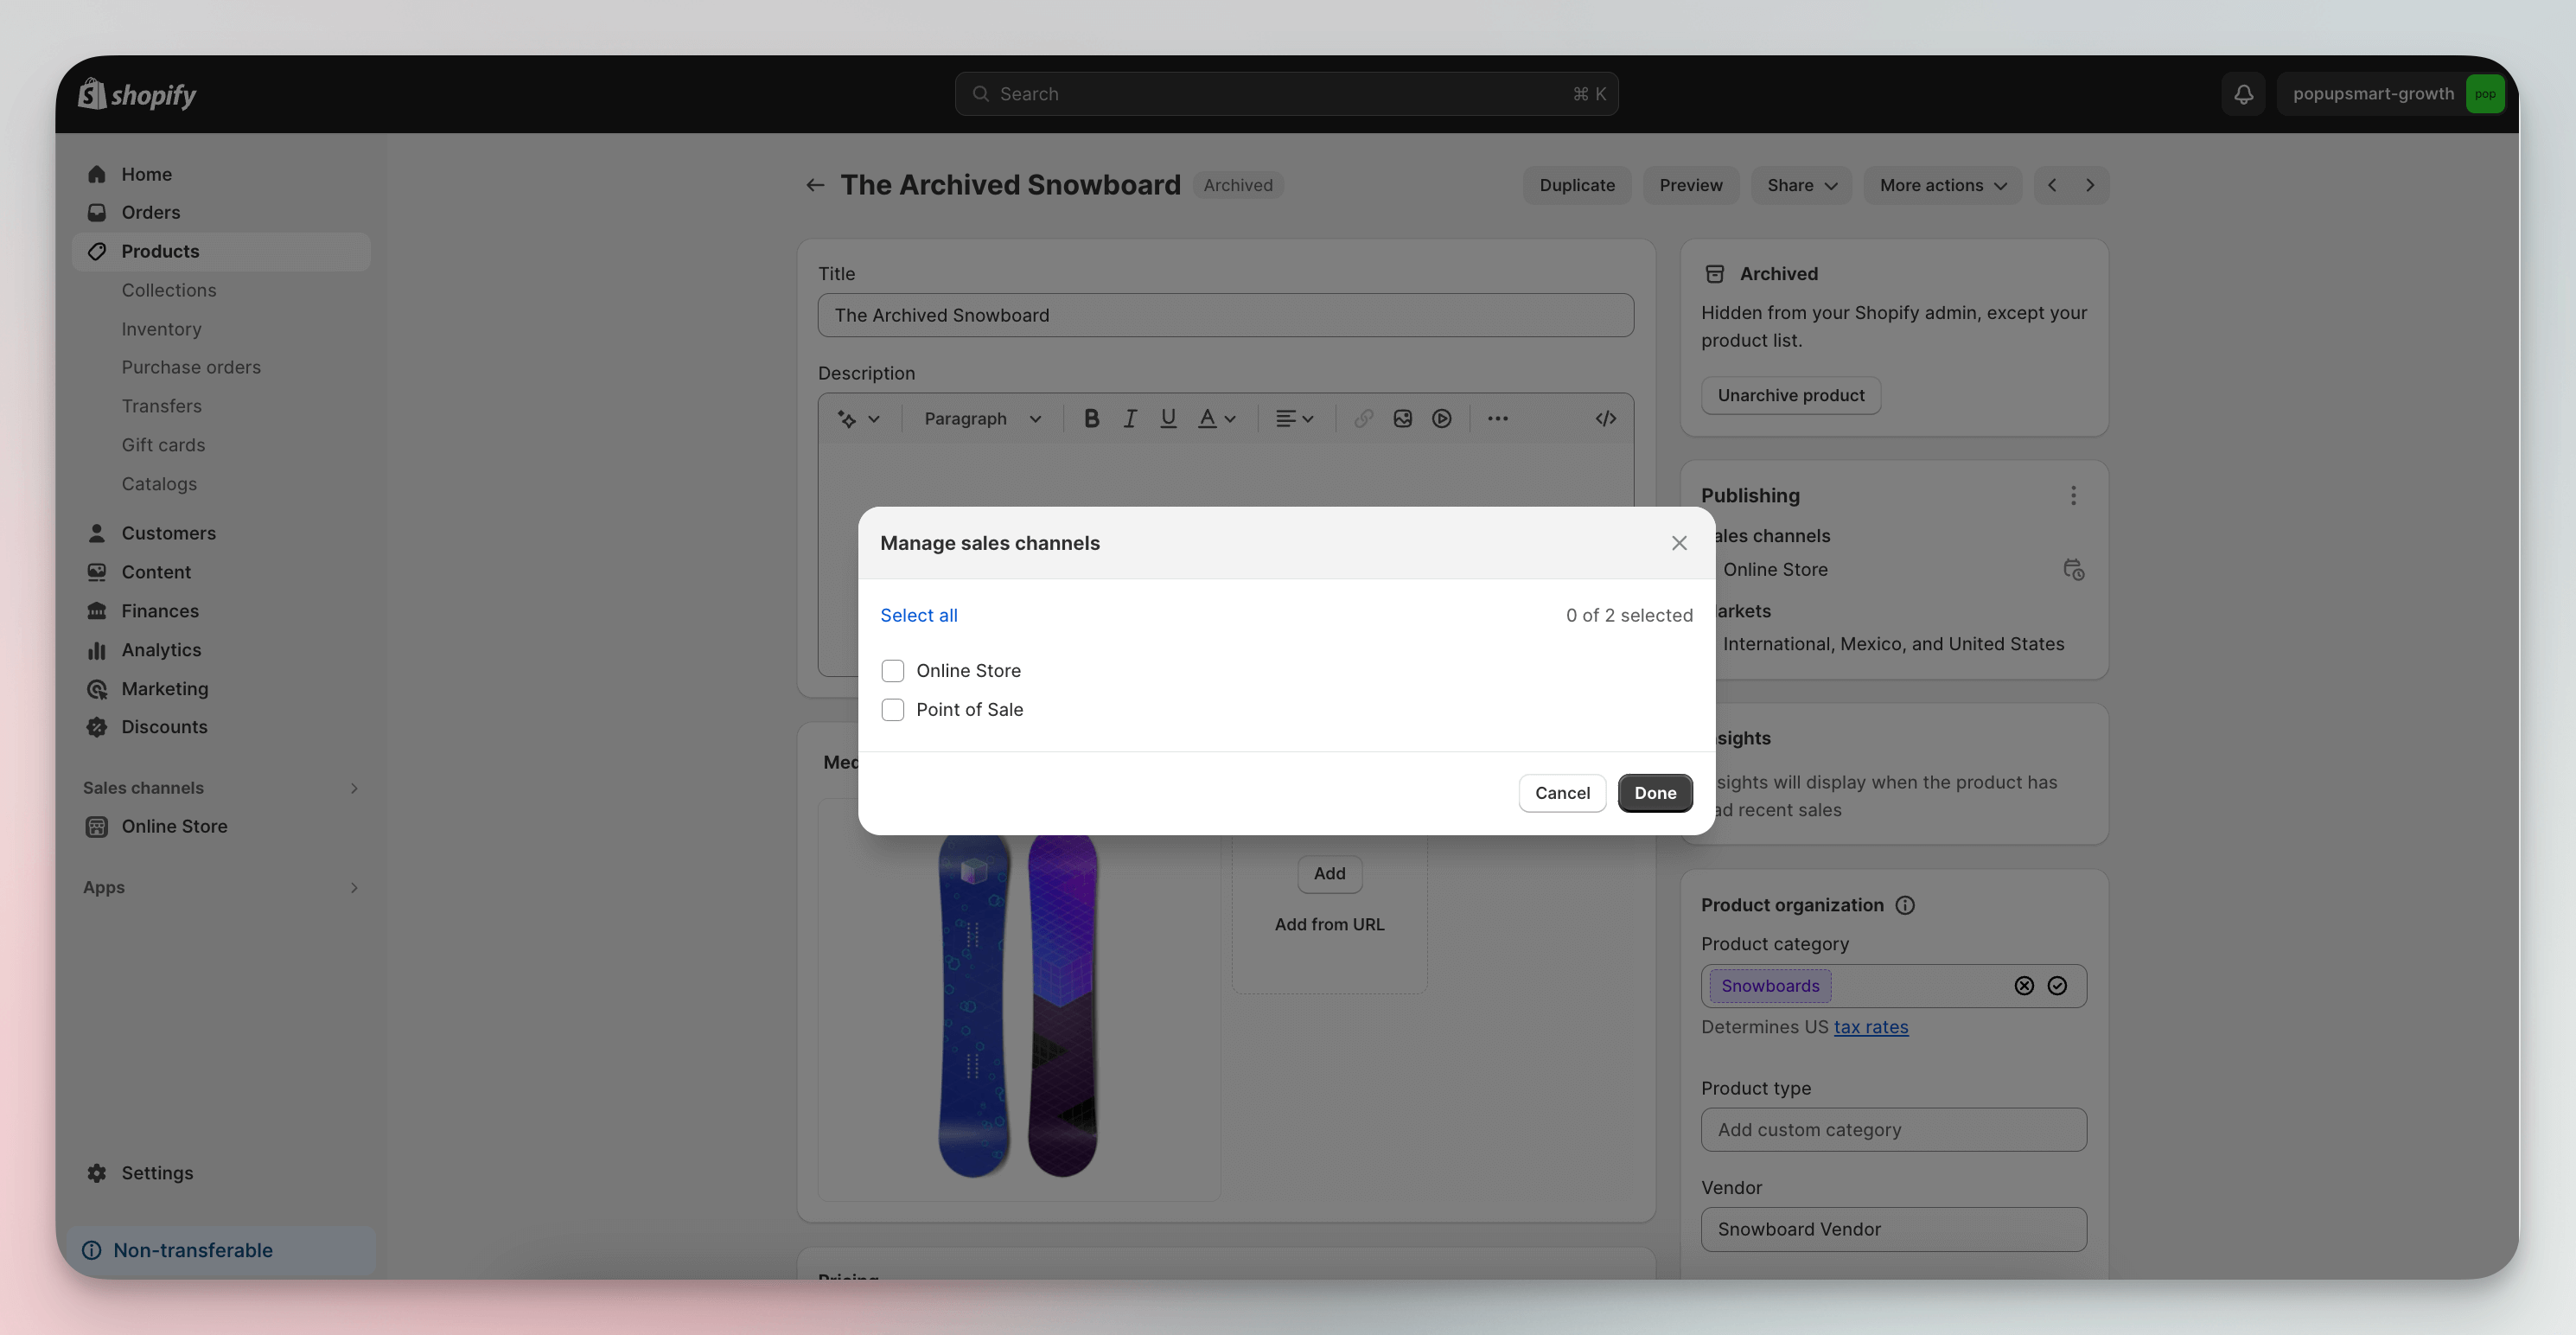
3. Scroll down to the Publishing section and find Sales channels.
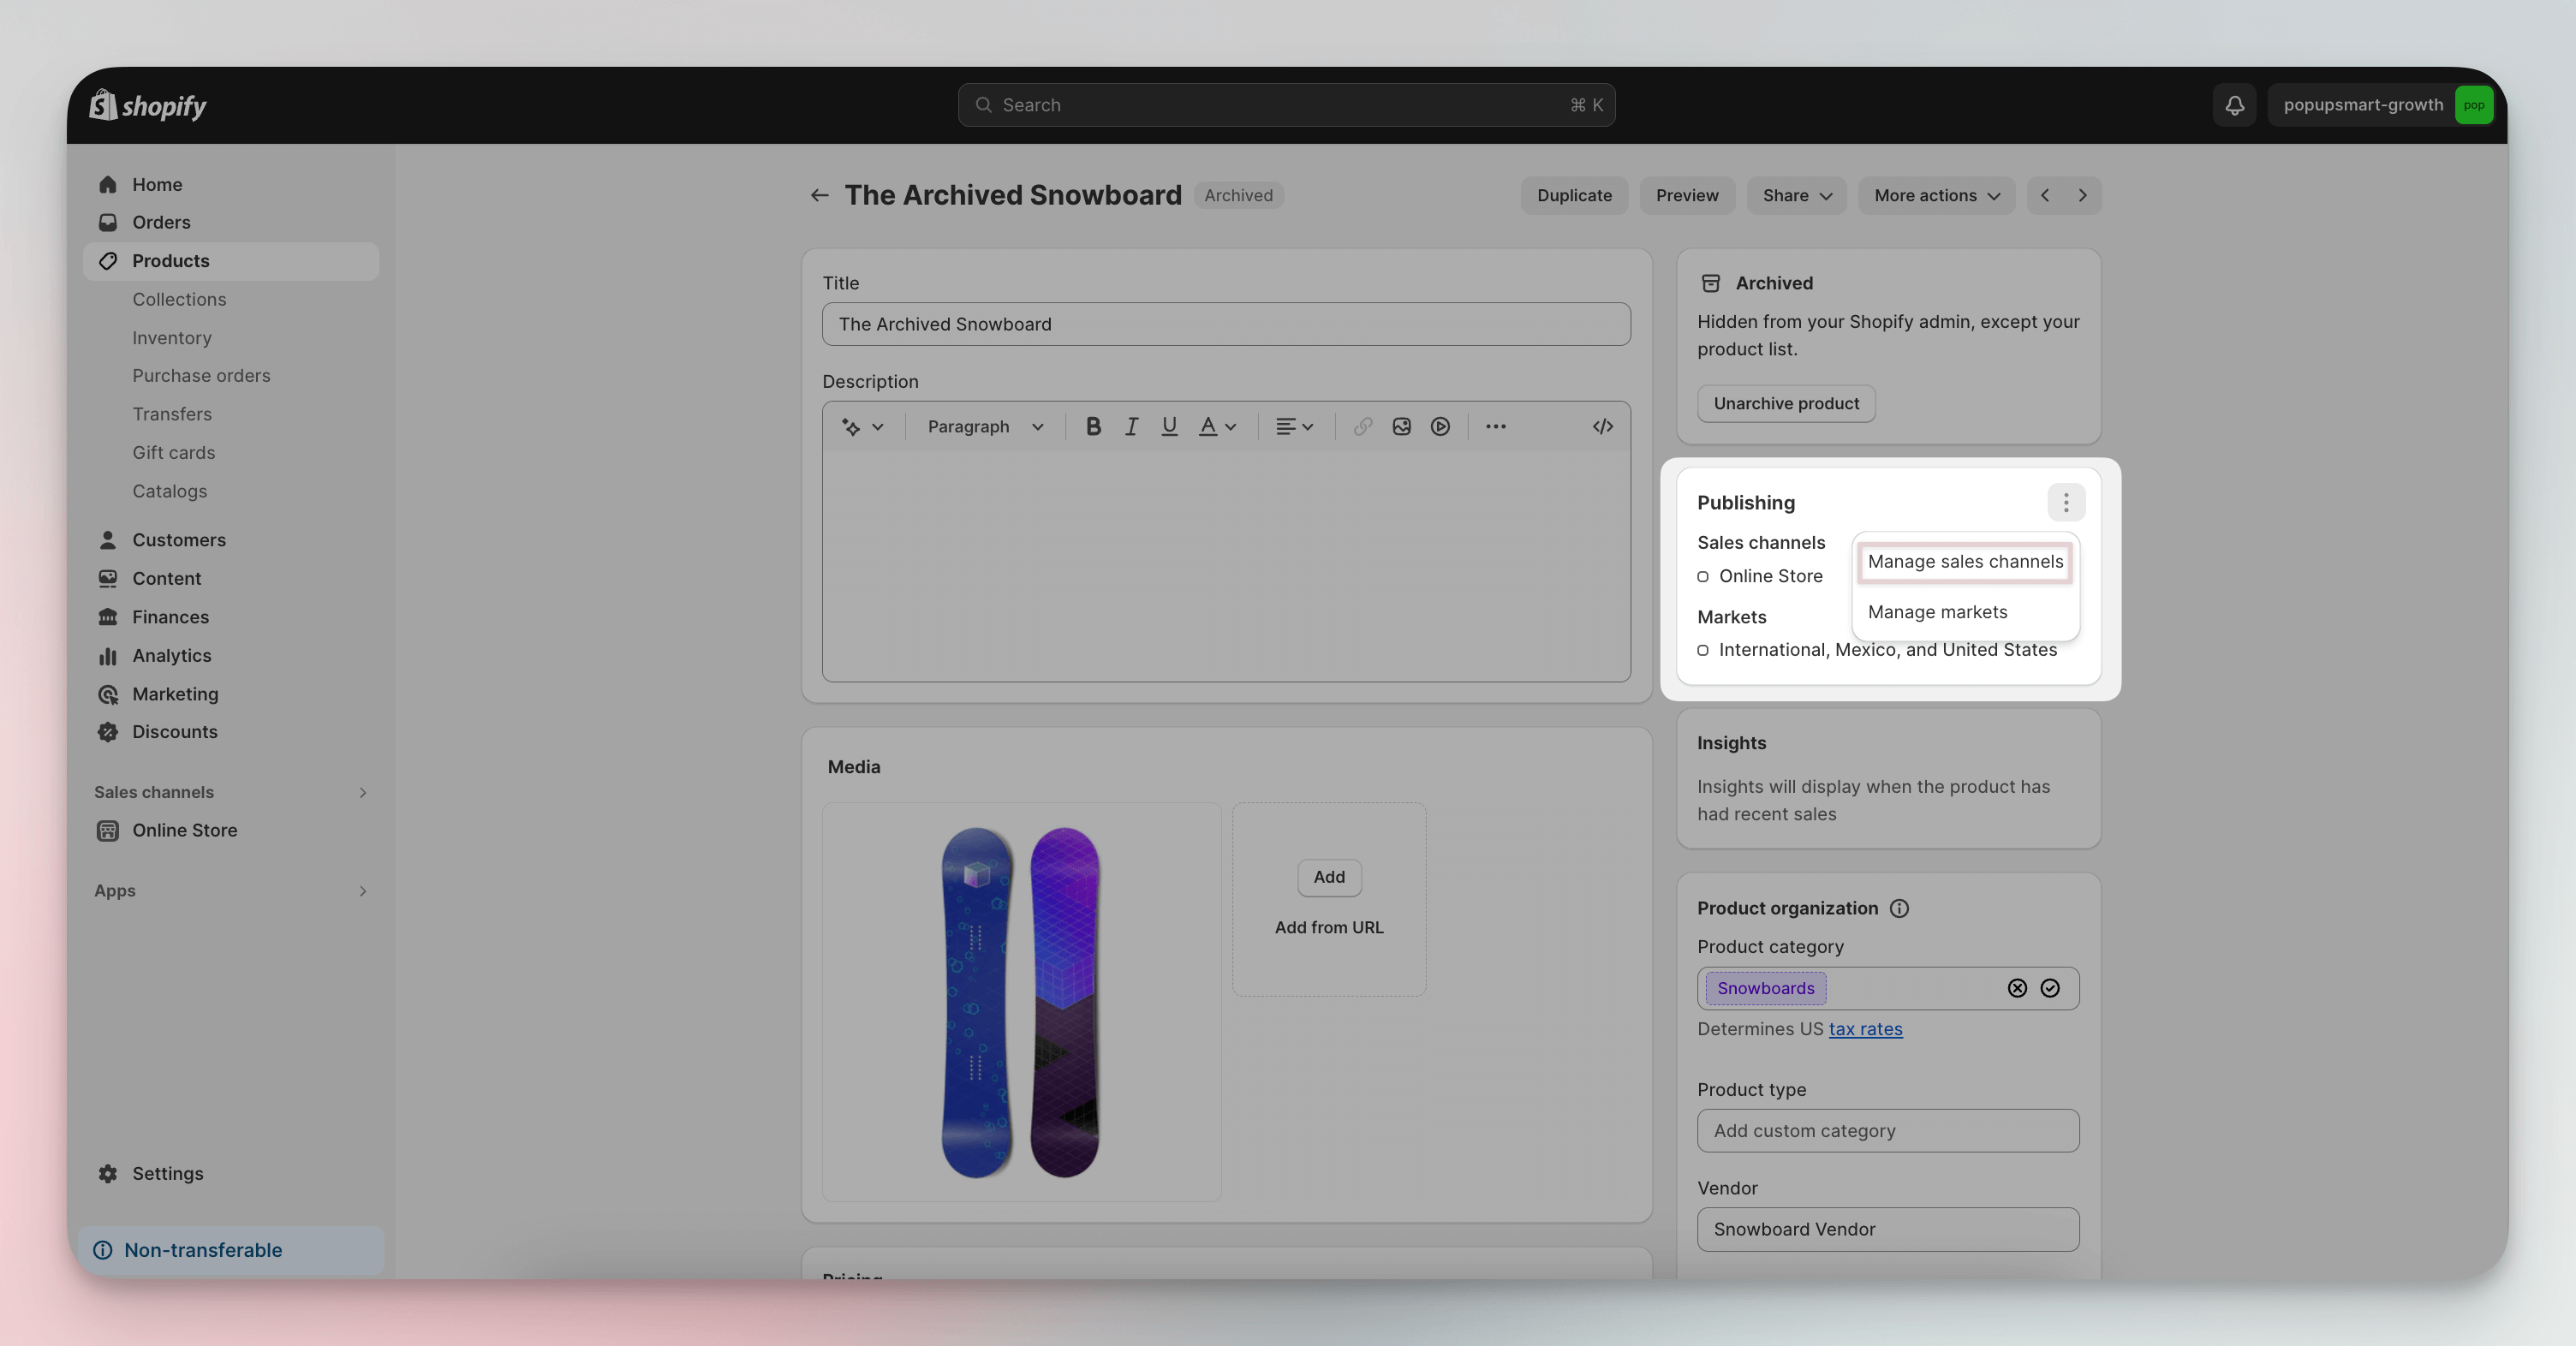
4. Uncheck Online Store (and any other channels where you don't want the product purchasable). Click Save.
Alternative: Set inventory to zero. Instead of removing from sales channels, you can set the product's inventory to 0 and enable "Continue selling when out of stock" set to off. The button will change to "Sold Out" and become unclickable.
You'll know it's working when: Visiting the product URL either returns a 404 page (if removed from the Online Store channel entirely) or shows the product with a grayed-out "Sold Out" button (if you set inventory to zero). Check by visiting the direct product URL while logged out of your admin.
Watch out for:
• SEO impact of removing products from the Online Store channel: If Google has already indexed the product page, making it return a 404 means you lose any search equity on that URL. If you want the page to stay indexed (for SEO value or future restocking), use Method 2 or Method 4 instead, which hide the button without removing the page.
• Broken links from other pages: If the product is featured in collections, blog posts, or homepage sections, removing it from the Online Store channel creates dead links. Audit your internal links before making the change, especially if the product appears in your Shopify collections.
What to Do After Removing the Add to Cart Button on Shopify
The button is gone. Now what? Removing the "Add to Cart" button changes how visitors interact with your product pages, and you need a replacement strategy to keep those visitors engaged.
Replace with a lead capture CTA. If your goal is lead generation, add a "Request a Quote," "Contact Us," or "Notify Me" button where the cart button used to be. Pair it with a lead generation popup that triggers after a visitor spends 10+ seconds on the product page.
Add a pre-order or waitlist option. For coming-soon products, a "Join the Waitlist" button collects emails and gauges demand before launch. Shopify's built-in pre-order feature or third-party apps can handle this.
Monitor your analytics closely. After making the change, track these metrics for at least 2 weeks:
| Metric | What to Watch For | Where to Check |
|---|---|---|
| Bounce rate on product pages | Increase above 70% signals confusion | Shopify Analytics > Reports |
| Time on product page | Should stay consistent or increase | Google Analytics > Engagement |
| Contact form submissions | Should increase if you added a CTA | Your form tool's dashboard |
| Returning visitors | Track if people come back for restocked items | Shopify Analytics > Reports |
According to Shopify conversion rate data, the average store converts at 1.4%. If removing the cart button drops your conversion rate significantly, you may need to reconsider your approach or add stronger alternative CTAs.
Communicate the change to visitors. Don't leave shoppers confused. If the button is gone, explain why. A short line of text like "This item is available by request only — contact us for pricing" prevents frustration and sets expectations.
Common Mistakes When Removing the Add to Cart Button on Shopify
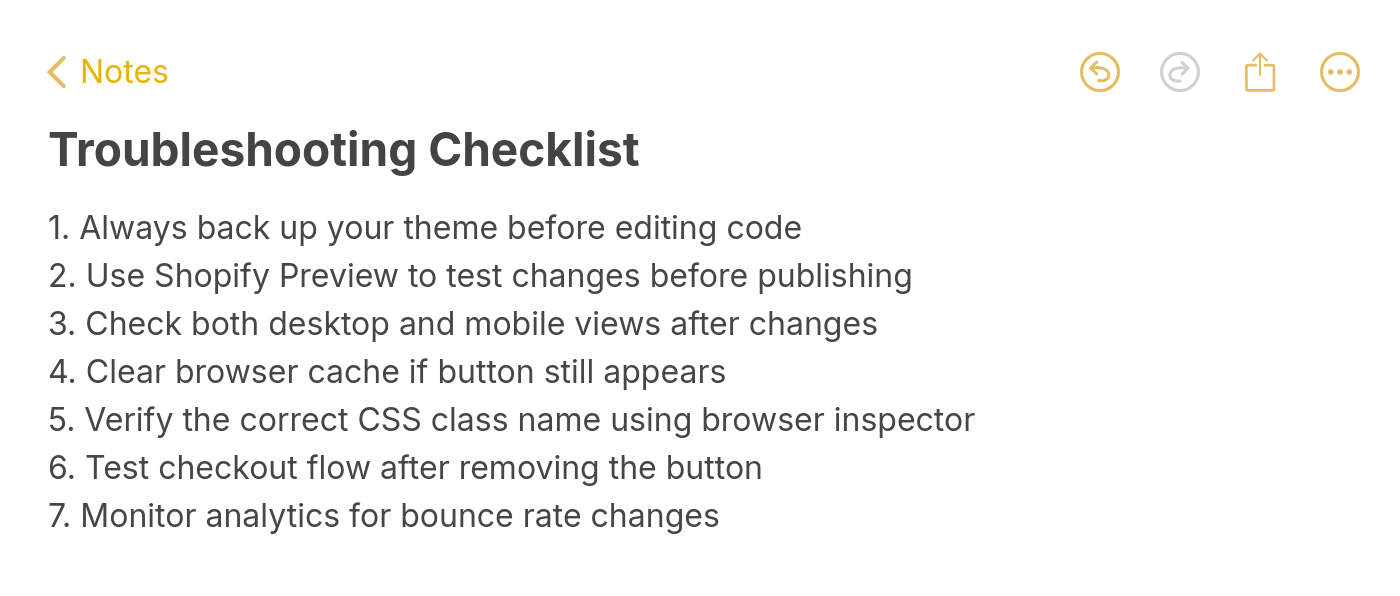
Troubleshooting Checklist After Removing the Add to Cart Button
Problem: The button disappears on desktop but still shows on mobile.
This happens when themes use separate CSS files or media queries for mobile layouts. The fix: add your CSS rule with !important and verify it's not inside a desktop-only media query. Test on an actual phone, not just the browser's responsive mode, since some themes load different assets on mobile devices.
Problem: The product page throws a Liquid error after editing code.
You likely have an unclosed tag or commented out too much code. Go back to the theme editor, find the file you edited, and check for matching open/close tags. If you can't find the issue, revert to your backup theme (you made one, right?) by going to Online Store > Themes and publishing the backup copy.
Problem: The "Buy it now" button still appears after removing "Add to Cart."
Shopify's dynamic checkout button is a separate element. In your theme's Liquid code, search for payment-button or shopify-payment-button and comment it out. For the CSS approach, add: .shopify-payment-button { display: none; }
Problem: An app you installed doesn't hide the button on your theme.
Some apps rely on specific HTML structures that differ between themes. Check the app's documentation for theme compatibility, or contact their support with your theme name and version. If the app doesn't support your theme, fall back to Method 1 or Method 2.
Problem: Customers can still add products to cart through direct URL manipulation.
Hiding the button only removes the visual element. A tech-savvy customer could still POST to your cart endpoint. If you need to fully prevent purchases, use Shopify's official product template approach or remove the product from sales channels entirely (Method 5).
Alternatives to the Add to Cart Button on Shopify
Removing the button doesn't mean removing all interaction. Here are practical replacements that keep visitors engaged:
• Pre-order button: Let customers reserve upcoming products. Shopify supports this natively for eligible stores.
• "Notify me when available" button: Collects email addresses for restocked products. Builds your list while keeping customer interest alive.
• Request a quote form: Ideal for B2B, wholesale, or custom products. Replaces impulse purchases with qualified inquiries.
• Contact or inquiry redirect: Send shoppers to a conversion-optimized page with a form or live chat widget.
• Countdown timer: For time-limited offers, a countdown creates urgency and can pair with an "Add to Cart" button that only appears when the timer hits zero.
• Popup with exit-intent trigger: Use a Shopify exit intent popup to capture visitors who are about to leave product pages without taking action.
Wrapping Up
Removing the "Add to Cart" button on Shopify isn't complicated, but picking the wrong method for your situation can create problems down the line. Here's the quick decision framework:
• Need a fast, reversible change? Use CSS (Method 2).
• Want different behavior per product? Use conditional Liquid logic (Method 4).
• Not comfortable with code? Install an app (Method 3).
• Need a permanent, clean removal? Edit the Liquid template (Method 1).
• Discontinuing the product entirely? Set it as unavailable (Method 5).
Whatever method you choose, always back up your theme first and test on a preview before publishing. And don't just remove the button without a plan for what replaces it. A product page with no call to action is a dead end for your visitors.
If you're replacing the cart button with a lead capture form or a "Contact Us" popup, Popupsmart's popup builder can help you set that up in minutes without touching your theme code. It's a solid option for Shopify stores that need to convert product page traffic into leads instead of direct sales.
Frequently Asked Questions
How Do I Edit the Add to Cart Button in Shopify?
To change the button's text (not remove it), go to Online Store > Themes > Edit code and search for the button element in your product template file. Change the text between the <button> tags to whatever you'd like: "Pre-Order Now," "Request a Quote," or "Contact for Pricing." In Dawn themes, you can also change button text through the Theme Editor > Sections > Product information > Buy buttons settings without code.
How Do I Get Rid of the Cart Icon on Shopify Checkout?
The cart icon in the header is separate from the "Add to Cart" button on product pages. To hide it, find your theme's header.liquid file (usually in the Sections folder) and search for the cart icon element. It's typically an SVG or icon font inside an anchor tag linking to /cart. Comment it out with Liquid tags, or use CSS: .header__icon--cart { display: none; } The exact class name depends on your theme.
How to Disable Add to Cart on Specific Shopify Products?
Use conditional logic in your Liquid code (Method 4 in this guide). Tag the products you want to hide the button for with a custom tag like "hide-cart," then wrap the button code with {% unless product.tags contains 'hide-cart' %} and {% endunless %}. This lets your team toggle the button on and off for individual products by adding or removing the tag in the Shopify admin. No code changes needed after the initial setup.
What Apps Help Remove the Add to Cart Button in Shopify?
EasyLockdown is the most popular option for wholesale and members-only stores. Out of Stock Police works best for automatically hiding buttons on sold-out items. Both integrate with Shopify's theme system without requiring code changes. Search the Shopify App Store for "hide add to cart" to find additional options that match your specific use case.
How to Hide the Add to Cart Button for Members-Only Shopify Stores?
Combine Shopify's customer account system with conditional Liquid logic. In your product template, check whether a customer is logged in using {% if customer %}. Visitors who aren't logged in see a "Log In to Purchase" message instead of the cart button. For more advanced access control (tiered memberships, wholesale pricing), apps like EasyLockdown or Locksmith can restrict entire collections or product pages to specific customer groups based on tags.

How would you rate your experience with this article? 😊