ChatGPT
 Perplexity
 Claude
 Grok
Grok Google AI Mode
A Shopify countdown timer is a live clock on your store that counts down to a deadline, such as the end of a sale or a launch.
What if we told you adding a countdown timer to your Shopify store can change your game positively?
Supposing that you want to create a campaign that aims to create a sense of urgency and your first go-to solution is a countdown timer.
Fair enough!
With an easy process to follow and practical steps, you can add your own countdown timer to prompt your visitors.
Here, we have two different processes that you can adopt and start now!
| Method | Where the timer shows | Cost | Best for |
|---|---|---|---|
| Theme section (this guide) | Inside a page: home, product, collection, password, or the header on every page | Free, part of your theme | One sale with one end date |
| Popupsmart countdown popup | In a popup over any page, with targeting | Popupsmart has a free plan | Showing the deadline only on some pages or to some visitors |
| A countdown app from the Shopify App Store | Depends on the app | Free and paid plans vary | Per-product timers without code |
Why Add a Countdown Timer to a Shopify Website?
Adding a countdown timer may provide benefit more than you think for several reasons.
We mean it and we reveal the importance of doing this for you.
- The Sense of Urgency: Creating FOMO is the number one reason to keep your visitors active.
- Special Offer Displaying: When you promote your products, countdown timer can be a good incentive to make people act.
- Sales and Conversion Rate Benefit: In the long term, you can lead your visitors to make sales and increase your conversion rate.
- Brand Loyalty and Trust Building: Since visitors will think that time-sensitive deals are present on your store, they can form a bond to support.
- Competition Advantage: When you urge your visitors to act once they see the countdown timer, you can get advantage over your competitors.
- Marketing Effort Measuring: You can evaluate your marketing efforts with countdown timers for your future actions.
- Impulse Buying Management: With the combination of sense of urgency and countdown timer impact, visitors are more likely to make purchases accordingly.
- Customer Engagement Contribution: Countdown timers are engaging whether it is on purpose or not. Therefore, visitors are made to engage with their contribution on your site.
There's a catch. A timer works when there is a real offer behind it, and the wording of urgency alone hasn't shown a measurable effect on popups. In Popupsmart's 2026 popup benchmark, "Button colour, dark vs light popup backgrounds, urgency words and question headlines show no measurable effect on conversion; the data are too noisy to rule out modest effects." The offer did show up in the numbers: signup popups that offer a discount code convert 1.46% vs 0.75% for signup popups without one (median campaign).
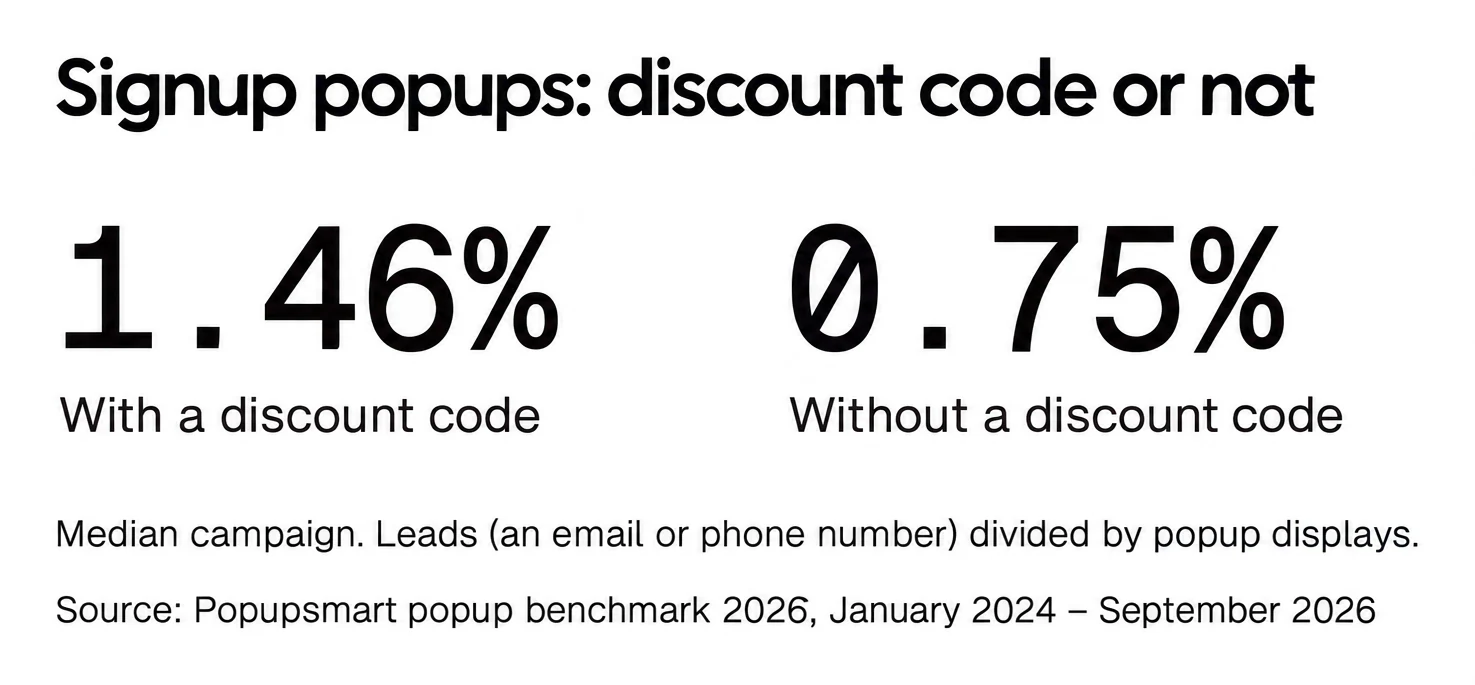
We read that as a rule for timers: the clock frames an offer, it doesn't replace one. If you need offer ideas first, our discount popup examples and limited-time offer examples are a good start.
Use a real end date, not a timer that resets
A countdown timer is honest when it ends at the same moment for every shopper. A timer that restarts for each visitor (an "evergreen" timer that always shows 15:00 left) is fake urgency: the deadline isn't real, and a shopper who comes back tomorrow sees the same 15 minutes.
Take a sale that ends on Monday 30 November at 23:59. With a fixed end date, a shopper who arrives on Friday sees about 3 days left and one who arrives on Sunday sees 1 day left. With a resetting timer, both see 15:00 left, every visit.
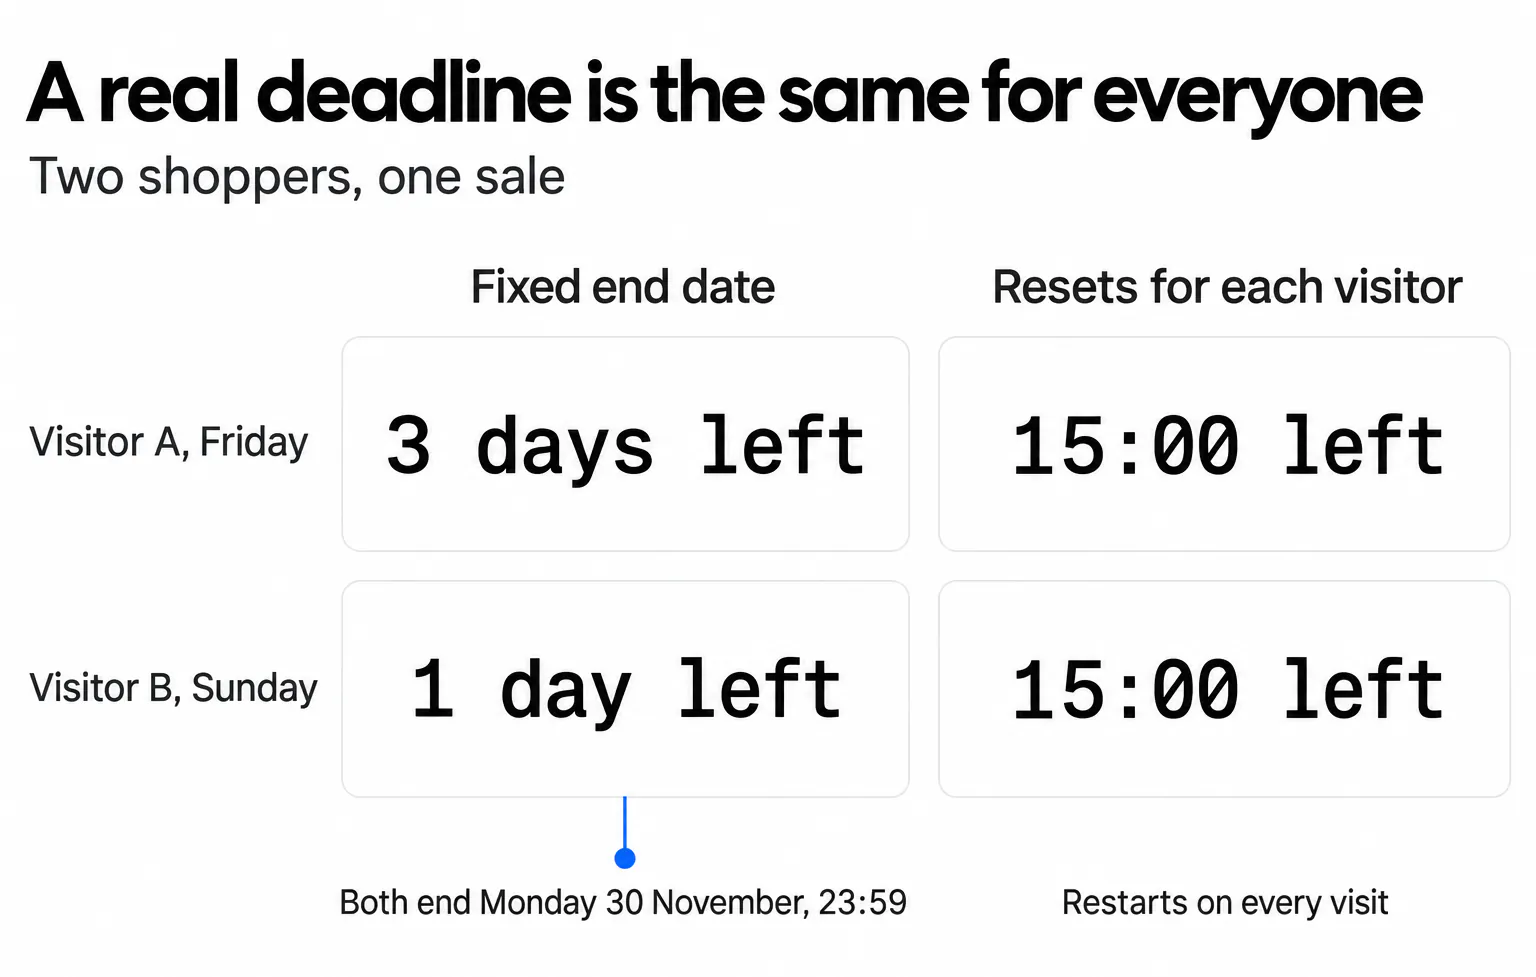
Two habits keep a timer honest. Give the discount the same end date as the timer, so the offer ends when the clock does. And take the timer down after the sale; a clock stuck at zero, or one quietly moved to next week, tells shoppers the first deadline wasn't real. The UK rule is in Schedule 20 of the DMCC Act 2024.
The only honest per-visitor timer is one whose offer expires for that visitor too, such as a single-use code that stops working when its clock reaches zero. Shopify's own discount codes end on a calendar date, so with them, use a fixed end date.
Add a Countdown Timer to Shopify
It is possible to see that to add countdown timer to Shopify can take a few minutes and actions of yours.
Here is the process you can move forward. It adds the timer as a theme section, so you never edit theme.liquid, and it works on Online Store 2.0 themes such as Dawn. We checked the code against Shopify's theme documentation and Dawn 16.0.0, the current version in October 2026.
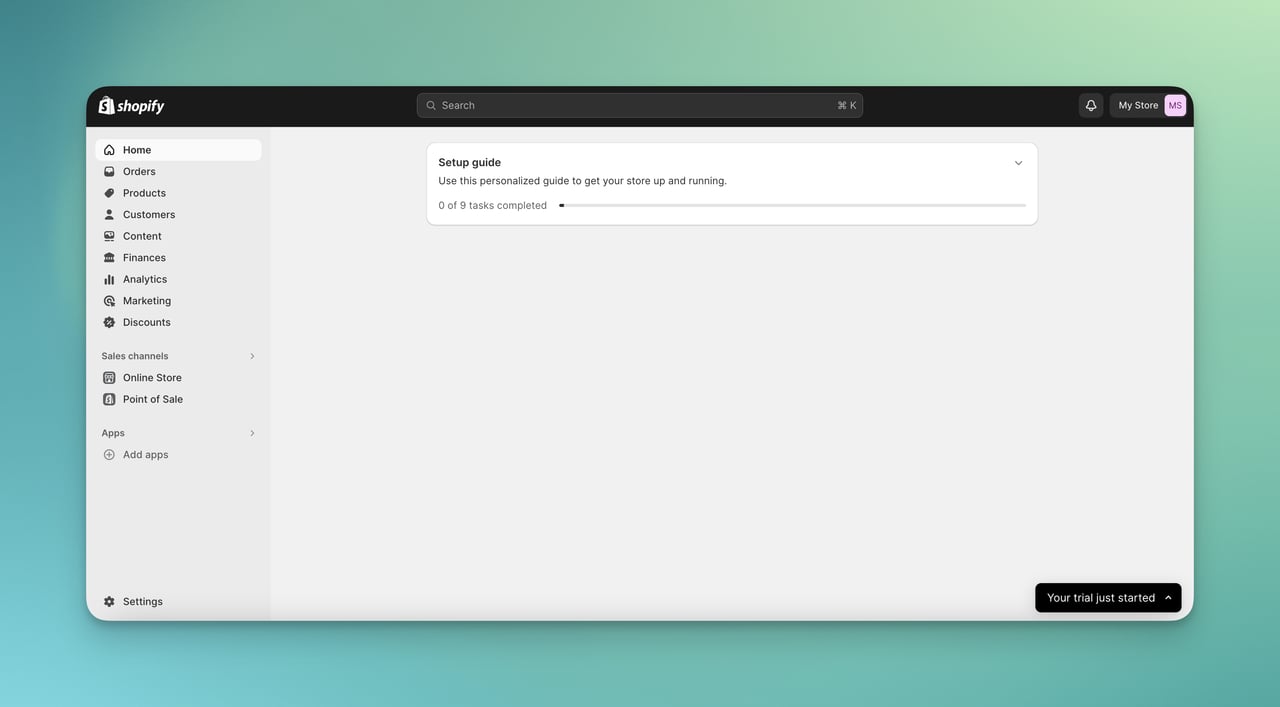
Step 1. Go to Your Shopify Admin Panel.
By logging into your Shopify account, you can view your admin panel of your Shopify store.
Step 2. Click “Online Store” under Sales Channels and Choose “Themes.”
On the left sidebar, you can find both Online Store and Sales channels to reach Themes.
Once you click on it, you will be able to view your store as well.

Step 3. Choose three dots and find “Edit code” to Continue.
The main theme should be edited, so you need to go forward with editing the code.
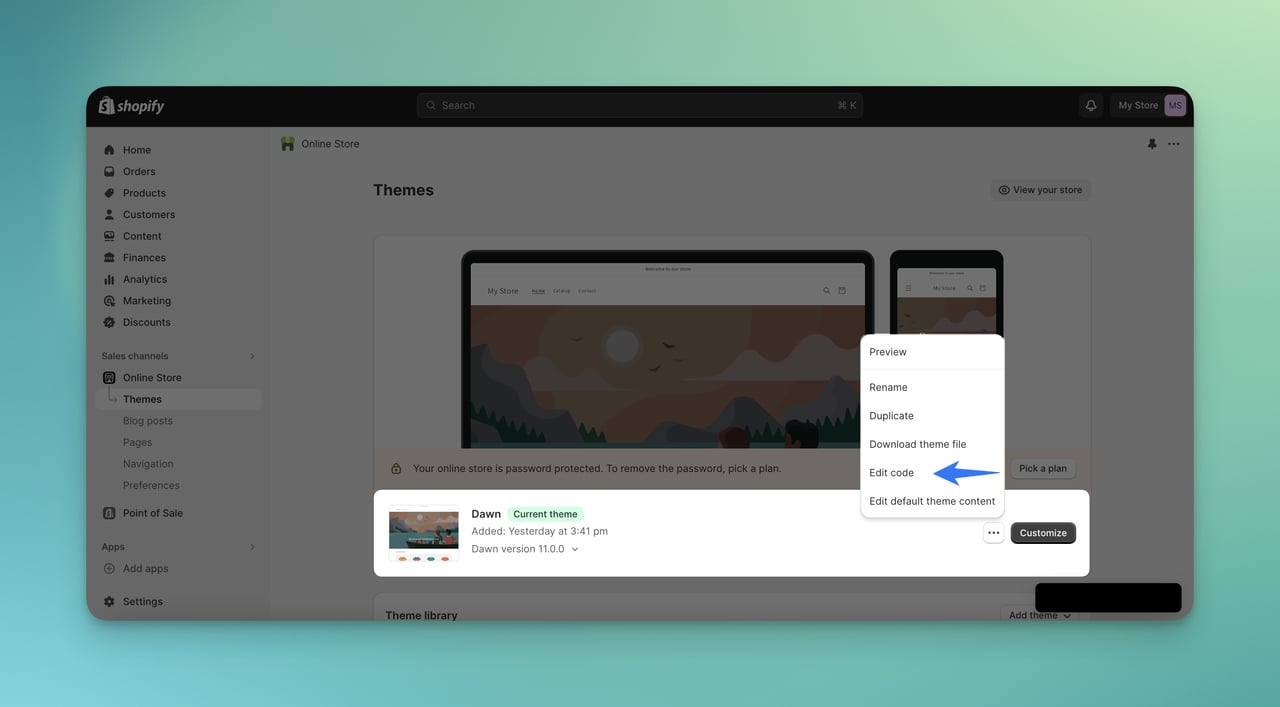
Step 4. In the editor, add a new file to the Sections folder
There are different folders on the left sidebar. Right-click the Sections folder, choose New file…, type countdown-timer.liquid and press Enter. These are the steps in Shopify's help center guide to editing theme code.
A section is the right home for the timer because you can add, move and remove sections in the theme editor without touching code again. Earlier versions of this guide used a snippet plus an {% include %} tag; Shopify has deprecated include, and a section needs neither.
Step 5. Paste the Following Code and Click “Save.”
This code will help you create your own countdown timer on Shopify.
{% comment %}
  Countdown timer section for Online Store 2.0 themes.
  It counts down to one fixed end date, so every visitor sees the same deadline.
  Checked against Shopify's theme docs and Dawn 16.0.0, October 2026.
{% endcomment %}

{%- assign end_date = section.settings.end_date | strip -%}

{%- if end_date != blank -%}
  <div class="countdown-timer page-width">
    {%- if section.settings.heading != blank -%}
      <h2 class="countdown-timer__heading" id="CountdownHeading-{{ section.id }}">
        {{- section.settings.heading | escape -}}
      </h2>
    {%- endif -%}

    <countdown-timer
      data-end="{{ end_date | escape }}"
      data-ended-text="{{ section.settings.ended_text | escape }}"
    >
      <div
        class="countdown-timer__clock"
        role="timer"
        {% if section.settings.heading != blank %}
          aria-labelledby="CountdownHeading-{{ section.id }}"
        {% else %}
          aria-label="Countdown"
        {% endif %}
      >
        <span class="countdown-timer__unit"><span data-unit="days">--</span> Days</span>
        <span class="countdown-timer__unit"><span data-unit="hours">--</span> Hours</span>
        <span class="countdown-timer__unit"><span data-unit="minutes">--</span> Minutes</span>
        <span class="countdown-timer__unit countdown-timer__unit--seconds"><span data-unit="seconds">--</span> Seconds</span>
      </div>
      <p class="countdown-timer__ended" role="status"></p>
    </countdown-timer>
  </div>
{%- elsif request.design_mode -%}
  <p class="countdown-timer page-width">Add an end date in this section's settings to show the timer.</p>
{%- endif -%}

{% stylesheet %}
  .countdown-timer {
    padding-block: 2rem;
    text-align: center;
  }

  .countdown-timer__clock {
    display: flex;
    flex-wrap: wrap;
    justify-content: center;
    gap: 0.5em 1.5em;
  }

  .countdown-timer__unit {
    display: flex;
    flex-direction: column;
    align-items: center;
  }

  .countdown-timer__unit [data-unit] {
    font-size: 2em;
    font-variant-numeric: tabular-nums;
    line-height: 1.2;
  }

  .countdown-timer [hidden] {
    display: none;
  }

  /* With reduced motion on, hide the seconds so the numbers change once a minute. */
  @media (prefers-reduced-motion: reduce) {
    .countdown-timer__unit--seconds {
      display: none;
    }
  }
{% endstylesheet %}

{% javascript %}
  if (!customElements.get('countdown-timer')) {
    class CountdownTimer extends HTMLElement {
      connectedCallback() {
        this.end = Date.parse(this.dataset.end);

        if (Number.isNaN(this.end)) {
          if (window.Shopify && Shopify.designMode) {
            this.textContent = 'Check the end date. Use this format: 2026-11-30T23:59:00-05:00';
          } else {
            this.hidden = true;
          }
          return;
        }

        this.tick();
        this.interval = setInterval(() => this.tick(), 1000);
      }

      disconnectedCallback() {
        clearInterval(this.interval);
      }

      tick() {
        // Recomputed from the clock on every tick, so a throttled background tab catches up.
        const secondsLeft = Math.ceil((this.end - Date.now()) / 1000);

        if (secondsLeft <= 0) {
          clearInterval(this.interval);
          this.finish();
          return;
        }

        this.show('days', Math.floor(secondsLeft / 86400));
        this.show('hours', Math.floor(secondsLeft / 3600) % 24);
        this.show('minutes', Math.floor(secondsLeft / 60) % 60);
        this.show('seconds', secondsLeft % 60);
      }

      show(unit, value) {
        const element = this.querySelector(`[data-unit="${unit}"]`);
        if (element) element.textContent = String(value).padStart(2, '0');
      }

      finish() {
        const message = this.dataset.endedText;

        if (!message) {
          this.closest('.countdown-timer').hidden = true;
          return;
        }

        this.querySelector('.countdown-timer__clock').hidden = true;
        this.querySelector('.countdown-timer__ended').textContent = message;
      }
    }

    customElements.define('countdown-timer', CountdownTimer);
  }
{% endjavascript %}

{% schema %}
{
  "name": "Countdown timer",
  "tag": "section",
  "class": "section",
  "settings": [
    {
      "type": "text",
      "id": "heading",
      "label": "Heading",
      "default": "Sale ends in"
    },
    {
      "type": "text",
      "id": "end_date",
      "label": "End date and time",
      "info": "Use this format, with your store's UTC offset: 2026-11-30T23:59:00-05:00"
    },
    {
      "type": "text",
      "id": "ended_text",
      "label": "Message after the deadline",
      "default": "This offer has ended.",
      "info": "Leave empty to hide the section when the timer reaches zero."
    }
  ],
  "presets": [
    {
      "name": "Countdown timer"
    }
  ]
}
{% endschema %}
What each part does:
- The markup shows the heading and four numbers. The numbers sit in a
role="timer"region named by the heading, which screen readers don't announce on every tick. - At zero, the numbers hide and your message goes into a
role="status"region, so screen readers announce it once. Leave the message empty and the whole section disappears instead. A date that has already passed never shows negative numbers. {% stylesheet %}and{% javascript %}are Shopify tags. Shopify bundles their contents once per section file and loads the script withdefer, so the timer doesn't slow the first render. The script defines acountdown-timerelement that starts its own clock and stops it when the theme editor removes or reloads the section, so two timers on one page run independently.- With reduced motion on, the seconds hide and the numbers change once a minute. That happens when a shopper has "reduce motion" switched on in their device settings. WCAG 2.2 success criterion 2.2.2 asks for a way to pause, stop, hide or slow auto-updating content like a ticking clock.
{% schema %}adds three settings (heading, end date, message after the deadline) and a preset. The preset is what puts Countdown timer in the theme editor's Add section list: per Shopify's section docs, "Section and block files must define presets in their schema to support being added to JSON templates using the theme editor."- The
escapefilter keeps the heading safe: HTML typed into the setting shows as text and never runs.
We ran the file through Shopify's Theme Check on Dawn 16.0.0 with no warnings or errors, and tested the HTML and JavaScript it outputs in Chromium and in WebKit, the engine behind Safari, in October 2026. Liquid itself only runs on Shopify, so preview the section in your theme editor before you publish.
snippets/countdown-timer.liquid and its {% include %} line, then add the section above.Step 6. Determine where you will show your countdown timer and add the section there
The page option depends on you, whether that be a product page or homepage, the decision is yours to display.
All you need to do is to decide and add the section:
-
Go back to Online Store > Themes and click Customize next to your theme.
-
Use the page selector at the top to open the page you want: the home page, a product template, a collection template or the password page.
-
In the left sidebar, click Add section and choose Countdown timer.
-
Drag the section to where you want it, for example right under the product details or above the footer.
-
Fill in the heading and the end date, then click Save.
You'll know it's working when: the preview shows the numbers counting down. To test the ending, enter an end date two minutes ahead: the clock should switch to your message when it reaches zero. Then put the real date back.
Step 7. Set the end date and end the discount at the same time
Shopify's theme settings have no date picker, so the end date is a text field. Type it in this format, with your store's offset from UTC at the end:
2026-11-30T23:59:00-05:00
That is 30 November 2026 at 23:59 in New York. A store in Istanbul uses +03:00 all year, and Z means UTC.
The end date should be changed based on the time that you want to keep your countdown timer.
Then end the offer itself at the same moment: in your Shopify admin, open Discounts, choose the discount, and under Active dates tick Set end date and enter the same date and time.
-04:00 before that date and -05:00 after it. A wrong offset moves the deadline by an hour.Watch out for:
- A date the browser can't read: in the theme editor the timer shows the expected format; on the live store it hides itself rather than showing nonsense.
- Theme updates: Shopify warns that when your code changes are incompatible with a theme update, "all your code changes are removed in the updated copy". Keep a copy of
countdown-timer.liquid. - Older themes: a vintage (pre-2.0) theme can't add sections to most pages from the theme editor. There, a countdown popup or an app is the simpler route.
How to Add a Countdown Timer to Shopify with Popupsmart
A countdown timer popup is a popup with a live clock that counts down to a deadline, such as the end of a sale. It opens over any page you choose, so you can show the deadline only where it matters.
No coding, no rush, no effort. It is easier than ever.
Since you have a website on Shopify, you can add Popupsmart app on Shopify App Store and start using it without touching your theme code.
How about providing the countdown timer? Here is the process, following Popupsmart's guide to getting started with the Shopify app!
Step 1. Find “Popupsmart” App on Your Shopify Admin Panel.
Since you have a Shopify store, you are more likely to reach Popupsmart Shopify app easier. Click Install and approve the permissions. Popupsmart creates your account, connects it to your store and imports your store's fonts and colors.
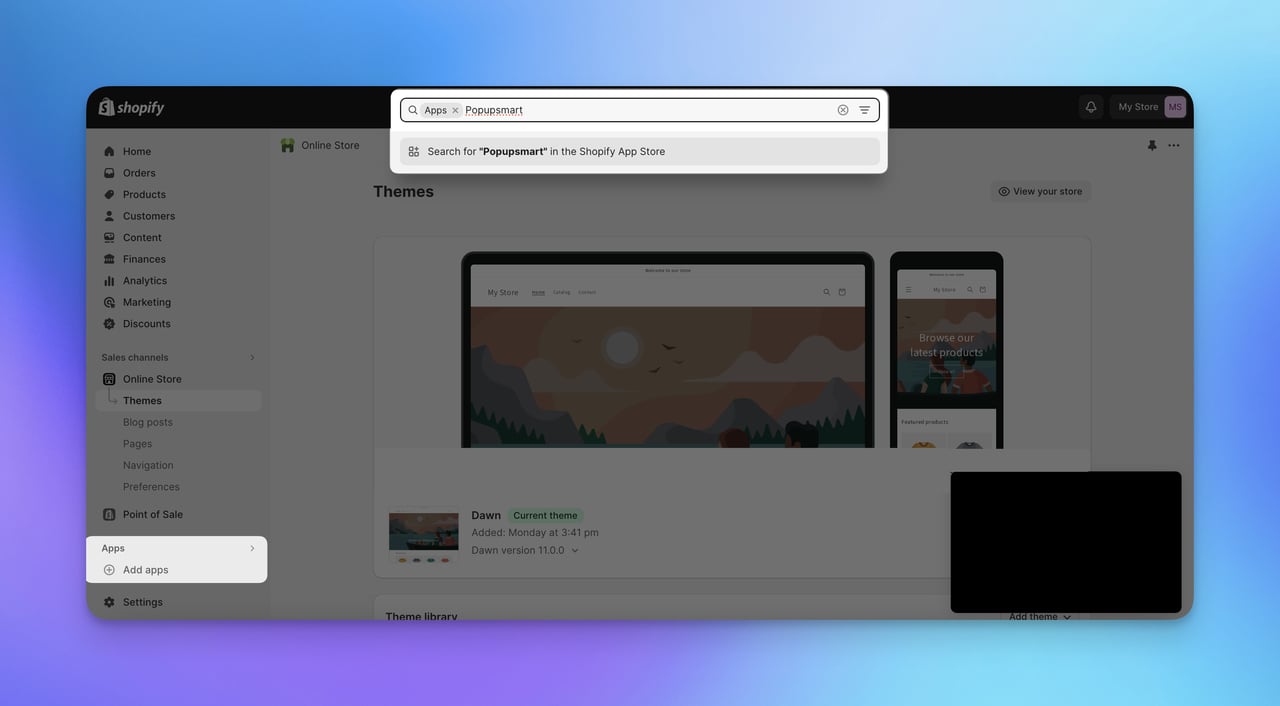
Step 2. Create a New Campaign.
You can move forward to your Popupsmart dashboard and create your campaign. On the Overview page, click Create first campaign. Choose the Increase Sales Conversions goal, then the Increase sales with countdown use case, and click Continue.
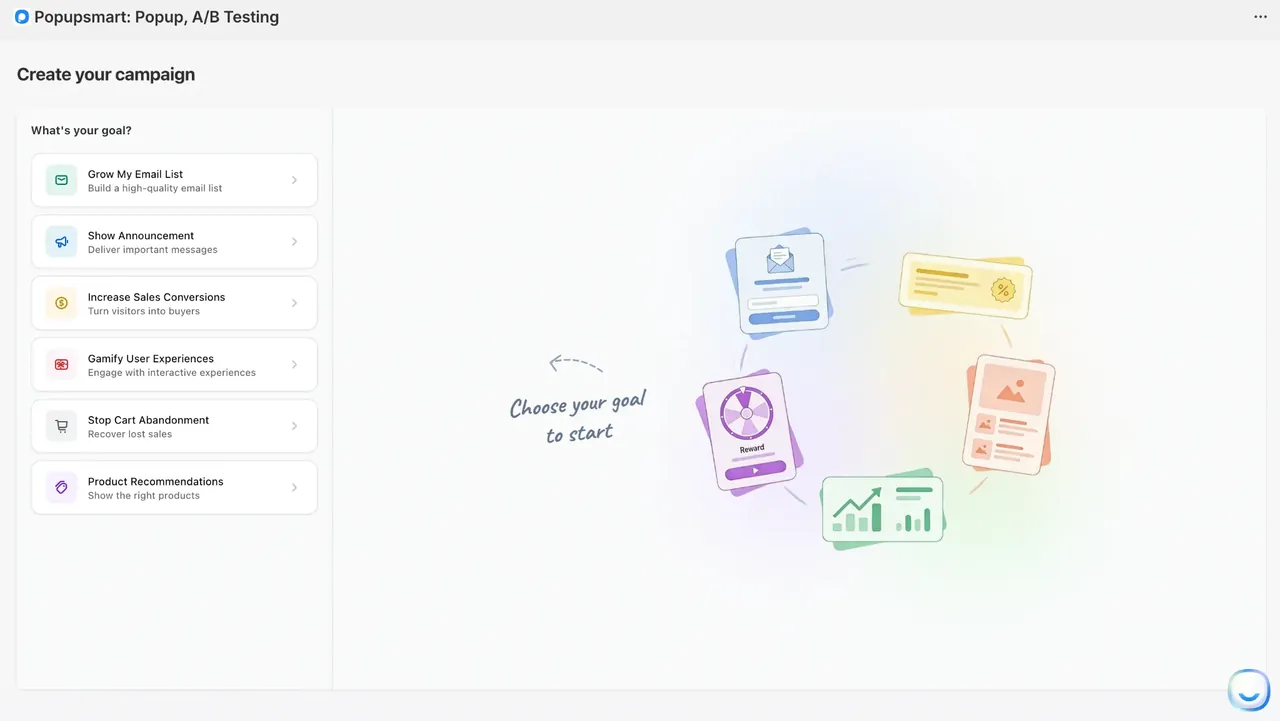
Step 3. Add ‘Countdown Timer’ on the First Step and Customize Your Popup.
The first step of the builder is Design. Whether you choose a popup template or a blank popup, you can add a countdown element to your popup and create sense of urgency as it is supposed to be.
-
Under Step Elements, click the countdown to open its settings.
-
Set Countdown type to Static (Fixed date), then pick the Timezone, End date and End time of your sale.
-
Choose which time units to show (days, hours, minutes, seconds) and the alignment, then edit the headline and button text.
The other option, Dynamic (Recurring), is the default, and the app describes it plainly: it "Resets for each visitor". That is the resetting timer from the section above, so switch it to Static for a real sale. To add or remove elements, or build a multi-step popup, open the Advanced Editor with the pencil icon. There you can also choose what the countdown does when the time runs out; the help center's guide to activating the countdown timer covers the element.
Step 4. Save and Publish.
Click Save & Next to Segment, choose who should see the popup, then click Publish. When the sale ends, unpublish the campaign.
That’s how it is done in minutes.
For timer lengths, schedules and layouts that work, see these countdown timer popup examples.
Along with what you can do with your manual process and Popupsmart app on Shopify, there are several methods to use Shopify and Popupsmart integration.
You can check Popupsmart’s Shopify solutions for your store.
Conclusion
All in all, this is not a rocket science to add a countdown timer to your Shopify store.
Also, while there are strong two ways to manage it, you are free to try both and choose the best one that you find easier.
There is no doubt that you will create a new sense of dealing with your visitors in a different way. With both methods, give the timer a real end date, end the discount at the same moment, and take the timer down when the sale is over.
No matter what you choose, you can create the impact you want to see and urge visitors to buy according to their intention of being interested in your store.
Frequently Asked Questions
There are some questions to find answers about how to add a countdown timer to Shopify.
What is a countdown timer popup for Shopify?
A countdown timer popup for Shopify is a popup with a live clock that counts down to a deadline, such as the end of a sale or the moment a discount code stops working. It opens over the store page instead of sitting inside it. In Popupsmart's Shopify app, set the countdown type to Static (Fixed date) so every shopper sees the same end time.
Do I need an app to add a Shopify countdown timer?
No. A section file in your theme adds a countdown timer for free, and you place it with the theme editor like any other section. An app or a popup builder such as Popupsmart saves you the code and adds targeting, so you can show the timer only on some pages or only to some visitors.
Do Countdown Timers Work on Mobile Devices?
Yes, countdown timers are mobile-responsive and you can display and view them on your mobile devices. The section in this guide fits a 375-pixel-wide phone screen without sideways scrolling (we tested it) and wraps onto a second line when a theme's larger font needs the room. Popups with a countdown timer adapt to the screen as well.
What are Common Mistakes to Avoid When Using Countdown Timers?
The biggest mistake is a timer that resets for each visitor: the deadline isn't real, shoppers notice, and UK law lists false limited-time claims among banned practices. The others are an end date in the wrong time zone, a discount that keeps working after the clock hits zero, and a timer left on the page after the sale ends.
Can I add a countdown timer to the Shopify password page?
Yes, on an Online Store 2.0 theme. Add the section file from this guide, open the theme editor, switch the page selector at the top to the password page, click Add section and choose Countdown timer. Dawn's password page is a JSON template, so it takes sections like any other page. Set the end date to your launch time.
Do I Need Coding Skills to Add a Countdown Timer to Shopify?
No, you don't need coding skills actually. The thing you should know is where to copy and paste the provided codes. By following the steps in both processes, you can easily add your countdown timer to your Shopify store. Popupsmart's Shopify app needs no theme code at all.