How to Create Popup Forms in 2026 (Free Guide)
Guide to launching a no-code Popupsmart popup form in 10–15 minutes: add your site and verify embed code, pick a template, customize design/fields, set targeting/triggers, connect email integrations, then publish and track/optimize with analytics and A/B tests.
Popup signup forms or popup contact forms let you easily connect with your website visitors.
You can grow your audience, connect with them, drive more sales, and collect leads as well as valuable customer data for your marketing campaigns.
To create a popup form for your website, sign up for a no-code popup builder like Popupsmart, pick a template, customize form fields and design, set targeting rules, then publish. The entire process takes under 10 minutes and doesn't require any coding. According to Email Vendor Selection, 76.2% of marketers who use opt-in forms prefer pop-ups for lead generation.
What You’ll Need to Launch Your First Popup Form
What you'll need:
• A website where you can add a JavaScript snippet (Shopify, WordPress, Wix, Squarespace, or any custom site)
• A free Popupsmart account
• Your brand colors and logo (optional but recommended)
• Time estimate: 10-15 minutes for your first popup form
• Skill level: Beginner-friendly, no coding required
Quick overview of the process:
1. Sign up or sign in to Popupsmart
2. Navigate your dashboard and add your website domain
3. Create a new popup campaign
4. Choose a form popup template
5. Customize your popup form design and fields
6. Set up visitor targeting rules
7. Connect your email automation service
8. Configure button-click triggers (optional)
9. Save and publish your popup form
Step 1: Sign Up or Sign In to Popupsmart
Creating your first popup form starts with a free Popupsmart account. Registration takes about 30 seconds and doesn't require a credit card.
Go to Popupsmart's registration page. Enter your email address and create a password (or sign up with Google). You'll land directly on your dashboard, ready to build. If you already have an account, skip straight to Step 2.
You'll know it's working when: You see the Popupsmart dashboard with a "New Campaign" button in the top-right corner.
Step 2: Navigate Your Dashboard and Add Your Website
Before building any popups, you must install the Popupsmart embed code and verify your website. Go to Account → Websites on your dashboard, click New Website, enter your domain, and save it; your site will initially appear as Unverified. To complete verification, click the Unverified button, choose Verify website (which opens your site in a new tab), then return to the dashboard and click Refresh—once the embed code is detected, your status will switch to Verified.
Step 3: Create a New Popup Campaign
With your domain connected, it's time to start building. This step launches the popup builder where you'll design, configure, and publish your form.
From the dashboard, locate the "New Campaign" button in the top-right corner. Click it to open the campaign creation wizard.
Step 4: Choose a Form Popup Template
Every popup campaign in Popupsmart starts with a business objective. This choice pre-filters your template options and sets default form fields that match your goal. You can select your business objective on the left side, to find relevant templates.Templates give you a design starting point so you don't have to build from scratch. Popupsmart offers dozens of fully customizable options filtered by your chosen business objective.
You can pick a template that already has form fields or a layout that supports them. Some templates don't include form fields by default.
Want to see all available designs? Browse the full Popupsmart popup template library.
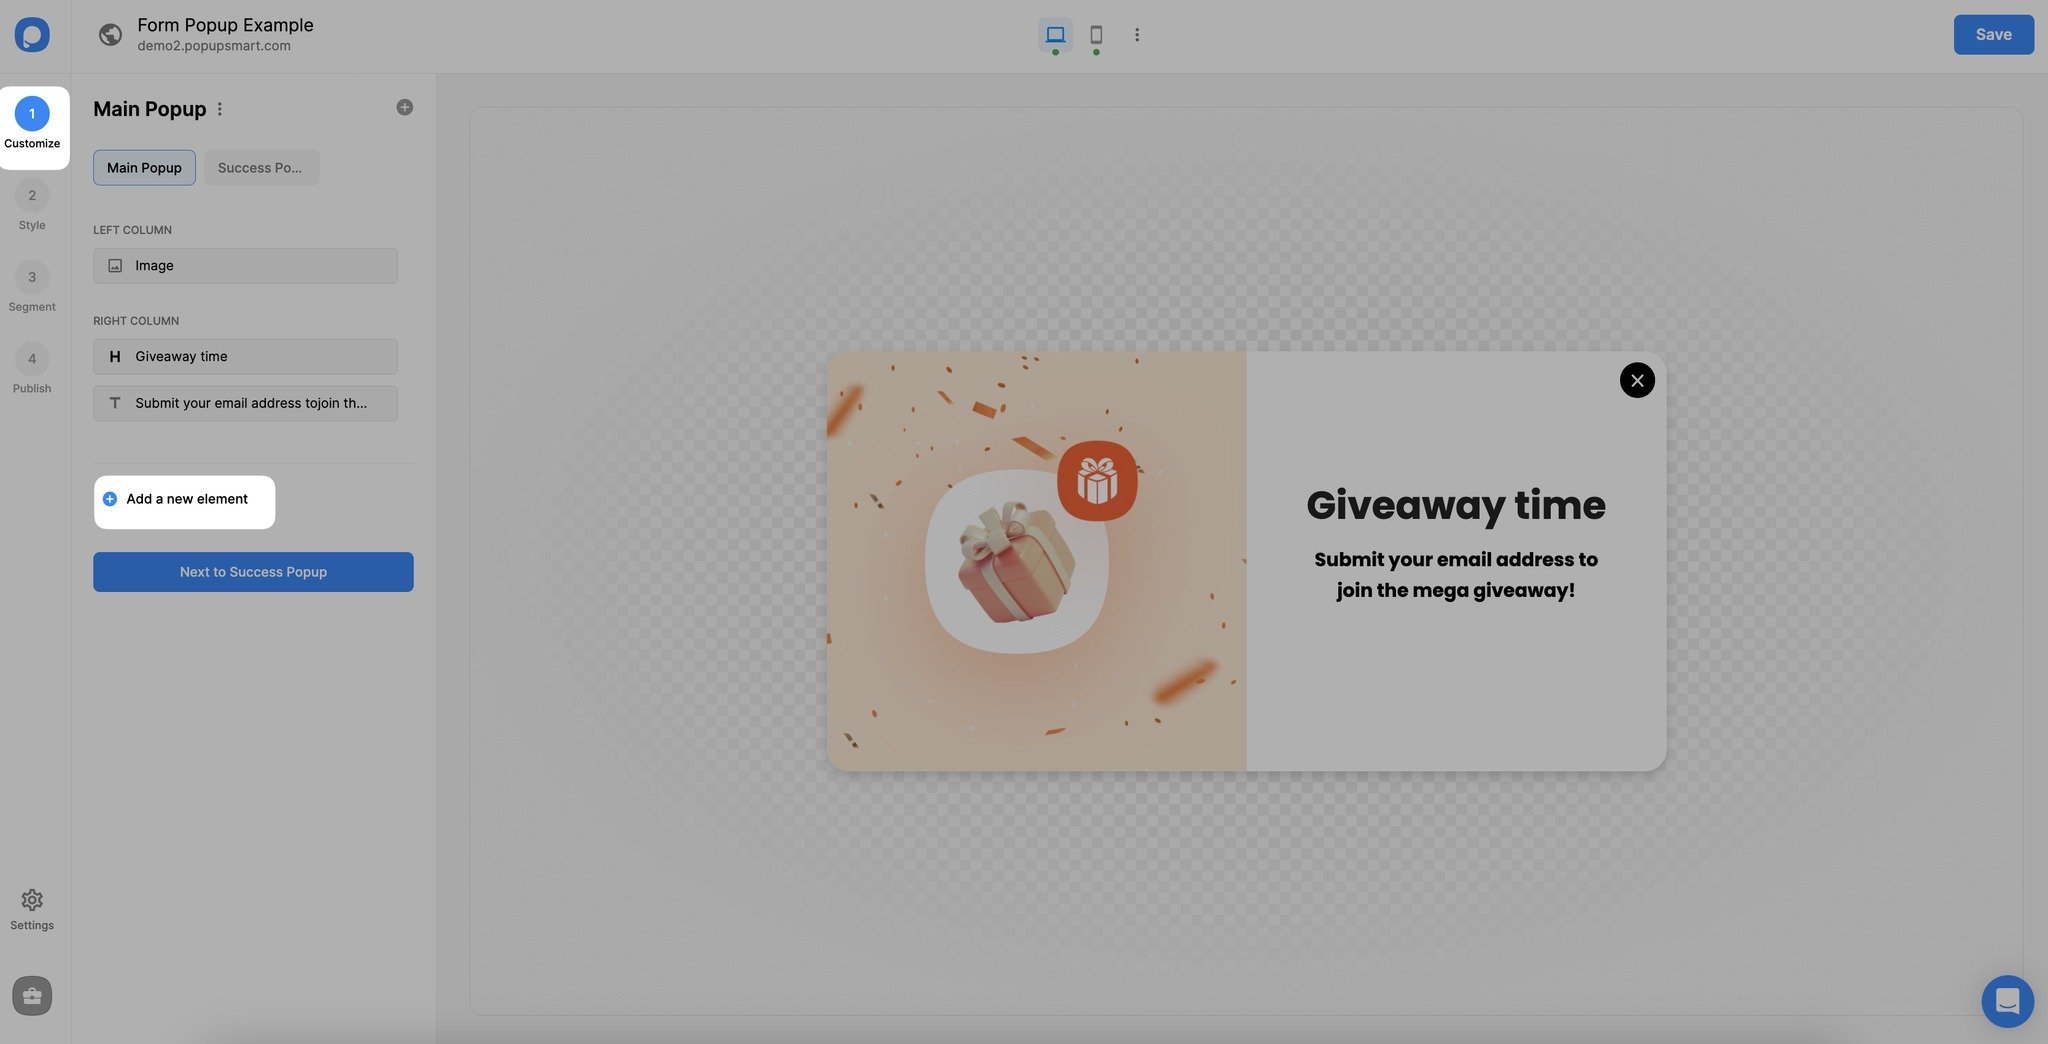
Step 5: Customize Your Popup Form Design and Fields
This is the most important step. Here you'll shape your popup's appearance, write your copy, add form fields, and set up validation rules. Spend the most time here.
1. Click "Customize" to make changes on your popup template's content.
2. Go to the "Style" to adjust the button color, background, border-radius, and font
Preview changes in real time on the right panel. For detailed customization options, see the documentation on how to customize your popup.
How to Write Effective Popup Headlines and CTAs
Your headline and CTA button text determine whether visitors engage or close the popup. Keep them short and benefit-focused.
Good headlines follow a simple pattern: tell visitors what they get. "Get 20% Off Your First Order" outperforms "Subscribe to Our Newsletter" every time. Similarly, "Send Me the Guide" converts better than "Submit" as a CTA button.
How to Add and Configure Form Fields
1. Click "Add a new element" in the builder and choose "Form."
2. Select the form element you need:
• Email (most common for lead gen)
• Phone (with built-in validation)
• Short text (for names or company)
• Long input (for messages or feedback)
• Dropdown (for predefined choices)
3. Change placeholder text to match your needs
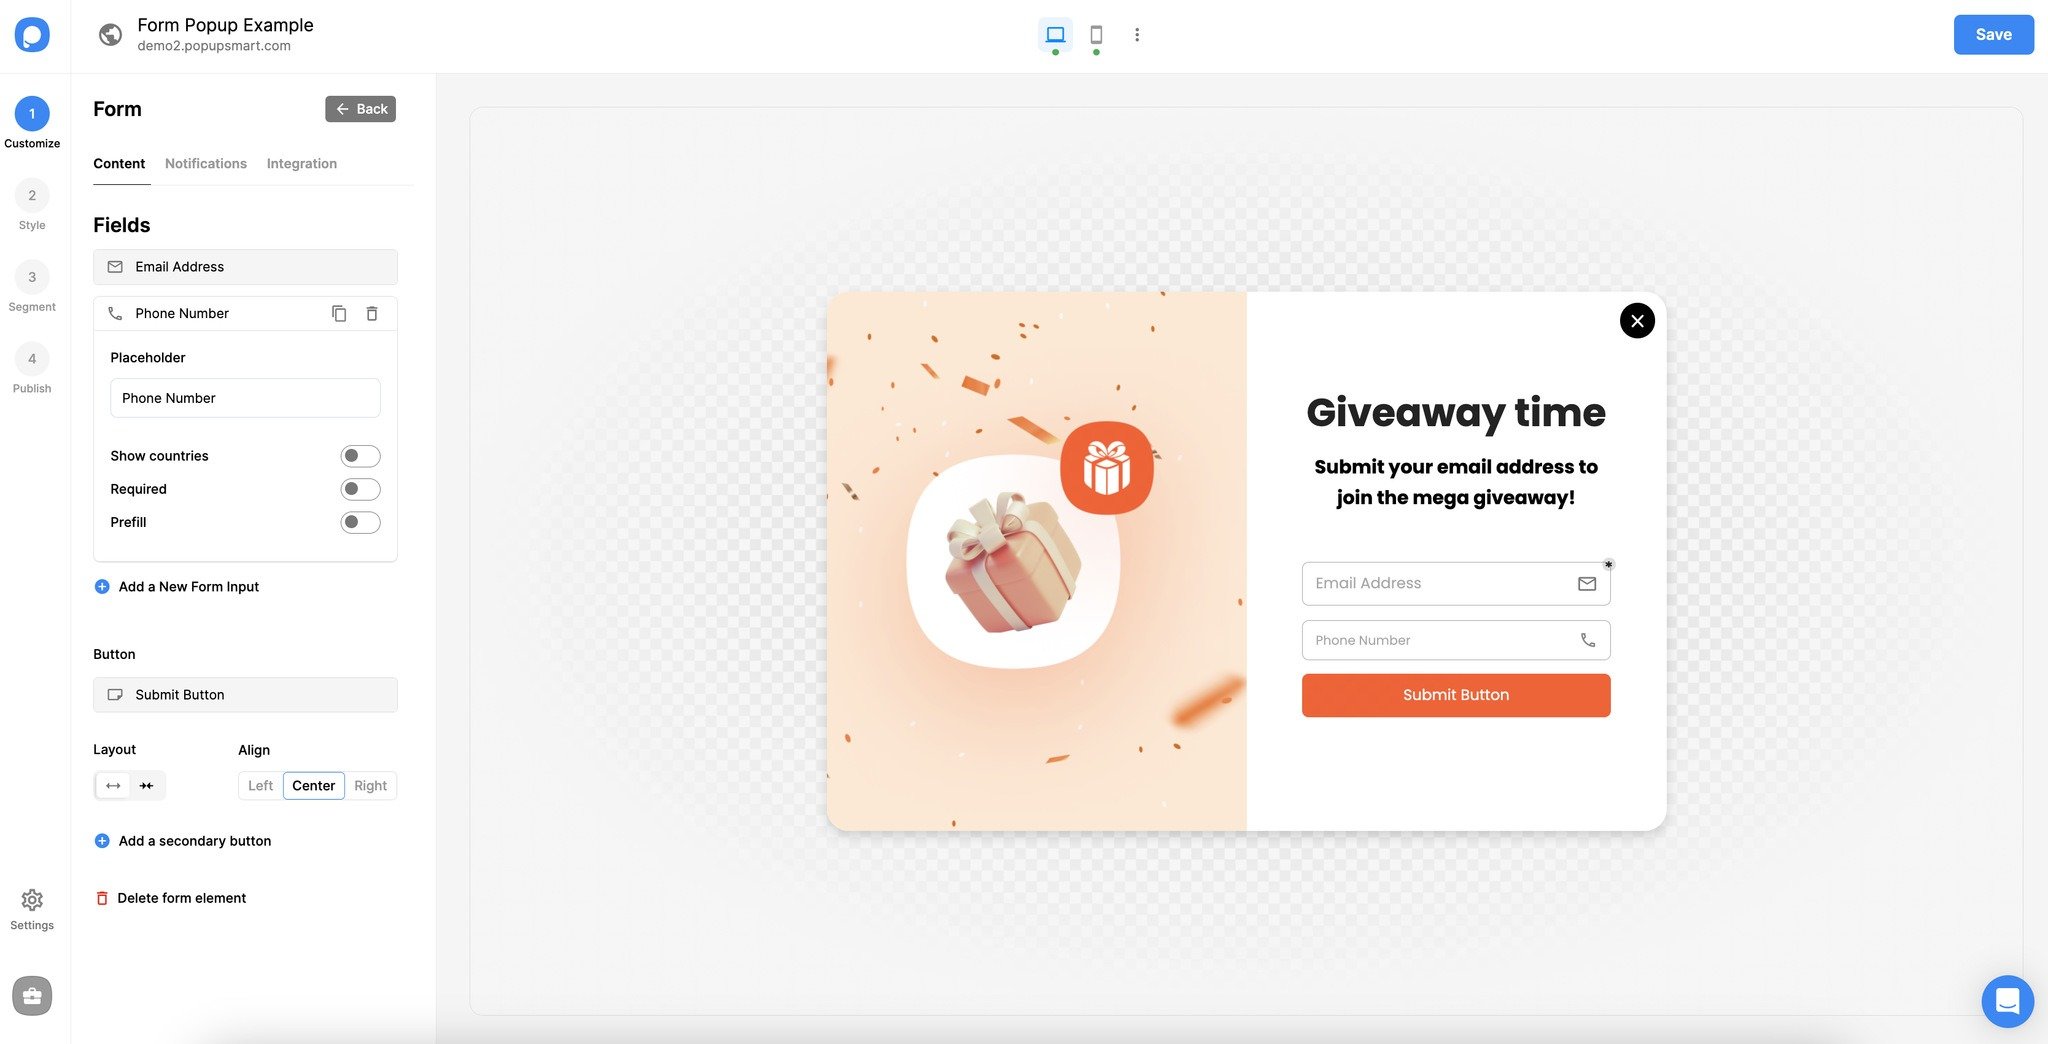
4. Toggle "Required" on for fields that must be filled before submission
How to Add a Privacy Policy Checkbox
1. Select "Notice and Consent" form element.
2. Turn the "Required" toggle on
3. Write your privacy policy text or paste a link to your privacy page
4. Enable the checkbox if you need explicit opt-in consent (required under GDPR Article 7 for EU visitors)
Form Popup Design Customization Mistakes to Avoid
• Adding too many form fields: Every field you add increases abandonment. For email lead generation, stick to 1-2 fields (email + first name at most). According to Interaction Design Foundation's form research, reducing form fields from four to three can increase conversions by up to 50%.
• Using "Submit" as your CTA text: Generic button text kills conversions. Write benefit-driven copy: "Get My Free Guide," "Claim My Discount," or "Start My Free Trial." The button should complete the visitor's thought about what happens next.
• Ignoring mobile preview: Always toggle to mobile view in the builder. A popup that looks great on desktop can completely cover the screen on phones, which violates Google's interstitial guidelines and frustrates users.
Pro tip: After testing over 200 popup form designs at Popupsmart, here's what I've found works best: match your popup's background color to your website's dominant color, but make the CTA button a contrasting color. This creates visual harmony while making the action button impossible to miss.
Step 6: Set Up Visitor Targeting Rules
Targeting determines who sees your popup, when they see it, and on which pages. This step separates effective popup forms from annoying ones.
How to Configure Display Settings
1. Click the "Segment" tab in the popup builder
2. Choose your segment type:
• After X seconds: Show the popup after a time delay (5-10 seconds is typical)
• After scrolling x%: Trigger when a visitor scrolls past 50% of the page
• Exit intent: Display when the visitor's cursor moves toward the browser's close button
• Set URL targeting: choose specific pages or URL patterns where the popup appears
• Configure visitor device targeting: desktop only, mobile only, or both
For the full targeting documentation, see Popupsmart's audience targeting guide.
You'll know it's working when: Your targeting summary shows the correct page URLs, trigger conditions, and frequency caps before you move to the next step.
Targeting Mistakes to Avoid on Popup Forms
• Showing the popup immediately on page load: Visitors who haven't read a single word on your page aren't ready to give you their email. Wait at least 5 seconds or 30% scroll depth. This gives visitors time to engage with your content first.
• Not setting frequency caps: A popup that shows on every single page view will annoy returning visitors and increase bounce rates. Set it to show once per session or once per 3 days at most.
• Targeting all pages with the same popup: A discount popup makes sense on product pages. It makes zero sense on your About Us page. Use URL targeting to match the popup message to the page context. This is where you can increase form conversion rates dramatically.
Pro tip: Exit-intent triggers are my top recommendation for first-time popup creators. They only show the popup when someone is about to leave, so they don't interrupt the browsing experience at all. We've run exit-intent campaigns that recovered 12-15% of abandoning visitors who would have left without converting.
Step 7: Connect Your Email Automation Service
Collecting leads means nothing if those leads don't flow into your marketing stack. This step connects your popup form to your email marketing platform so new subscribers get added automatically.
How to Set Up Email Integrations
1. Click the "Integrations" under "Publish" tab in the popup builder
2. Click "Add integration" and browse the available integrations: Mailchimp, HubSpot, ActiveCampaign, Zapier, and dozens more
3. Click "Connect" on your email marketing provider
4. Authenticate by entering your API key
5. Select the email list or audience where new subscribers should be added
6. Map your popup form fields to the corresponding fields in your email platform
Explore all available integrations on the Popupsmart integrations page, including Mailchimp popup integration and WordPress popup setup.
Integration Setup Mistakes
• Skipping the test submission: Always submit a test entry after connecting your integration. I've seen integrations that looked connected but had a field mapping error. The popup collected leads fine, but nothing reached the email platform for two weeks.
• Forgetting to set up a welcome email sequence: Capturing an email is step one. If you don't have an automated welcome email ready to send within minutes of signup, you're wasting the highest-engagement moment. New subscribers are most active in the first hour.
Pro tip: If you're collecting email leads for a newsletter popup, set up at least a 3-email welcome sequence before going live. We've seen that businesses who send a welcome email within 5 minutes of signup get 4x higher open rates than those who wait 24 hours. Don't activate your popup until your email automation is tested and ready. Learn more about creating effective newsletter popups with Popupsmart.
Step 8: Save and Publish Your Popup Form
You've built, designed, and configured everything. Now it's time to go live.
1. Review your popup one final time in the builder preview
2. Click "Save" to store the campaign without publishing (useful if you need approval from a teammate)
3. Click "Publish" to push it live immediately
After publishing, use Popupsmart's built-in analytics to track impressions, submissions, and conversion rates. You can also integrate with Google Analytics for deeper reporting.
Why Should You Use Popup Forms on Your Website?
Popup forms remain one of the highest-converting lead generation tools available to marketers in 2026. They work because they interrupt passive browsing with a focused, time-sensitive message that visitors can't ignore.
Popup Forms Actually Convert
I've watched marketers avoid popups because they remember the spammy, full-screen ads from the early 2000s. That's a mistake. Modern popup forms with smart targeting are nothing like those traditional popup ads.
According to Envive AI's conversion research, exit-intent popups achieve 17.12% conversion rates, with top performers reaching 42.35%. That's significantly higher than most landing page forms. At Popupsmart, we've seen similar numbers across thousands of campaigns. Personalized popup forms that match your brand and target the right visitors at the right time simply convert.
Higher Visibility Than Static Forms
Visitors don't want to hunt through your site for a contact page. A popup form appears right where they are, whether that's a blog post, product page, or homepage. It's the next best thing to live chat for capturing attention.
Contact form popups beat standard contact pages on visibility alone. They appear in context, right when the visitor is engaged. In a scenario where someone can't decide whether to buy but doesn't want to dig through your navigation to find support, a contact form popup captures that lead before they bounce.
URL Targeting Lets You Show Forms on Specific Pages
Not every page needs the same popup. With URL targeting, you can display a free e-book offer only on related blog posts, show a discount code only on product pages, or trigger a demo request form only on your pricing page.
This kind of smart targeting keeps your popups relevant instead of annoying. We'll cover the targeting setup in Step 7 below.
Popup Forms Look Better Than Inline Forms
Nobody enjoys a 12-field contact form crammed into a sidebar. According to Email Vendor Selection's lead generation data, 90.7% of marketers use their websites to generate leads, yet conversion rates suffer when forms feel overwhelming.
Popup forms solve this by limiting visible fields. A well-designed popup asks for 2-3 inputs max, uses your brand colors, and closes cleanly. You can deploy them across blog posts, landing pages, homepages, or any page on your site. With Popupsmart's popup design best practices, fewer form fields means higher completion rates and less friction.
What Happens After Publishing Your Popup Form?
After publishing your popup form, here's a realistic timeline of what happens.
Week 1: You'll see your first form submissions trickle in. Conversion rates at this stage are unreliable because of small sample sizes. Focus on checking that the form works, leads arrive in your email platform, and the popup doesn't cause usability issues.
Weeks 2-4: Your conversion rate stabilizes. For email signup popups, a rate between 2-5% is solid. Exit-intent popups typically convert 3-7%. According to Popupsmart's Shopify conversion data, stores converting above 3.7% are in the top 20% of Shopify merchants, so similar benchmarks apply to popup forms.
Month 2-3: This is when A/B testing starts to pay off. By now, you should have tested 2-3 headline variations, different trigger timings, and possibly different form layouts. I've seen clients double their conversion rate between the first version and their third iteration.
Key Popup Form Metrics to Track
| Metric | What It Tells You | Target Range |
|---|---|---|
| Impression rate | What percentage of visitors see the popup | 30-60% (depends on trigger) |
| Conversion rate | What percentage of viewers submit the form | 2-7% for email signups |
| Close rate | What percentage close without engaging | Below 85% |
| Bounce rate change | Whether the popup hurts page engagement | No increase from baseline |
Popup Form Best Practices for Higher Conversions
Following the steps above gets your popup live. Following these best practices gets it converting.
The Six Principles That Drive Popup Form Performance
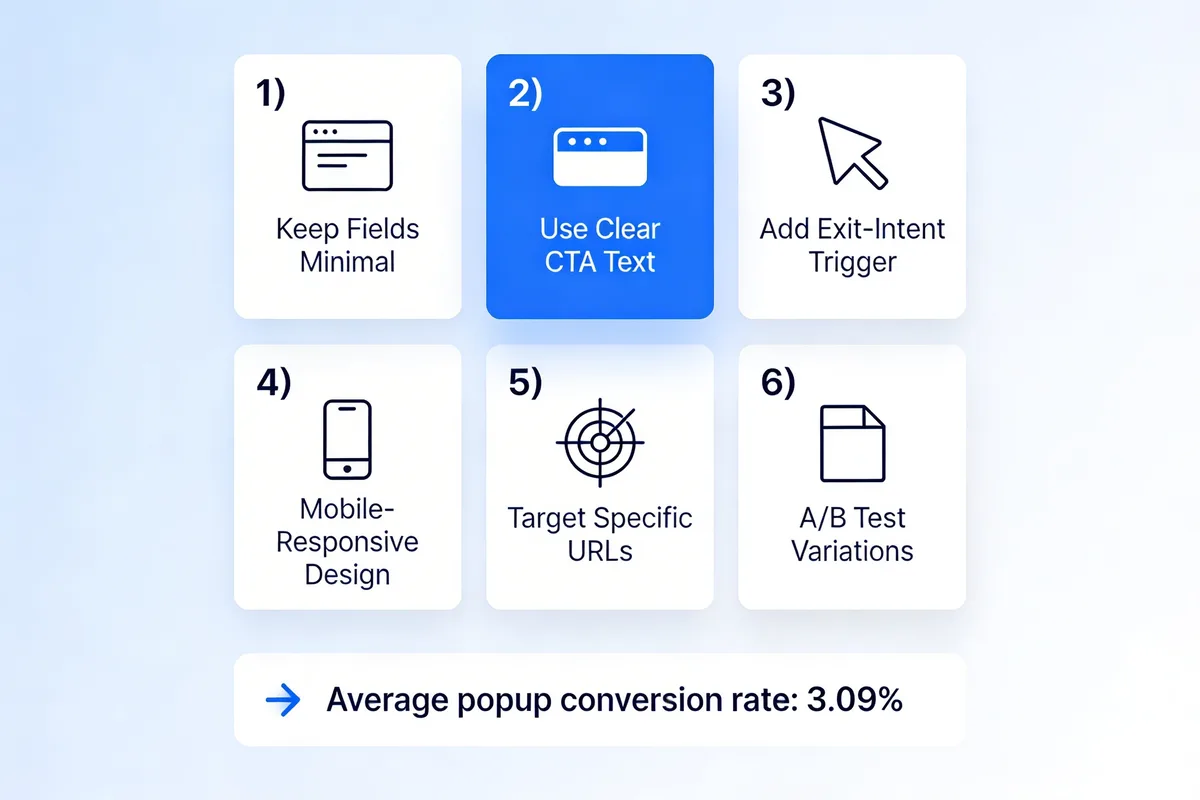
1. Keep form fields to a minimum. Every additional field reduces submissions. For top-of-funnel email capture, one field (email) is often enough. Need a name too? Make it optional. According to Involve.me's landing page research, the median conversion rate across industries is around 6.6% for forms with minimal friction.
2. Write benefit-focused CTA copy. "Get My Free Guide" outperforms "Submit" by a wide margin. Your button text should answer the visitor's question: "What do I get by filling this out?"
3. Use exit-intent triggers as your default. They don't interrupt browsing and only fire when the visitor is already leaving. For first-time popup creators, exit-intent is the safest starting point.
4. Make every popup mobile-responsive. More than half of web traffic comes from mobile devices. Preview your popup on both desktop and mobile before publishing.
5. Match the popup to the page context. A "Download our SEO guide" popup on a cooking blog makes no sense. Use URL targeting to display relevant offers on relevant pages. Explore 33 website popup examples for inspiration on matching popup messages to page context.
6. Run A/B tests consistently. Change one variable at a time: headline, trigger timing, design, or CTA copy. Give each test at least 500 impressions before drawing conclusions.
Common Popup Form Mistakes and How to Fix Them
After working with hundreds of popup campaigns, these are the errors I see most often.
Mistakes That Hurt User Experience
Showing popups before any content loads. If your popup fires before the page finishes rendering, visitors see a form before they even know what the page is about. Set a minimum delay of 3-5 seconds or use scroll-based triggers.
No easy way to close the popup. Always include a visible close button (the X icon) and allow clicking outside the popup to dismiss it. Trapping visitors with a popup they can't close is the fastest way to increase bounce rates.
Asking for too much information. A contact form popup doesn't need a company name, job title, phone number, email, and message field all at once. Ask for one piece of information now and progressive-profile the rest later. For a deeper look at form optimization, check out our guide on ecommerce optimization strategies.
Mistakes That Hurt Conversions
Generic messaging. "Sign up for our newsletter" doesn't give anyone a reason to subscribe. Offer something specific: a discount, a free resource, or exclusive access. Specificity wins.
No value exchange. Why should a visitor give you their email? If your popup doesn't answer that question in the headline, it won't convert. The best popup forms clearly state what the visitor receives in return.
Ignoring analytics data. If your popup has 10,000 impressions and 50 submissions (0.5% conversion), something is wrong. Check your headline, form field count, trigger timing, and targeting. Don't just let a low-performing popup run indefinitely.
Popup Form Examples That Convert Well
Seeing what works in practice helps more than abstract advice. Here are popup form patterns that consistently perform across different industries.
Email Signup With Content Upgrade
A blog post about email marketing offers a downloadable "50 Email Subject Line Templates" PDF in exchange for an email address. The popup uses exit-intent targeting, has one form field (email), and the CTA reads "Send Me the Templates." This pattern works because the offer directly relates to what the visitor was already reading.
Exit-Intent Discount for E-commerce
A Shopify store shows a "Wait! Here's 15% off your first order" popup when the cursor moves toward closing the tab. One field (email), and a coupon code delivered by email after signup. According to Popupsmart's Shopify conversion data, stores converting above 5.2% are typically in the top-performing 10%, and exit-intent discounts are one of the fastest ways to reach those numbers.
Contact Form Popup for B2B
A SaaS company adds a "Talk to Sales" button on their pricing page. Clicking it opens a popup with name, email, and a short message field. The popup closes the gap between "I'm interested" and "Let me fill out your 10-field contact page" by keeping the interaction lightweight and in context.
Start Building Your First Popup Form Today
Creating a popup form doesn't require a developer or a big budget. With a no-code builder like Popupsmart, you can go from zero to a live, converting popup form in under 15 minutes.
Here's what to do right now:
1. Create your free Popupsmart account
2. Follow the steps in this guide to build your first popup
3. Run it for 7 days, then check your analytics
4. Create a second variation and start A/B testing
The data consistently shows that popup forms convert better than static inline forms. According to Email Vendor Selection, 74.7% of marketers are actively growing their email lists, and popup forms are one of the fastest ways to accelerate that growth.
Frequently Asked Questions About Popup Forms
How Do You Create a Popup Form?
Sign up for a no-code popup builder like Popupsmart, choose a template, customize the design and form fields, set targeting rules (which pages, what trigger), connect your email platform, and publish. The whole process takes 10-15 minutes. No coding required. If you prefer coding, you can also build a popup form with HTML, CSS, and JavaScript using a W3Schools popup form tutorial, though a no-code builder is faster for most teams.
What Is a Popup Form?
A popup form is an overlay that appears on a web page to collect visitor information, typically an email address, phone number, or feedback. Unlike embedded inline forms that sit within the page content, popup forms display on top of the page and demand attention. They can trigger based on time delays, scroll depth, exit intent, or button clicks.
What Is the Difference Between a Popup and an Overlay?
In practical terms, they're the same thing. An overlay is the technical term for any element that displays on top of the existing page content, usually with a dimmed background. A popup is the common name for that pattern. Some marketers distinguish between popups (which can be new browser windows) and overlays (same-window modals), but modern popup tools like Popupsmart exclusively use in-page overlays, not separate browser windows.
How Do You Create a Popup Form in WordPress?
The simplest way is to use Popupsmart's WordPress integration. Install the one-line JavaScript snippet in your theme's header (via Appearance > Theme File Editor > header.php or a plugin like Insert Headers and Footers), then build your popup in Popupsmart's dashboard. The popup will appear on your WordPress site based on your targeting rules. For a Wix site instead, see our guide on how to create a popup in Wix. You can also follow our detailed walkthrough on how to create popup ads in 7 steps.
What Are the Best Tools for Popup Forms in 2026?
For no-code users, Popupsmart is an easy-to-use recommendation because it combines a visual builder, smart targeting, and email integrations in a free tier. Mailchimp includes basic popup forms if you're already using it for email marketing. For developers who want full control, building with HTML, CSS, and JavaScript gives the most flexibility but requires ongoing maintenance. The right tool depends on your technical skills, budget, and how many popups you plan to run.

How would you rate your experience with this article? 😊