ChatGPT
 Perplexity
 Claude
 Grok
Grok Google AI Mode
Multi-step forms are effective for both interacting with visitors and optimizing user journeys.
In this blog post, we'll focus on the benefits, creation process, and multi-step form examples and templates.
What is a Multi-Step Form?
A multi-step form is a type of form that divides a long or complex process into several smaller, more manageable sections or steps, shown one at a time. It's also called a wizard or a multi-page form.

Instead of bombarding users with all the questions at once, you break the process into smaller, manageable sections. This makes the experience more user-friendly: each screen asks for one kind of information, and a progress indicator shows how much is left.
Perfect for:
- registrations,
- applications, or
- detailed surveys,
multi-step forms keep users engaged and focused on one group of questions at a time.
How to Create a Multi-Step Form
We'll touch upon two different methods for creating a multi-step form for your business: writing the code yourself, or using a no-code builder.
Method 1. Create a Multi-Step Form with Coding
It is not rocket science to create a multi-step form by coding, but there are some steps that you should take.
You need to be careful when you create your form and embed it on your website. The code below is plain HTML, CSS and JavaScript. No library. It builds a four-step sign-up form: name, contact details, birthday and login.
Updated October 2026: the code we published here in 2024 had no labels on its inputs, showed no visible error when a field was empty, left focus on the Next button and moved on with an invalid email. We replaced it with the version below.
What the form does for accessibility:
| Requirement | How the code handles it |
|---|---|
| Every field has a visible label | Each input has a <label for>; no placeholder stands in for a label |
| Progress is announced | Each step's heading carries the count ("Step 2 of 4"), and the progress list marks the current step with aria-current="step" |
| Focus moves to the new step | showStep() moves focus to the step's <h2>, which has tabindex="-1" |
| Errors are tied to fields | Each message sits in the element named in the field's aria-describedby, and the field gets aria-invalid="true" |
| Back keeps every answer | Steps are hidden, not removed, so the final submit carries the answers from every step |
| It works without JavaScript | All four steps show as one long form, and the browser checks it before sending |
Putting the step count in the heading follows the W3C Web Accessibility Initiative's multi-page forms tutorial, which shows progress in the main heading, as in "Shipping Address (Step 2 of 4)".
Let's have a look at the process:
Step 1: Add HTML
Create one <form> with a <fieldset> for each step. Every field gets a label and an empty error element that the script fills in.
<form id="signup" class="msf" action="/signup" method="post">
  <ol class="msf-progress" aria-label="Progress" hidden>
    <li aria-current="step">Name</li>
    <li>Contact</li>
    <li>Birthday</li>
    <li>Login</li>
  </ol>

  <fieldset class="msf-step">
    <legend><h2 tabindex="-1">Step 1 of 4: Your name</h2></legend>
    <label for="first-name">First name</label>
    <input id="first-name" name="first_name" type="text" autocomplete="given-name" required aria-describedby="first-name-error">
    <p class="msf-error" id="first-name-error"></p>
    <label for="last-name">Last name</label>
    <input id="last-name" name="last_name" type="text" autocomplete="family-name" required aria-describedby="last-name-error">
    <p class="msf-error" id="last-name-error"></p>
  </fieldset>

  <fieldset class="msf-step">
    <legend><h2 tabindex="-1">Step 2 of 4: Contact details</h2></legend>
    <label for="email">Email</label>
    <input id="email" name="email" type="email" autocomplete="email" required aria-describedby="email-error">
    <p class="msf-error" id="email-error"></p>
    <label for="phone">Phone (optional)</label>
    <input id="phone" name="phone" type="tel" autocomplete="tel" aria-describedby="phone-error">
    <p class="msf-error" id="phone-error"></p>
  </fieldset>

  <fieldset class="msf-step">
    <legend><h2 tabindex="-1">Step 3 of 4: Birthday</h2></legend>
    <label for="birthday">Date of birth</label>
    <input id="birthday" name="birthday" type="date" autocomplete="bday" required aria-describedby="birthday-error">
    <p class="msf-error" id="birthday-error"></p>
  </fieldset>

  <fieldset class="msf-step">
    <legend><h2 tabindex="-1">Step 4 of 4: Login details</h2></legend>
    <label for="username">Username</label>
    <input id="username" name="username" type="text" autocomplete="username" required aria-describedby="username-error">
    <p class="msf-error" id="username-error"></p>
    <label for="password">Password</label>
    <input id="password" name="password" type="password" autocomplete="new-password" minlength="8" required aria-describedby="password-hint password-error">
    <p class="msf-hint" id="password-hint">At least 8 characters.</p>
    <p class="msf-error" id="password-error"></p>
  </fieldset>

  <div class="msf-nav">
    <button type="button" class="msf-back" hidden>Back</button>
    <button type="submit" class="msf-next">Submit</button>
  </div>
</form>
Step 2: Add CSS
Style the form elements to enhance the user experience. The [hidden] rule keeps inactive steps hidden even if you give the steps a display value of your own.
.msf {
  max-width: 32rem;
  margin: 3rem auto;
  padding: 2rem;
  background: #fff;
  color: #171717;
  font: 1rem/1.5 system-ui, sans-serif;
}

.msf [hidden] {
  display: none;
}

.msf-progress {
  display: flex;
  gap: 0.5rem;
  margin: 0 0 1.5rem;
  padding: 0;
  list-style: none;
}

.msf-progress li {
  flex: 1;
  padding-top: 0.5rem;
  border-top: 4px solid #d4d4d4;
  font-size: 0.875rem;
}

.msf-progress .is-done,
.msf-progress [aria-current="step"] {
  border-color: #1b6fd1;
}

.msf-progress [aria-current="step"] {
  font-weight: 700;
}

.msf-step {
  margin: 0 0 1.5rem;
  padding: 0;
  border: 0;
}

.msf-step legend {
  padding: 0;
}

.msf-step h2 {
  margin: 0;
  font-size: 1.25rem;
}

.msf label {
  display: block;
  margin-top: 1rem;
  font-weight: 600;
}

.msf input {
  box-sizing: border-box;
  width: 100%;
  padding: 0.625rem;
  border: 1px solid #737373;
  border-radius: 4px;
  font: inherit;
}

.msf input[aria-invalid="true"] {
  border: 2px solid #b91c1c;
}

.msf-error,
.msf-hint {
  margin: 0.25rem 0 0;
  font-size: 0.875rem;
}

.msf-error {
  color: #b91c1c;
}

.msf-nav {
  display: flex;
  justify-content: flex-end;
  gap: 0.75rem;
}

.msf button {
  min-height: 44px;
  padding: 0 1.25rem;
  border: 1px solid #1b6fd1;
  border-radius: 4px;
  font: inherit;
  cursor: pointer;
}

.msf-next {
  background: #1b6fd1;
  color: #fff;
}

.msf-back {
  background: #fff;
  color: #1b6fd1;
}

.msf :focus-visible {
  outline: 3px solid #1b6fd1;
  outline-offset: 2px;
}
Step 3: Add JavaScript
Implement the logic for navigation between steps and form validation. The script checks only the current step's fields, uses the browser's own validation (checkValidity() and validationMessage), and lets the form submit normally from the last step.
const form = document.querySelector('#signup');
const steps = [...form.querySelectorAll('.msf-step')];
const progress = form.querySelector('.msf-progress');
const progressItems = [...progress.querySelectorAll('li')];
const backButton = form.querySelector('.msf-back');
const nextButton = form.querySelector('.msf-next');
let current = 0;

function showStep(index, { moveFocus = true } = {}) {
  current = index;
  steps.forEach((step, i) => {
    step.hidden = i !== index;
  });
  progressItems.forEach((item, i) => {
    item.classList.toggle('is-done', i < index);
    if (i === index) item.setAttribute('aria-current', 'step');
    else item.removeAttribute('aria-current');
  });
  backButton.hidden = index === 0;
  nextButton.textContent = index === steps.length - 1 ? 'Submit' : 'Next';
  if (moveFocus) steps[index].querySelector('h2').focus();
}

function checkField(field) {
  const error = document.getElementById(`${field.id}-error`);
  const valid = field.checkValidity();
  if (valid) field.removeAttribute('aria-invalid');
  else field.setAttribute('aria-invalid', 'true');
  error.textContent = valid ? '' : field.validationMessage;
  return valid;
}

function checkStep(step) {
  const fields = [...step.querySelectorAll('input, select, textarea')];
  const invalid = fields.filter((field) => !checkField(field));
  invalid[0]?.focus();
  return invalid.length === 0;
}

form.addEventListener('submit', (event) => {
  if (!checkStep(steps[current])) {
    event.preventDefault();
  } else if (current < steps.length - 1) {
    event.preventDefault();
    showStep(current + 1);
  }
  // On the last step the browser sends the form, with the answers from every step.
});

backButton.addEventListener('click', () => showStep(current - 1));

form.addEventListener('input', (event) => {
  if (event.target.hasAttribute('aria-invalid')) checkField(event.target);
});

form.noValidate = true;
progress.hidden = false;
showStep(0, { moveFocus: false });
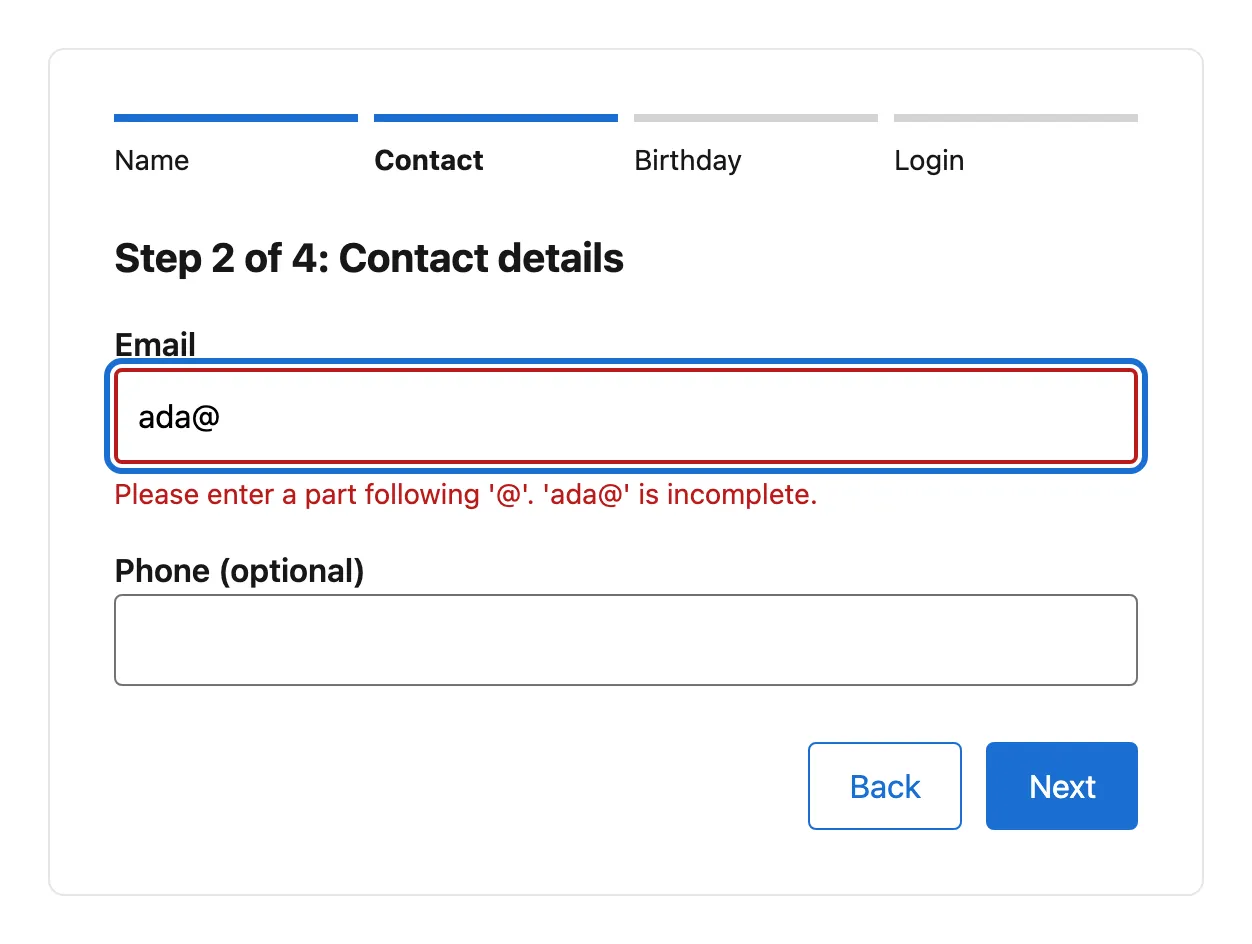
To use it as a single HTML template, put the CSS in a <style> element in the <head>, the form where it should appear, and the script just before </body>. Change action="/signup" to your own form handler, and validate every field again on the server: browser checks are easy to bypass. The error texts are the browser's own, in the visitor's browser language; to use your own wording, set it in checkField() instead of validationMessage.
We tested the form in October 2026 with Playwright 1.63 in Chromium 153 and in WebKit 26.6, the engine behind Safari. Each browser ran 28 checks, including keyboard-only use, an axe-core 4.14 scan with no violations, a 375px phone width and a run with JavaScript turned off. Every API the code uses is Baseline widely available on MDN, which covers current Chrome, Edge, Firefox and Safari.
This is how you can build a multi-step form with HTML, CSS, and JavaScript.
Method 2. Create Multi-Step Form with Popupsmart in Minutes
On the other hand, Popupsmart makes it easy to create multi-step forms to enhance engagement and capture more information from your visitors. It builds them as multi-step popups, so you can ask a question on the first step and collect contact details on the next, without code.
Here's a clear, step-by-step guide to help you set up a multi-step form using the no-code popup builder Popupsmart. The steps follow Popupsmart's multi-step popup guide in the help center.
Step 1: Choose a Multi-Step Popup Template
Click + New Campaign, name the campaign and choose your domain. Then go to the template page and use the "Multistep" filter to find and select a pre-designed multi-step popup template.
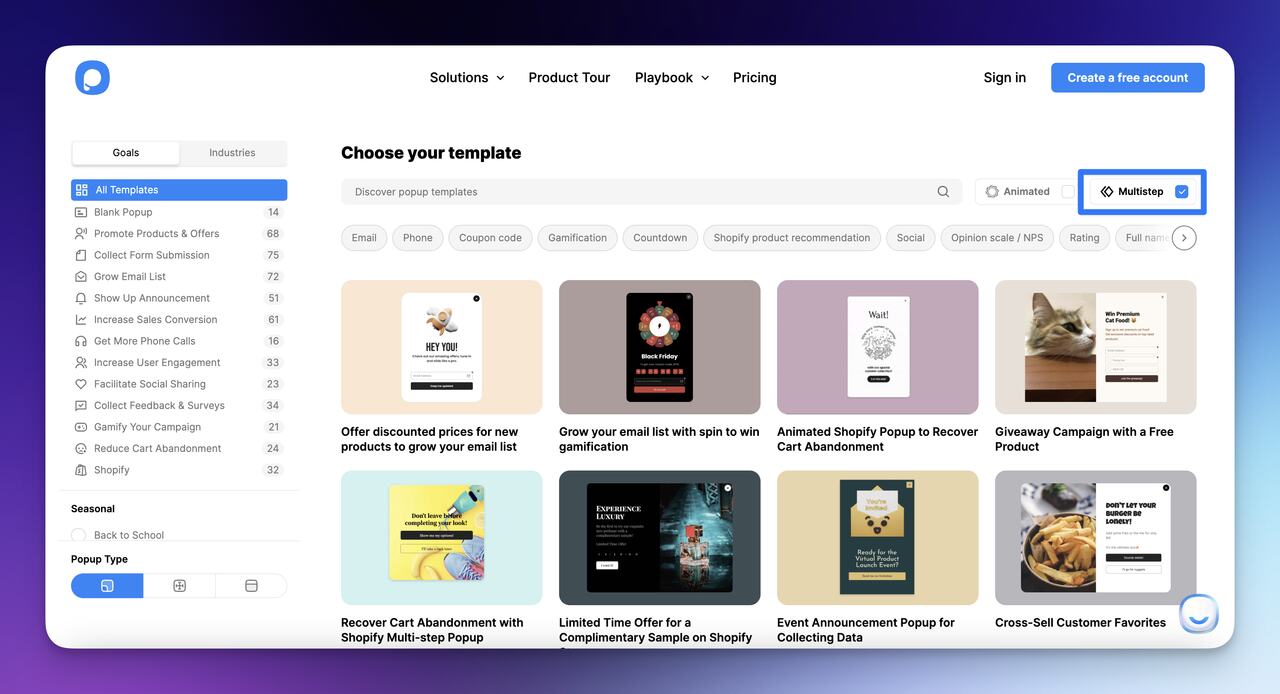
Popupsmart's template page, screenshot from July 2024.
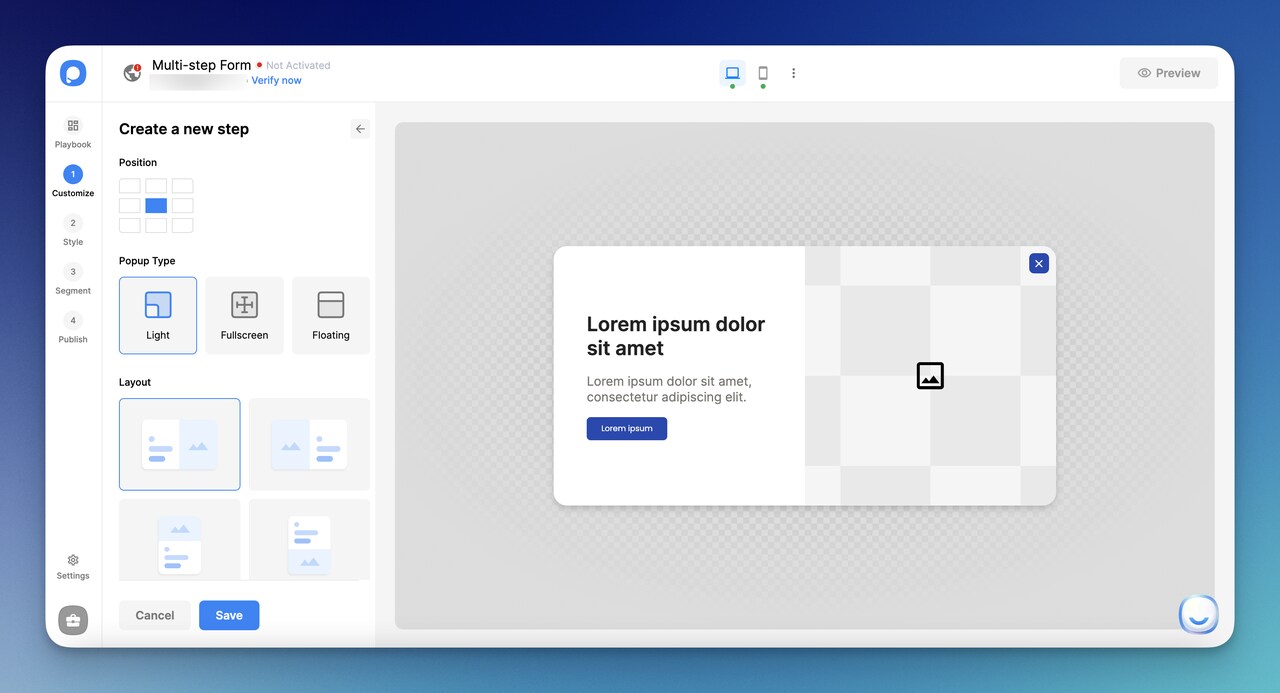
📝 Side note: If you want to create your multi-step popup by yourself, you can add a new step with the Add a new step button and customize it as well. Choose the new step's layout, type and position, then save it.
Step 2: Customize your Multi-Step Form Popup
To create unity, customize the look of each step of your multi-step form popup. You can adjust all details to match your branding.
Also, you can customize the steps independently from each other. To link them, select a button in the first step, open its Action dropdown, choose Show the Page and pick the step it should open.
Step 3: Style Your Popup
Adjust the style of your popup by changing the style of the elements you use.
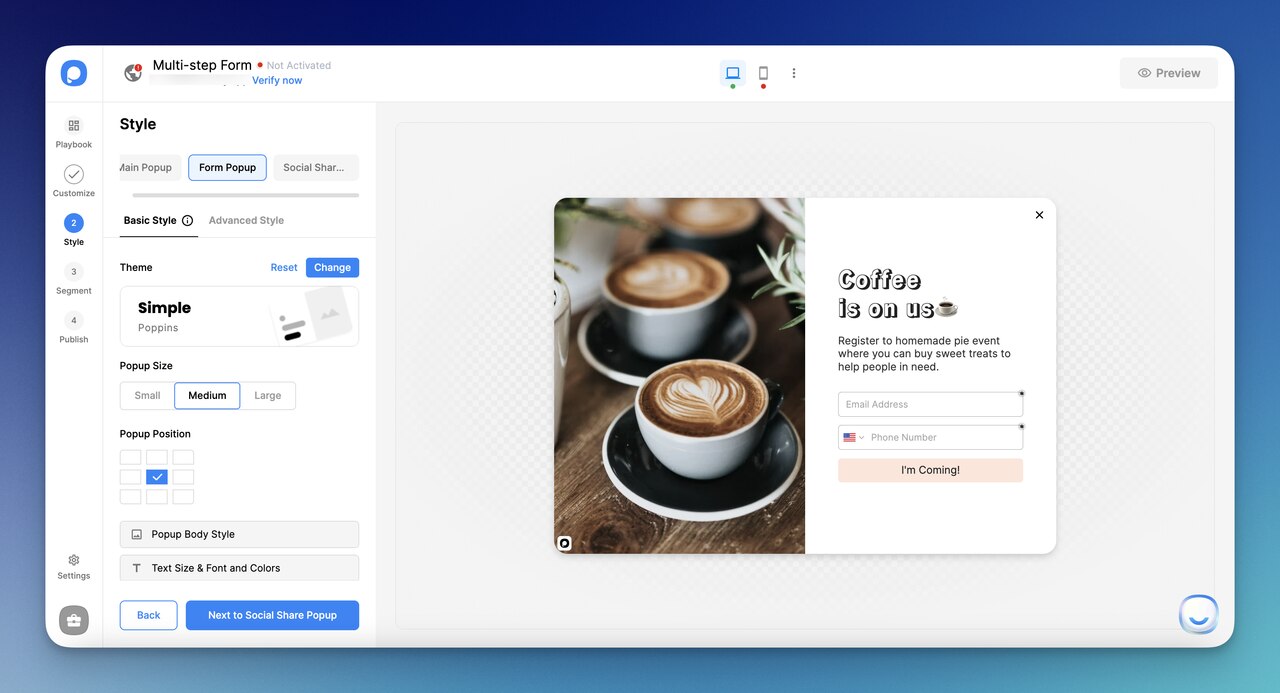
Step 4: Determine the Segment
For targeting your audience directly, you can determine the segment in terms of audience, user behaviour, and frequency settings.
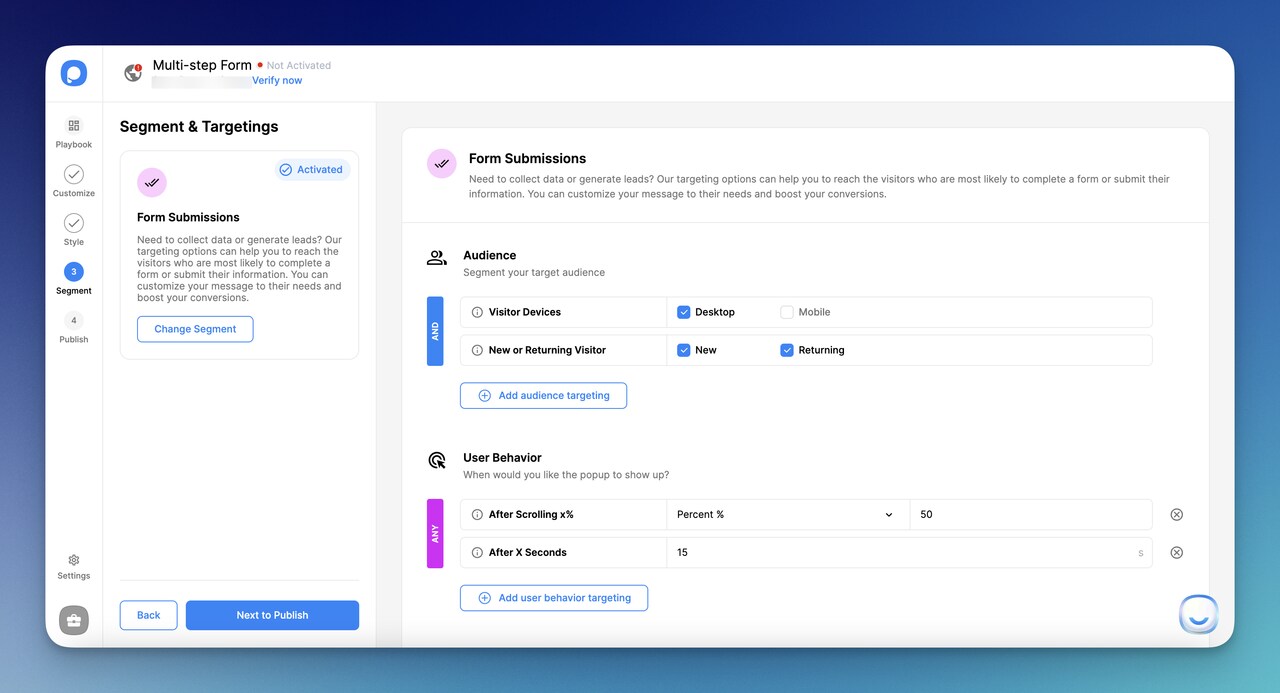
Popupsmart's builder steps, screenshots from July 2024.
Step 5: Finalize and Publish
Click Save, then review your multi-step popup and its targeting summary in the Publish step, and click Publish to make your multi-step form live. The popup shows on websites where Popupsmart's embed code is installed and the website is verified.
Note: Your multi-step form can have more than one step according to your business requirements and campaign goals. Adjust each step's settings and appearance for a smooth user experience. For ten ways to use the format, see the multistep popups guide.
Top 5 Multi-Step Form Examples
The following top 5 multi-step form examples effectively demonstrate how the brand aims to understand the needs of potential customers and create solutions. We checked each one in October 2026; the screenshots carry their dates.
Now, let's have a look at them and better understand the use of multi-step forms.
1. QuizRise
QuizRise is an AI quiz generator that helps you create questions for your tests, quizzes, and examples.
The multi-step form welcomes you when you register for the app during onboarding.
The app needs your role and then tries to get to know your primary goal for using the app.
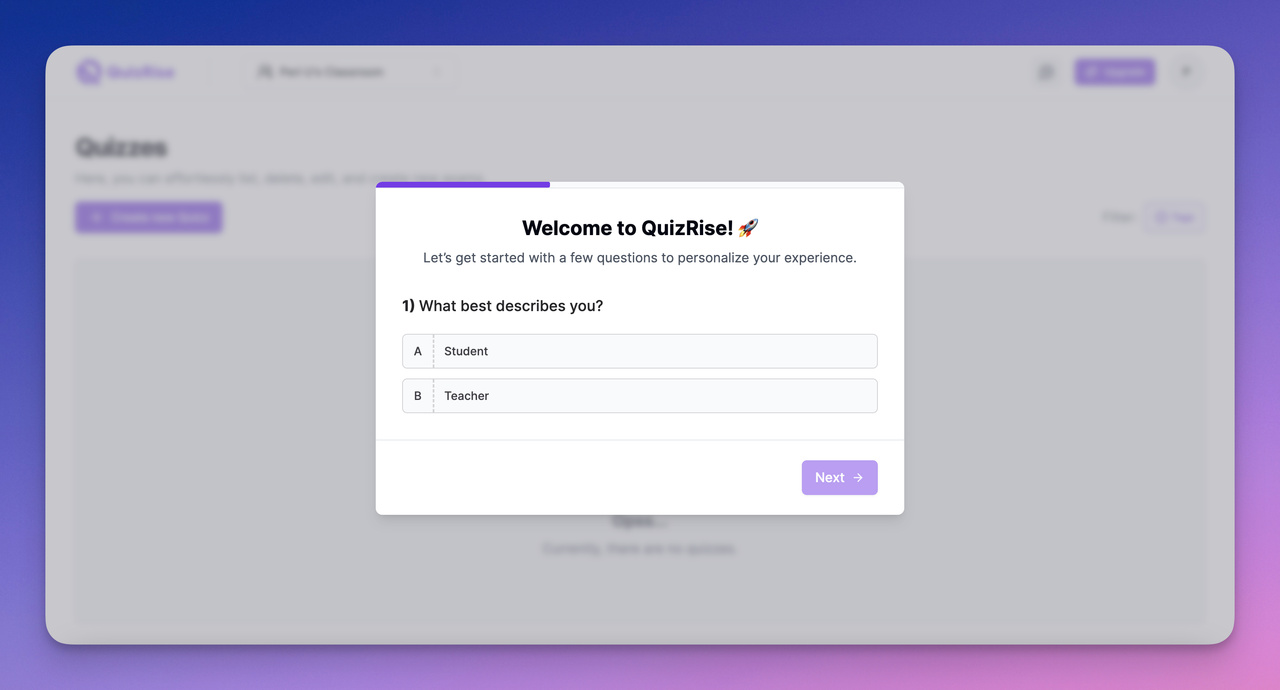
It does not bore new users, provides a smooth transition at the start, and creates a classroom for your activities.
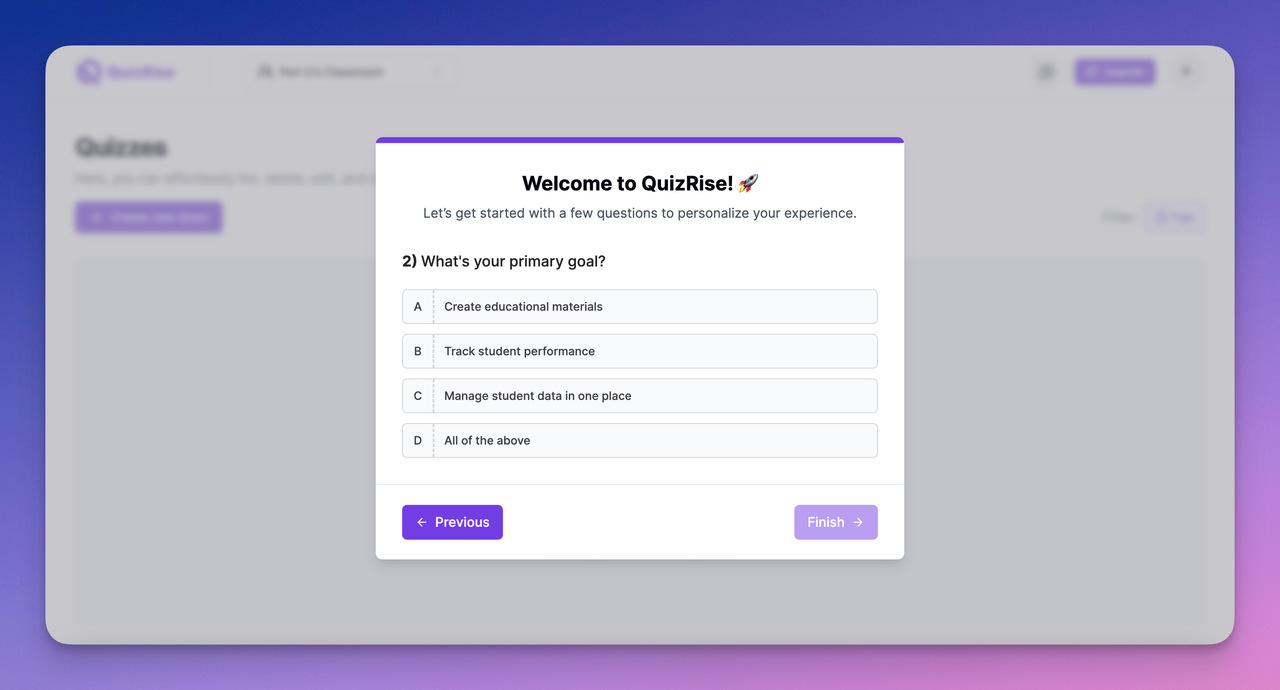
QuizRise onboarding, screenshots from July 2024. The site is live in October 2026, but the onboarding sits behind sign-up, so we haven't rechecked these steps.
2. Duolingo
Duolingo is one of the most well-known language learning apps that lead users through the step-by-step learning process.

Duolingo presents a multi-step form on the homepage. Click Get started and it asks for your target language.
Then, there come questions, like how you heard about Duolingo, how your time fits, your language level and so on.
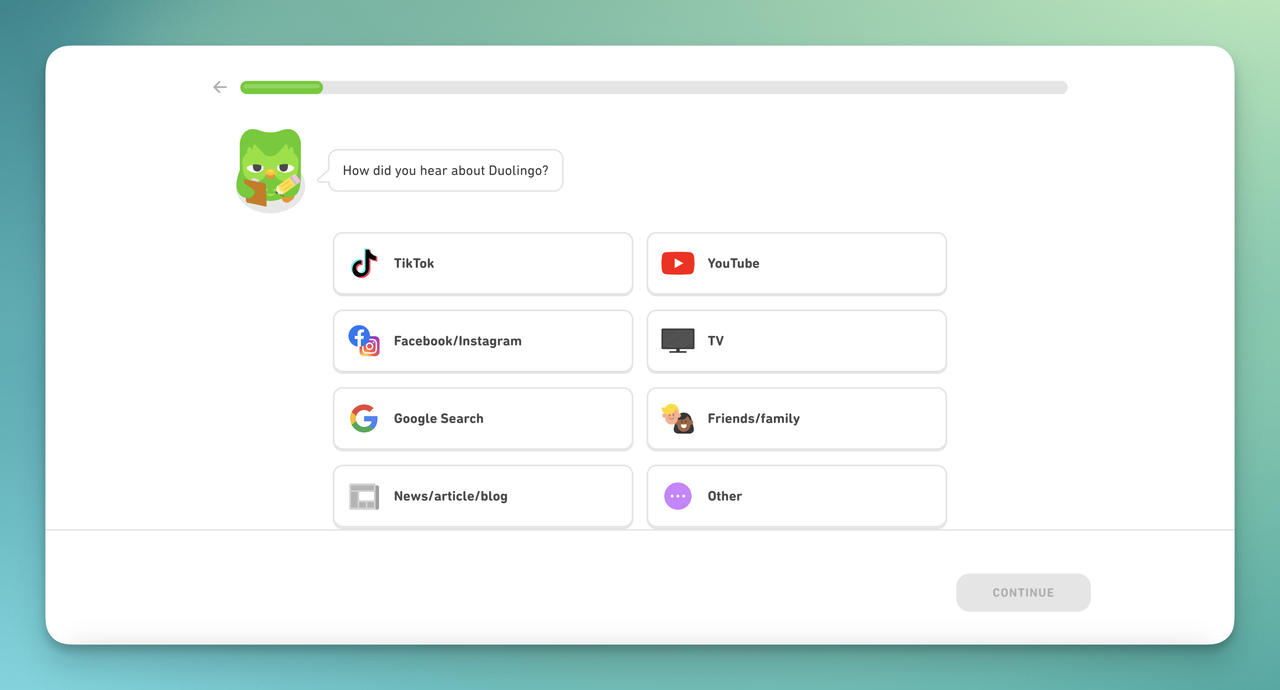
Duolingo's sign-up steps, screenshots from July 2024. The flow still opens with "I want to learn..." in October 2026.
These questions help Duolingo get to know the learner better and create a working flow.
Though it is a very thorough approach, Duolingo's multi-step form is longer than QuizRise's form.
3. GEICO
GEICO is an insurance company that creates quotes based on your criteria and the details you provide.
To provide details, visitors fill out the form step-by-step and finally reach the result that is most appropriate for them.
The homepage presents buttons to get the quote practically: under "Get a quote today", you pick a product such as Car or Homeowners.
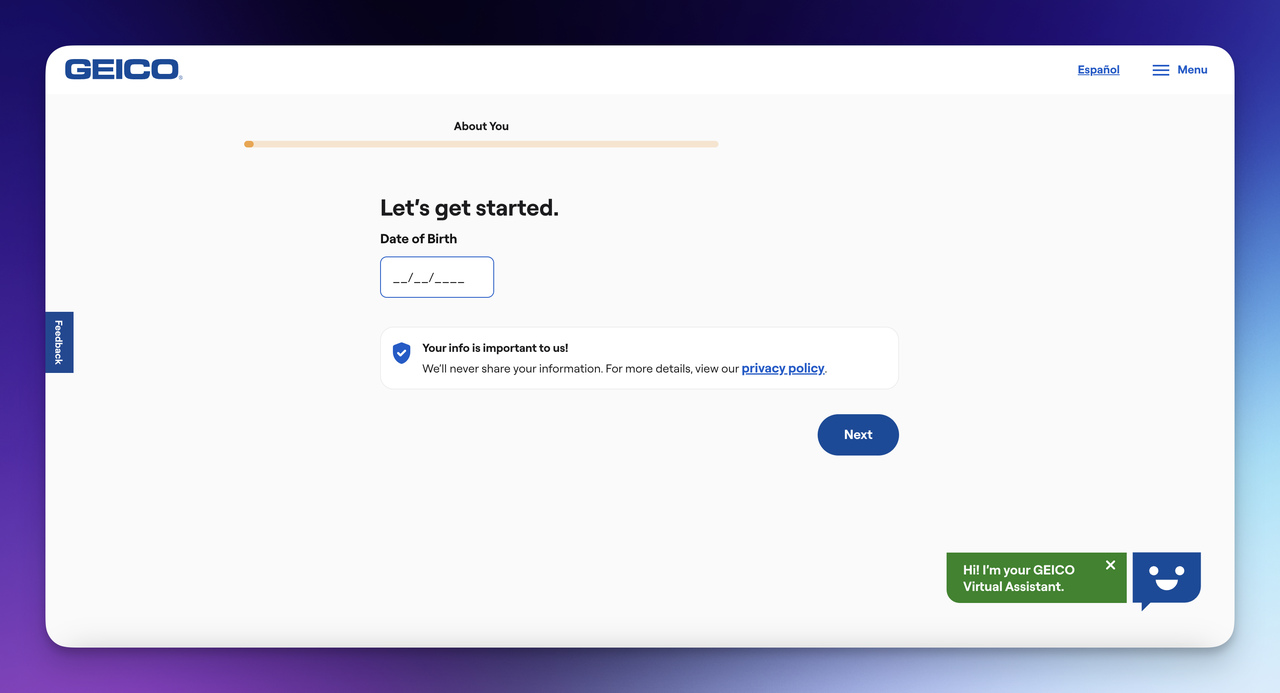
There are not many questions, and the length of the multi-step form is average.
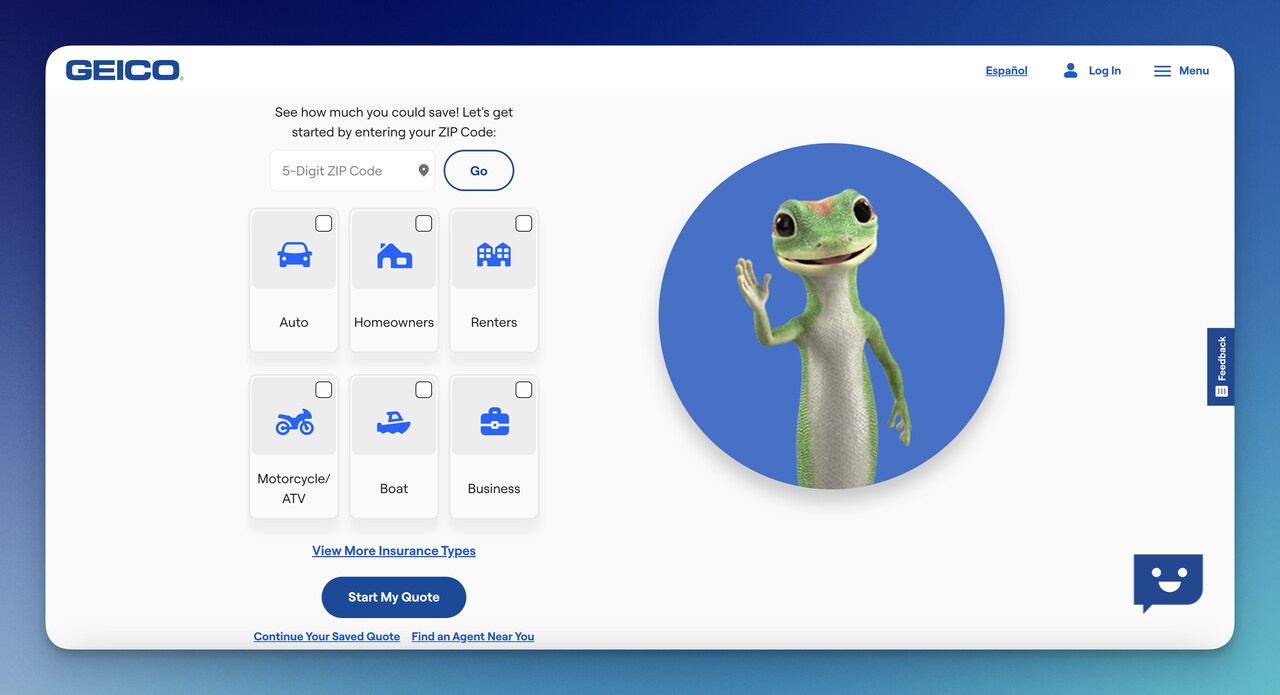
GEICO's quote form, screenshots from July 2024. In October 2026 the homepage still starts the quote with product buttons.
4. GOV.UK
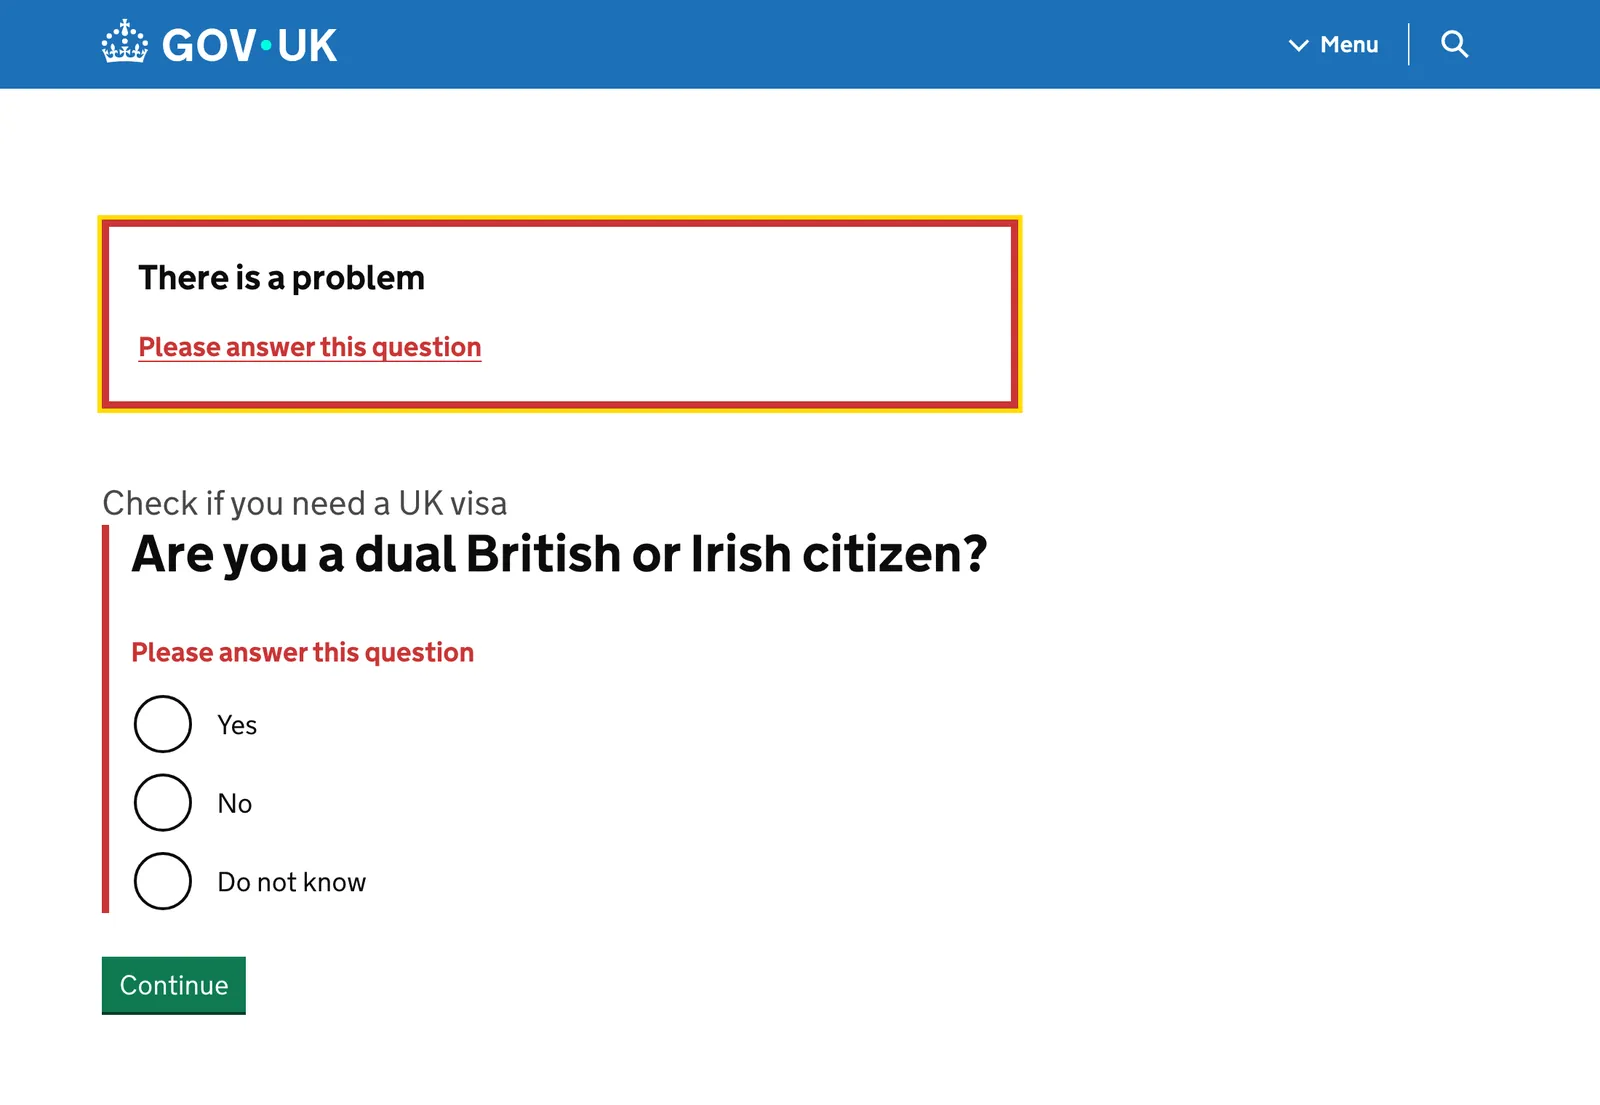
Check if you need a UK visa is a GOV.UK service that asks one question per page. It starts with your nationality, then asks if you're a dual British or Irish citizen, and keeps your earlier answers in a "Your answers" list, each with a Change link.
If you press Continue without answering, the page shows a "There is a problem" summary at the top and the same message on the question itself. That's the pattern the GOV.UK Design System recommends for question pages: "Asking just one question per question page helps users understand what you're asking them to do, and focus on the specific question and its answer."
5. KlientBoost
KlientBoost is a performance marketing agency that creates exclusive marketing campaigns and solutions.
The brand offers a free marketing plan on the homepage and collects the answers from the firms. The form opens with "What do you need help with?" and then asks "What are your goals?".

Based on the answers, the brand shares the plan by considering all your needs.

KlientBoost's free marketing plan form, screenshots from July 2024. The same first step is live in October 2026.
5 Effective Multi-Step Form Templates
Popupsmart has different multi-step form templates that can help you create your own forms by customizing them. They're popup templates, so the form opens over the page.
Here are the top five multi-step form templates we choose for you or you can check the popup template gallery for other templates.
→ 1. Free Sample on Orders Multi-Step Popup
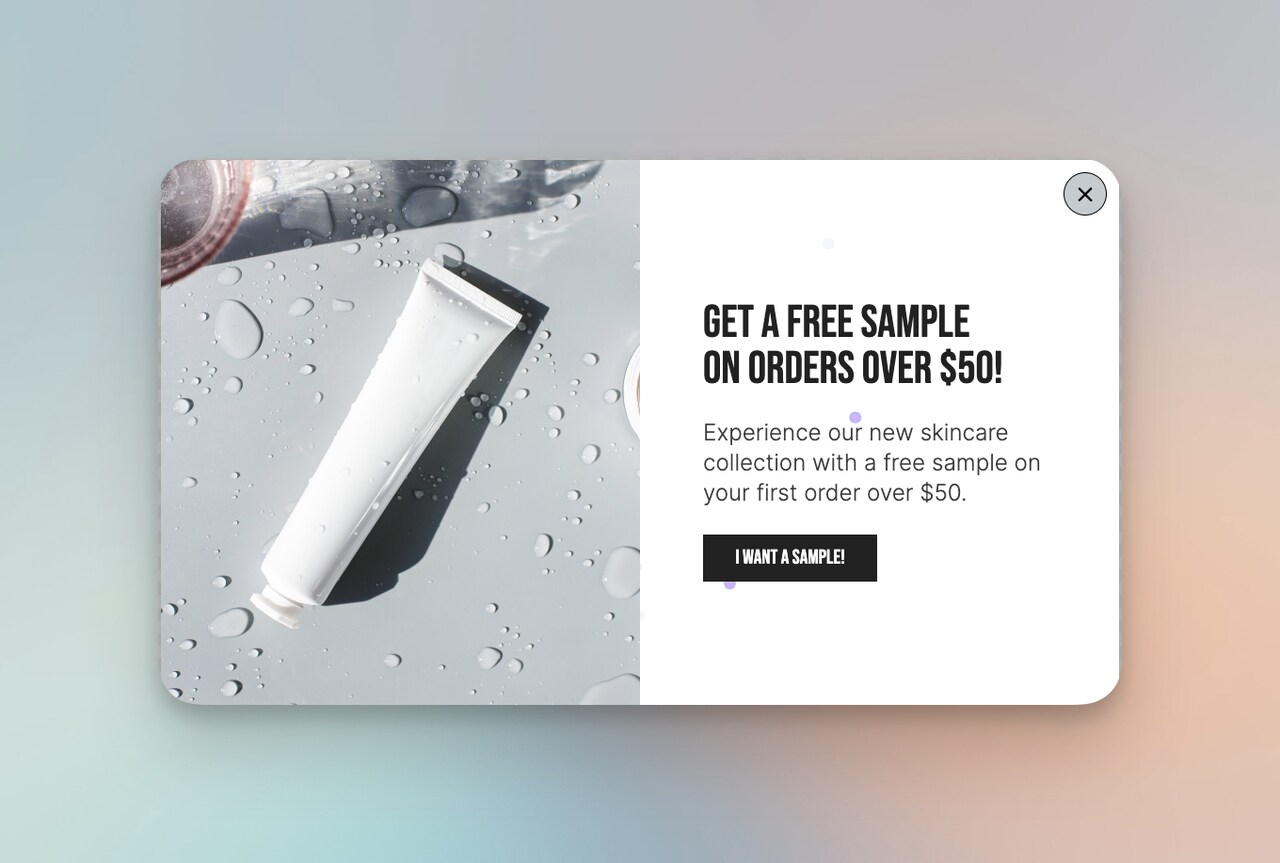
With this popup, you can offer product samples on purchases over a certain amount.
You can also change the amount based on your expectations by customizing your popup.
→ 2. Click-to-Call Multi-Step Popup
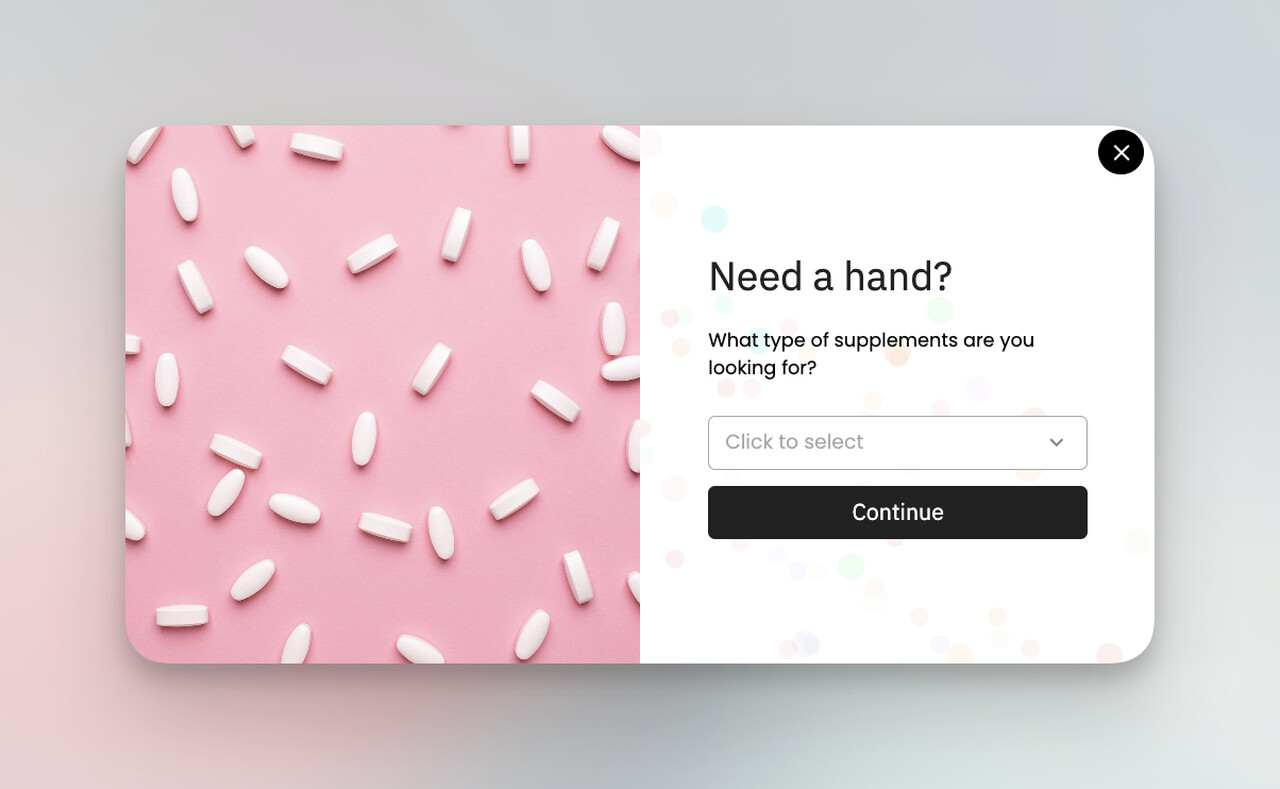
Here is a better example of a multi-step form because each question serves a purpose, and visitors don't mind filling in the form since the questions are effective.
→ 3. Multi-Step Popup to Collect Form Submission

This popup is directly about collecting form submissions and providing a related solution for visitors with questions that want detailed information to learn better.
→ 4. Multi-Step Popup to Collect Job Applications

This multi-step popup sample is for job applications to display that creating pages for job applications is not necessary, but multi-step popups can also be a solution for you to choose from.
→ 5. Customer Satisfaction Multi-Step Popup
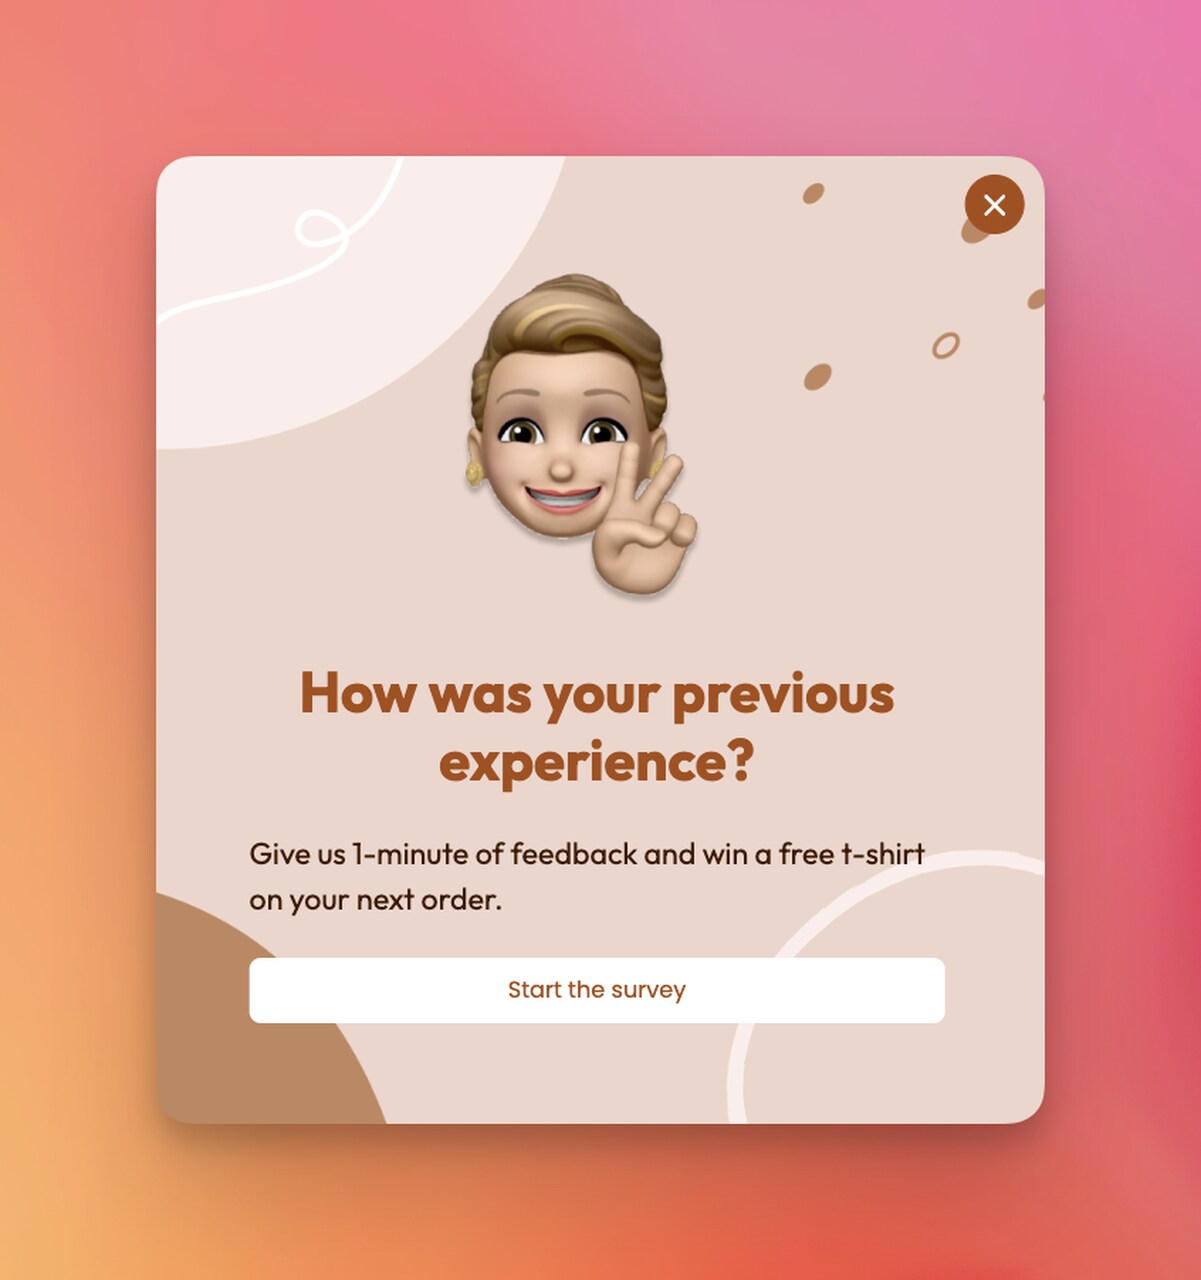
This multi-step form is for gaining attention and collecting feedback. Since providing feedback is voluntary, the popup asks first. Then the steps bring different types of questions, one at a time, without disturbing visitors.
Why Use Multi-Step Form
A multi-step form is worth it when a form is long, has groups of related questions, or changes based on earlier answers. For two or three fields, a single-step form is simpler.
| Benefit | Description |
|---|---|
| Improves User Experience | Breaks down lengthy forms into manageable steps, making it less overwhelming for users. |
| Can Help Long Forms Get Finished | Shorter screens make a long form feel lighter. Whether completion rises depends on the form, so compare it with a single-page version. |
| Enhanced Data Quality | Reduces errors as users focus on fewer fields at a time. |
| Mobile-Friendly | Easier to navigate on mobile devices compared to long, single-page forms. |
| Logical Flow | Organizes information in a logical sequence, guiding users through each step. |
| Conditional Logic | Later steps can change based on earlier answers, so people skip questions that don't apply to them. |
| Progress Indicators | Visual cues show users their progress, encouraging them to complete the form. |
| Segmented Validation | Allows for step-by-step validation, ensuring each section is correctly filled before moving on. |
Do Multi-Step Forms Increase Conversion?
Not by default. A multi-step form can help a long or branching form. On a short form, the extra clicks can cost more than they save. There's no current, published study with a stated method that settles the question for web forms in general; most of the figures that circulate come from older vendor case studies.
For popups, we have our own data. In popups, Popupsmart's 2026 benchmark found that multi-step forms show no measurable conversion advantage over single-step forms once step-1 clicks without contact details are excluded. A lead there is a popup submission that contains an email address or phone number, and the rate divides leads by popup displays, across campaigns from January 2024 to September 2026 (method and definitions in Popupsmart's 2026 popup benchmark). The finding describes popup forms only, so don't read it as a verdict on a checkout or registration form.
What steps can do for a long form:
→ By breaking down a lengthy form into smaller, digestible sections, users are less likely to feel overwhelmed.
→ This structured approach also allows for better information organization, logical flow, and clear progress indicators, all of which make a long form easier to follow.
→ Multi-step forms also reduce cognitive load, which makes filling in the form more manageable and enjoyable.
So test your own form. Count completed submissions, not clicks on step one, and compare them with a single-page version of the same form. And if a tool reports a big lift from adding a step, check what it counts as a conversion first.
Use Case: A Course Registration Form
Picture this scenario. An online education platform offers a variety of courses. Previously, it used a single-page form for course registration, which included multiple fields for personal information, course preferences, payment details, and more. Say many users abandoned the form halfway due to its length and complexity.
The organization decided to implement a multi-step form to improve the registration process. Here's how it could be structured:
Step 1: Personal Information: First Name, Last Name, Email Address
Step 2: Course Selection: Select Course(s) of Interest, Preferred Learning Schedule
Step 3: Payment Information: Credit Card Details, Billing Address
Step 4: Confirmation: Review Details, Submit
By breaking the form into four clear and manageable steps, the platform makes the registration process easier to navigate. Each step asks for one kind of information, the progress indicator shows how far along the student is, and payment comes after the student has chosen a course. The confirmation step lets students check their answers and go back to change one, as GOV.UK's "Your answers" list does.
Measure completed registrations before and after the change to see whether the steps helped.
Also, you can adapt this kind of process for different sectors as well, like:
- E-commerce: Splitting the checkout process into steps.
- Healthcare: Collecting detailed patient information.
- Event Management: Managing complex event registrations.
- Real Estate: Gathering full client details.
To Conclude
Multi-step forms simplify complex data inputs into manageable steps.
By properly choosing the right solution, you can enhance your platform's user journey and overall user experience. Build yours with accessible code or a no-code builder, keep each step short, and measure completed submissions to see whether the steps help your form.
Frequently Asked Questions
Multi-Step Forms vs. Single-Step Forms: Which is Better?
It depends on the form. Multi-step forms break long forms into manageable steps, and this approach is ideal for detailed information collection, such as registrations, applications and quotes. While single-step forms are fine for short tasks of two or three fields, extra steps there only add clicks. In popups, Popupsmart's 2026 benchmark found that multi-step forms show no measurable conversion advantage over single-step forms once step-1 clicks without contact details are excluded.
How do multi-step forms impact mobile user experience?
Multi-step forms work well on mobile devices when each step fits on one screen. They reduce the need for excessive scrolling and make it easier for users to input information on smaller screens. This enhances the overall mobile user experience. Use the right input types (email, tel, date) so phones show the right keyboard, and check that Back keeps every answer.
What are some common mistakes to avoid when creating multi-step forms?
Common mistakes to avoid include making each step too long or complex, not providing clear navigation or progress indicators, failing to optimize the form for mobile devices, overloading users with too many fields in a single step, and neglecting to test the form for usability and functionality before going live. Accessibility mistakes count too: inputs without labels, focus left on the old Next button, and a Back button that clears answers.
How do I ensure the security of data collected through multi-step forms?
To ensure the security of data collected through multi-step forms, you can use HTTPS to encrypt data transmission, implement validation and sanitization to prevent SQL injection and other attacks, regularly update your form software and plugins, and store data securely and comply with relevant data protection regulations. Run that validation on the server: browser checks like the ones in this guide are easy to bypass.
How many steps should a multi-step form have?
As few as the information needs. Group related questions, such as name, contact details and payment, and give each group its own step. The GOV.UK Design System goes further and asks one question per page. There's no fixed number, so watch where people drop off and merge or cut steps there.
Can you build a multi-step form with only HTML and CSS?
Not one that checks each step and moves focus to the next. Without JavaScript you can split the form across separate pages that your server connects, or show it as one long form, which is what the code in this guide falls back to. To show one step at a time on a single page, add a short script like the one above.
Check these related blog posts as well: