How to Add Size Chart in Shopify: 5 Methods (2026)
Size charts in Shopify improve customer experience, build trust, reduce cart abandonment and returns, and cut return costs. The post outlines 5 ways to add them: page+code, metafield image section, theme popup, Popupsmart app, or size chart apps.
If you are a Shopify store owner, you already know the critical role that user experience plays in the success of an online store. Among the most important aspects of this is providing size details for your products with size charts in Shopify.
To add a size chart in Shopify, you can edit your theme code, use product metafields, create a popup through the theme editor, install a popup builder like Popupsmart, or use a dedicated Shopify size chart app. Each method takes 10-30 minutes and helps reduce returns caused by sizing issues.
What you'll need to add a size chart in Shopify
• A Shopify store with an active theme (Online Store 2.0 recommended for Methods 2-3)
• Product images of your size charts ready to upload
• Basic measurements for your products (chest, waist, hips, inseam, etc.)
• Time estimate: 10-30 minutes per method
• Skill level: Beginner-friendly (Methods 4-5) to Intermediate (Methods 1-3)
Overview of 5 methods oyou can use to add a size chart to your Shopify store:
1. Edit Theme Code: Create a dedicated size chart page and add a "See Size Chart" button to product pages using Liquid code.
2. Use Product Metafields + Image Section: Store size chart images as metafields and display them with the "Image with text" section in your theme editor.
3. Create a Theme Editor Popup: Build a popup block that pulls size chart content from a linked page through Shopify's native popup feature.
4. Use Popupsmart's Shopify App: Install a no-code popup builder to create and display size chart popups with advanced targeting options.
5. Install a Dedicated Size Chart App: Pick a specialized app from the Shopify App Store for template-based size charts with built-in customization.
Why Does Your Shopify Store Need a Size Chart?
Wrong sizing is the single biggest driver of product returns in e-commerce. If you sell clothing, shoes, or any product where fit matters, a size chart on your product pages isn't optional.

Key e-commerce statistics on how sizing issues drive product returns
According to the National Retail Federation, e-commerce return rates hit roughly 19% in 2025, meaning nearly 1 in 5 products sold online got sent back. Fashion retailers saw it spike to 35-40% during holiday seasons.
Here's what a properly placed size chart actually does for your store:
• Cuts return rates and shipping costs: Fewer wrong-size orders means less money lost on reverse logistics, restocking, and replacement shipping.
• Reduces cart abandonment: Shoppers who can't figure out their size often leave without buying. A visible size guide removes that friction.
• Builds buyer confidence: According to Yahoo Finance, 47% of consumers hesitate to purchase when they're unsure about returns. Clear sizing information prevents that hesitation upfront.
• Improves product page conversion rates: Customers who know their size are more likely to complete checkout. That's a direct lift to your Shopify conversion rate.
• Earns better reviews: Products that fit as expected get fewer complaints and more positive feedback.
Comparison of 5 Methods to Add a Size Chart in Shopify
Each method has different trade-offs depending on your technical skill, budget, and how much control you want over the design. Here's a side-by-side breakdown:
| Method | Difficulty | Cost | Customization | Best For |
|---|---|---|---|---|
| Theme Code Editing | Intermediate | Free | High | Developers or stores with a single size chart |
| Product Metafields | Intermediate | Free | Medium | Stores needing different charts per product |
| Theme Editor Popup | Intermediate | Free | Medium | Shopify 2.0 themes with popup block support |
| Popupsmart App | Beginner | Free plan available | High | Non-technical users wanting advanced targeting |
| Size Chart App | Beginner | Free–$9.99/mo | Medium | Stores wanting ready-made templates |
Method 1: Create a Size Chart Page by Editing Your Theme Code
This method creates a standalone size chart page in Shopify, then adds a "See Size Chart" button directly into your product template using Liquid code. It's completely free and gives you full control over placement and styling.
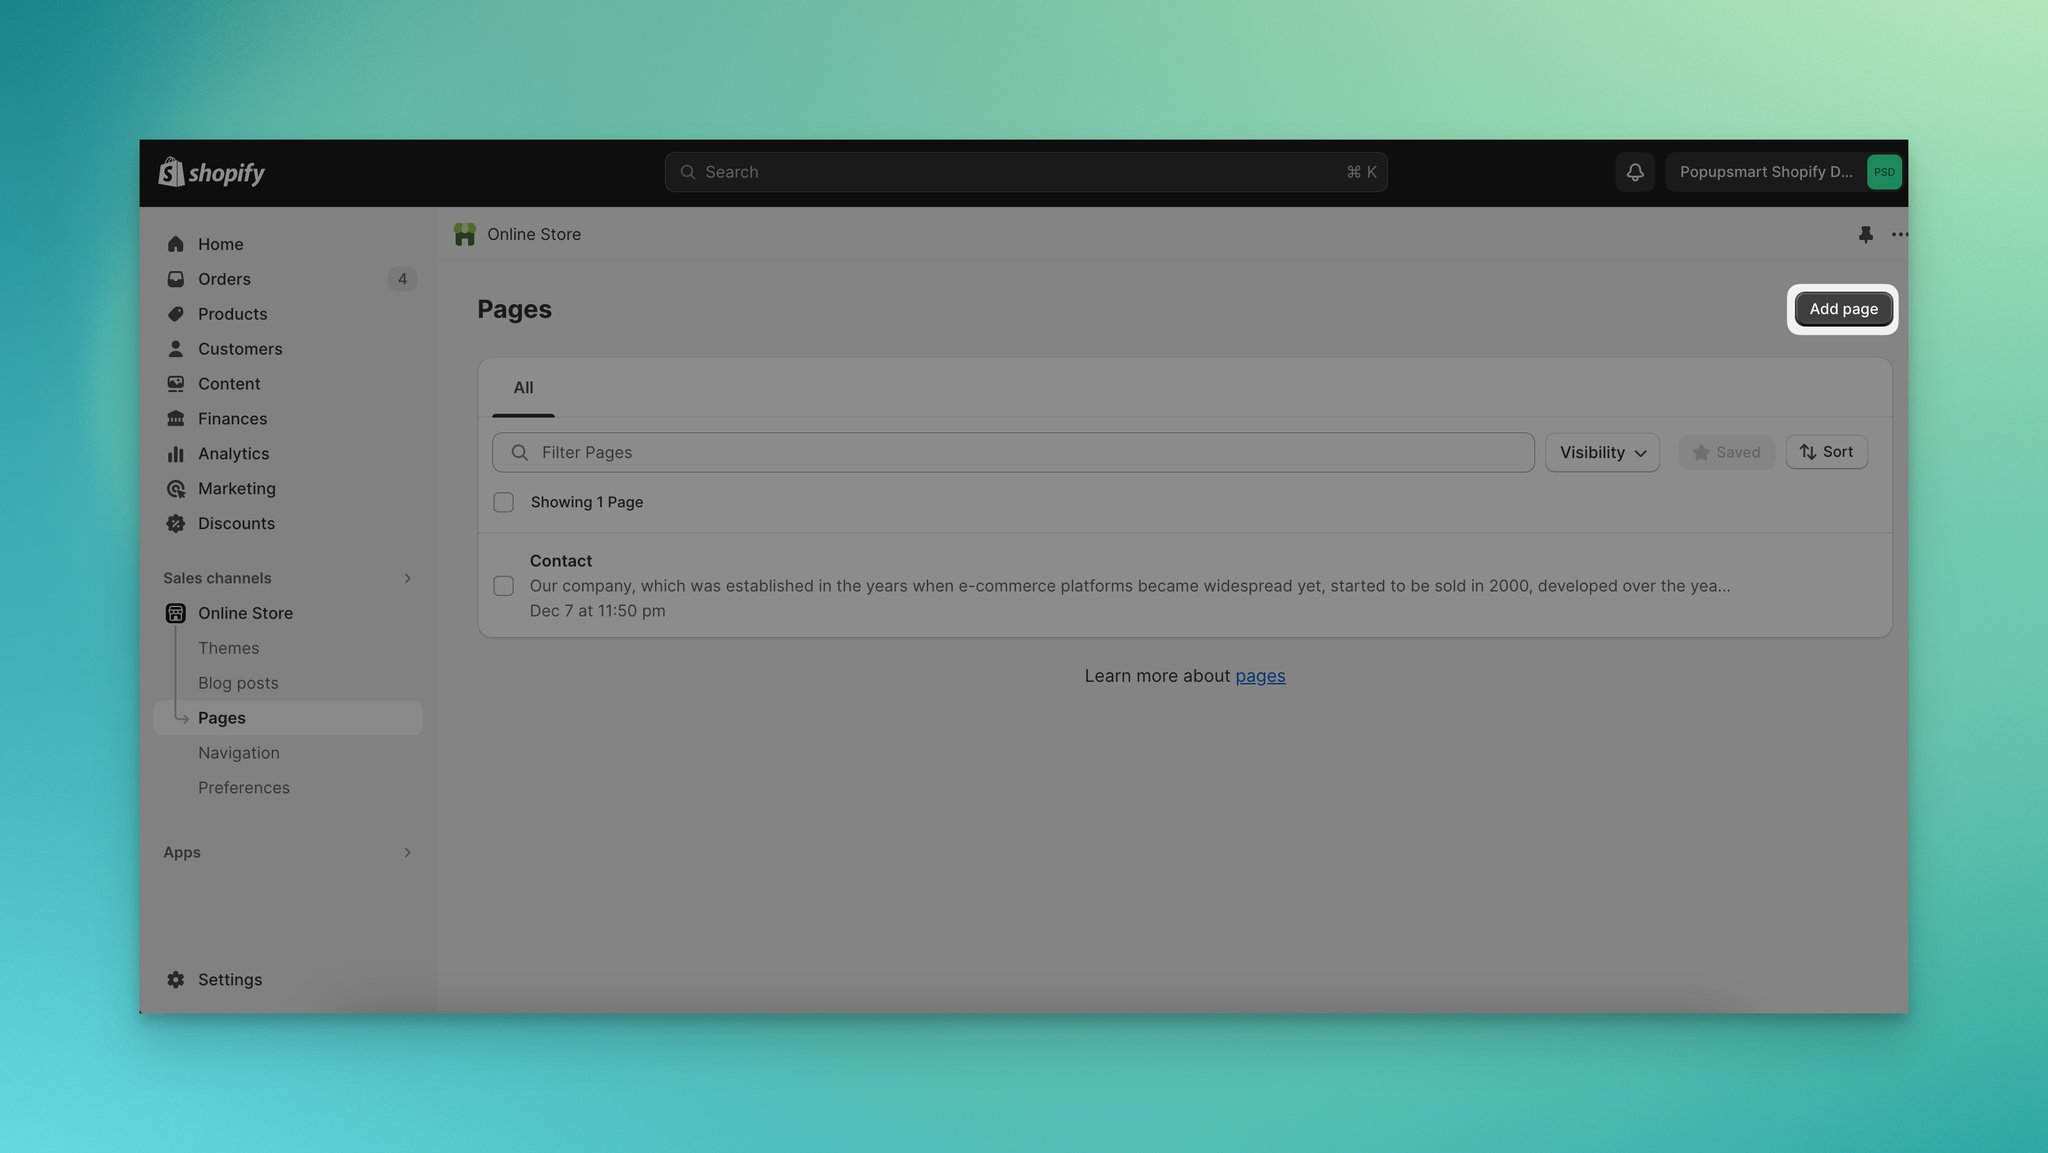
1. Go to your Shopify admin dashboard. Click Online Store in the sidebar, then select Pages.

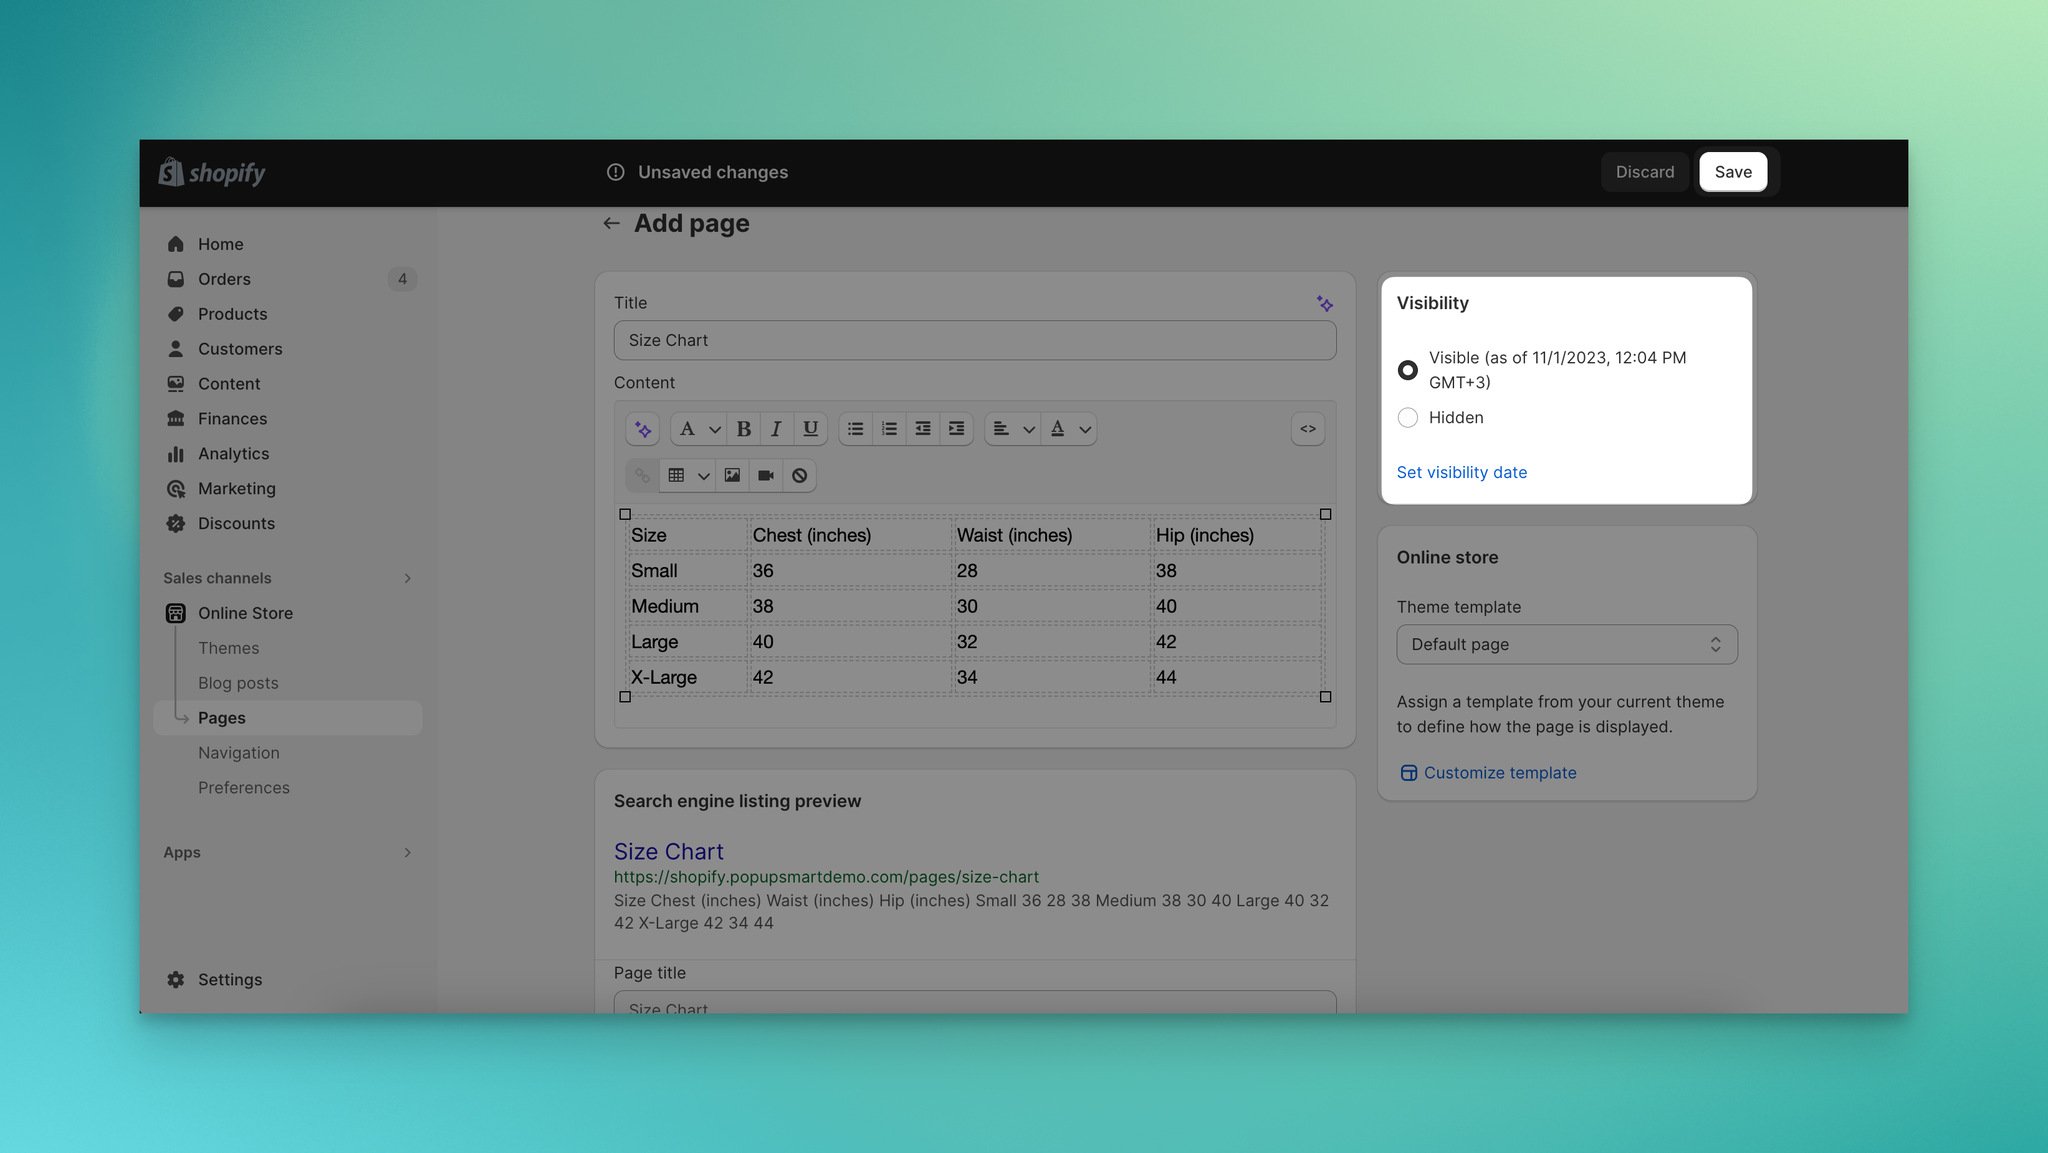
2. Click the Add page button in the top-right corner.
3. Enter a title for your size chart page. The title you choose determines the URL slug and scope:
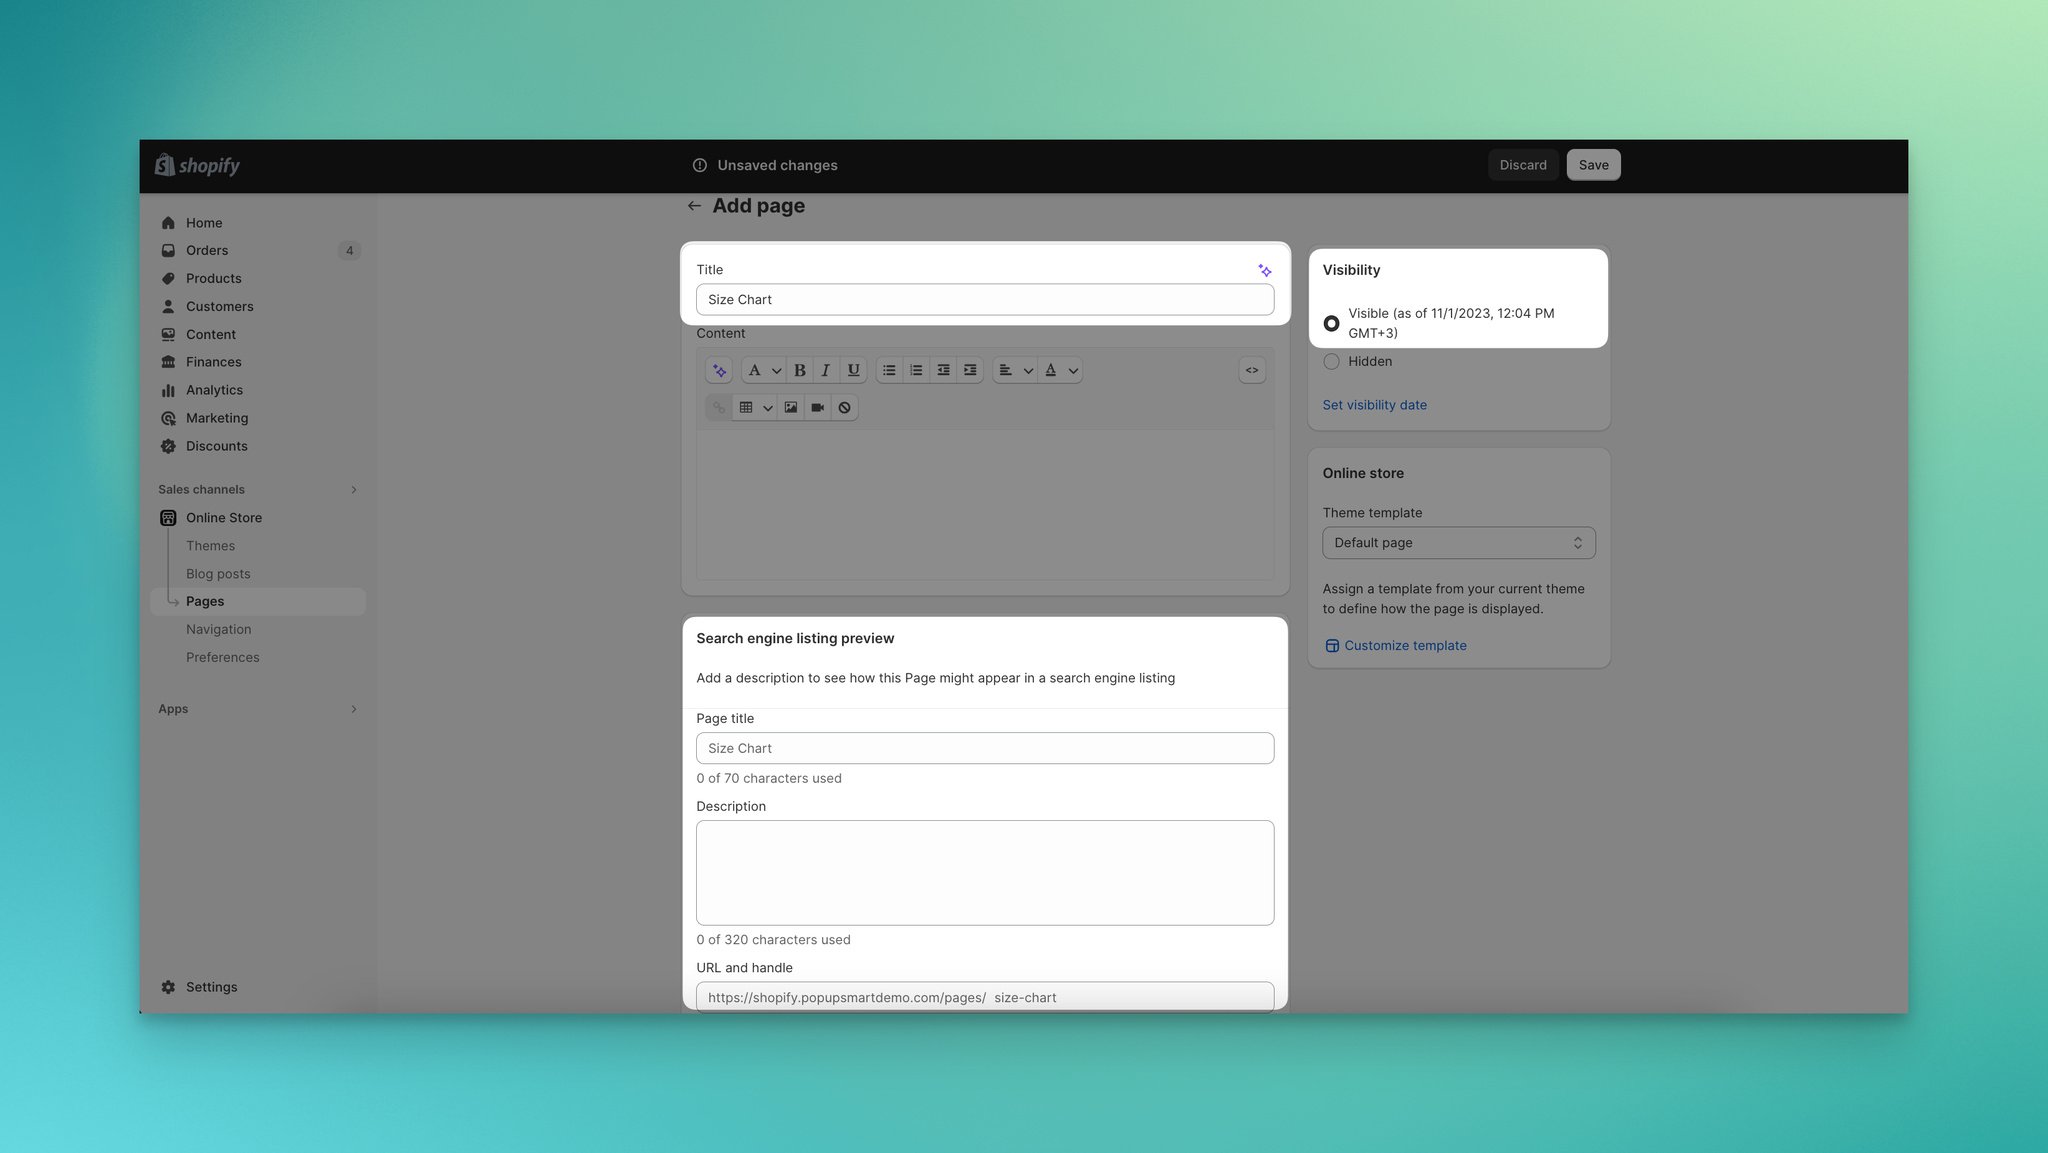
• Site-wide chart: Title it "Size Chart" so the URL ends with /size-chart
• Vendor-specific chart: Use the vendor name followed by "Size Chart" (e.g., "Nike Size Chart") so the URL becomes /nike-size-chart
• Product-type chart: Use the product type plus "Size Chart" (e.g., "Shirts Size Chart") for a URL like /shirts-size-chart
Check the Search engine listing preview section to confirm the URL slug matches your intent.
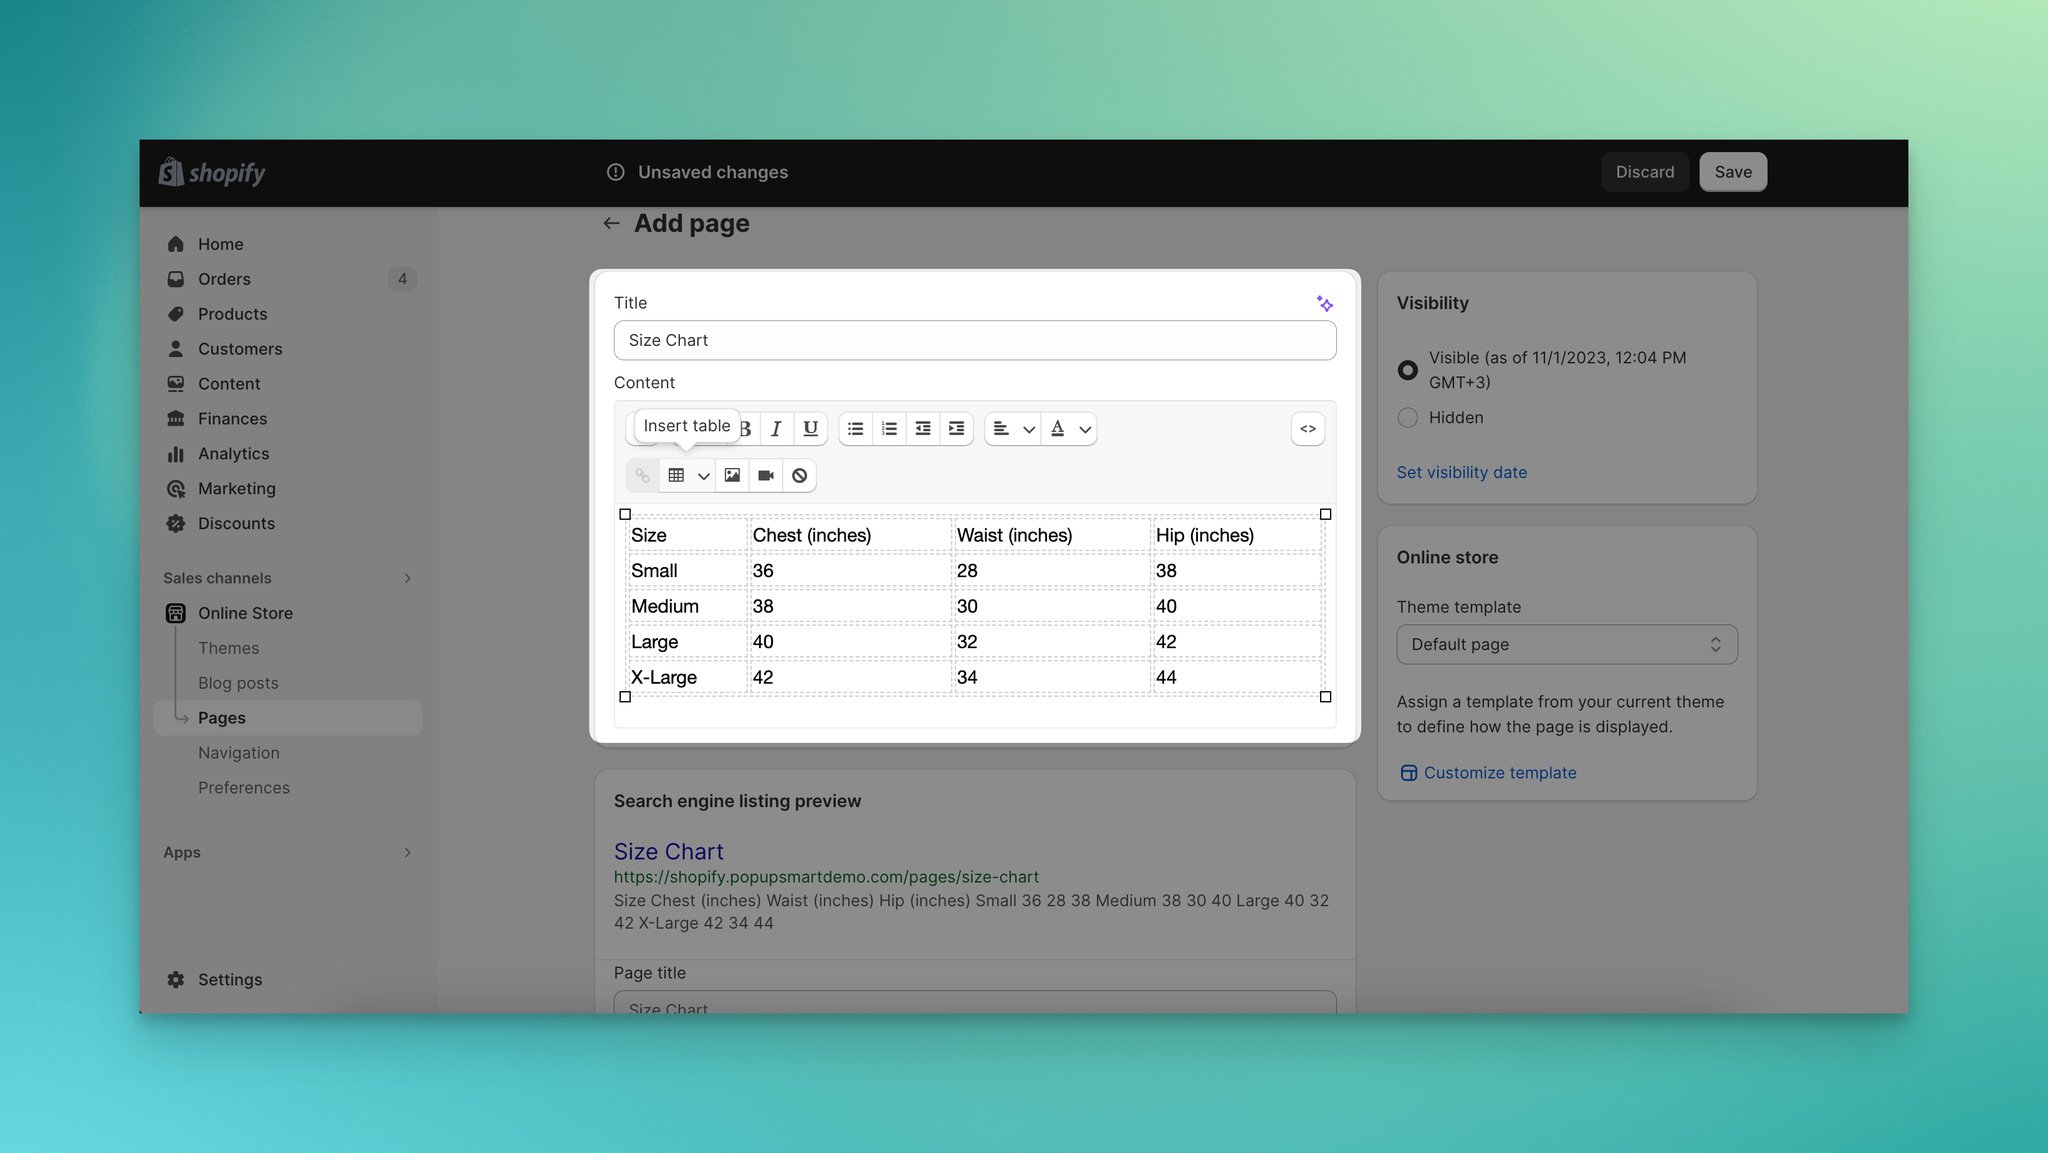
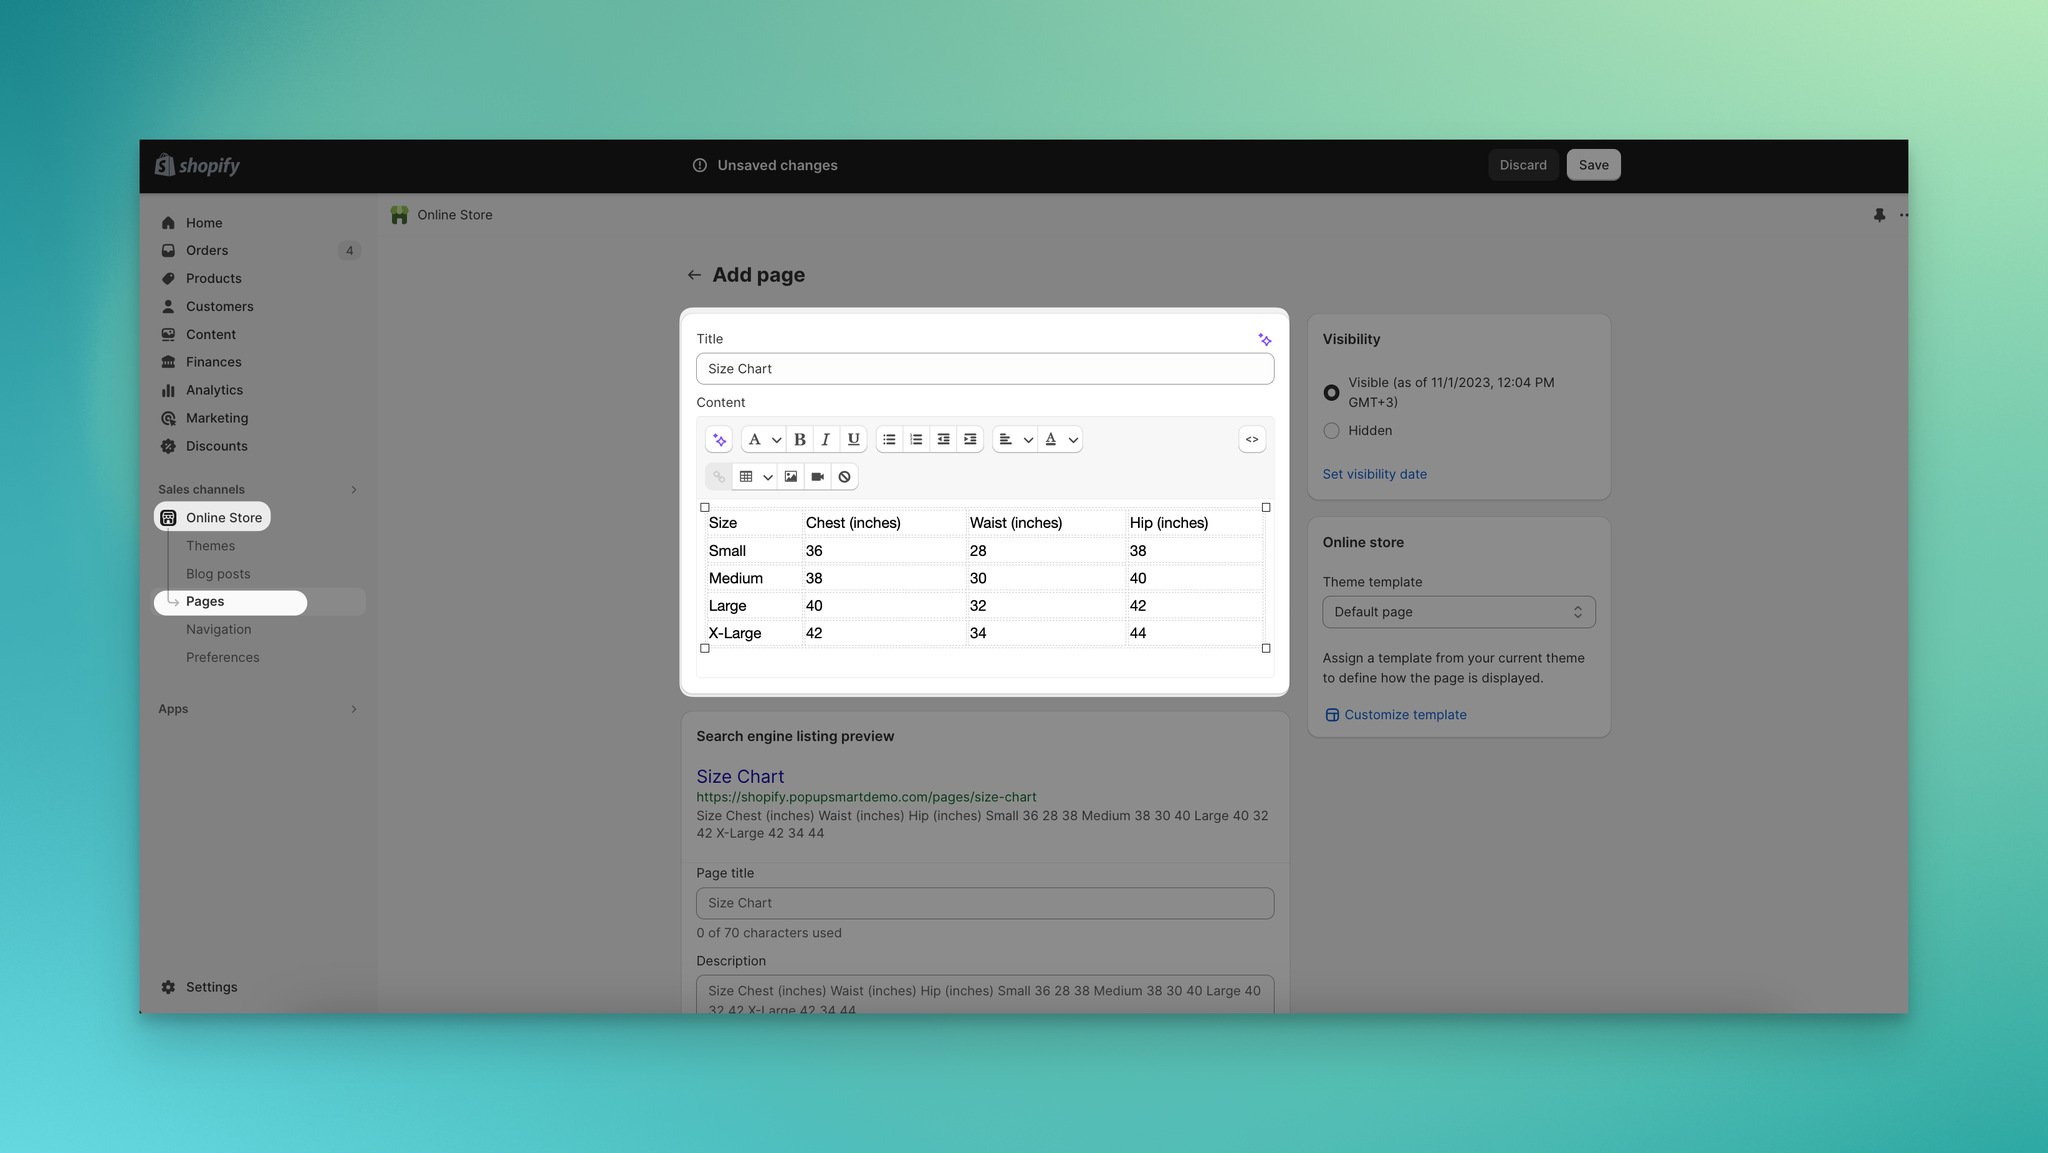
4. In the Content editor, build your size chart table. Include columns for size labels (S, M, L, XL) and rows for each measurement (chest, waist, hips, length). Use the rich text editor's table tool to create the layout.
5. Under Visibility, set the page to Visible. Click Save.
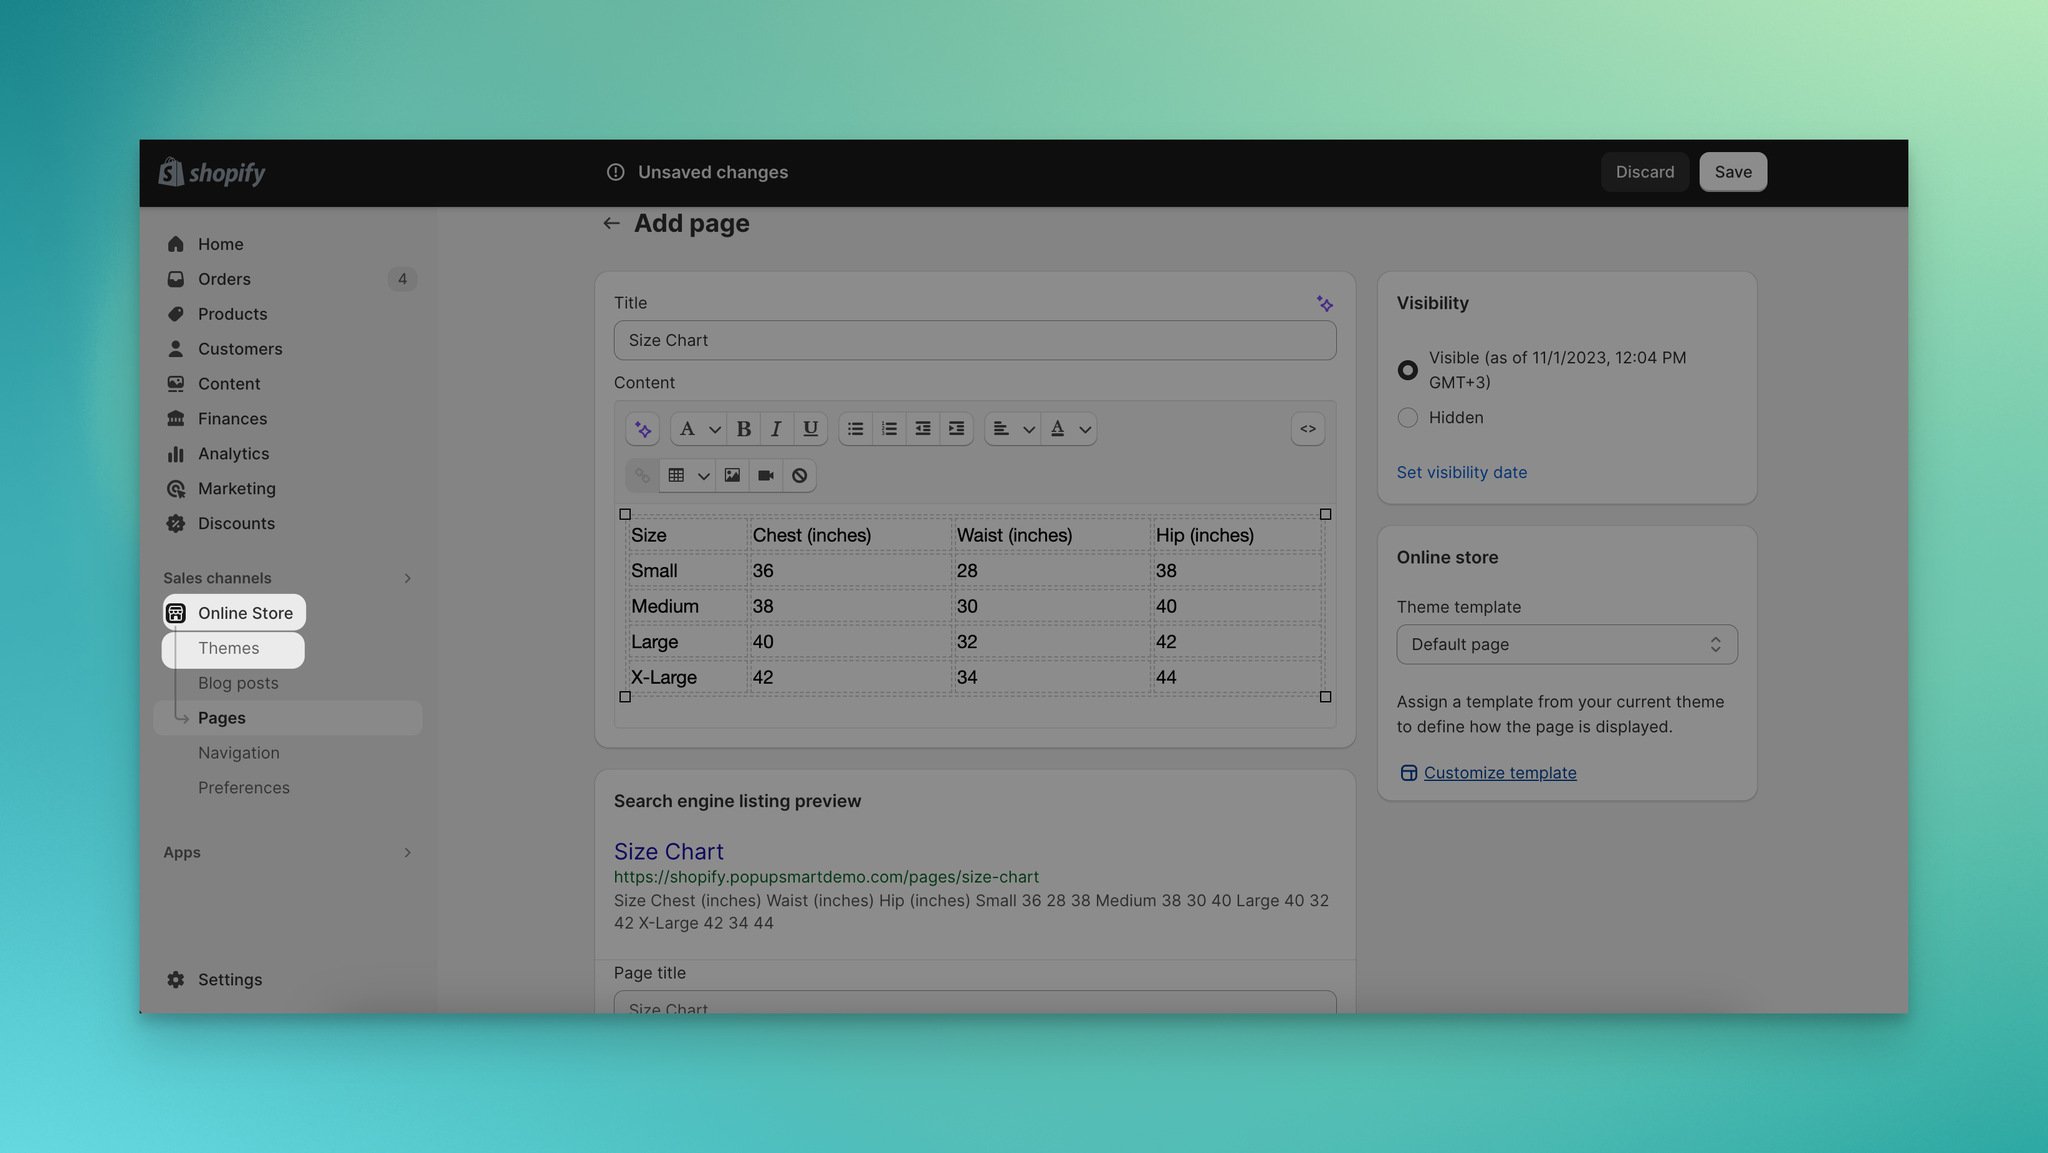
6. Now you need to add the size chart button to your product template. Go to Online Store and select Themes.
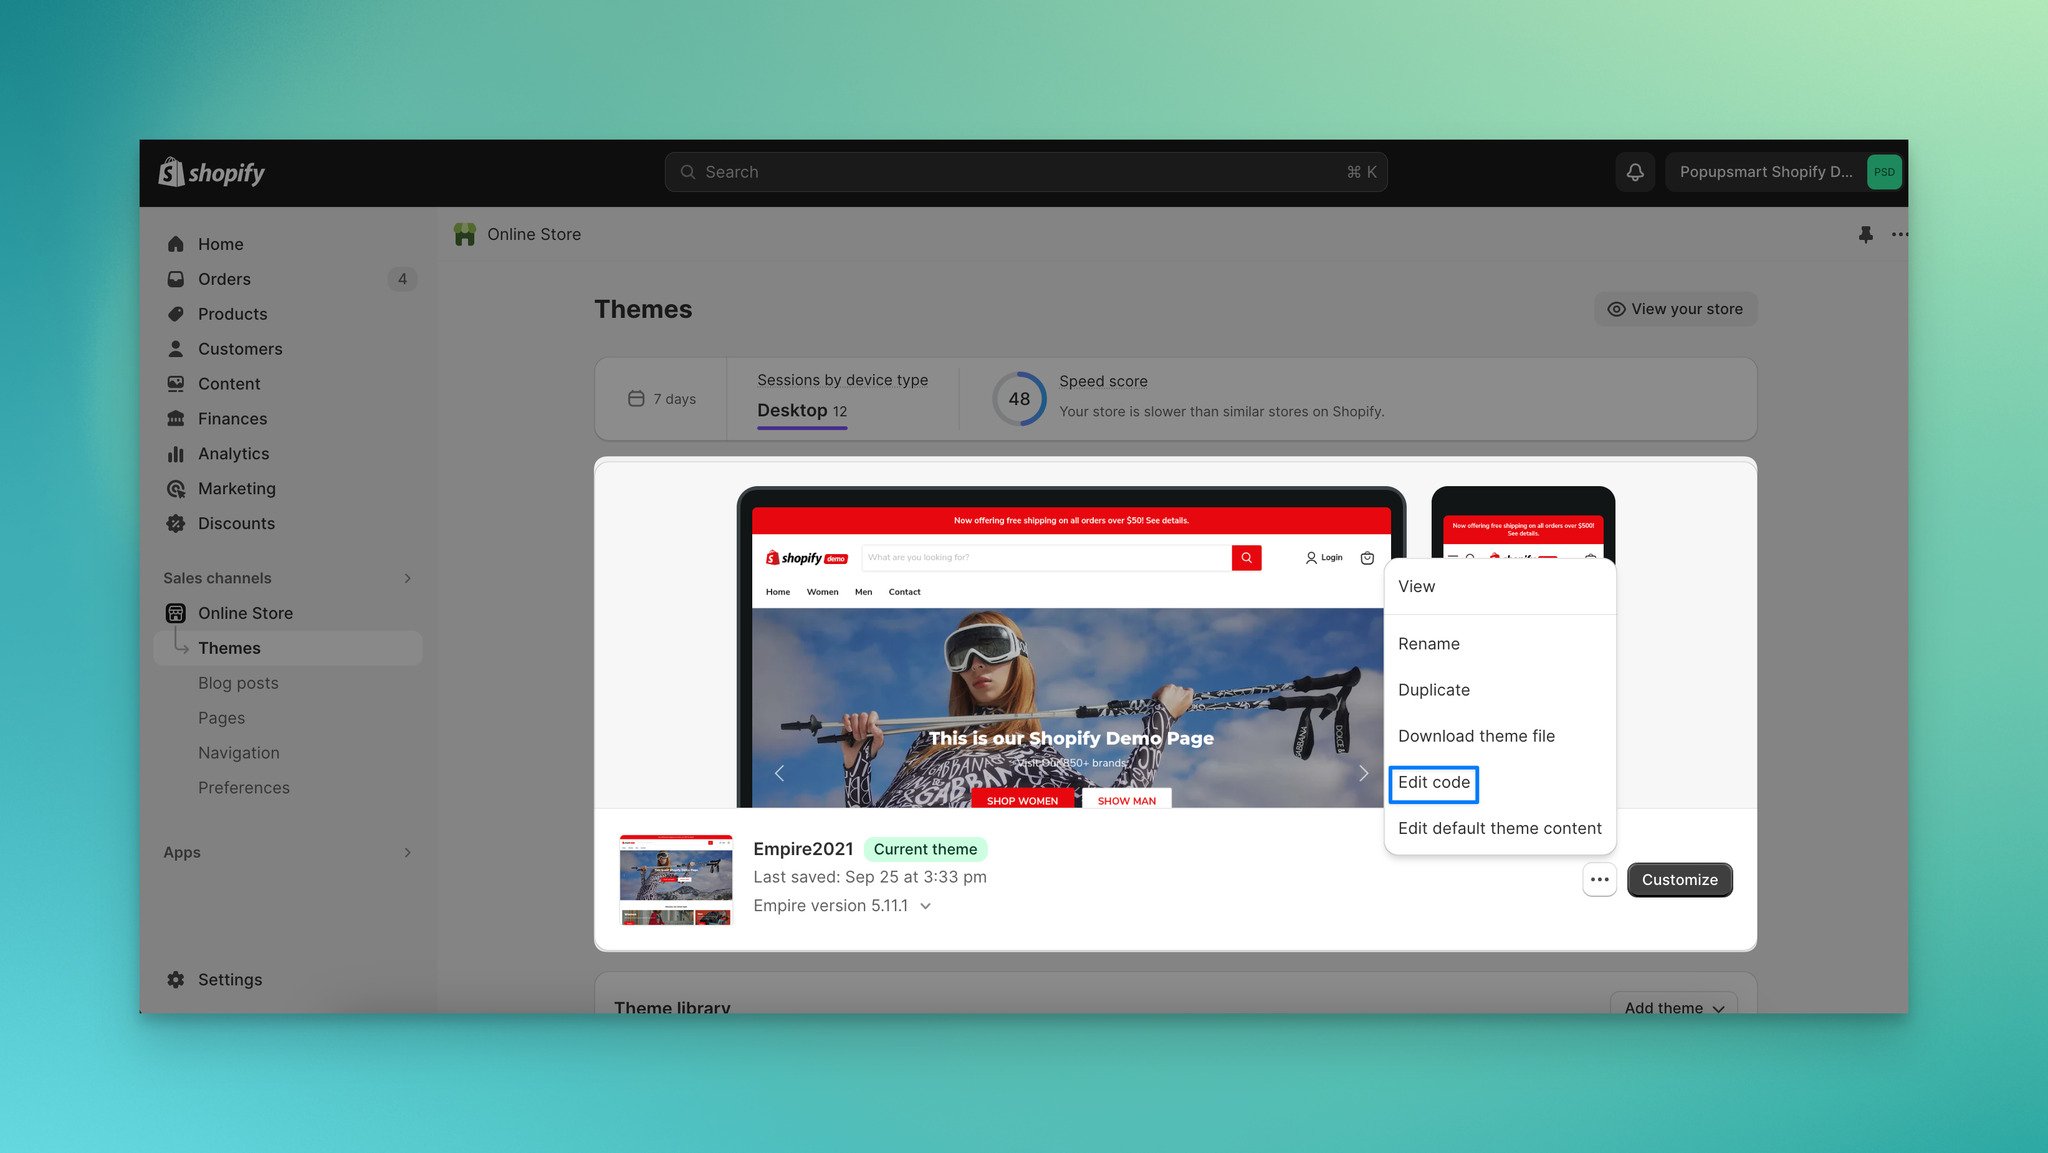
7. Find your active theme, click the three-dot menu (...), and select Edit code.
8. In the code editor, open the Sections directory and find product-template.liquid (the file name may vary by theme, such as main-product.liquid or product.liquid).
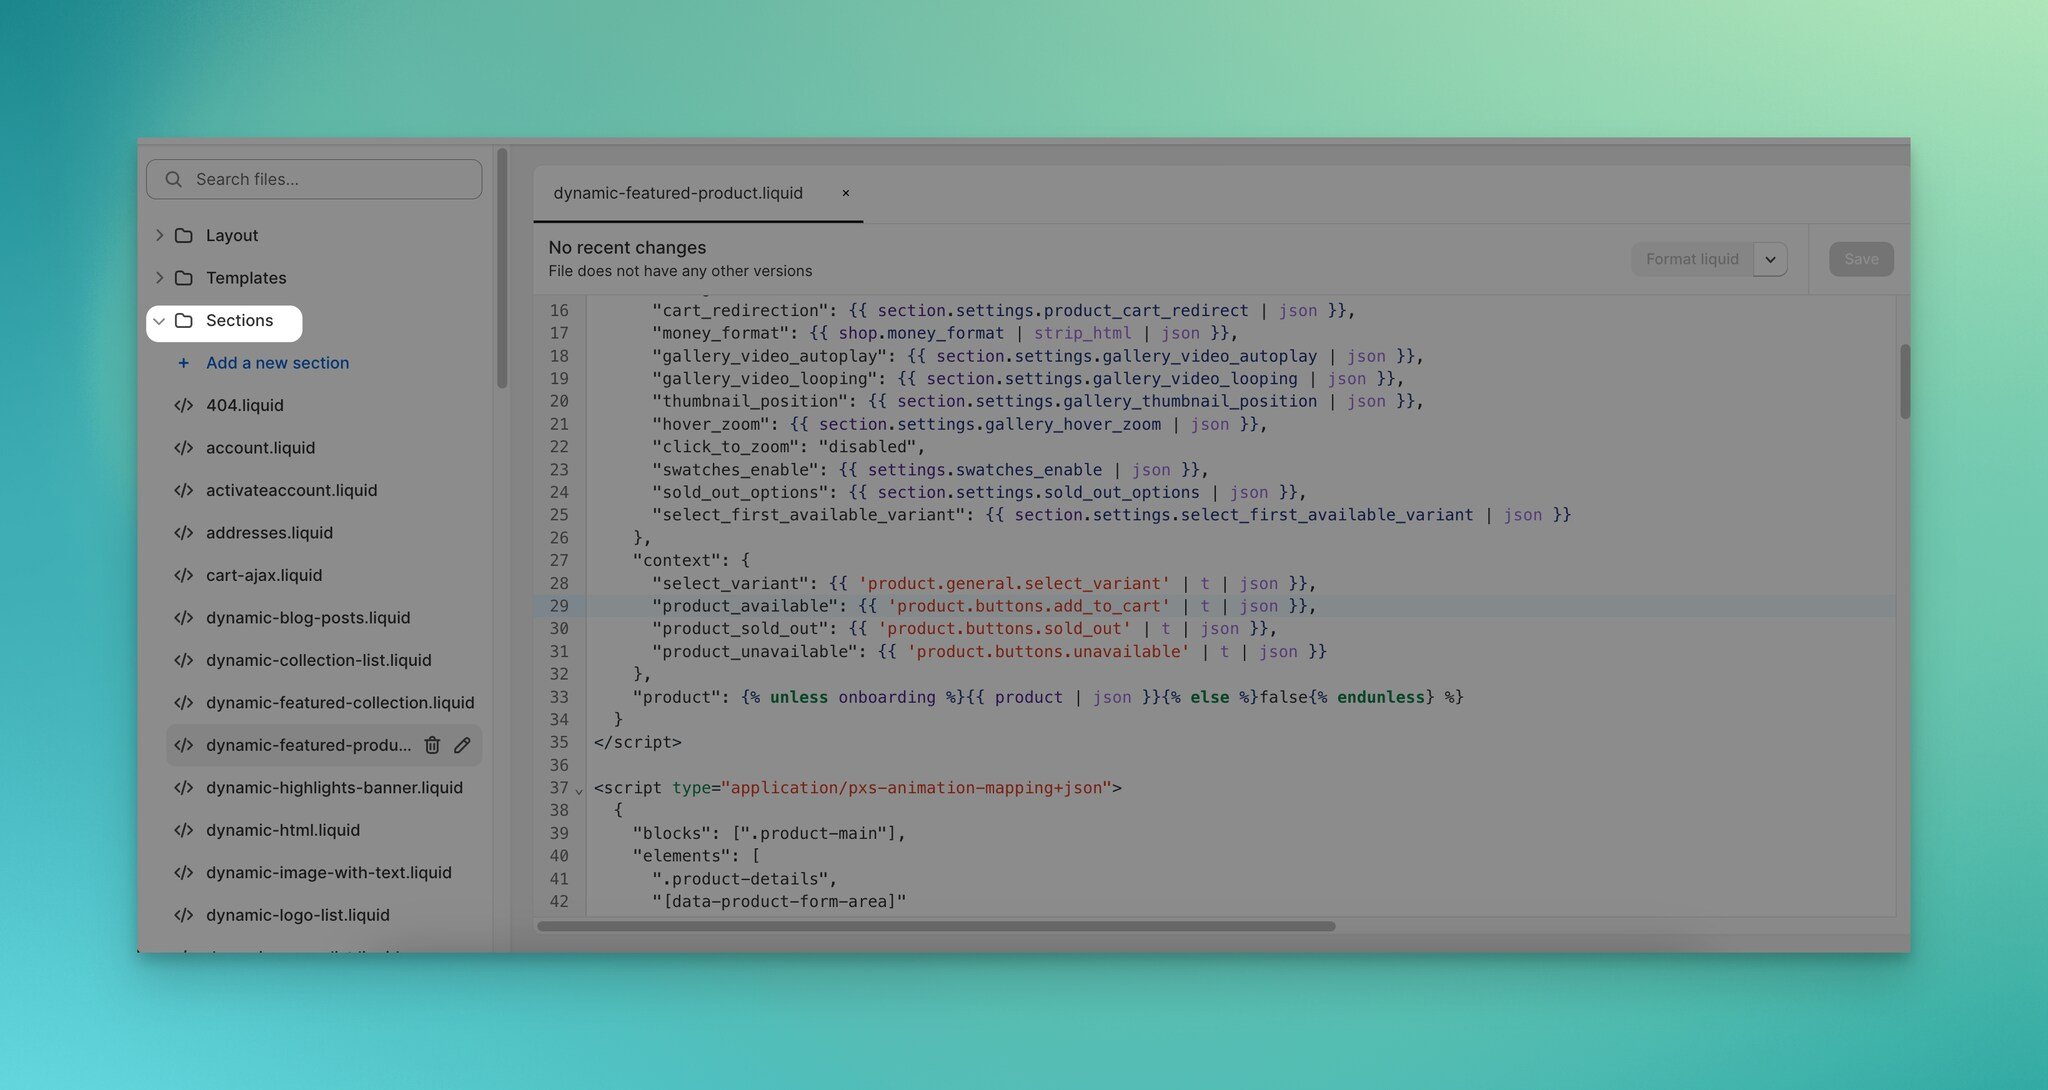
9. Search for the "Add to cart" form in the file. Below it, paste this Liquid snippet:
{% if product.options contains 'Size' %}
  <a class="trigger-pop-up btn" href="/pages/size-chart">See Size Chart</a>
{% endif %}
This code displays a "See Size Chart" link only on products that have a "Size" option. Replace /pages/size-chart with your actual page URL if you used a different slug.
10. Click Save in the code editor.
Tip: Visit any product page that has a "Size" variant. You should see a "See Size Chart" link below the Add to Cart button. Clicking it opens or navigates to your size chart page. Products without a Size option won't show the link.
Watch out for:
• Editing the wrong template file: Shopify themes name the product template differently. Dawn uses main-product.liquid, older themes use product-template.liquid, and some custom themes use product.liquid. If your button doesn't appear, check which file actually renders your product pages by previewing the theme and inspecting the HTML.
• Size option name mismatch: The Liquid condition checks for the exact string "Size." If your products use "Taille" (French), "Größe" (German), or a custom label like "Fit," the button won't appear. Update the condition to match your actual option name.
• Forgetting to set page visibility: If you leave the page as "Hidden," the URL returns a 404. Always confirm the page status is set to Visible before testing the link.
Method 2: Display a Size Chart Using Product Metafields and the Image with Text Section
This method stores your size chart as an image metafield on each product, then displays it using the built-in "Image with text" theme section. It works with Shopify 2.0 themes and lets you assign different size charts to different products without touching code.
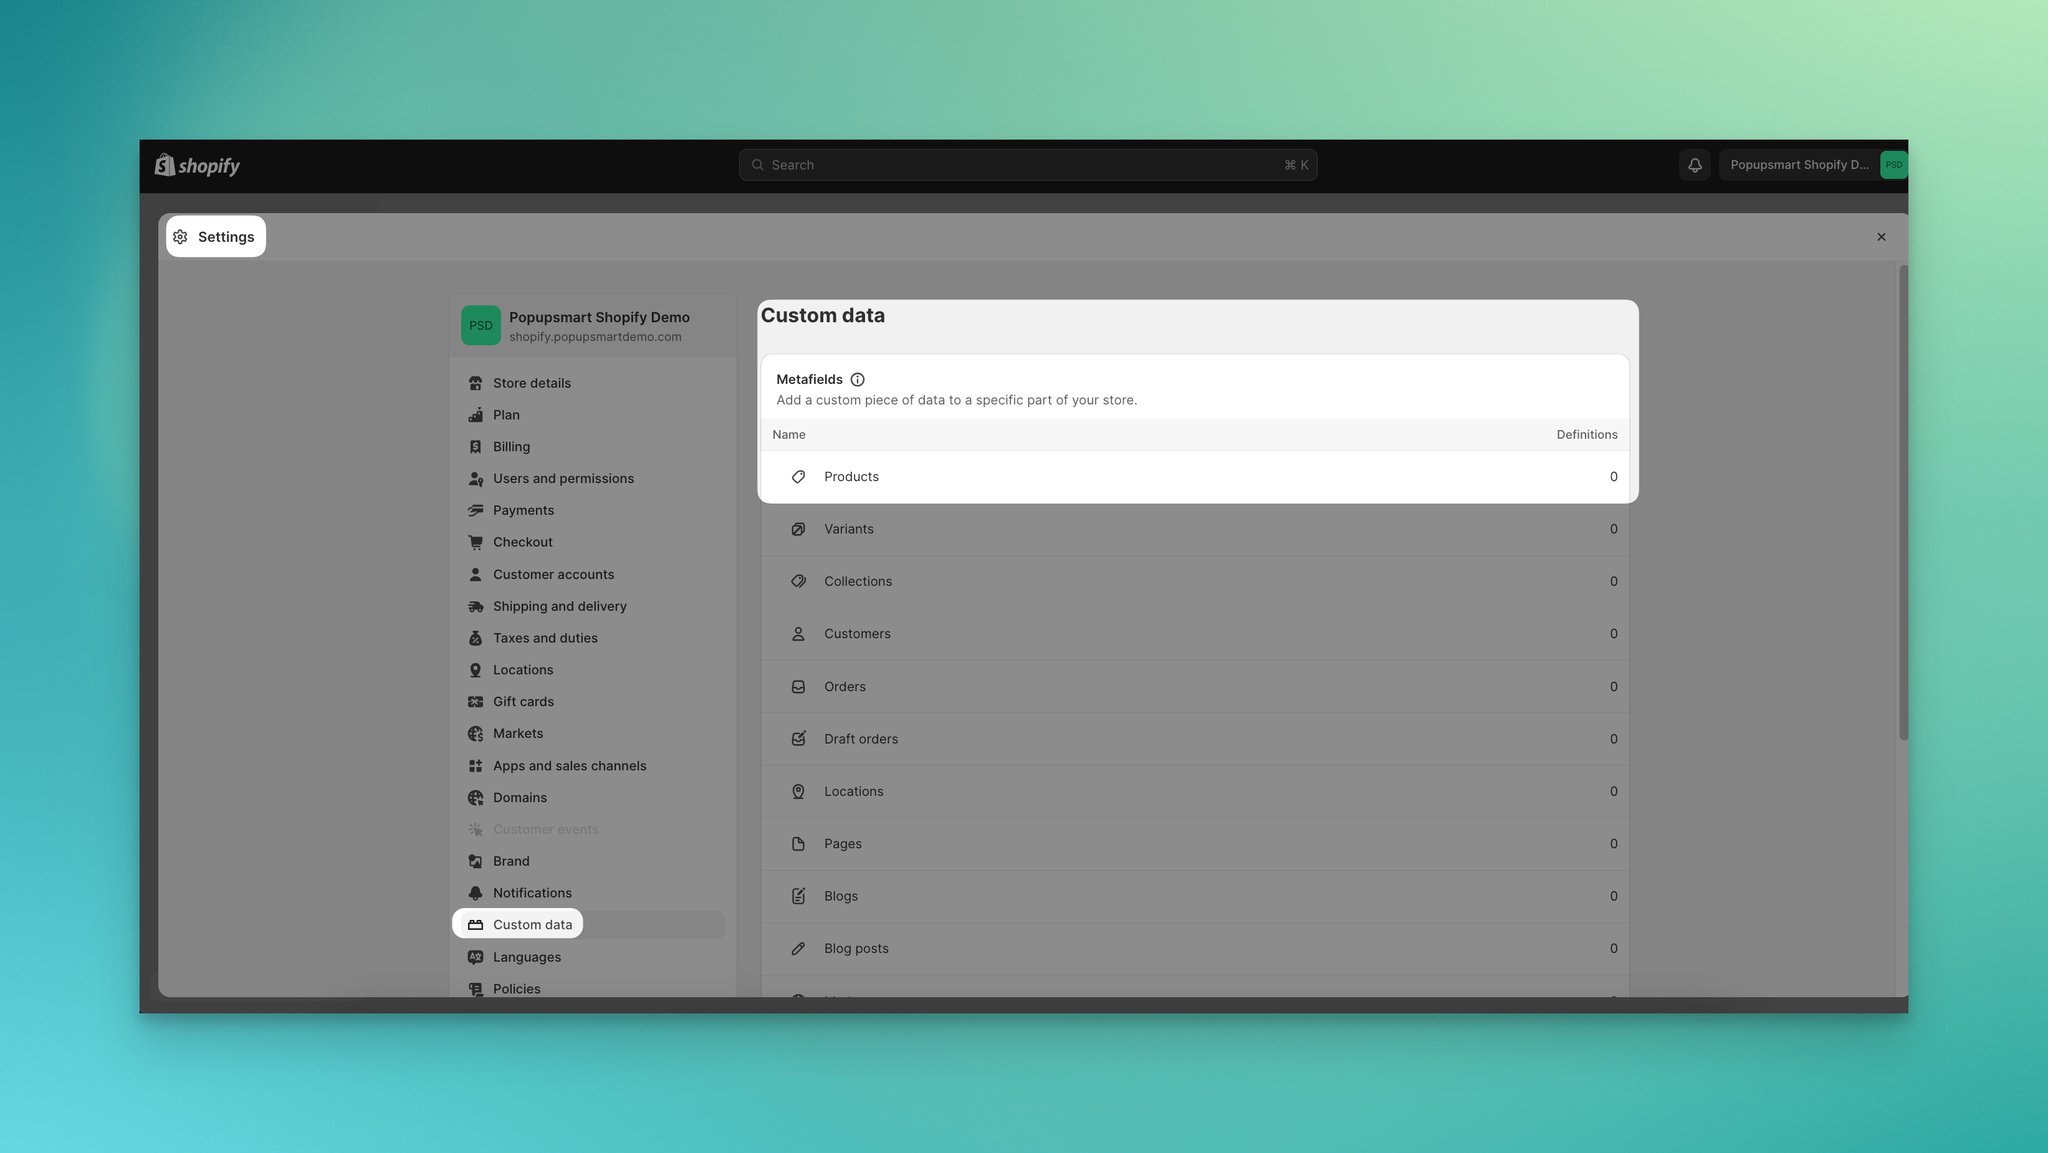
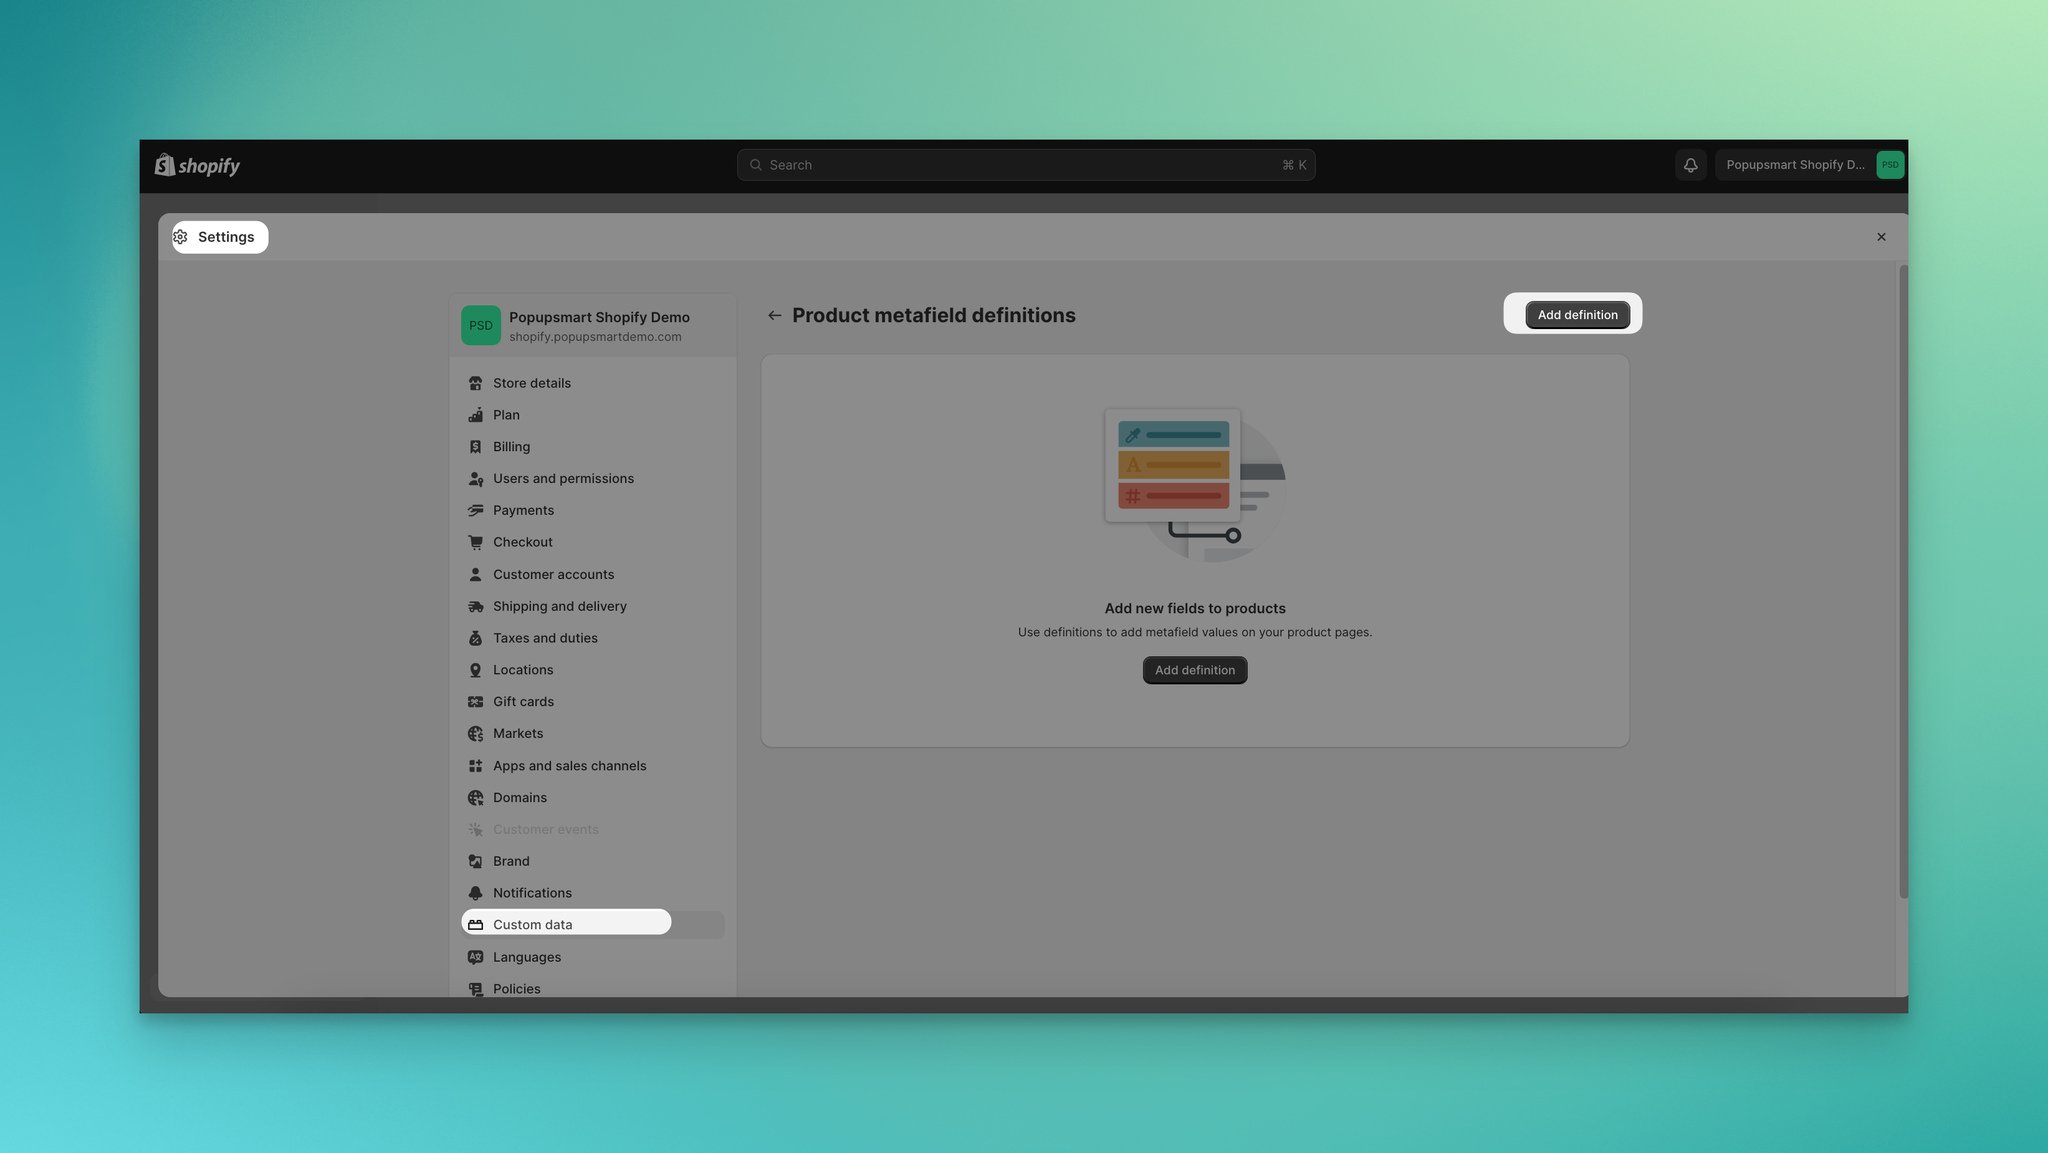
1. Go to Settings in your Shopify admin, then navigate to Custom data (previously labeled "Metafields"). Click Products.
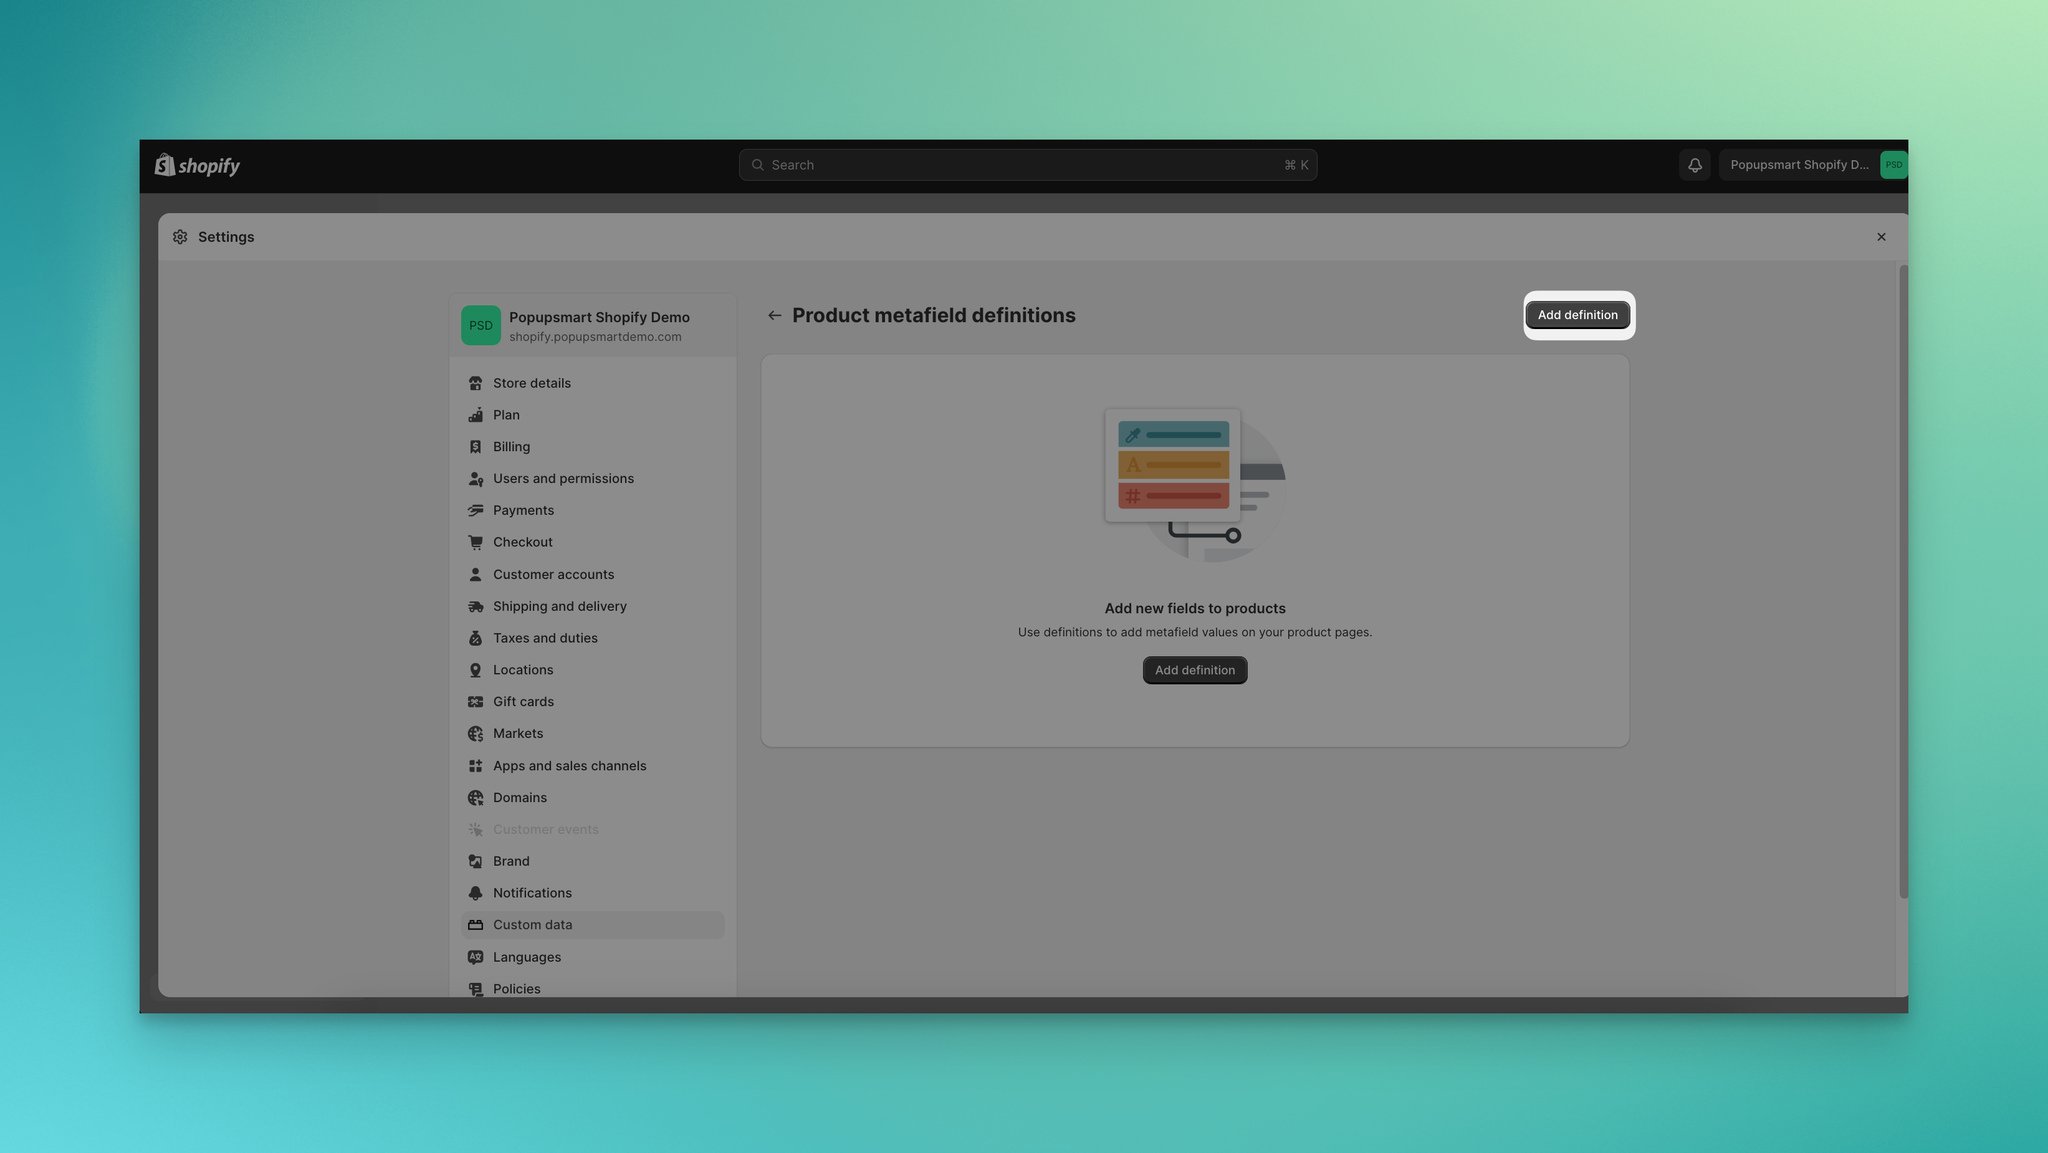
2. Click Add definition.
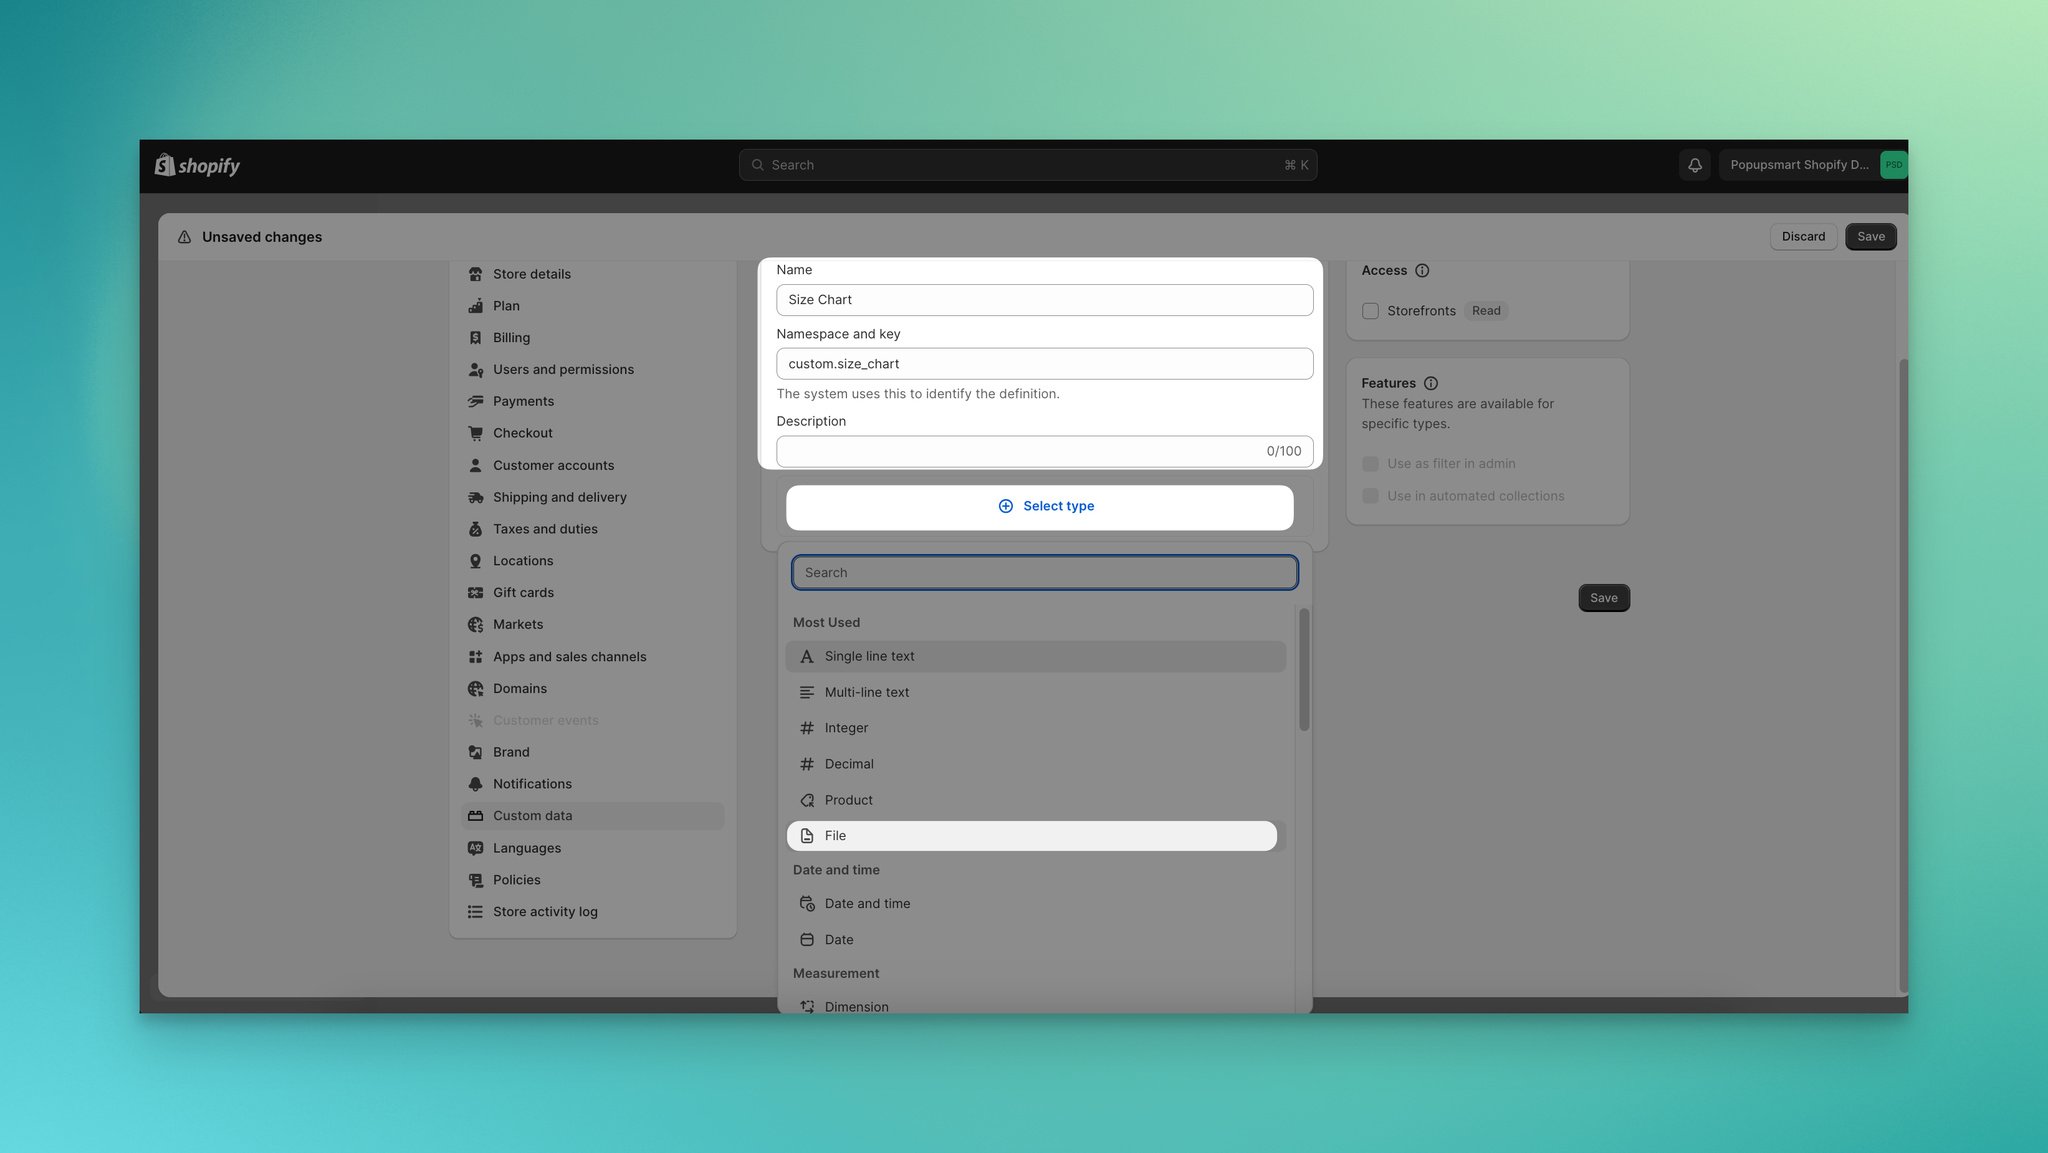
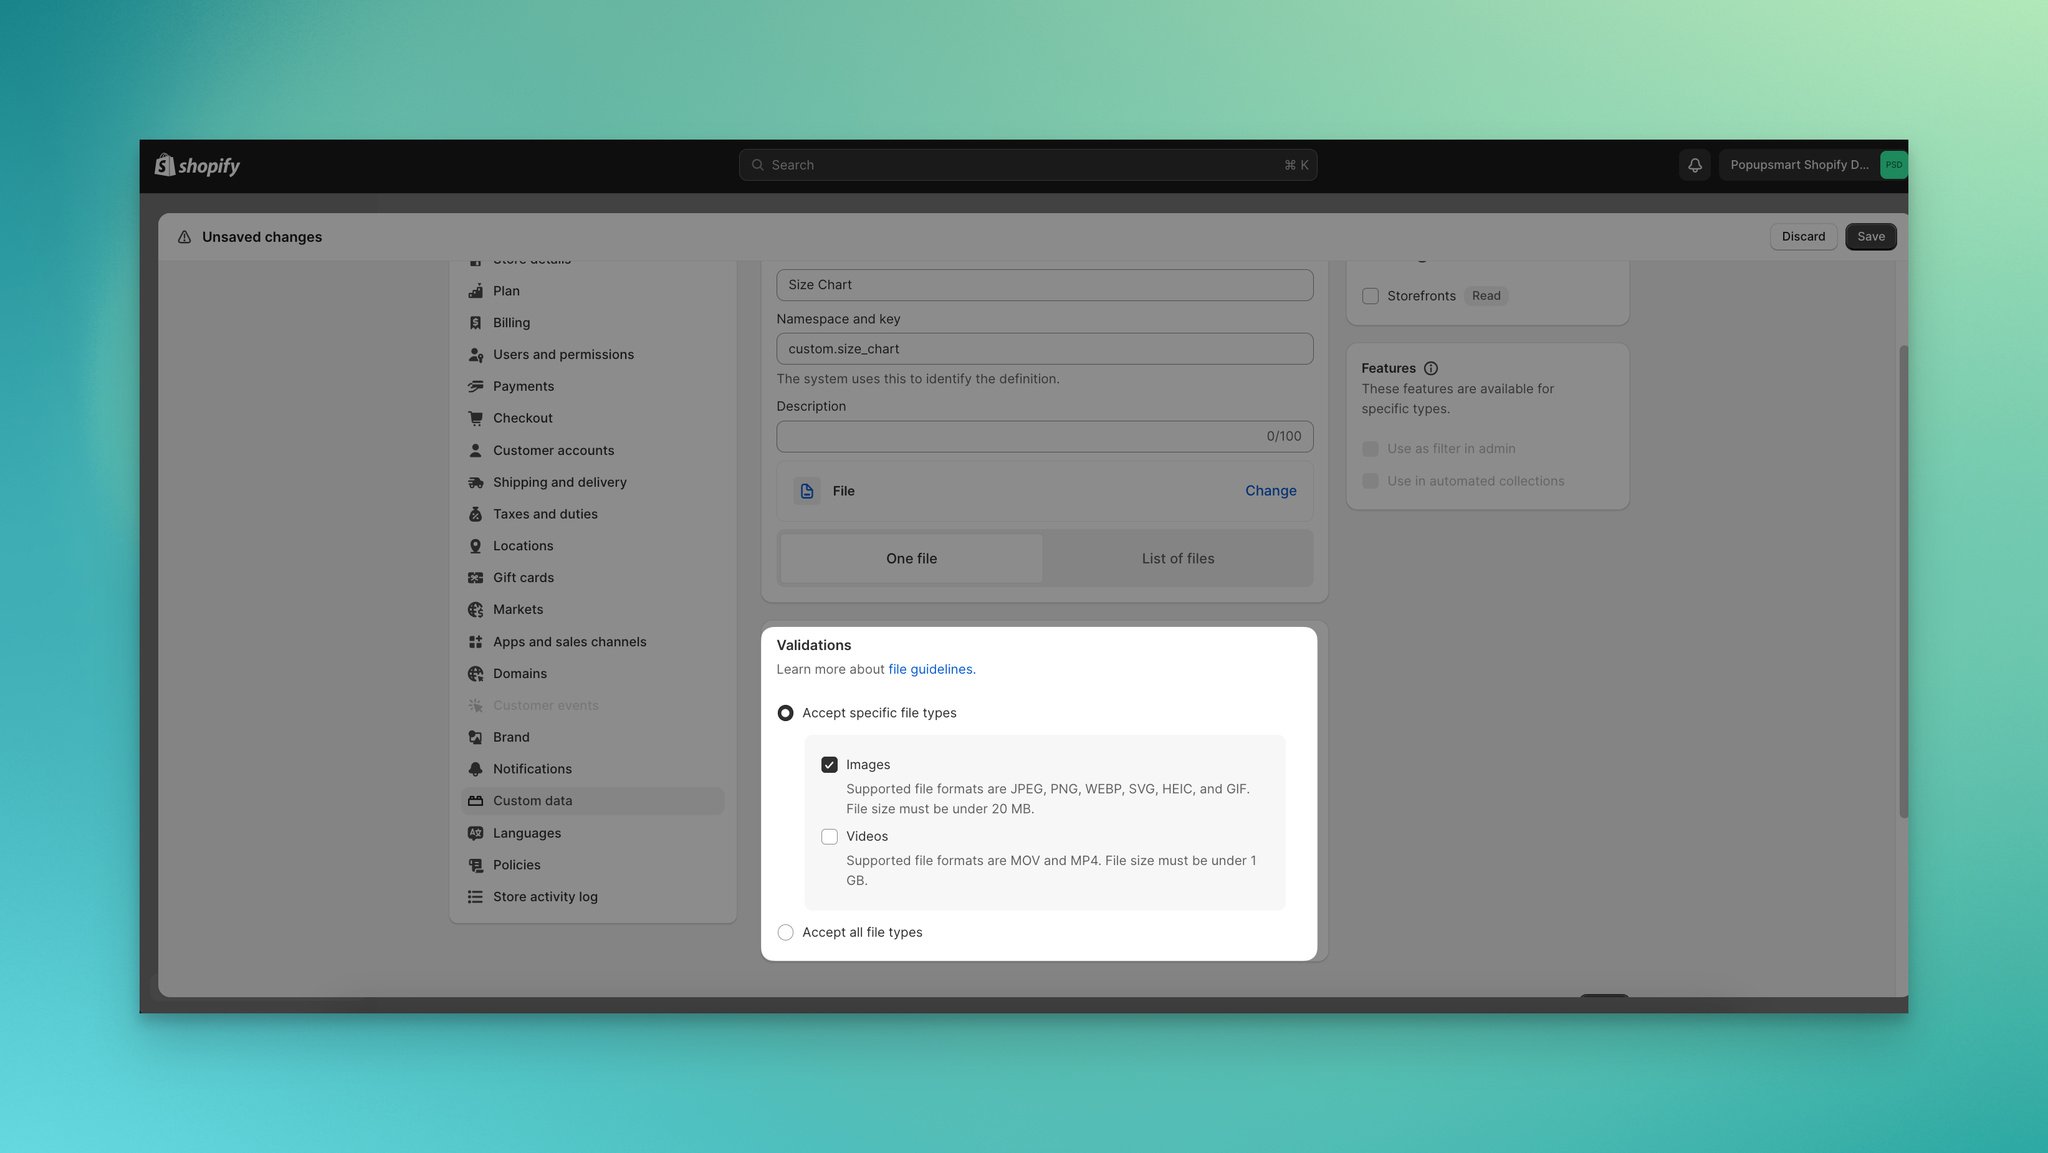
3. Name your metafield (e.g., "Size Chart Image") and set the content type to File. Under Validation, select Only accept images.
4. Go to Products in your admin. Open any product that needs a size chart. Scroll down to the Metafields section and upload your size chart image to the field you just created. Click Save.
Repeat this for every product that needs its own size chart. Products that share the same sizing can use the same image file.
5. Go to Online Store then Themes and click Customize on your active theme. Navigate to Products and open your product page template. Add an Image with text section.
6. In the image field, click Connect dynamic source and select your "Size Chart Image" metafield. Click Connect.
7. Fill in the text portion with measurement instructions, such as "How to measure: use a flexible tape measure around the fullest part of your chest, natural waistline, and widest part of your hips."
8. Click Save in the theme editor.
You'll know it's working when: Open a product page where you uploaded a size chart image. The "Image with text" section should display your chart alongside the measurement instructions. Products without an uploaded size chart image will show a blank or hidden section (depending on your theme's empty-state behavior).
Common mistakes and troubleshooting:
• Using a theme that doesn't support dynamic sources: This method requires a Shopify 2.0 theme (like Dawn, Craft, or Sense). If you're on a vintage theme, the "Connect dynamic source" option won't appear. You'll need to upgrade your theme or use Method 1 or 4 instead.
• Uploading low-resolution images: Size chart images with small text become unreadable on mobile. Export your charts at a minimum of 1200px wide so measurements remain legible when the image scales down on phone screens.
• Forgetting to assign the metafield to each product: The section only pulls the image if the metafield has a value. If you add 50 products but only upload size charts to 10, the other 40 will show a blank section. Use Shopify's bulk editor (Products then Export) to manage metafields at scale.
Method 3: Add a Size Chart Popup Using the Shopify Theme Editor
This method uses Shopify's built-in popup block (available in many 2.0 themes) to display your size chart as a modal overlay on product pages. You connect a size chart page to a metafield, then assign it to a popup block in your template. No apps needed, no code needed.
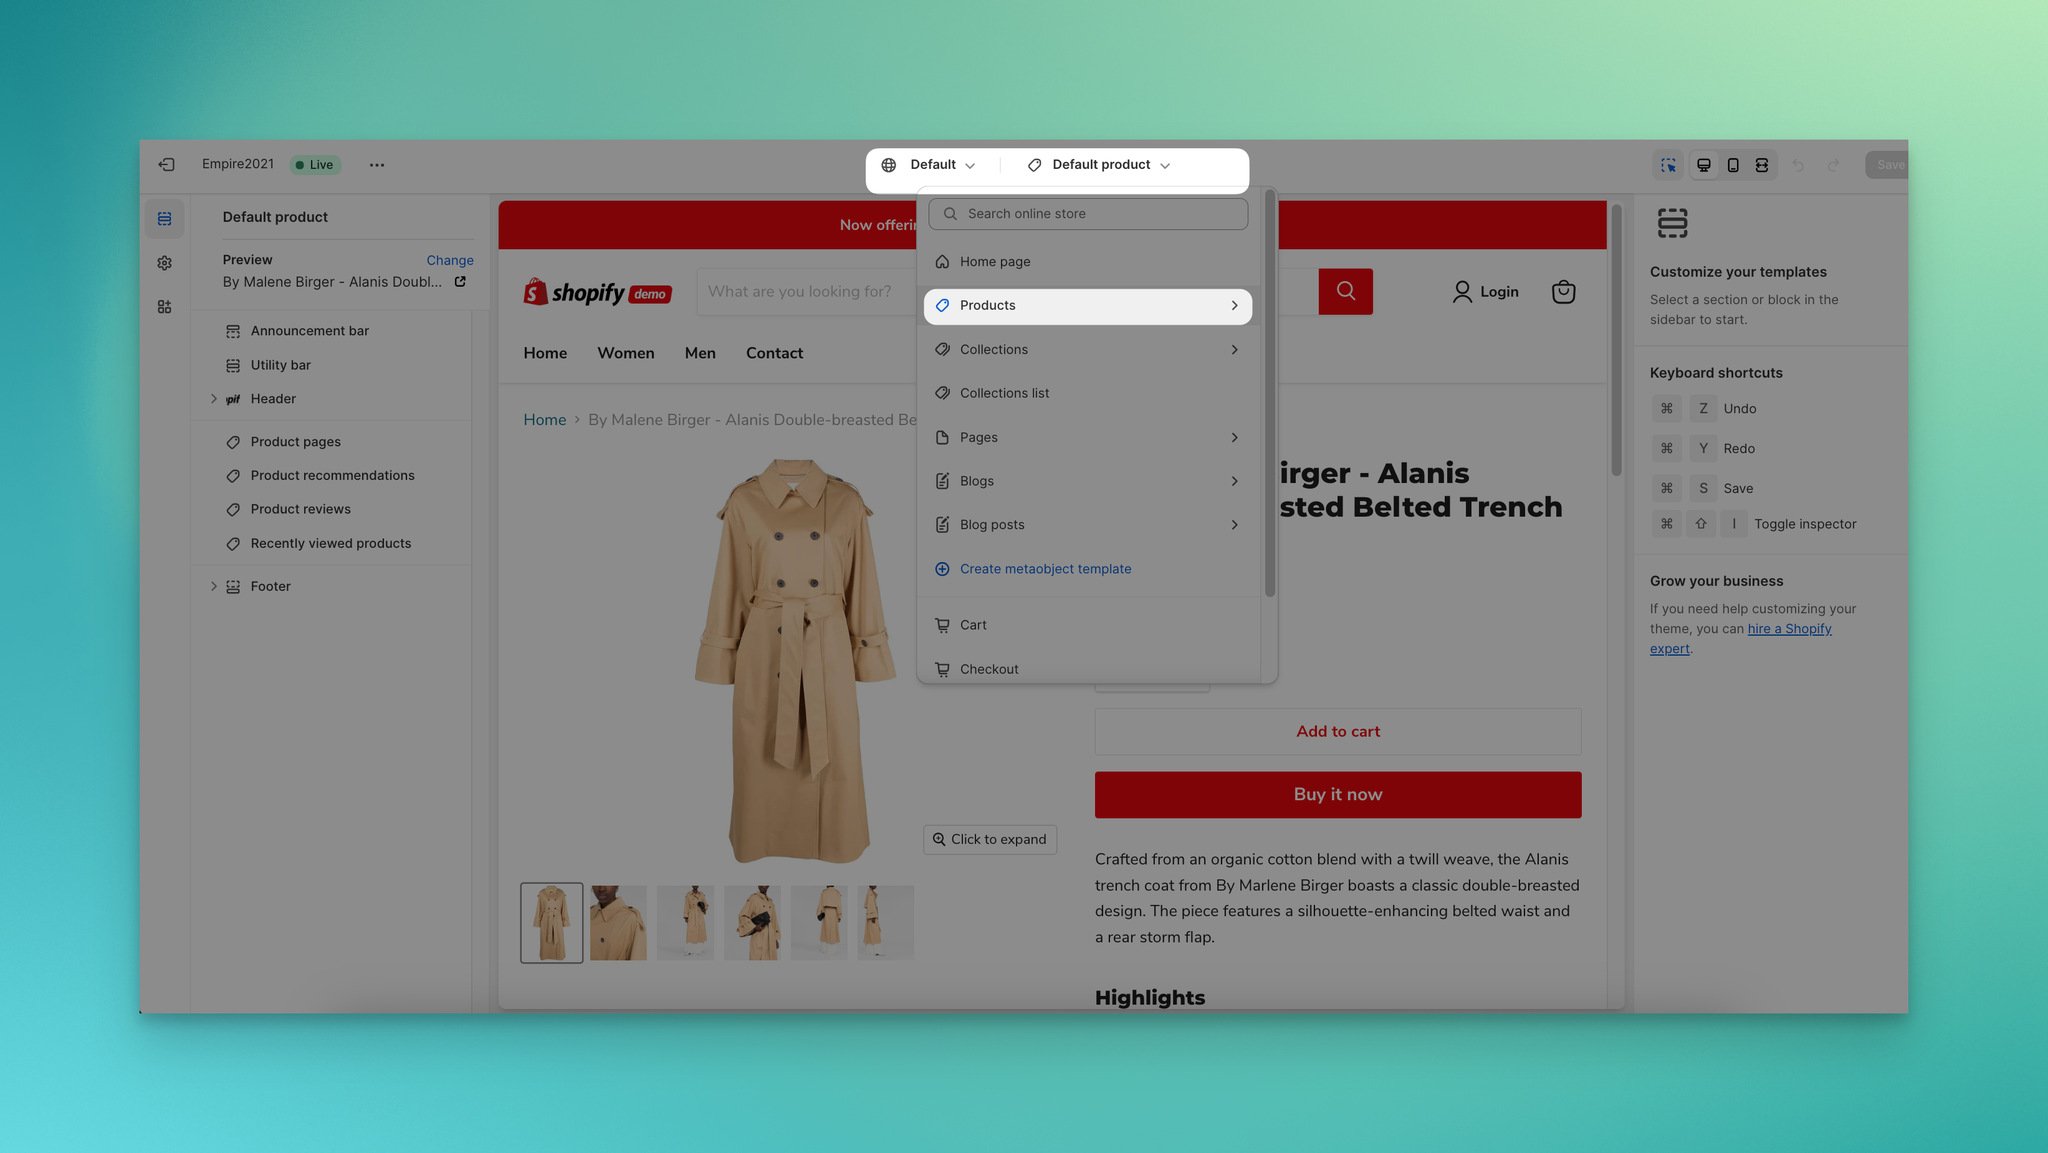
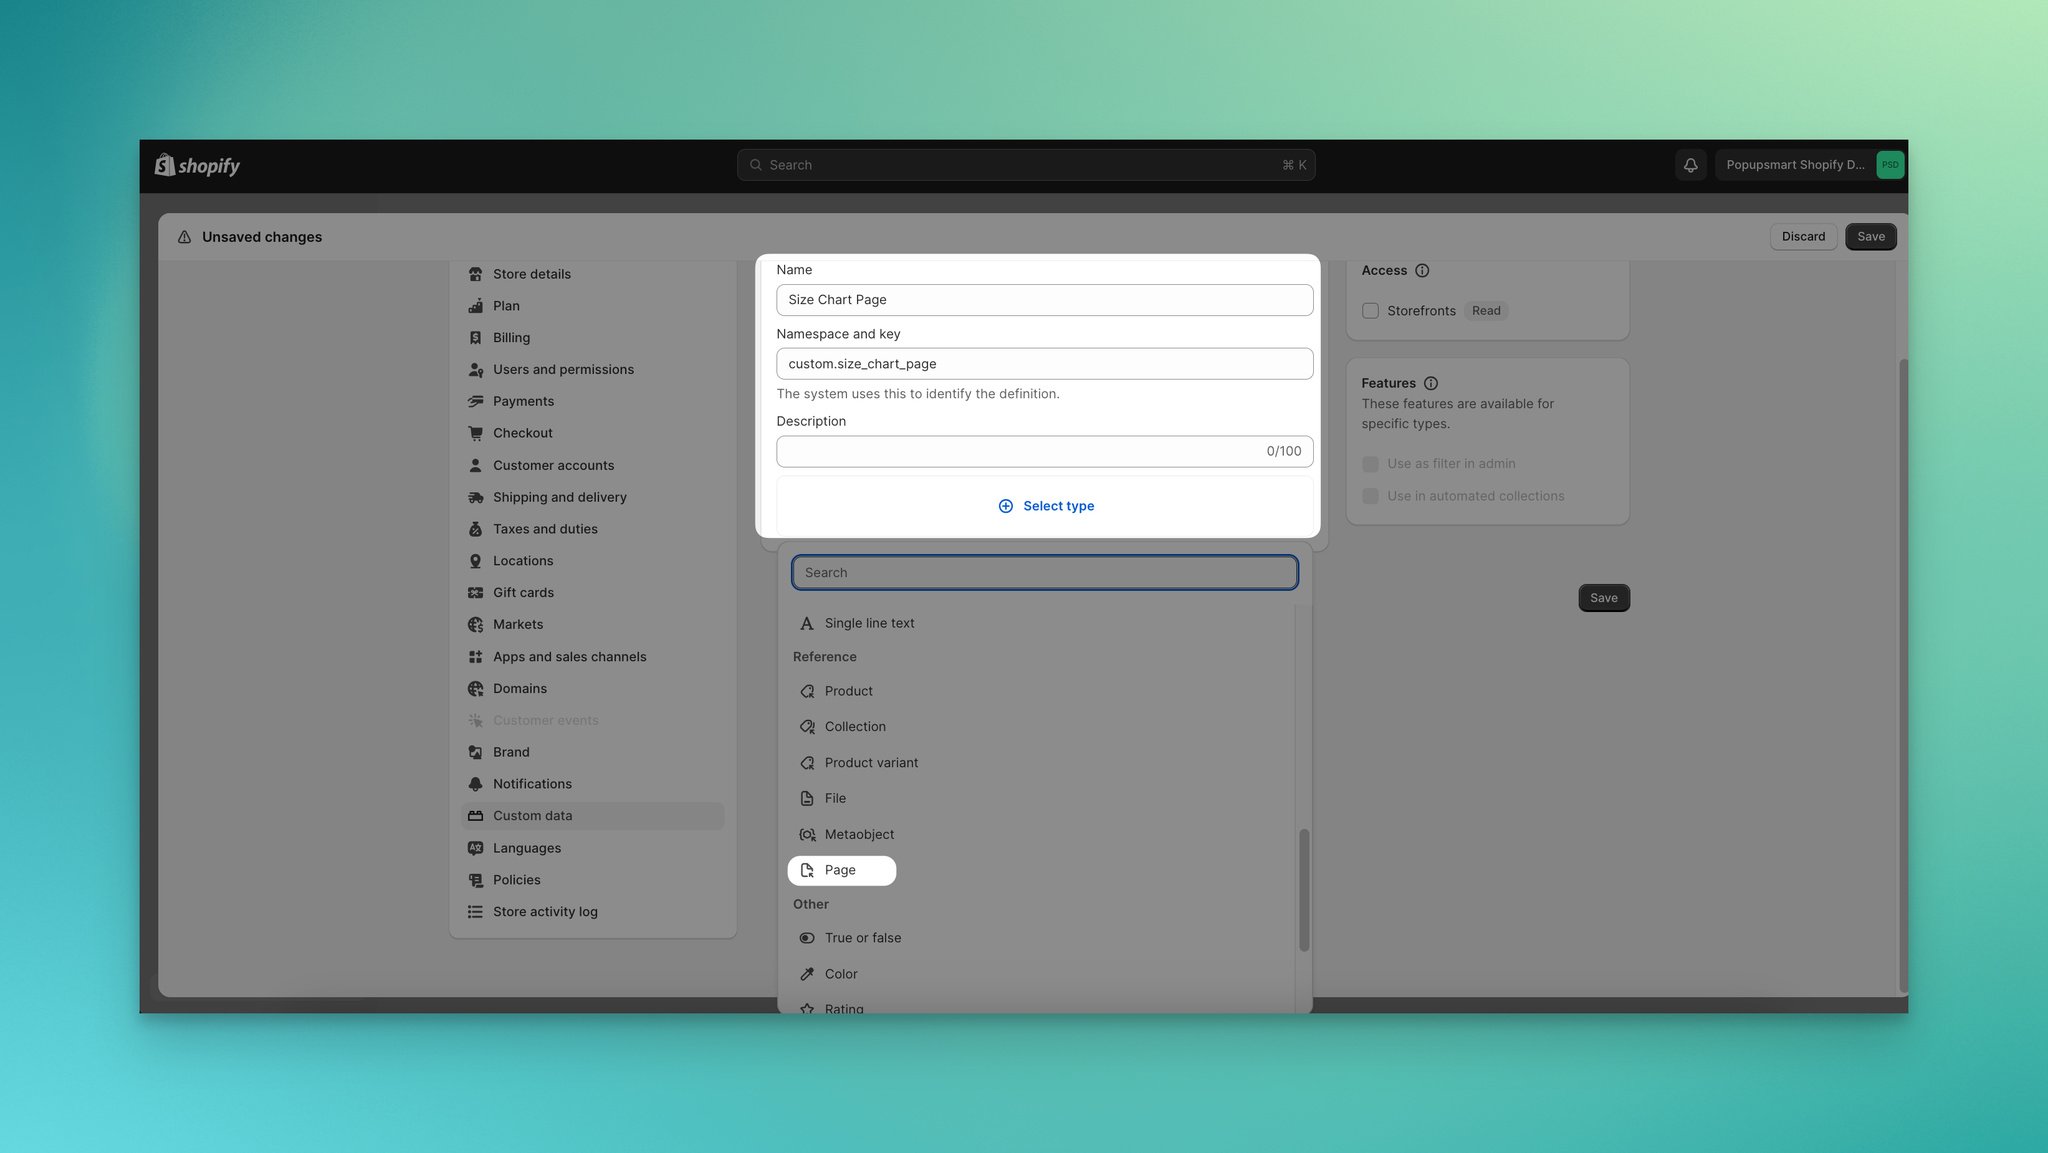
1. Go to Settings then Custom data. Click Products, then Add definition. Name it "Size Chart Page" and set the content type to Page.
2. Create the size chart page. Go to Online Store then Pages, click Add page, and build your size chart with the rich text editor. Include a table with all measurements and any instructions. Set it to Visible and save.
3. Assign your size chart page to each product. Go to Products, open a product, scroll to the metafields section, and select your size chart page from the dropdown in the "Size Chart Page" field. Save.
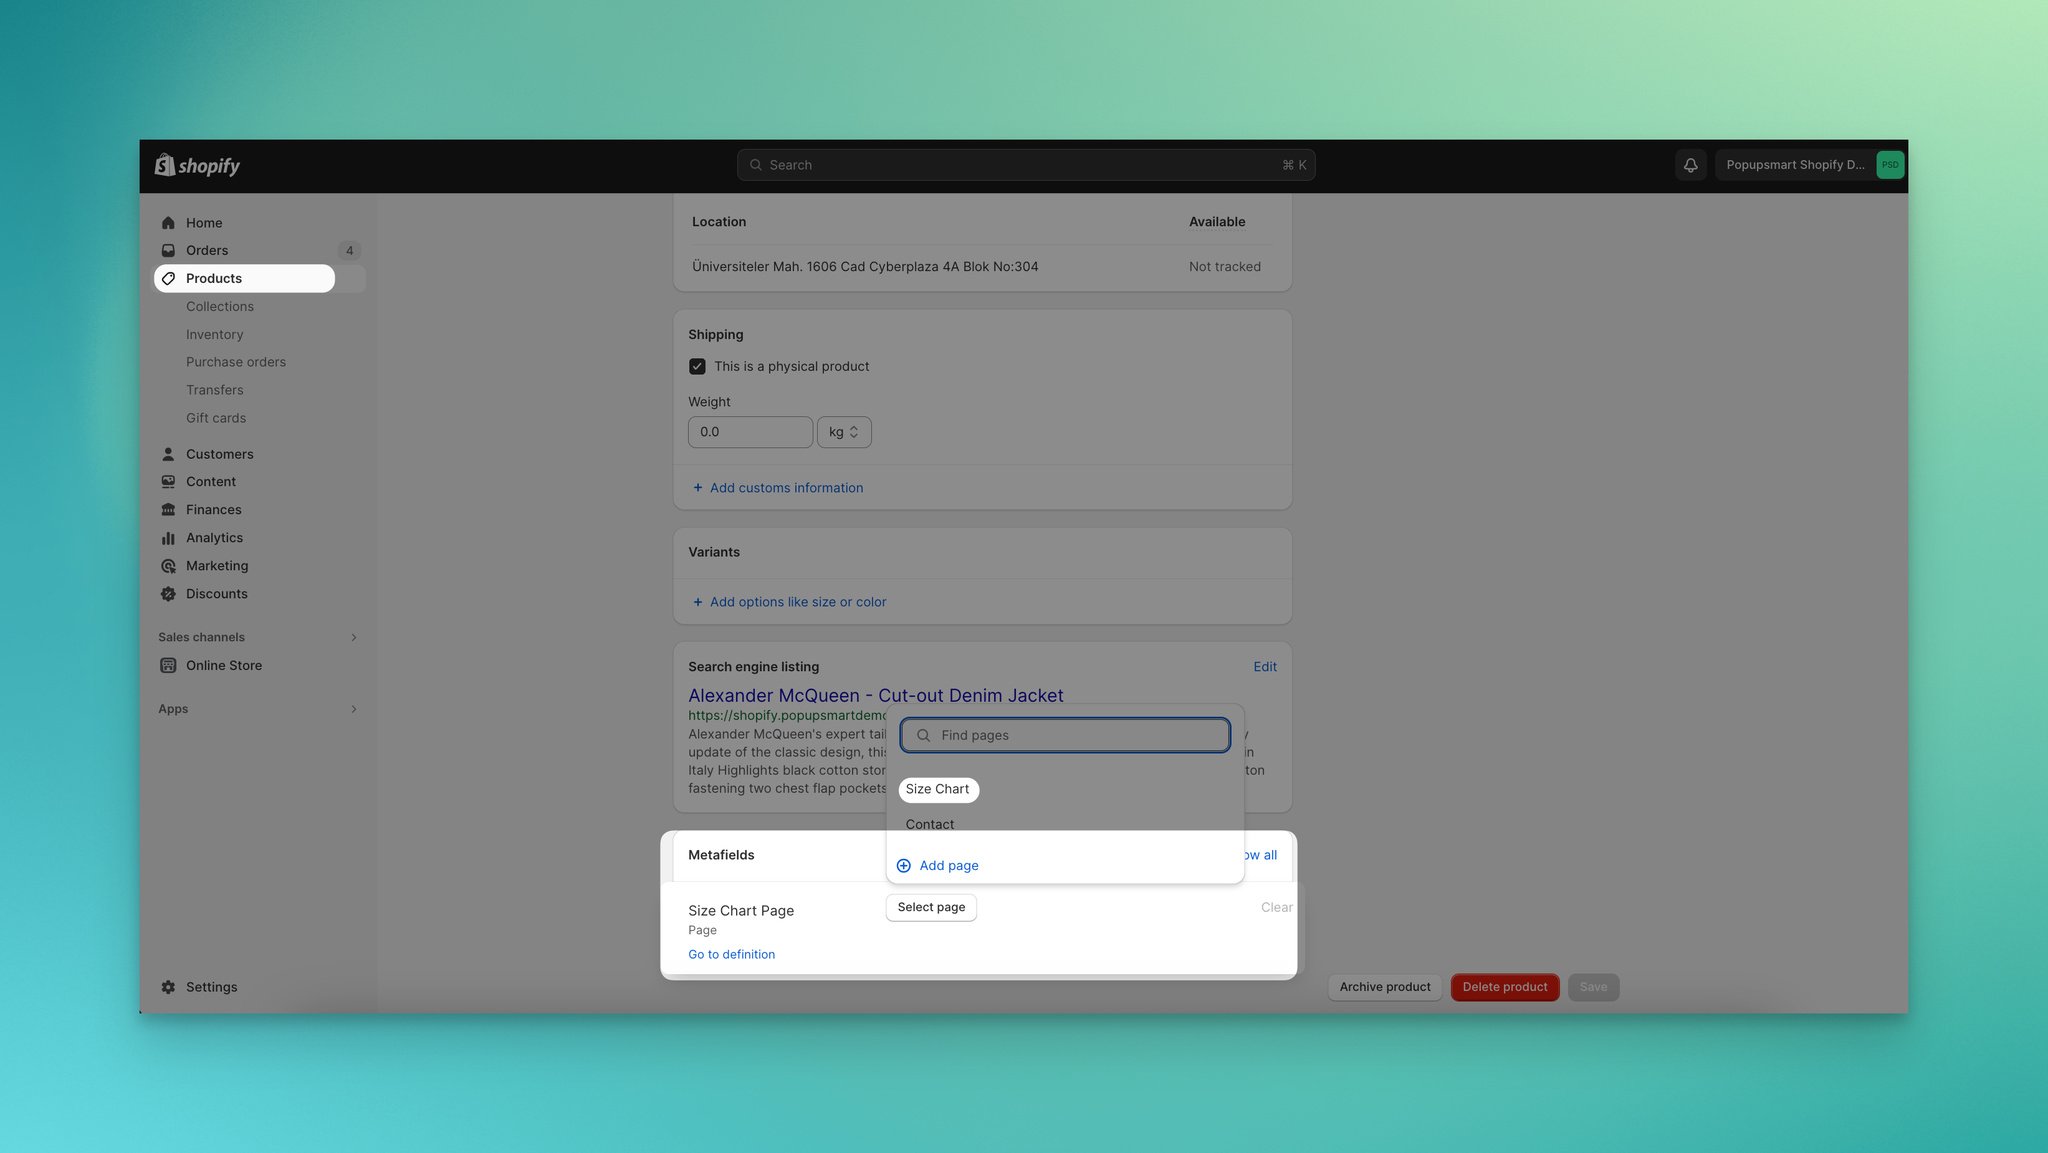
4. Open the theme editor (Online Store then Themes then Customize). Go to your Product page template. Add a Popup block to the product information section. You can drag it to position it where you want the link to appear.
5. In the popup block settings, click Connect dynamic source and select your "Size Chart Page" metafield. Set a Link Label like "View Size Chart." This text becomes the clickable link on your product page.
6. Save the theme editor.
Expected Result: Visit a product page where you assigned a size chart page. You should see a "View Size Chart" link. Clicking it opens a modal popup displaying the full content of your size chart page. The popup can be closed by clicking outside it or pressing the X button. This matches what Shopify's official documentation describes for popup size charts.
Watch out for:
• Theme doesn't have a popup block: Not all Shopify 2.0 themes include a popup block. Dawn (Shopify's default theme) supports it, but third-party themes might not. Check your theme's documentation or contact the theme developer. If popups aren't supported, use Method 2 or 4.
• Popup content looks broken on mobile: Tables inside popup modals can overflow on small screens. Test your size chart page on a phone before publishing. If the table is too wide, switch to a stacked layout or use an image-based chart instead of an HTML table.
• Metafield not appearing in dynamic source list: If you created the metafield but can't find it in the theme editor's dynamic source picker, refresh the page. Shopify sometimes needs a moment to sync new metafield definitions to the theme editor.
Pro tip: You can use the same metafield approach for more than size charts. I've seen stores reuse this pattern for care instructions, fabric composition details, and warranty information, all as separate Page-type metafields linked to popup blocks. It keeps product pages clean while giving customers access to detailed info on demand.
Method 4: Add a Size Chart Popup with Popupsmart's Shopify App
If you want a size chart popup without editing code or configuring metafields, Popupsmart's Shopify app gives you a drag-and-drop builder with advanced targeting. You can trigger the popup on specific product pages, show it when visitors click a button, and customize the design to match your store.
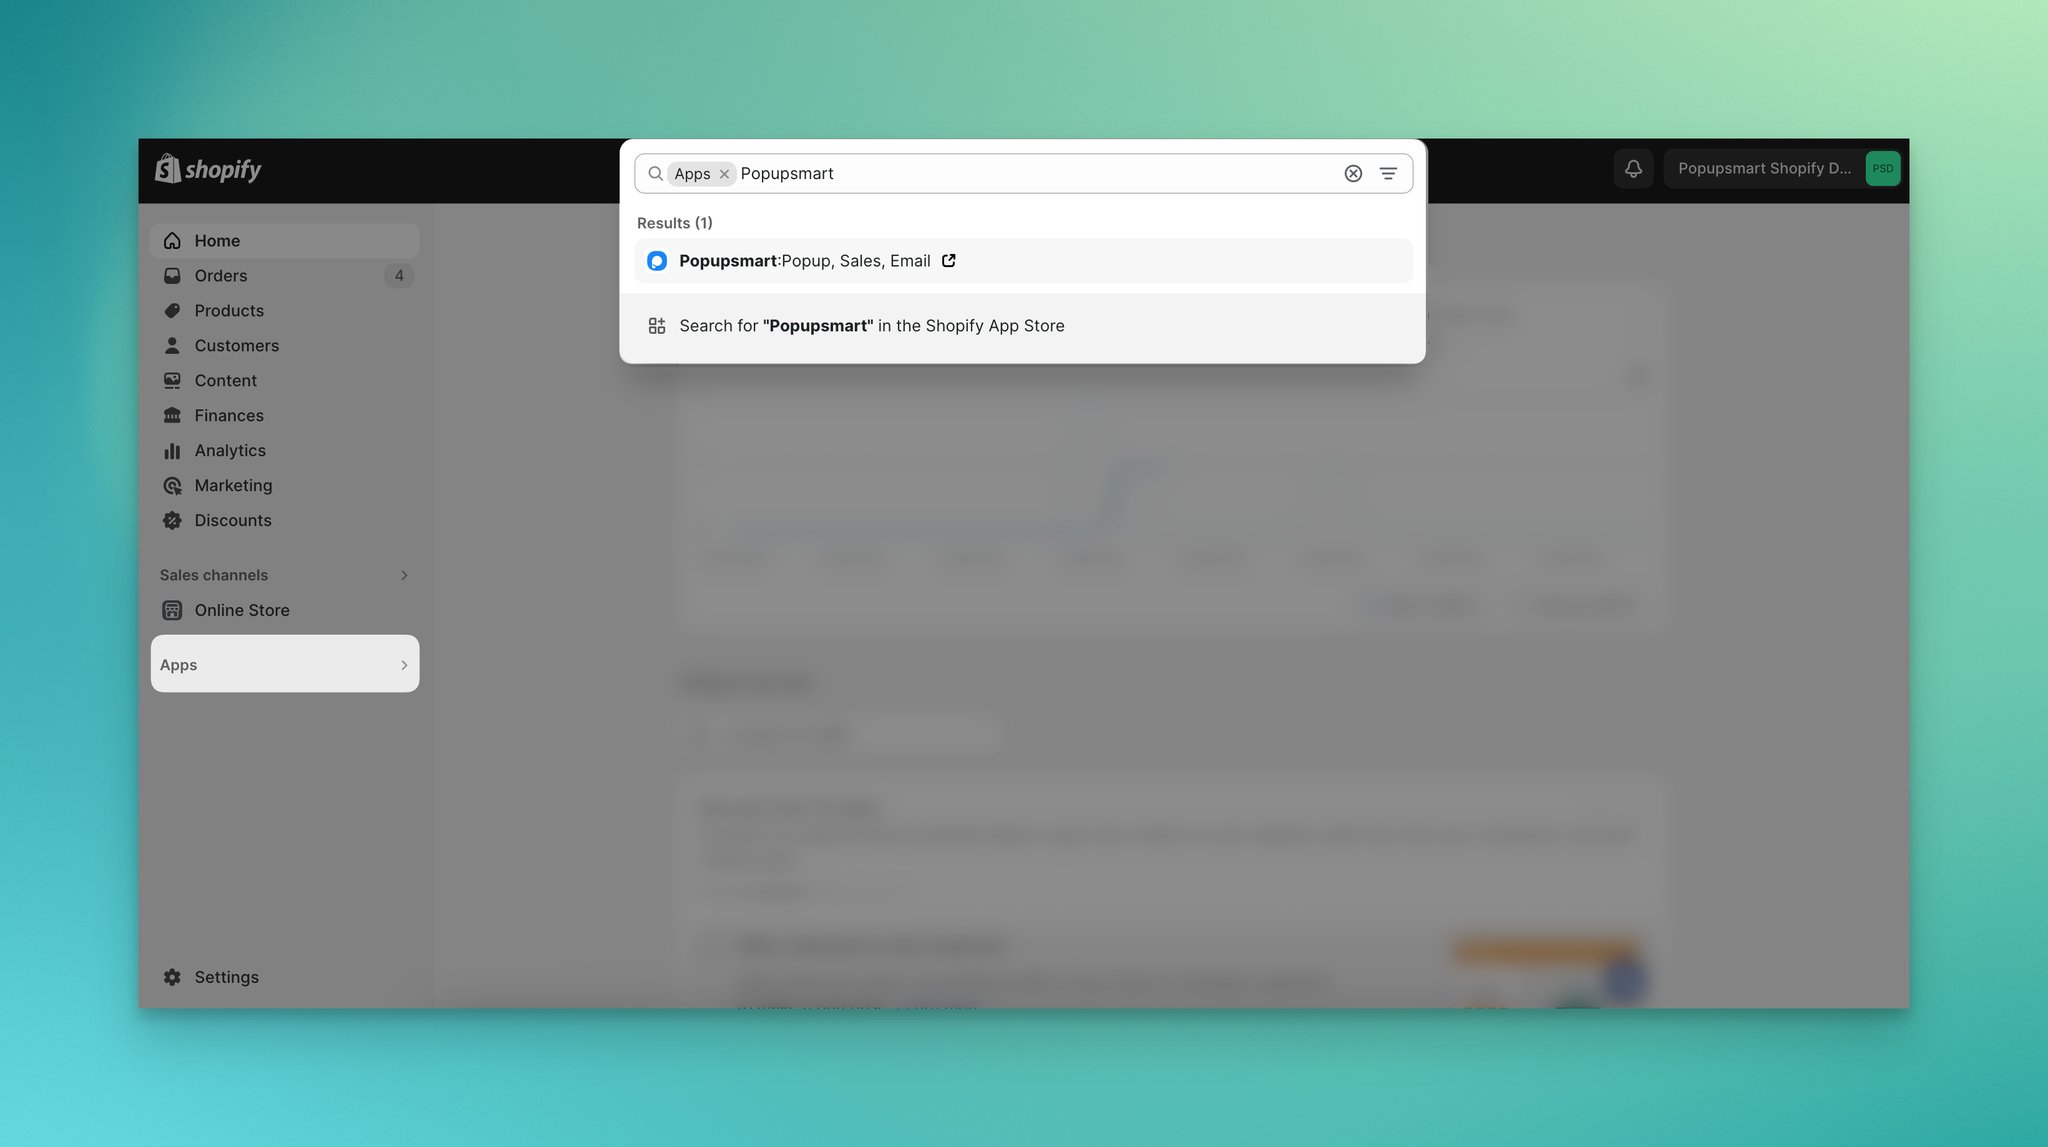
1. In your Shopify admin, go to the App Store and search for "Popupsmart." Click Install.
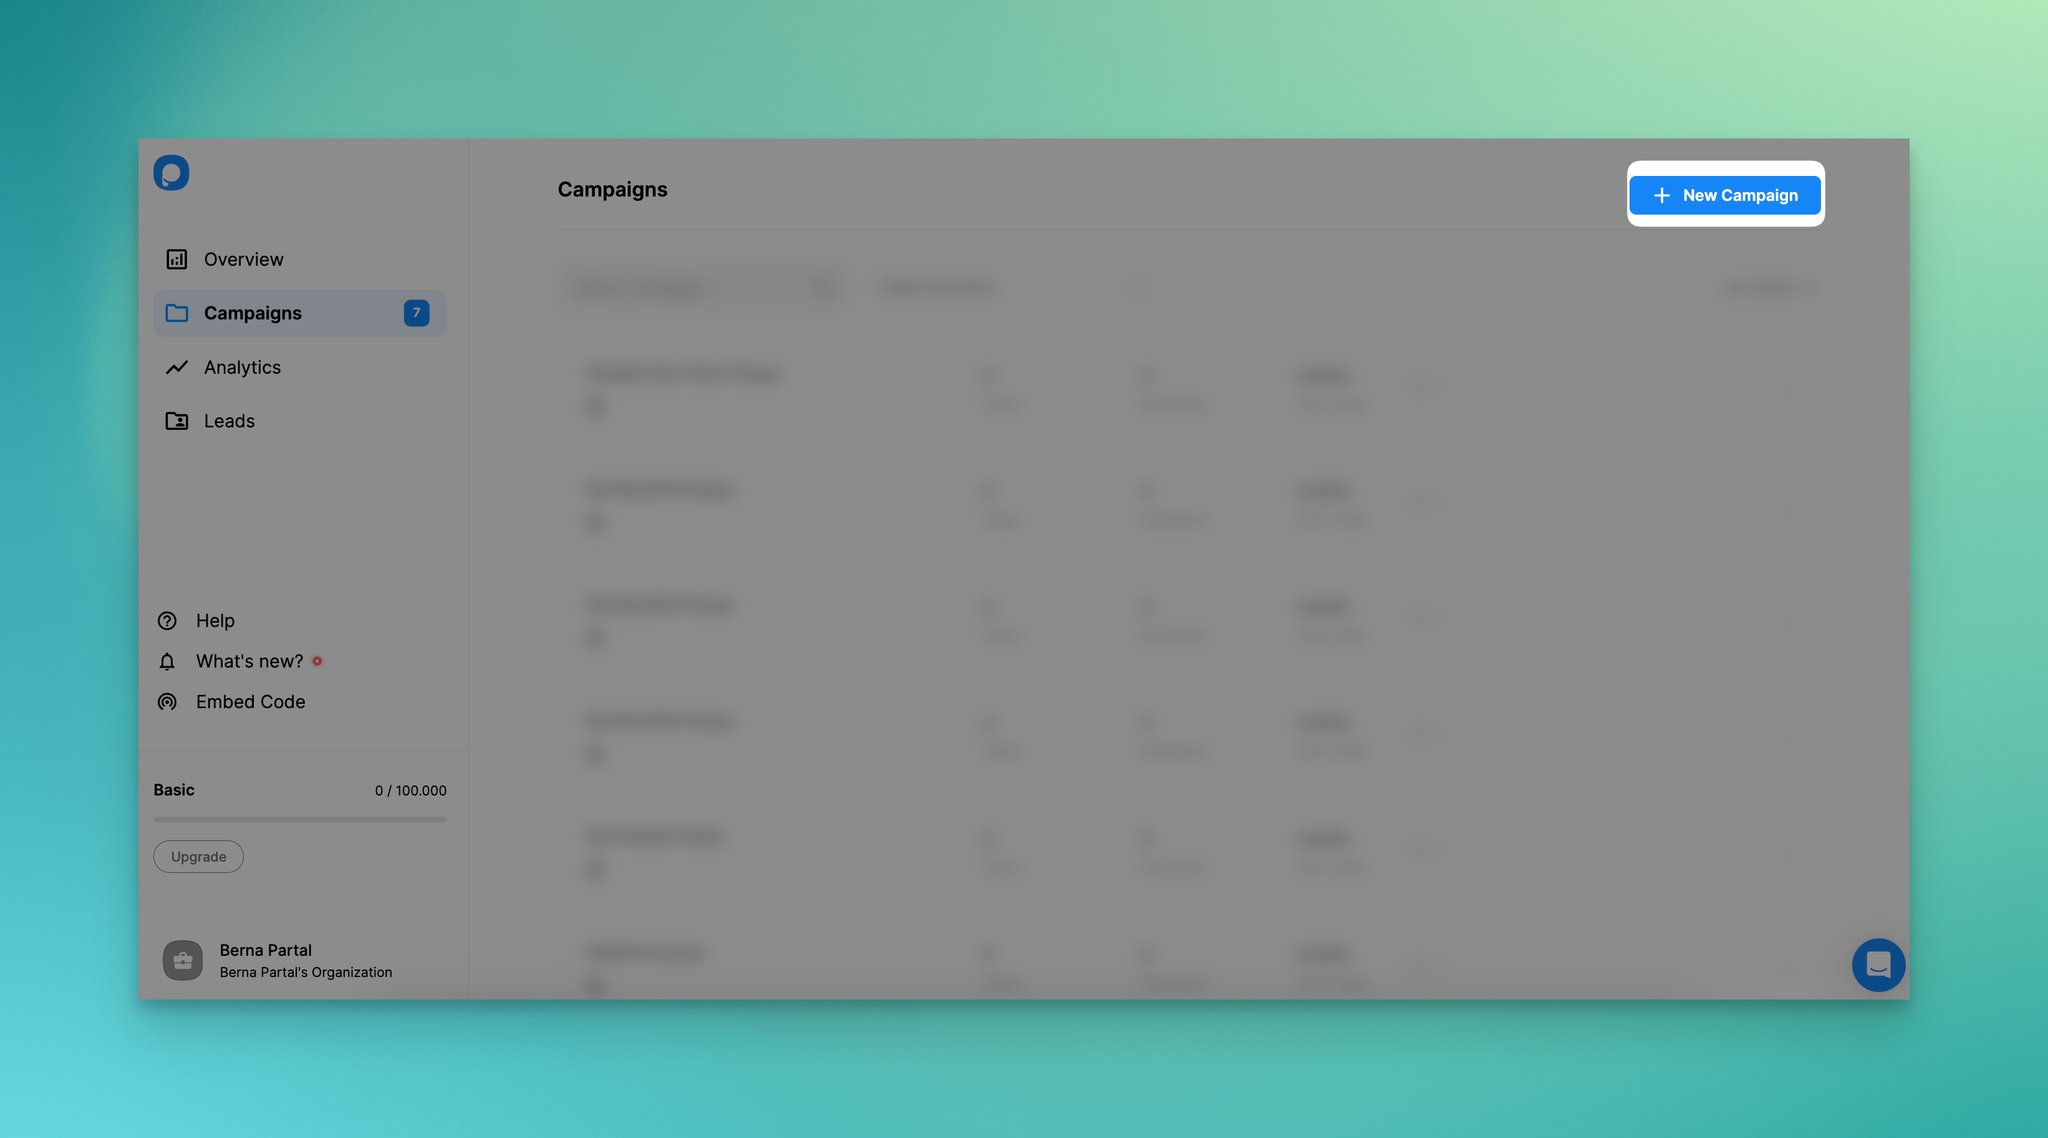
2. Open Popupsmart and click Create a New Campaign. Select a popup template or start from scratch.
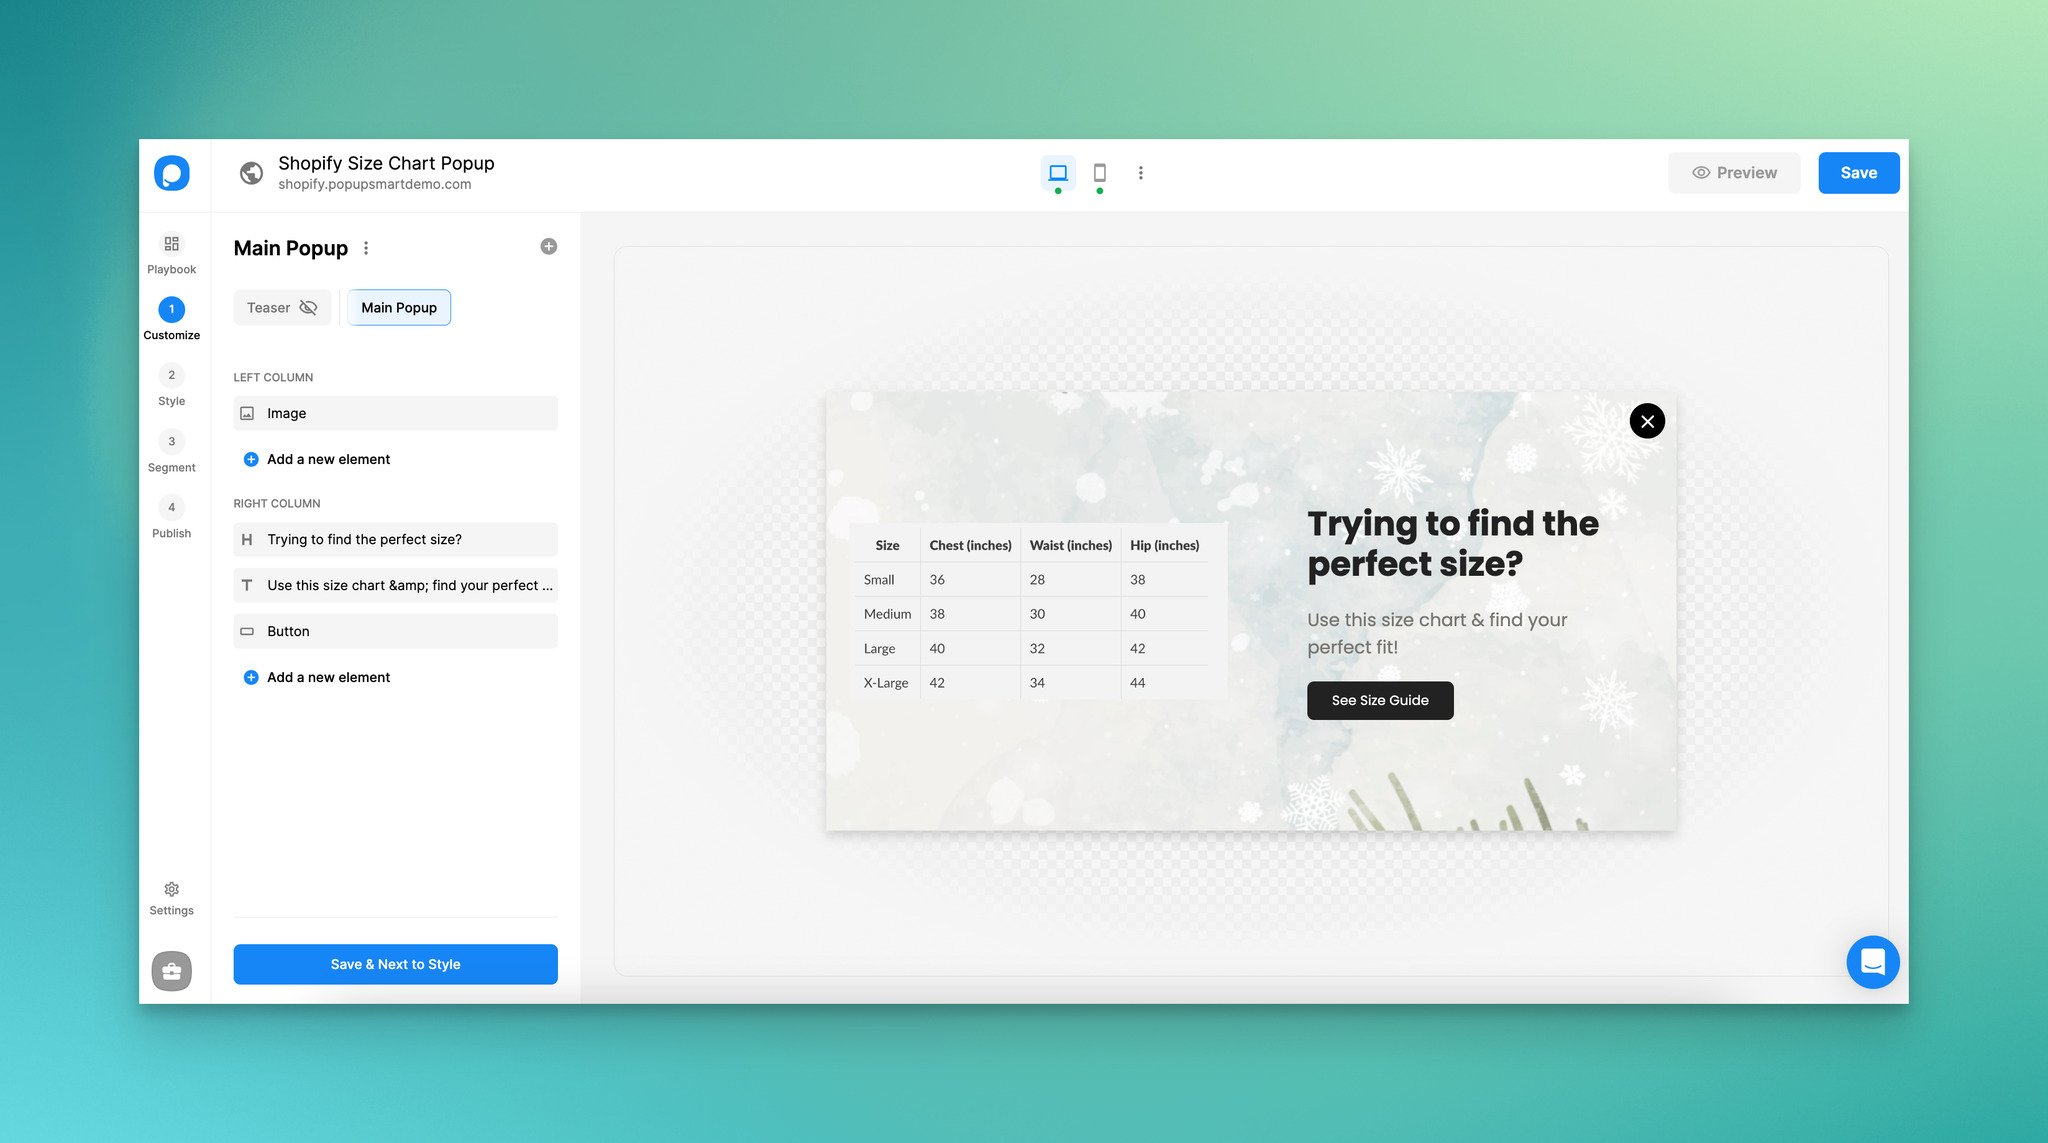
3. Design your size chart popup. Add a headline like "Find Your Perfect Size," upload your size chart image, and include a call-to-action button linking to your full sizing guide if you have one.
4. Set your targeting. Under Segment, you can target specific product page URLs so the popup only appears on products that need a size chart. For example, target URLs containing /products/ that match your clothing collection.
5. To make the popup appear when visitors click a specific button (instead of automatically), go to Segment, then under User Behavior Targeting, select On-Click Targeting. Enable it and assign the trigger to a CSS selector or button text like "Size Guide."
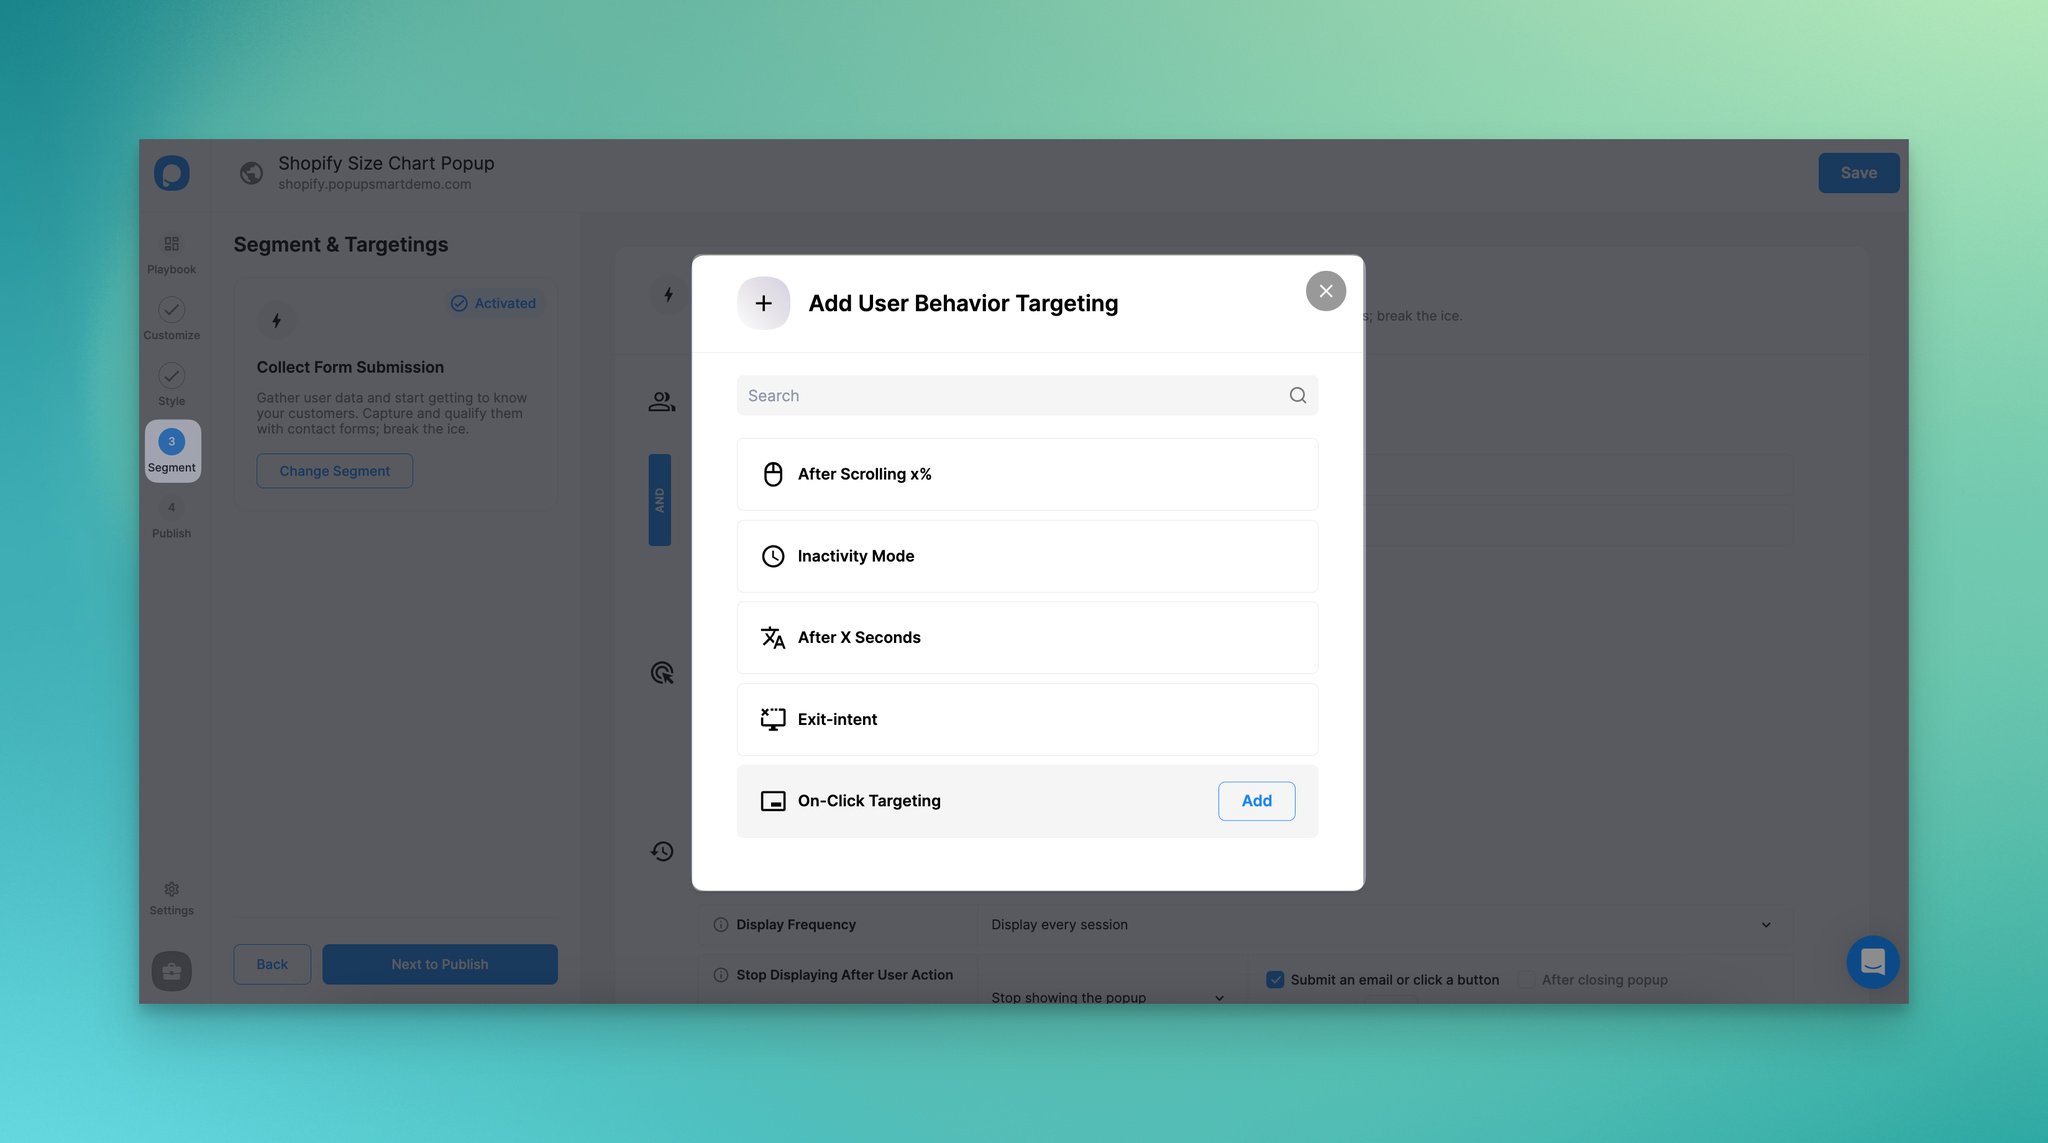
You can learn more about this feature in the On-Click Targeting guide.
6. Click Save and then Publish to push the popup live on your store.
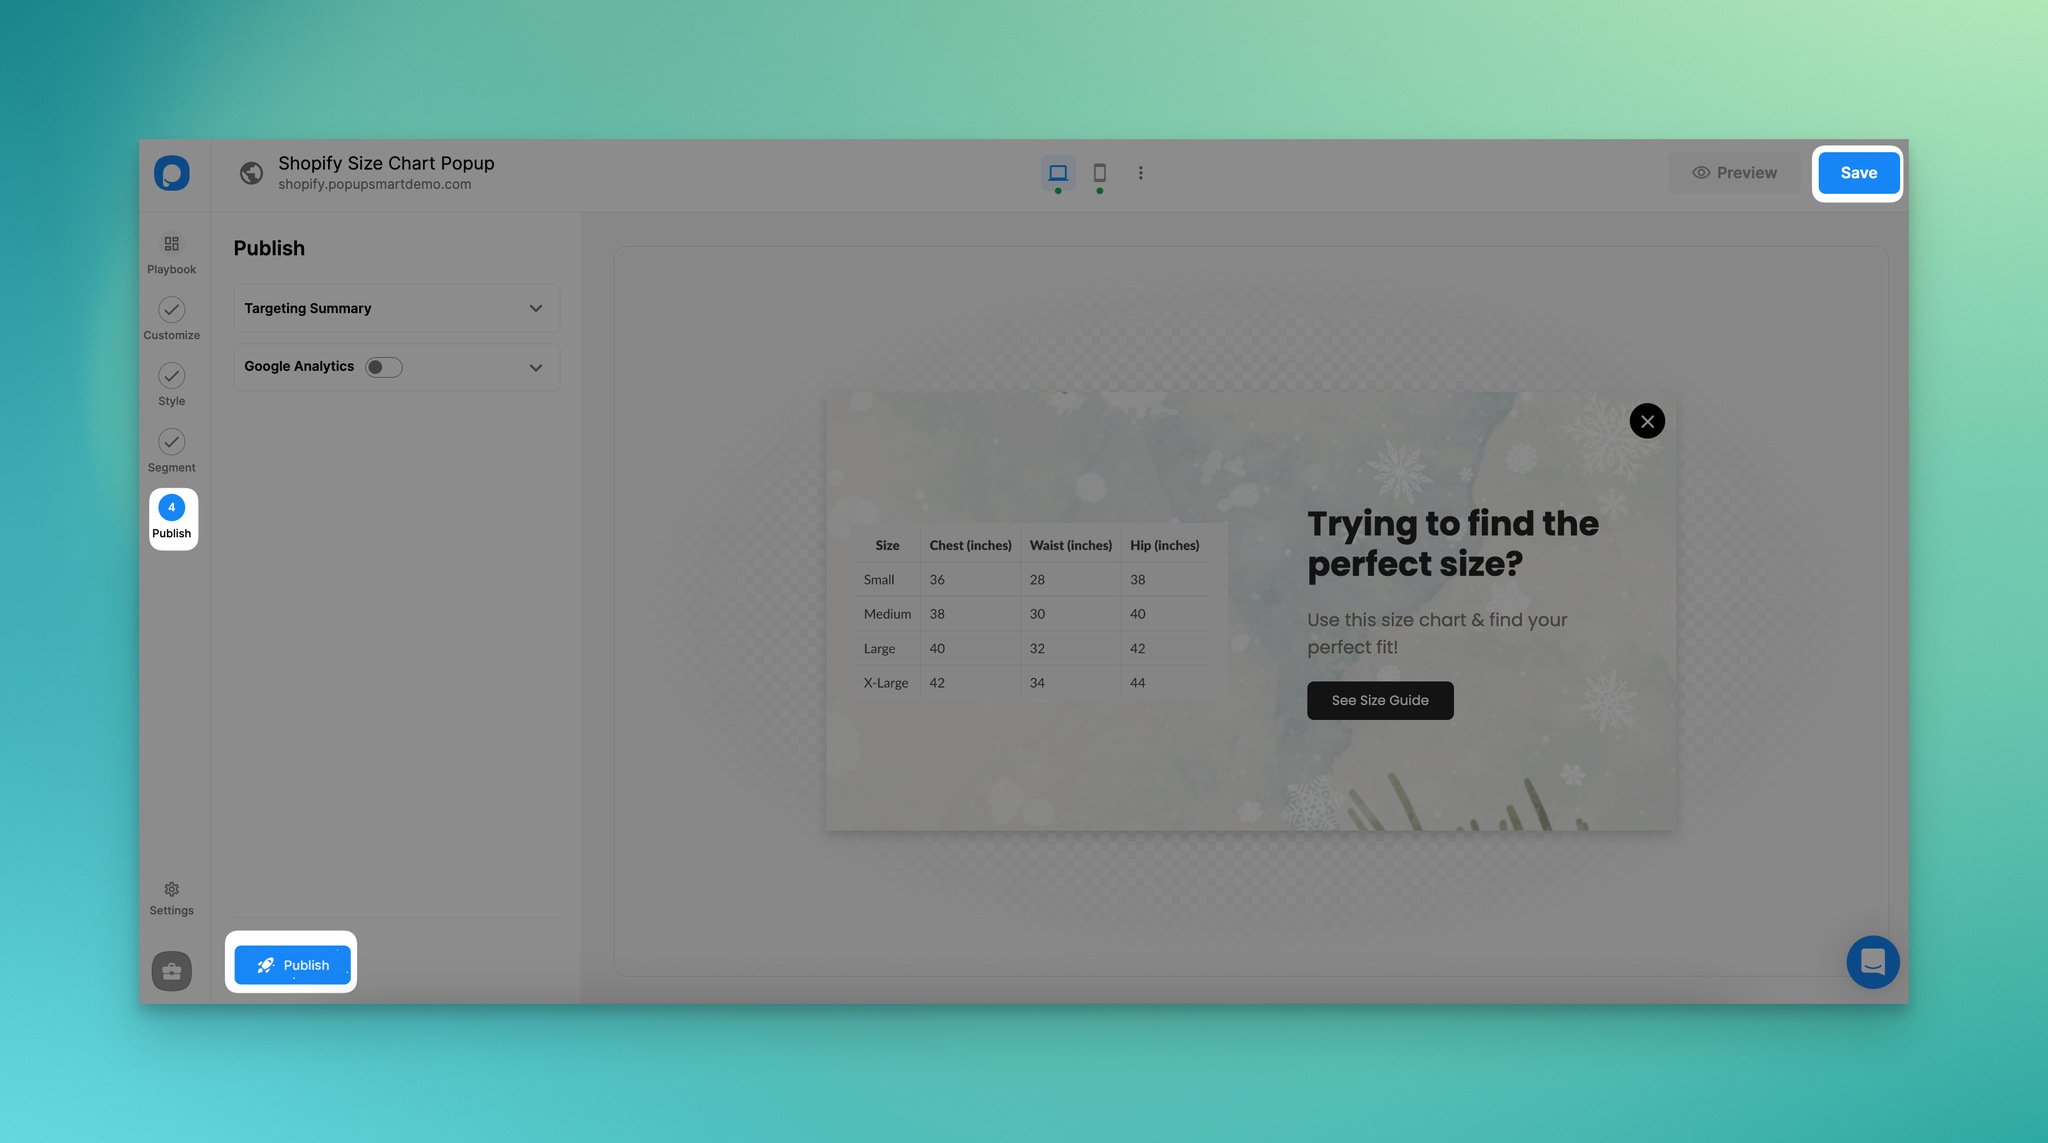
Expected result: Visit a product page you targeted. If you set up on-click targeting, click the designated button to trigger the popup. If you used automatic display, the popup should appear based on your timing rules. The size chart image and text should render correctly on both desktop and mobile. You can check engagement stats in Popupsmart's analytics dashboard.
Watch out for:
• Popup showing on every page: If you skip the URL targeting step, the popup displays site-wide, including your homepage, blog, and checkout pages. Always set page-level targeting to limit it to product pages or specific collections.
• Size chart image too small inside the popup: Popupsmart popup builder lets you adjust the popup width. If your chart looks cramped, increase the popup container width. For detailed measurement tables, consider using a full-screen popup layout.
• On-click trigger not firing: The CSS selector in On-Click Targeting must match the actual element on your page. Use your browser's inspect tool (right-click then Inspect) to find the correct selector for your "Size Guide" button. If you changed themes, selectors may have shifted.
Pro tip: I've tested size chart popups across multiple Shopify stores, and combining on-click targeting with a visible "Size Guide" text link near the variant selector consistently outperforms auto-triggered popups. Shoppers who click to see a size chart have high purchase intent.
You can explore more Shopify popup strategies to get additional ideas for your store.
Method 5: Install a Dedicated Shopify Size Chart App
The Shopify App Store has several apps built specifically for creating and managing size charts. These apps give you pre-made templates, product-level assignment, and built-in design tools. This is a fast option if you want a polished result without building anything from scratch.
1. Go to the Shopify App Store and search for "size chart" or "size guide." Review ratings, feature lists, and pricing for the top results.

Popular options include AVADA Size Chart and Kiwi Size Chart and Recommender. Both offer free plans for basic use.
2. Install the app and follow its onboarding wizard. Most apps walk you through creating your first size chart immediately after installation.
3. Build your size chart using the app's editor. Enter measurements for each size (XS through XXL, or numeric sizes). Most apps let you add multiple measurement types, such as chest, waist, hips, sleeve length, and inseam. You can also upload a custom image or use the app's built-in table builder.
4. Assign the chart to products. Apps typically let you assign by:
• Individual product: Manually select which products get this chart
• Product type: Auto-assign to all products matching a type (e.g., "T-Shirts")
• Collection: Assign to all products in a specific collection
• Tag: Apply to products with a specific tag
5. Configure the display settings. Choose whether the chart appears as a popup, an inline tab, or a dedicated section on the product page. Set the trigger (button text, icon placement, position relative to the Add to Cart button).
6. Save and preview. Open a product page to verify the chart looks correct on desktop and mobile.
You'll know it's working when: Visit any product you assigned the chart to. A "Size Chart" button or tab should appear on the product page. Clicking it opens the chart in whatever format you chose (popup, tab, inline). The chart should display all your measurement data and render cleanly on mobile devices.
Common mistakes and troubleshooting:
• App conflicts with your theme: Some size chart apps inject JavaScript that conflicts with other apps or custom theme code. If the chart doesn't render, temporarily disable other apps one by one to isolate the conflict. Check the app's support docs for known theme compatibility issues.
• Forgetting to assign charts to new products: When you add new products to your store, they won't automatically get a size chart unless you've set up collection-based or tag-based auto-assignment. Set a rule (e.g., "all products tagged 'apparel' get the clothing size chart") to avoid gaps.
• Using the wrong measurement system: If you sell internationally, include both inches and centimeters in your charts. According to Kiwi Sizing, providing dual measurements reduces confusion for international shoppers and can lower sizing-related return rates.
Pro tip: Before committing to a paid plan, install the free tier and test it on 5-10 products first. I've seen stores pay for apps they ended up removing because the chart style didn't match their theme. Most size chart apps offer enough on their free plan to evaluate fit before upgrading.
What Results to Expect After Adding a Size Chart
Don't expect overnight changes. Here's a realistic timeline based on what typically happens after implementing a size chart on a Shopify store:
Week 1-2: You'll see size chart clicks in your analytics (if using Popupsmart or an app with tracking). This tells you shoppers are actually using the chart. If clicks are low, the chart isn't visible enough, so reposition the trigger button closer to the variant selector.
Month 1: Return rates for sizing-related reasons should start declining. Track this by comparing return reasons in your order management system before and after implementation.
Month 2-3: Conversion rate improvements become measurable. Stores that previously lost customers due to size uncertainty often see a 5-15% increase in Shopify conversion rate for products with size charts. According to Returnalyze, proactive retailers held return rates flat even as the broader industry saw increases.
Ongoing: Monitor and update your charts when you add new vendors, change suppliers, or adjust your product line. A size chart with outdated measurements is worse than no size chart at all.
Best Practices for Shopify Size Charts
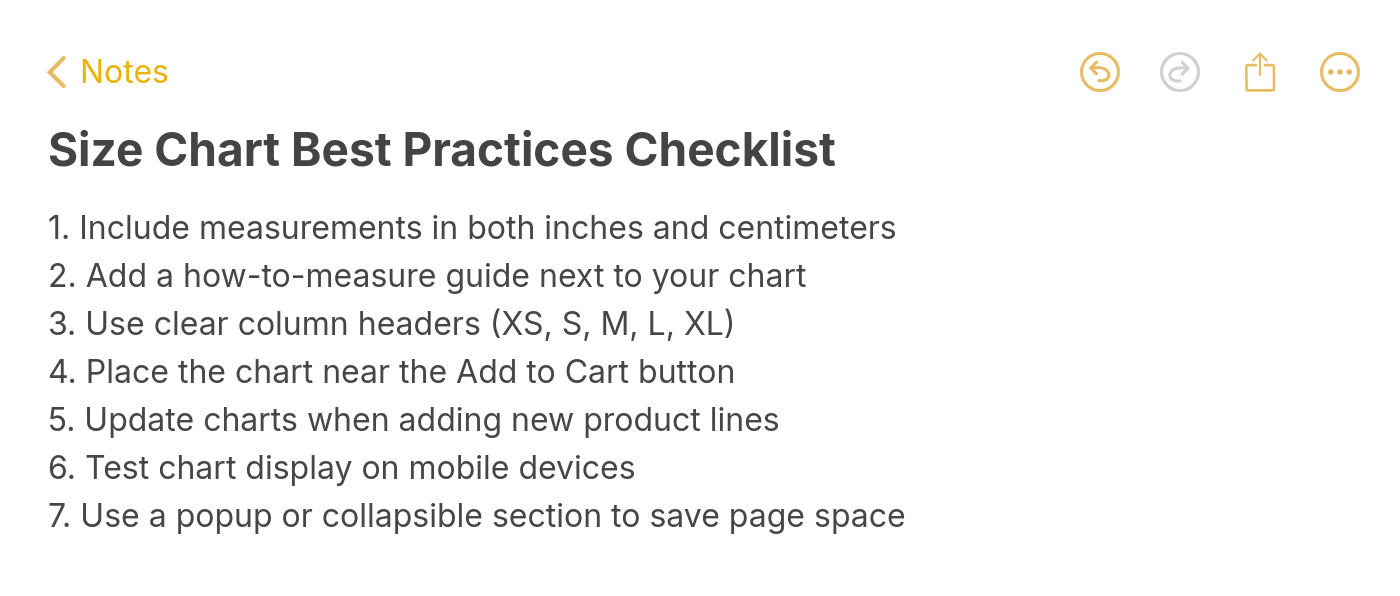
Best practices checklist for creating effective Shopify size charts
• Include both inches and centimeters: Your international customers will thank you. Show dual measurements in every chart, or add a toggle if your app supports it.
• Add a "how to measure" section: A chart is useless if shoppers don't know where to measure. Include a brief guide or diagram showing where to place the tape measure for chest, waist, hips, and inseam.
• Use clear column and row headers: Label every column (S, M, L, XL) and row (Chest, Waist, Length) explicitly. Avoid abbreviations that could confuse shoppers.
• Test on mobile before publishing: According to Shopify, more people browse on mobile than desktop. If your size chart table overflows on a phone screen, switch to a stacked layout or use an image.
• Place the chart where shoppers look for it: Near the variant selector, not buried at the bottom of product descriptions. Use e-commerce personalization techniques to show the right chart to the right customer.
• Keep charts updated: When you switch suppliers or add new brands, update the measurements. An inaccurate chart does more damage than having no chart.
Start Adding Your Size Chart to Your Shopify Store
You've got five methods to choose from. If you're comfortable editing code, first method gives you the most control at zero cost. If you want per-product flexibility without code, second and third method use Shopify's built-in metafields. If you want the fastest setup with advanced targeting, install Popupsmart and have a size chart popup running in under 10 minutes.
Sizing uncertainty drives returns, and returns eat into your margins. A well-placed size chart is one of the simplest product page optimizations you can make. Pick the method that matches your technical comfort level, implement it today, and start tracking the impact on your return rate and conversion rate next month.
Frequently Asked Questions
How Do I Create a Size Chart in Shopify Without an App?
You can create a size chart in Shopify without installing any app using Methods 1-3 in this guide. The simplest approach: create a new page (Online Store then Pages then Add page), build a table with your measurements in the content editor, and link to it from your product template.
What Is the Best App for Size Charts in Shopify?
It depends on what you need. For a simple, template-based chart, AVADA Size Chart is popular and has a free plan. For fit recommendations that suggest sizes based on customer input, Kiwi Size Chart offers AI-powered sizing. If you want a popup-based approach with full control over targeting and triggers, Popupsmart gives you that flexibility while also handling email capture and other popup use cases.
How Do I Add a Size Chart Popup in Shopify?
You have three options. First, use Shopify's built-in popup block, which requires a 2.0 theme and a Page-type metafield. Second, use a popup app like Popupsmart, which gives you a visual builder and on-click targeting without any code. Third, some dedicated size chart apps include popup display as a built-in option. Choose based on how much control you want over the popup's behavior and design.
Can I Customize Size Charts Per Product in Shopify?
Yes. Methods 2 and 3 both use product metafields, which let you assign a different size chart to each individual product. Method 5 (apps) also supports product-level assignment through tags, product types, or manual selection. Method 1 is the only approach that creates a single, store-wide chart. If you sell products from multiple vendors with different sizing standards, product-level customization is the way to go.
How Do I Link a Size Chart to Product Pages in Shopify?
The linking approach depends on your method. With theme code, you add a Liquid conditional that inserts a link to your size chart page on products with a "Size" option. With metafields, the link is automatic: once you connect the dynamic source in the theme editor, any product with that metafield filled in displays the chart. With apps, assignment happens inside the app's dashboard through product selection, tag matching, or collection rules.

How would you rate your experience with this article? 😊