How to Add Facebook (Meta) Pixel to Shopify in 2026
Facebook (Meta) Pixel is website code that tracks visitor actions to measure ad performance, optimize targeting, and build retargeting audiences. The text explains creating a pixel and adding/removing it on Shopify via partner integration or manual theme code, plus setup tips.
Tracking your visitors’ behavior and activities on your Shopify store is crucial. You can use Meta, formerly Facebook Pixel, which is a little piece of code, to track users’ activities on your website.
To add Facebook Pixel to Shopify, create a Meta Pixel in Events Manager, then connect it through Shopify's built-in Facebook & Instagram sales channel or paste the code manually into your theme.liquid file. Both methods take under 15 minutes and enable conversion tracking, retargeting, and ad optimization.
By exploring how the Facebook Pixel works on Shopify and how you can use it, you can improve your marketing strategy and Shopify.
![]()
What Is Facebook Pixel and How Does It Work?
What you'll need:
• A Facebook Business account with an active ad account
• Shopify store admin access
• Meta Pixel Helper Chrome extension (for verification)
• Time estimate: 10-15 minutes
• Skill level: Beginner-friendly
Facebook Pixel (now called Meta Pixel) is a small JavaScript snippet that sits on your Shopify store and sends visitor behavior data back to Meta's ad platform. Every time someone views a product, adds an item to cart, or completes a purchase, the pixel fires an event that Meta uses to build audience profiles and measure ad performance.
The pixel works by dropping a first-party cookie in each visitor's browser. When that visitor later scrolls through Facebook or Instagram, Meta matches their cookie data to their social profile, allowing you to serve retargeting ads to people who already showed purchase intent on your store.
According to Influee's 2025 benchmark report, the average Facebook ad conversion rate sits at 8.95% across all industries. A conversion rate above 10% is considered strong, while anything below 3% signals room for improvement. Without a pixel installed, you're flying blind on all of these numbers.
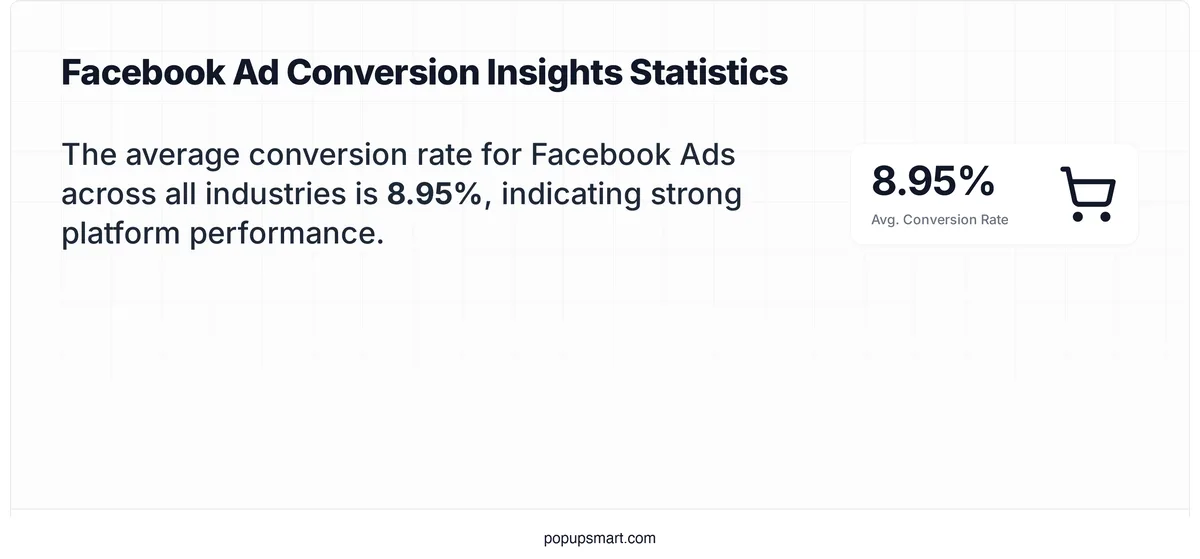
Average Facebook ad conversion rate benchmark across industries (Source: Influee, 2025)
The pixel tracks two types of events: standard events (predefined actions like PageView, AddToCart, Purchase) and custom events (specific behaviors you define, such as watching 75% of a product video). Standard events are what most Shopify stores need out of the box.
Why Should You Add Facebook Pixel to Your Shopify Store in 2026?
Installing Meta Pixel on your Shopify store isn't optional if you run paid ads on Facebook or Instagram. Without it, Meta's algorithm has no feedback loop. It can't tell which clicks led to purchases, which audiences converted, or which ad creatives drove revenue.
Here's what the pixel unlocks for your store:
Conversion tracking. See exactly which ads generate sales, not just clicks. You'll know your actual return on ad spend (ROAS) down to the individual campaign level.
Retargeting audiences. Build custom audiences from visitors who browsed specific product pages, abandoned their cart, or viewed your collection pages. These warm audiences convert at significantly higher rates than cold traffic.
Lookalike audiences. Once Meta collects enough purchase data through your pixel, it can find new potential customers who share behavioral patterns with your existing buyers.
According to StoreCensus's 2026 benchmarks, Meta Pixel has a 70% adoption rate among Shopify stores, while 69.6% rely on Google Analytics 4. High-traffic stores with 1M+ monthly visitors use an average of 6.1 tracking pixels. If you're not running a pixel yet, you're behind the majority of your competitors.
![]()
Meta Pixel adoption rate among Shopify stores (Source: StoreCensus, 2026)
In 2024, Facebook's advertising revenue reached nearly $165 billion according to Statista. That revenue comes from advertisers who rely on pixel data to optimize their spend. The brands investing in proper tracking infrastructure are the ones capturing the lion's share of results.
Step 1: Create Your Facebook Pixel in Meta Events Manager
Before you can connect anything to Shopify, you need a pixel. This step creates your unique tracking identifier inside Meta's ad platform. It takes about two minutes.
1. Log into your Meta Events Manager
2. Click the green "Connect Data Sources" button on the left sidebar
3. Select "Web" as your data source type
4. Enter a descriptive name for your pixel (e.g., "MyStore-Main-Pixel") and click "Create Pixel"
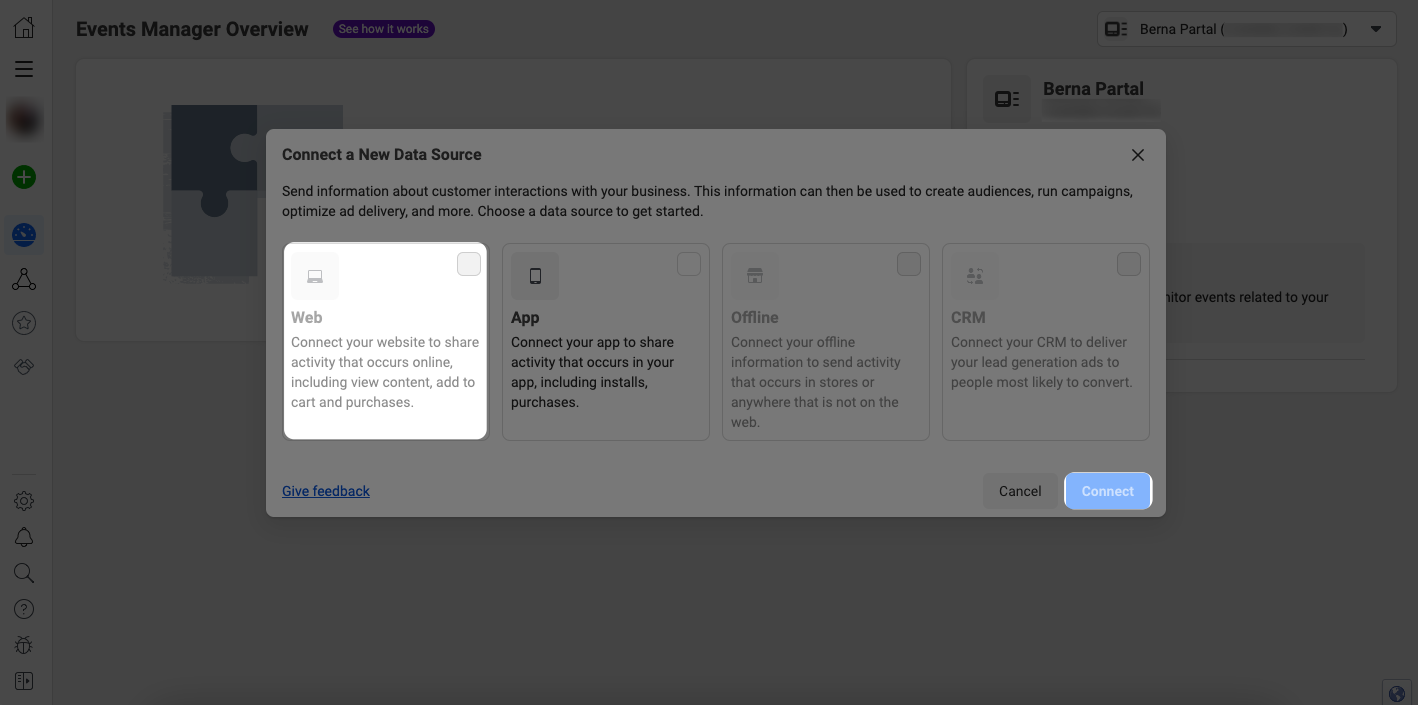
After creation, you'll land on the "Check for Partner Integration" screen. This is where you choose between the automated Shopify integration or manual code installation.
![]()
You'll know it's working when: Your new pixel appears in Events Manager with a status of "No Activity Yet." That's expected. It won't show data until you complete the Shopify connection in the next steps.
Watch out for:
• Multiple Business Manager accounts: If you manage several brands, confirm you're creating the pixel under the correct Business Manager. I've seen store owners accidentally create pixels in the wrong account and spend days troubleshooting why data doesn't match their ad account.
• Naming your pixel "Pixel" or "Test": Use a descriptive name that includes your store name. When you run multiple pixels later (for different product categories or domains), generic names create confusion.
Pro tip: I always name pixels with the format "[Brand]-[Purpose]-[Year]". This naming convention saves hours of confusion when clients scale to multiple pixels or hand off accounts to agencies.
Step 2: Add Facebook Pixel via Shopify's Partner Integration
The partner integration is the recommended method for most Shopify stores. It connects your pixel through the official Facebook & Instagram sales channel, which handles standard event tracking automatically and supports the Conversion API for server-side data.
1. On the partner integration screen in Events Manager, select "Shopify" from the partner list
![]()
2. In your Shopify admin panel, navigate to Sales Channels > Online Store > Preferences
3. Scroll down to the "Facebook Pixel" section
![]()
4. Click "Set up Facebook" to launch the Facebook & Instagram app connection flow
![]()
5. If the app isn't installed yet, click "Add app" on the Shopify App Store page
![]()
6. Go to Settings > Apps and sales channels in your Shopify admin
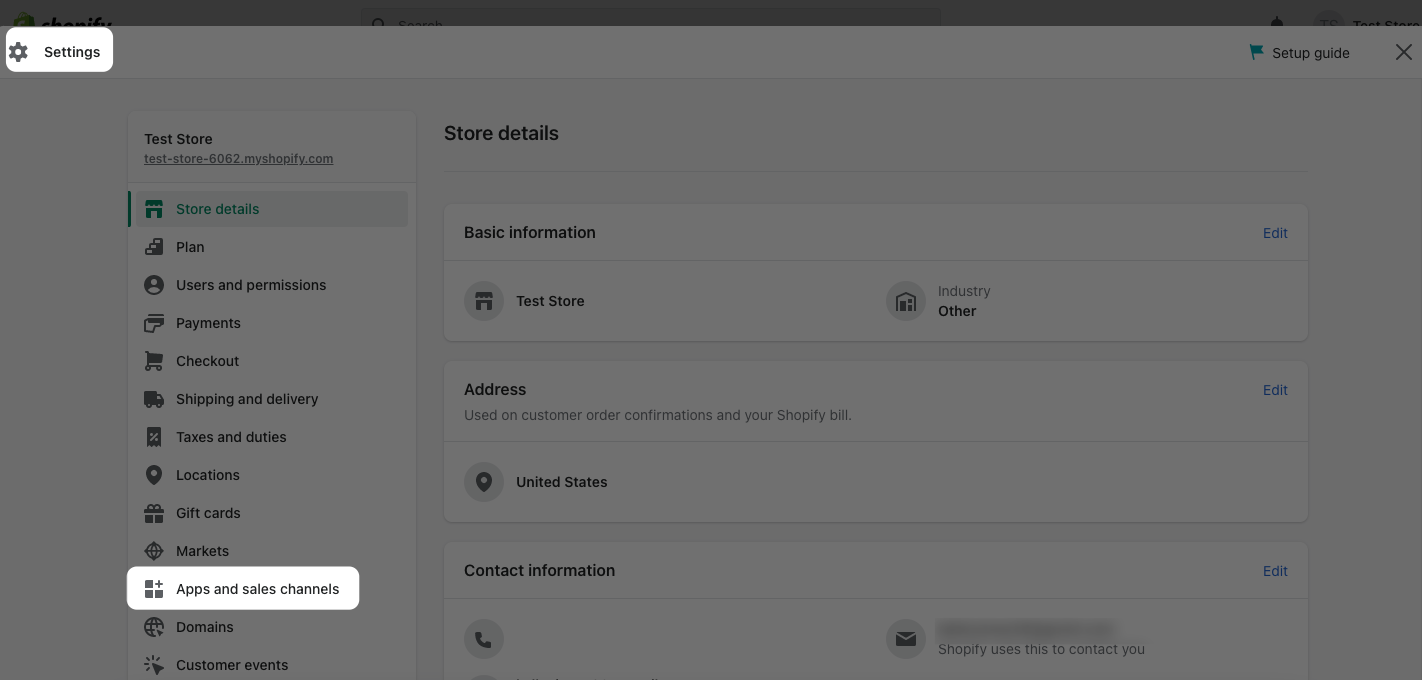
7. Select the Facebook app, click "Open sales channel", then go to Settings > Data sharing settings
8. Enable data-sharing under "Customer data-sharing" and select your data-sharing level:
| Data-Sharing Level | What It Sends | Best For |
|---|---|---|
| Standard | Browser pixel events only | Stores just starting with Facebook ads |
| Enhanced | Browser events + hashed customer info (email, phone) | Stores wanting better match rates |
| Maximum | Browser events + Conversion API server-side events | Serious advertisers needing the most accurate tracking |
9. Choose your pixel from the dropdown list and click "Confirm"
You'll know it's working when: Return to Meta Events Manager and check your pixel's overview page. Within 5-10 minutes of browsing your store, you should see a green "Active" status and incoming PageView events.
Watch out for:
• Selecting "Standard" data-sharing by default: Standard mode only fires browser-side events, which ad blockers and iOS privacy settings can block. If you're spending over $500/month on Facebook ads, go with "Maximum" to enable Conversion API (CAPI) server-side tracking.
• Shopify's "Optimized" pixel setting: As of January 13, 2026, Shopify switched its default pixel setting to "Optimized", which can pause or suppress tracking events without your knowledge. Check Settings > Customer events and confirm your pixel status is set to your preferred configuration.
Step 3: Add Facebook Pixel Code to Shopify Manually
Manual installation gives you direct control over where the pixel code sits in your theme. This method works best when the Shopify integration isn't available, when you need a secondary pixel for a specific product category, or when you want custom event tracking beyond the standard setup.
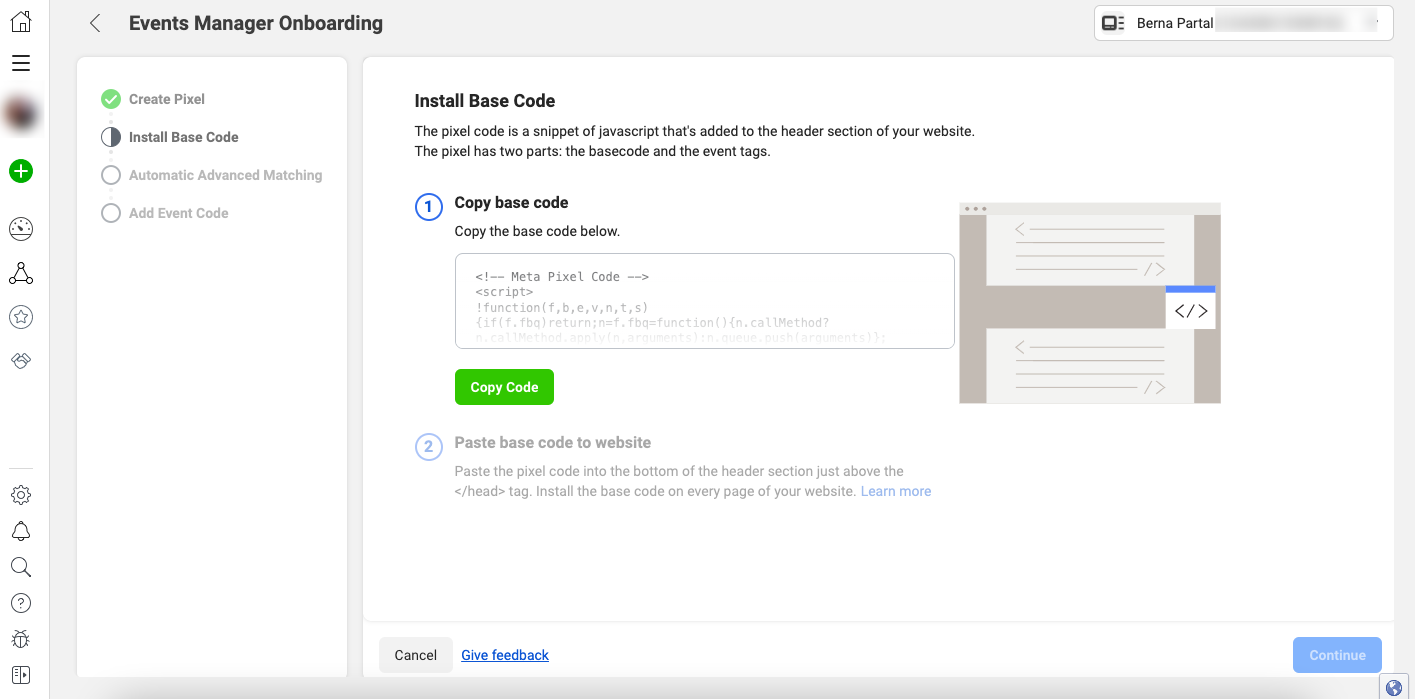
1. Go back to Meta Events Manager and select "Manually add Pixel code to website"
2. Copy the full pixel base code snippet displayed on screen
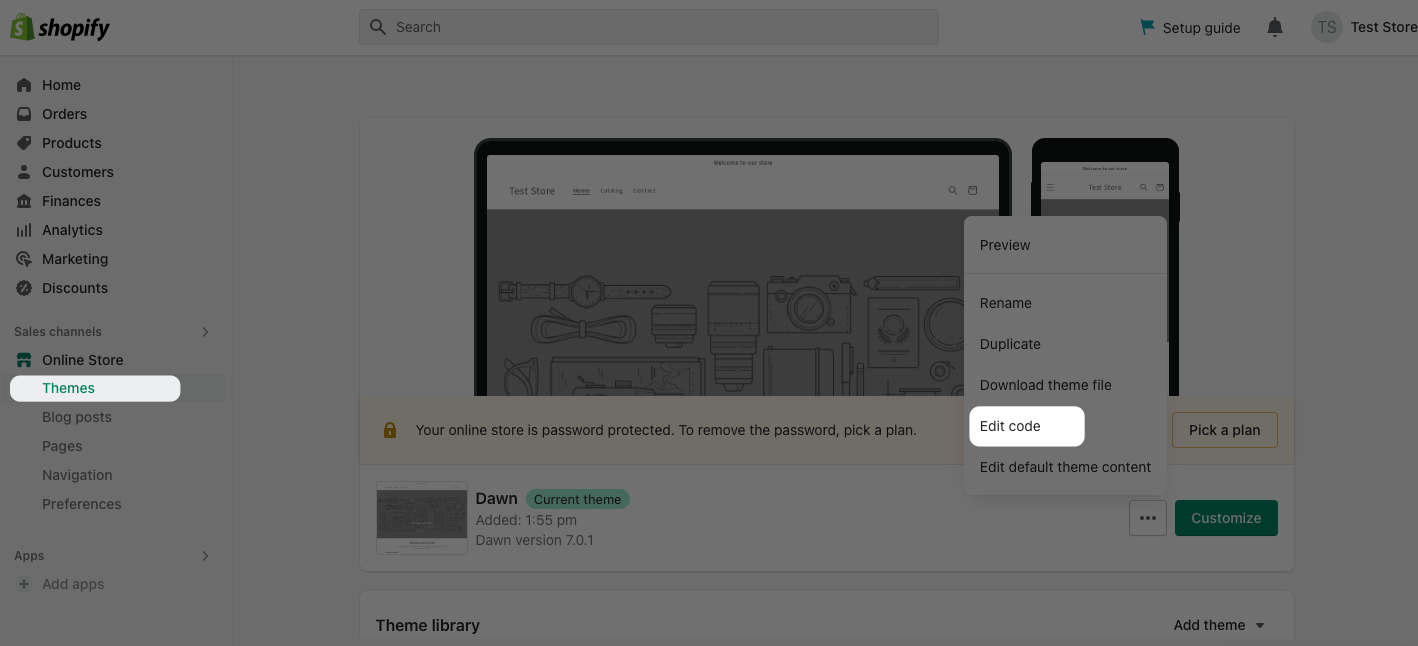
3. In your Shopify admin, go to Online Store > Themes
4. Click Actions > Edit code (or the three-dot menu > Edit code on newer themes)
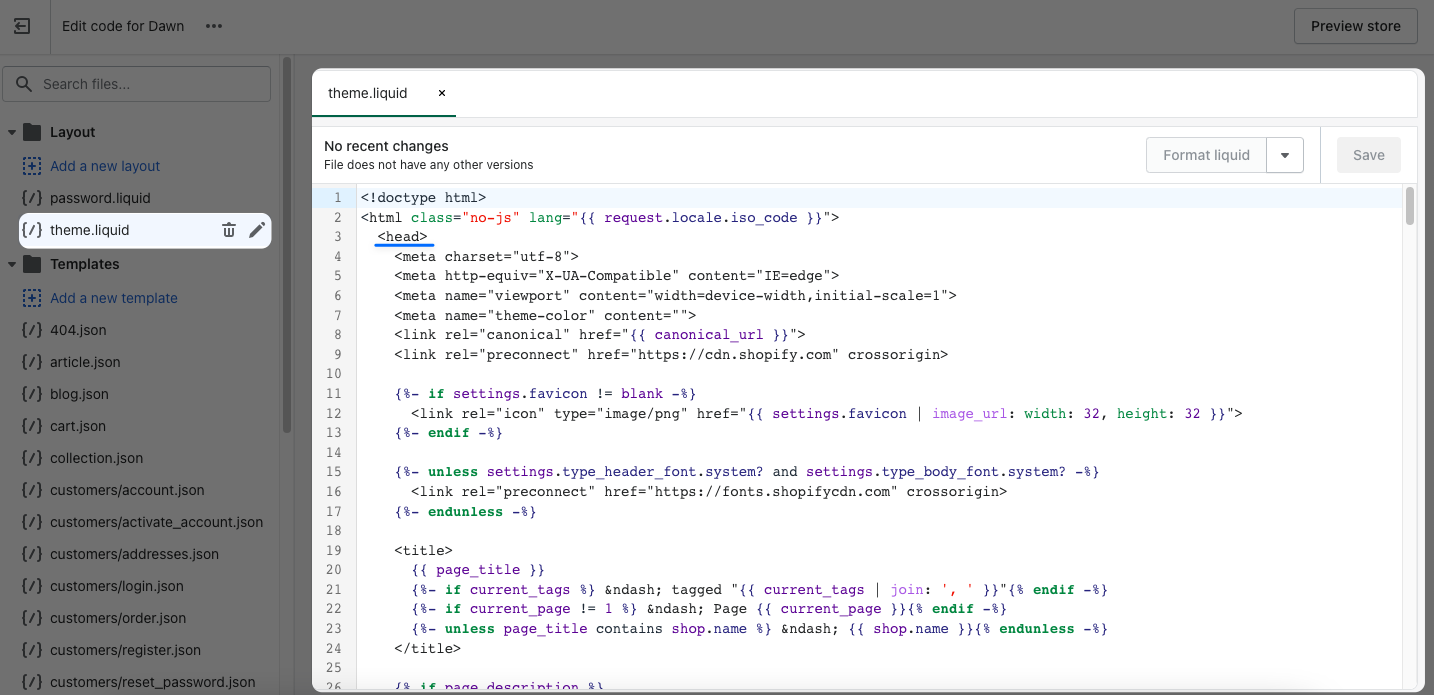
5. Open the theme.liquid file from the Layout folder
6. Paste the pixel code just before the closing tag
7. Click "Save"
For checkout page tracking, paste the same pixel code into Settings > Checkout > Additional scripts (Shopify Basic and above). This captures Purchase and InitiateCheckout events that the theme.liquid file can't track due to Shopify's checkout domain separation.
You'll know it's working when: Install the Meta Pixel Helper Chrome extension, visit your store, and check for a green icon showing your pixel ID with "PageView" firing.
Watch out for:
• Pasting the code in the wrong location: The pixel must go inside the section, before the closing tag. Placing it in the
delays tracking and can cause missed events on fast page exits.• Duplicate pixels from both methods: If you already connected via the Shopify integration (Step 2), adding the same pixel ID manually creates duplicate event firing. This inflates your reported conversions by 2x and corrupts your ad optimization data. Use one method or the other, not both.
Pro tip: If you're running a multi-category Shopify store (say, apparel and electronics), consider installing a second pixel manually for one category while using the integration for the primary pixel. This way, each pixel builds separate custom audiences.
Step 4: Configure Data-Sharing and Pixel Events
Installing the pixel is half the job. Configuring what data it collects and how it sends that data to Meta determines whether your ad campaigns actually improve or just accumulate noise.
1. In Shopify admin, go to Settings > Customer events
2. Find your Meta Pixel in the connected pixels list
3. Verify the pixel status is "Connected" (not "Paused" or "Optimized")
4. In Meta Events Manager, navigate to your pixel's Settings tab
5. Scroll to "Event Setup Tool" and add any custom events for buttons or pages that standard events don't cover
Standard events Shopify tracks automatically through the integration:
| Event Name | When It Fires | Why It Matters |
|---|---|---|
| PageView | Every page load | Measures overall traffic from Facebook |
| ViewContent | Product page views | Tracks product interest for retargeting |
| AddToCart | Items added to cart | Identifies high-intent shoppers |
| InitiateCheckout | Checkout started | Spots checkout abandonment |
| AddPaymentInfo | Payment details entered | Signals near-purchase intent |
| Purchase | Order confirmed | Measures actual conversions and ROAS |
According to Cometly's tracking analysis, most advertisers running only basic pixel tracking score between 3 and 5 on Meta's Event Match Quality scale (out of 10). Configuring enhanced matching and CAPI pushes that score above 8, which gives Meta's algorithm significantly more data to work with.
You'll know it's working when: In Events Manager, each event shows a green checkmark and displays recent activity. Your Event Match Quality score (visible in the Diagnostics tab) should be 6.0 or higher within 48 hours of proper setup.
Watch out for:
• Ignoring the "Optimized" pixel default: Shopify now defaults marketing pixels to an "Optimized" setting that can suppress tracking events without telling you. Check your pixel status weekly during the first month after setup.
• Not enabling Enhanced Matching: Without it, Meta can only match visitors using browser cookies. Enhanced Matching adds hashed email and phone data, which survives cross-device sessions and ad blockers.
Pro tip: After configuring events, wait 72 hours before judging your Event Match Quality score. Meta needs time to process enough events to calculate an accurate score. I've seen store owners panic and reconfigure their setup after 6 hours of low scores, only to create more problems. Patience here saves you a week of troubleshooting later.
Step 5: Verify Your Pixel Fires Correctly
A pixel that's installed but not verified is worse than no pixel at all. You might spend weeks running ads optimized against broken data. Verification takes five minutes and gives you full confidence in your tracking.
1. Install the Meta Pixel Helper Chrome extension
2. Visit your Shopify store's homepage and check for the Pixel Helper icon turning green
3. Click the icon to confirm your pixel ID and verify a "PageView" event appears
4. Navigate to a product page. Confirm "ViewContent" fires with the correct product ID
5. Add an item to your cart. Confirm "AddToCart" fires
6. Proceed to checkout (use Shopify's Bogus Gateway for test orders) and confirm "InitiateCheckout" and "Purchase" events fire
7. Back in Events Manager, go to Test Events tab and enter your store URL to see events in real time
According to StoreCensus, mobile accounts for 79% of Shopify store visits. Test your pixel on a mobile device too. Open your store in Chrome on your phone, browse a few pages, then check Events Manager for incoming mobile events.
You'll know it's working when: The Test Events tab in Events Manager shows each event as you trigger it, with no error warnings. The Pixel Helper extension shows a green icon with your pixel ID on every page.
Watch out for:
• Ad blockers in your test browser: Extensions like uBlock Origin or Brave's built-in blocker will prevent the pixel from firing during testing. Use an incognito window with extensions disabled, or test in a different browser profile.
• Caching layers hiding your changes: Shopify's CDN and any caching apps you use (PageFly, Vitals) can serve stale pages without your pixel code. Clear your store's cache after installation and hard-refresh (Ctrl+Shift+R) before testing.
Pro tip: Don't just test the happy path. I simulate an abandoned cart scenario (add items, start checkout, close the tab) and verify that Meta records the AddToCart and InitiateCheckout events without a Purchase event. This confirms your Shopify marketing strategy for cart abandonment retargeting will work correctly from day one.
Step 6: Set Up Custom Audiences and Conversion Events
Once your pixel collects data for 24-48 hours, you can start building the audiences and conversion rules that make Facebook ads profitable. This is where raw tracking data turns into actionable targeting.
1. In Meta Ads Manager, go to Audiences > Create Audience > Custom Audience
2. Select "Website" as your source
3. Create these foundational audiences:
| Audience Name | Rule | Retention Window |
|---|---|---|
| All Visitors | All website visitors | 180 days |
| Product Viewers | ViewContent event | 30 days |
| Cart Abandoners | AddToCart but NOT Purchase | 14 days |
| Purchasers | Purchase event | 180 days |
| High-Value Buyers | Purchase with value > $100 | 180 days |
4. For custom conversions, go to Events Manager > Custom Conversions > Create Custom Conversion
5. Set the URL rule (e.g., URL contains "/thank-you" for order confirmations) and assign a conversion value
Custom audiences based on pixel data are the backbone of profitable e-commerce advertising. Without them, you're targeting broadly and hoping something sticks.
You'll know it's working when: Your custom audience shows a growing audience size (check Audiences dashboard after 48 hours). Lookalike audiences become available once your source audience hits at least 100 people.
Watch out for:
• Setting retention windows too short: A 7-day cart abandoner audience might be too small to deliver ads efficiently. Start with 14-30 day windows and narrow down as your traffic grows.
• Forgetting to exclude purchasers from prospecting campaigns: Without exclusion rules, your acquisition campaigns waste budget showing ads to people who already bought. Always exclude your Purchasers audience from top-of-funnel campaigns.
Step 7: Troubleshoot Common Facebook Pixel Issues on Shopify
Even a clean installation can run into problems. Here are the issues I see most often and the exact fixes that resolve them.
Pixel Not Firing on Any Page
1. Open Meta Pixel Helper and check for error messages
2. Verify your pixel ID in Shopify Settings > Apps and sales channels > Facebook > Settings
3. If you installed manually, confirm the code is inside the
section of theme.liquid (not in a section file or snippet)4. Check if your theme has a separate head.liquid partial. Some custom themes split the head across multiple files
Pixel Fires but Events Are Missing
1. Go to Events Manager > Diagnostics and look for event-specific error messages
2. Verify data-sharing is set to "Enhanced" or "Maximum" (not "Standard")
3. For checkout events, confirm you've added the pixel to Settings > Checkout > Additional scripts
4. Check if any Shopify apps (cart drawers, one-page checkout apps) are intercepting the standard checkout flow
Duplicate Events Firing
1. You likely have both the integration AND manual code active. Remove one
2. Check for third-party apps (Trackify, Omega) that might be firing their own pixel events alongside yours
3. In Events Manager, go to Settings > Automatic Advanced Matching and check if Advanced Matching parameters are doubling up
Organic search drives 20-30% of traffic for optimized Shopify stores. If your pixel issues stem from conflicting scripts, they might also be slowing your page load time and hurting your organic rankings.
You'll know it's working when: The Diagnostics tab in Events Manager shows zero active issues, and your Test Events page mirrors exactly the actions you take on your store, with no duplicates or missing events.
Watch out for:
• Browser privacy changes: Safari's ITP and Firefox's Enhanced Tracking Protection limit cookie lifetimes. The Conversion API (Step 2, "Maximum" data-sharing) is the primary workaround for these restrictions.
• Third-party Shopify apps conflicting: Apps like Reconvert, CartHook, or custom checkout extensions can break event tracking by overriding standard Shopify checkout pages. Test each app individually by disabling them one at a time.
Pro tip: When troubleshooting pixel issues, use the Events Manager Diagnostics tab first, not Pixel Helper. Diagnostics shows server-side data that Pixel Helper can't see, including CAPI events and deduplication status. Most of "pixel not working" issues are actually CAPI configuration problems that only show up in Diagnostics.
Step 8: Remove or Replace a Facebook Pixel on Shopify
Whether you're switching ad accounts, consolidating pixels, or cleaning up a test installation, removing a pixel properly matters. Leftover code creates data conflicts and can send false events to the wrong ad account.
To remove via the Shopify integration:
1. Go to Settings > Apps and sales channels in your Shopify admin
2. Select "Facebook" and click "Open sales channel"
3. Navigate to Settings > Data sharing settings
4. Click "Disconnect" to disable your Facebook pixel
To remove a manually installed pixel:
1. Go to Online Store > Themes > Edit code
2. Open theme.liquid
3. Find and delete the entire pixel code block (starts with or fbq('init'...)
4. Save the file
5. Also check Settings > Checkout > Additional scripts and remove any pixel code there
Important: If you used both methods (integration and manual), you need to remove from both locations. Leaving one active while removing the other still sends partial data.
You'll know it's working when: The Meta Pixel Helper extension shows no pixel detected on your store, and Events Manager shows "No Recent Activity" for the removed pixel.
Watch out for:
• Forgetting the checkout scripts: The Additional scripts section in checkout settings is a common place for leftover pixel code. Always check there when removing a pixel.
• Third-party apps still firing the old pixel: Apps like Trackify or Shopify form builder apps sometimes store pixel IDs independently. Check each app's settings after removing your main pixel.
Pro tip: Before removing a pixel, export your custom audiences and conversion data from Events Manager. Once you disconnect a pixel, historical data stays in Meta's system, but it becomes harder to access.
What Results to Expect After Installing Your Pixel
Don't expect immediate results. The pixel needs time to collect enough data for Meta's algorithm to optimize your ad delivery effectively.
First 24-48 hours: Events start appearing in Events Manager. PageView and ViewContent events populate first. You can verify your installation is clean and complete.
Days 3-7: Your Event Match Quality score stabilizes. If you enabled Maximum data-sharing with CAPI, this score should be 7.0 or higher. If it's below 6.0, revisit your configuration.
Weeks 2-4: Custom audiences reach usable sizes (100+ people for lookalike creation). You can start running retargeting campaigns to cart abandoners and product viewers.
Month 2-3: Meta's algorithm has enough purchase data to optimize for conversions rather than just clicks. This is where your cost per acquisition typically starts dropping as the algorithm learns which users are most likely to buy.
The timeline varies based on your daily traffic. Stores with 500+ daily visitors see usable data within a week. Stores with under 100 daily visitors might need 3-4 weeks before audiences are large enough for effective retargeting. If you're looking to boost traffic to your store faster, conversion-optimized Shopify templates and mobile marketing strategies can help accelerate your visitor growth.
Advanced Tips for Optimizing Facebook Pixel on Shopify
Use multiple pixels for multi-category stores. If you sell in distinctly different niches (e.g., pet supplies and home decor), each category benefits from its own pixel. According to WeTracked, utilizing multiple pixels allows for granular data collection and better audience segmentation, which ultimately improves ad performance. Use the integration for your primary pixel and manual installation for secondary ones.
Enable Conversion API alongside browser tracking. CAPI sends events server-to-server, bypassing ad blockers, browser privacy restrictions, and cookie limitations. This is no longer optional for serious advertisers. Meta's CAPI documentation walks through the setup process for Shopify.
Set up value-based optimization. Once you have 50+ purchase events per week, switch your ad campaign optimization from "Conversions" to "Value." This tells Meta to find buyers likely to spend more, not just anyone likely to purchase. It's the difference between optimizing for volume and optimizing for revenue.
Monitor iOS privacy impacts. Apple's App Tracking Transparency framework limits data collection from iOS users. The Conversion API partially compensates, but you should also configure Aggregated Event Measurement in Events Manager to maintain tracking accuracy for iPhone visitors, who often represent 40-50% of e-commerce traffic.
Run your ads alongside on-site conversion tools. The pixel tracks visitors, but converting them requires more than ads alone. Conversion optimization tools let you create targeted offers for cart abandoners or product page visitors. When a visitor triggered by your Facebook ad sees a personalized exit-intent offer, your chances of converting that paid click go up. The pixel then records that conversion, feeding better data back to Meta for future ad optimization. You can also run giveaway campaigns to grow your retargeting audiences faster.
Wrapping Up
Adding a Facebook Pixel to your Shopify store is a 15-minute task that fundamentally changes how you run paid advertising. Without it, every dollar you spend on Facebook and Instagram ads is a guess. With it, you get conversion data, retargeting audiences, and the feedback loop Meta's algorithm needs to find your best customers.
Start with Step 1 today: create your pixel in Events Manager. If you've already done that, jump to Step 2 and connect through Shopify's integration (the fastest path for most stores). Once your pixel is firing cleanly, build your first cart abandonment audience and run a retargeting campaign. That's where most stores see their first real return from pixel tracking.
For stores looking to maximize the conversions their pixel tracks, pairing Facebook ads with on-site lead generation tactics and multi-channel marketing campaigns creates a compounding effect. Your pixel captures the data, your ads bring the traffic, and your on-site tools convert the visitors.
Frequently Asked Questions
Why Is My Facebook Pixel Not Showing Up on Shopify?
The three most common causes are: (1) your pixel ID doesn't match between Shopify and Events Manager, (2) ad blockers in your browser prevent the pixel from loading during testing, or (3) Shopify's new "Optimized" pixel setting has paused your tracking. Open an incognito window, visit your store, and check with Meta Pixel Helper. If no pixel appears, verify your pixel ID in Shopify > Settings > Apps and sales channels > Facebook > Settings.
How Do I Integrate Facebook with Shopify?
The fastest method is through Shopify's built-in Facebook & Instagram sales channel. Go to your Shopify admin, add the Facebook & Instagram app from the App Store, connect your Facebook Business account, and select your pixel in the data-sharing settings. This integration handles standard event tracking, supports CAPI, and doesn't require any code changes. The full process is covered in Step 2.
How Do I Create a Facebook Pixel for Shopify?
Go to Meta Events Manager, click "Connect Data Sources," select "Web," name your pixel, and click "Create Pixel." The pixel is created instantly. You then connect it to your Shopify store using either the partner integration or manual code installation. Step 1 above covers this in full detail.
What Should I Do If Facebook Pixel Is Not Tracking on Shopify?
Start with the Diagnostics tab in Events Manager. It shows exactly which events are failing and why. Common fixes include re-enabling data-sharing in Shopify settings, switching from the "Optimized" pixel setting to your original configuration, clearing your store's cache, and checking for conflicting third-party apps. If you installed manually, verify the code didn't get stripped during a theme update. Shopify theme updates can overwrite theme.liquid changes.
How Do I Remove Facebook Pixel from Shopify?
If you used the integration, go to Settings > Apps and sales channels > Facebook > Settings > Data sharing settings and click "Disconnect." If you installed manually, delete the pixel code from your theme.liquid file and from checkout additional scripts. Check both locations regardless of which method you used. Leftover code sends conflicting data and can corrupt your ad account's optimization. See Step 8 for the complete removal process.
Related Shopify guides you might find useful:
• How to Make Money on Shopify: 10 Proven Ways

How would you rate your experience with this article? 😊