Shopify Abandoned Checkout: 3 Ways to Recover Lost Sales in 2026
Shopify abandoned checkout is when shoppers start checkout and enter details but leave before paying; it signals high intent and affects revenue, ROI, trust, and conversions (avg ~70% abandonment). It differs from abandoned carts and can be reduced via clearer costs, simpler checkout, trust/payment options, and recovery emails (manual, automated, or apps).
A Shopify abandoned checkout happens when a shopper enters their email or payment details, then quits before paying. Recover these orders three ways: send Shopify's manual recovery email, turn on the abandoned checkout automation in Marketing > Automations, or run a 1-hour, 24-hour, 48-hour cross-channel sequence with Popupsmart.

What is a Shopify abandoned checkout?
A Shopify abandoned checkout is a session where a customer made it past the cart, started filling out the checkout form, and then disappeared. Shopify only counts the session as abandoned once the shopper has entered identifying information (almost always an email address), which is what gives you a chance to follow up at all.
I've shipped abandoned checkout flows for dozens of Shopify stores, and the first thing merchants want clarified is the difference between an abandoned cart and an abandoned checkout. They sound interchangeable, but Shopify treats them as two separate events with very different recovery options.
An abandoned cart is a shopper who added a product but never clicked the checkout button. You usually have no contact info, so the only way to win them back is on-site, with an exit-intent popup, a sticky bar, or a retargeting ad. An abandoned checkout sits one step deeper in the funnel: the shopper typed in their email, maybe even their shipping address, and then left. Because Shopify now has a contact point, the platform can email them, and so can you.
The buying intent gap between the two is enormous. A casual browser who adds a hoodie to the cart on a Tuesday night is shopping. A returning visitor who fills in their full address on a Sunday morning is buying — they were sixty seconds from converting. That distinction is why checkout-stage recovery is one of the highest-ROI tasks an e-commerce manager can ship this quarter.
Why Shopify abandoned checkouts cost stores millions in 2026
Checkout abandonment is no longer a small leak. It's the single largest source of lost ecommerce revenue for Shopify merchants, and the numbers are bigger in 2026 than they were when most stores last looked at them.
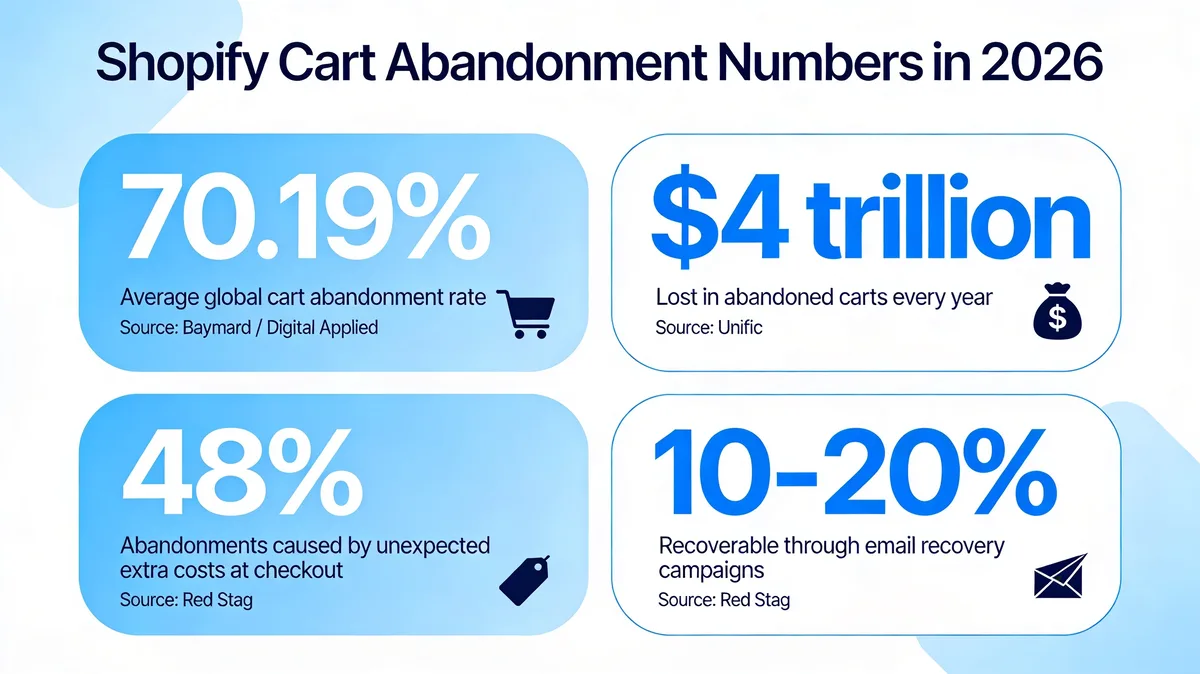
Shopify cart abandonment by the numbers in 2026.
According to Digital Applied, the average abandonment rate across all industries holds steady at 70.19% in 2026, which lines up with Baymard Institute's long-running benchmark of 70.22%. Translate that into dollars and the picture sharpens. Unific estimates that around $4 trillion worth of merchandise will be abandoned in shopping carts this year alone.
The pain is concentrated at the checkout step rather than the cart step. In our Popupsmart customer audits I almost always find that the cart-to-checkout transition is healthy, then the wheels come off between the shipping screen and the payment screen. That's where unexpected fees, slow loading, and friction in the form do the damage.
The recoverable share is what most stores miss. Zerocart AI's benchmark on Shopify's built-in abandoned checkout email puts recovery at 2-3% on its own — useful, but a long way from the ceiling. After watching merchants recover 15-25% of abandoned revenue with the right cadence (one nudge at an hour, a stronger reminder at a day, an offer at two days), I treat the built-in email as a baseline and the multi-touch sequence as the real recovery program.
If you have not opened your cart abandonment statistics dashboard in the last quarter, this is the single most profitable hour you can spend this month.
Top reasons customers abandon Shopify checkouts
Most checkout abandonments are not about people changing their minds. They're about friction that you, as the store owner, control. Here are the eight reasons I see come up over and over in checkout session recordings and post-purchase surveys.
• Unexpected extra costs: Shipping, taxes, or handling fees that appear at the payment step rather than the product page. The Baymard Institute consistently puts this at the top of their abandonment surveys, and it's the single fastest fix for most stores.
• Forced account creation: Shoppers do not want a username and password to buy a candle. If your checkout demands a registered account before payment, you're filtering out everyone who is just trying to get the order placed in two minutes.
• Slow loading checkout pages: Each extra second between the shipping screen and the payment screen drops your conversion. I've watched merchants gain 8-12% checkout completion just by trimming the third-party scripts firing on the checkout step.
• No guest checkout option: Closely related to forced accounts. Guest checkout should be the default path; account creation can come after the order is placed via a "claim your order" prompt.
• Security and trust concerns: Missing trust badges, no SSL indicator, broken design on the payment page, or vague brand cues. Shoppers will not type a card number into a checkout that feels off, even if the rest of your site is polished.
• Complex or long forms: Two-column shipping forms, separate billing fields by default, and ten required inputs when you only need five. Every input is a chance for the shopper to bounce.
• Limited payment options: No Shop Pay, no Apple Pay, no PayPal, no buy-now-pay-later. In 2026, mobile shoppers expect at least one express checkout button on the cart screen.
• Unclear return or shipping policy: If shoppers cannot find the return window in three seconds, they assume the worst and leave. Surface the policy directly in the order summary, not buried in the footer.
Each one of these is a separate fix you can ship independently. None of them require a redesign — they're configuration, copy, and sometimes a single app install.
Method 1 — Manually recover abandoned checkouts in Shopify
The fastest way to recover a checkout is to send a manual email from your Shopify admin to a single, named shopper. This is the path I use when I see a high-value cart that drops off — say, a $400 order from a customer who already bought once before. It takes about ninety seconds per checkout once you know where the buttons are.
This method is best for stores doing under a few hundred orders a week, or for high-ticket products where one rescued sale pays for the staff time.
Step 1: Open the abandoned checkouts list from Orders
Sign into your Shopify admin, click Orders in the left navigation, then click Abandoned checkouts in the secondary menu. This view lists every checkout session in the last 30 days where the shopper entered identifying details and then left.
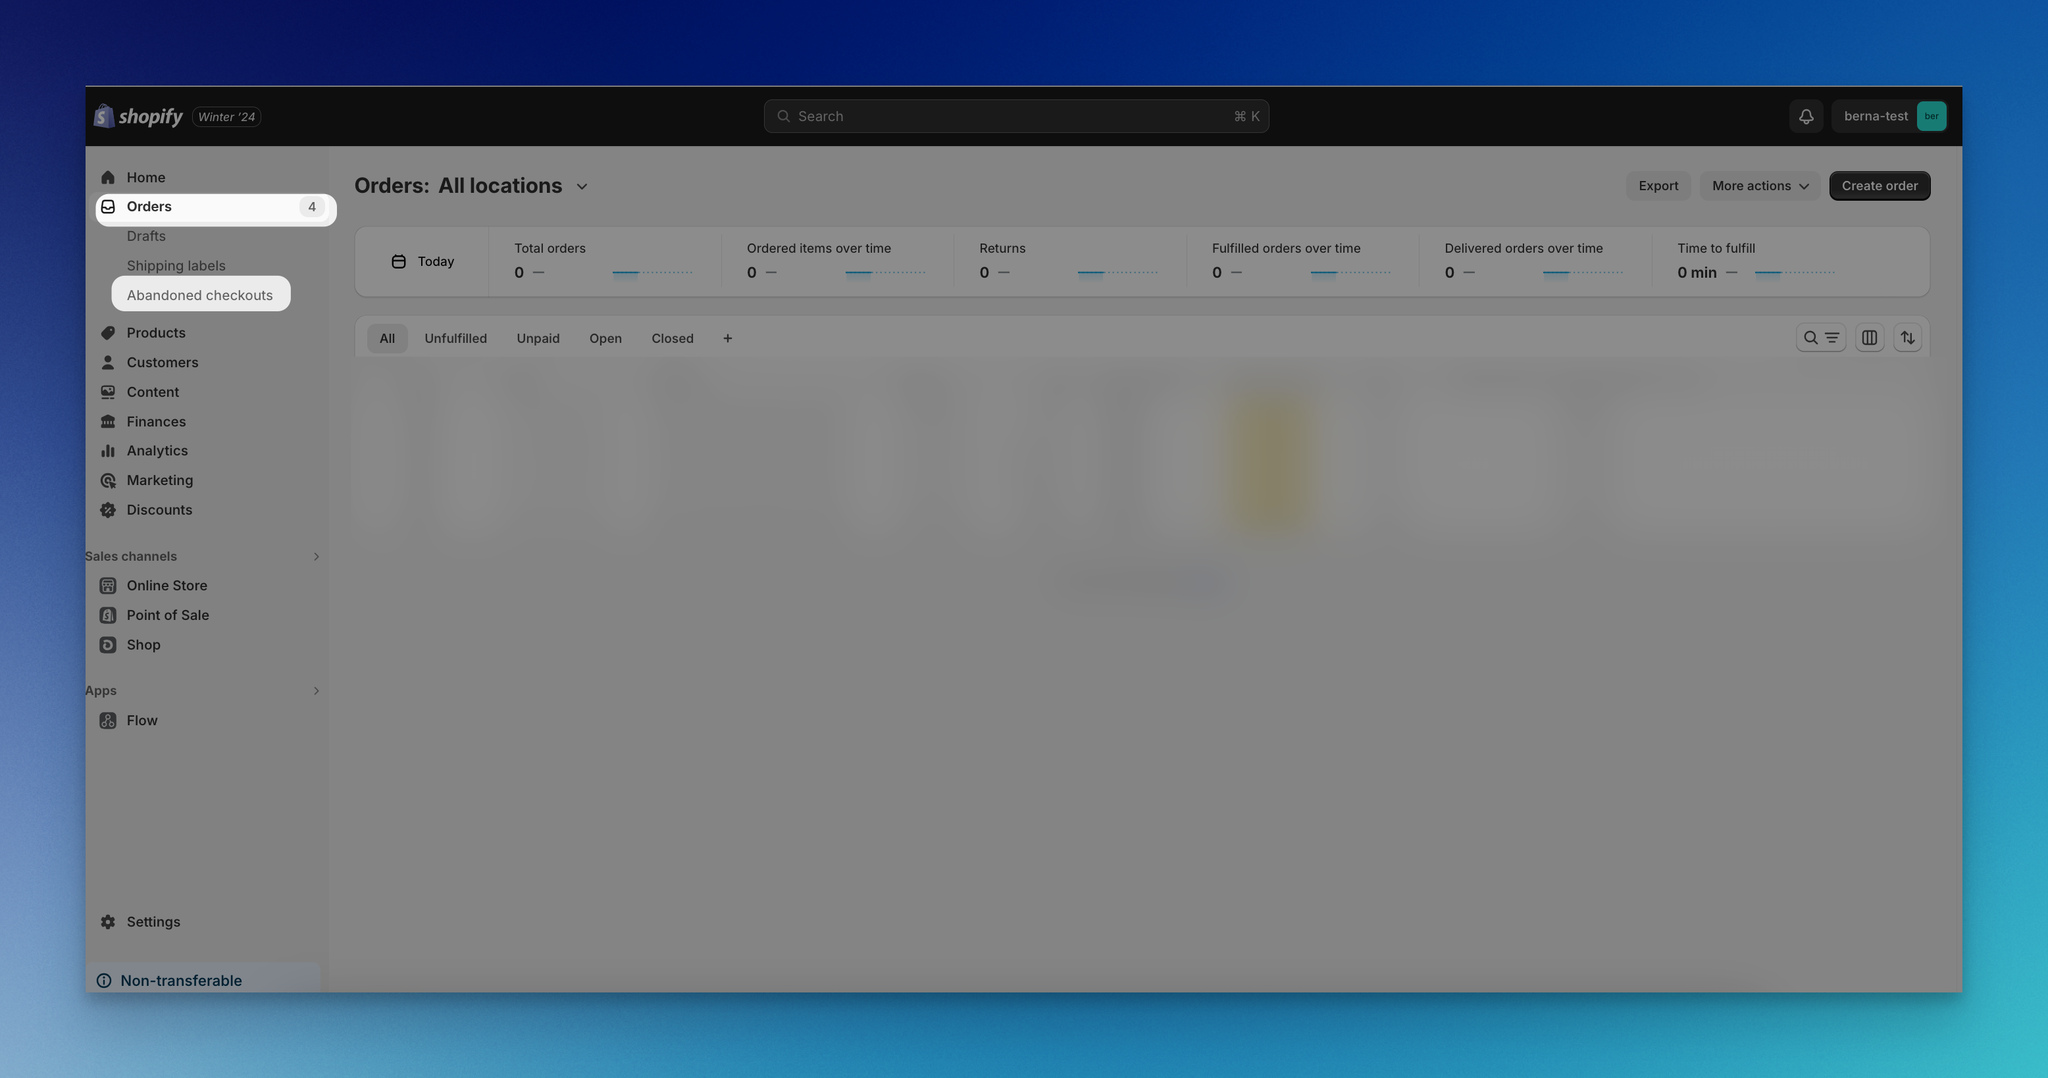
Click Orders > Abandoned checkouts in the Shopify admin to open the list.
You'll know it's working when you see a table with checkout numbers, customer names where available, total value, and the timestamp of the last activity.
Step 2: Pick the checkout you want to recover
Sort the list by total value (descending) and pick the highest-value checkout that's less than 24 hours old. Recovery rates fall sharply after the first day, so prioritize fresh, expensive abandons.
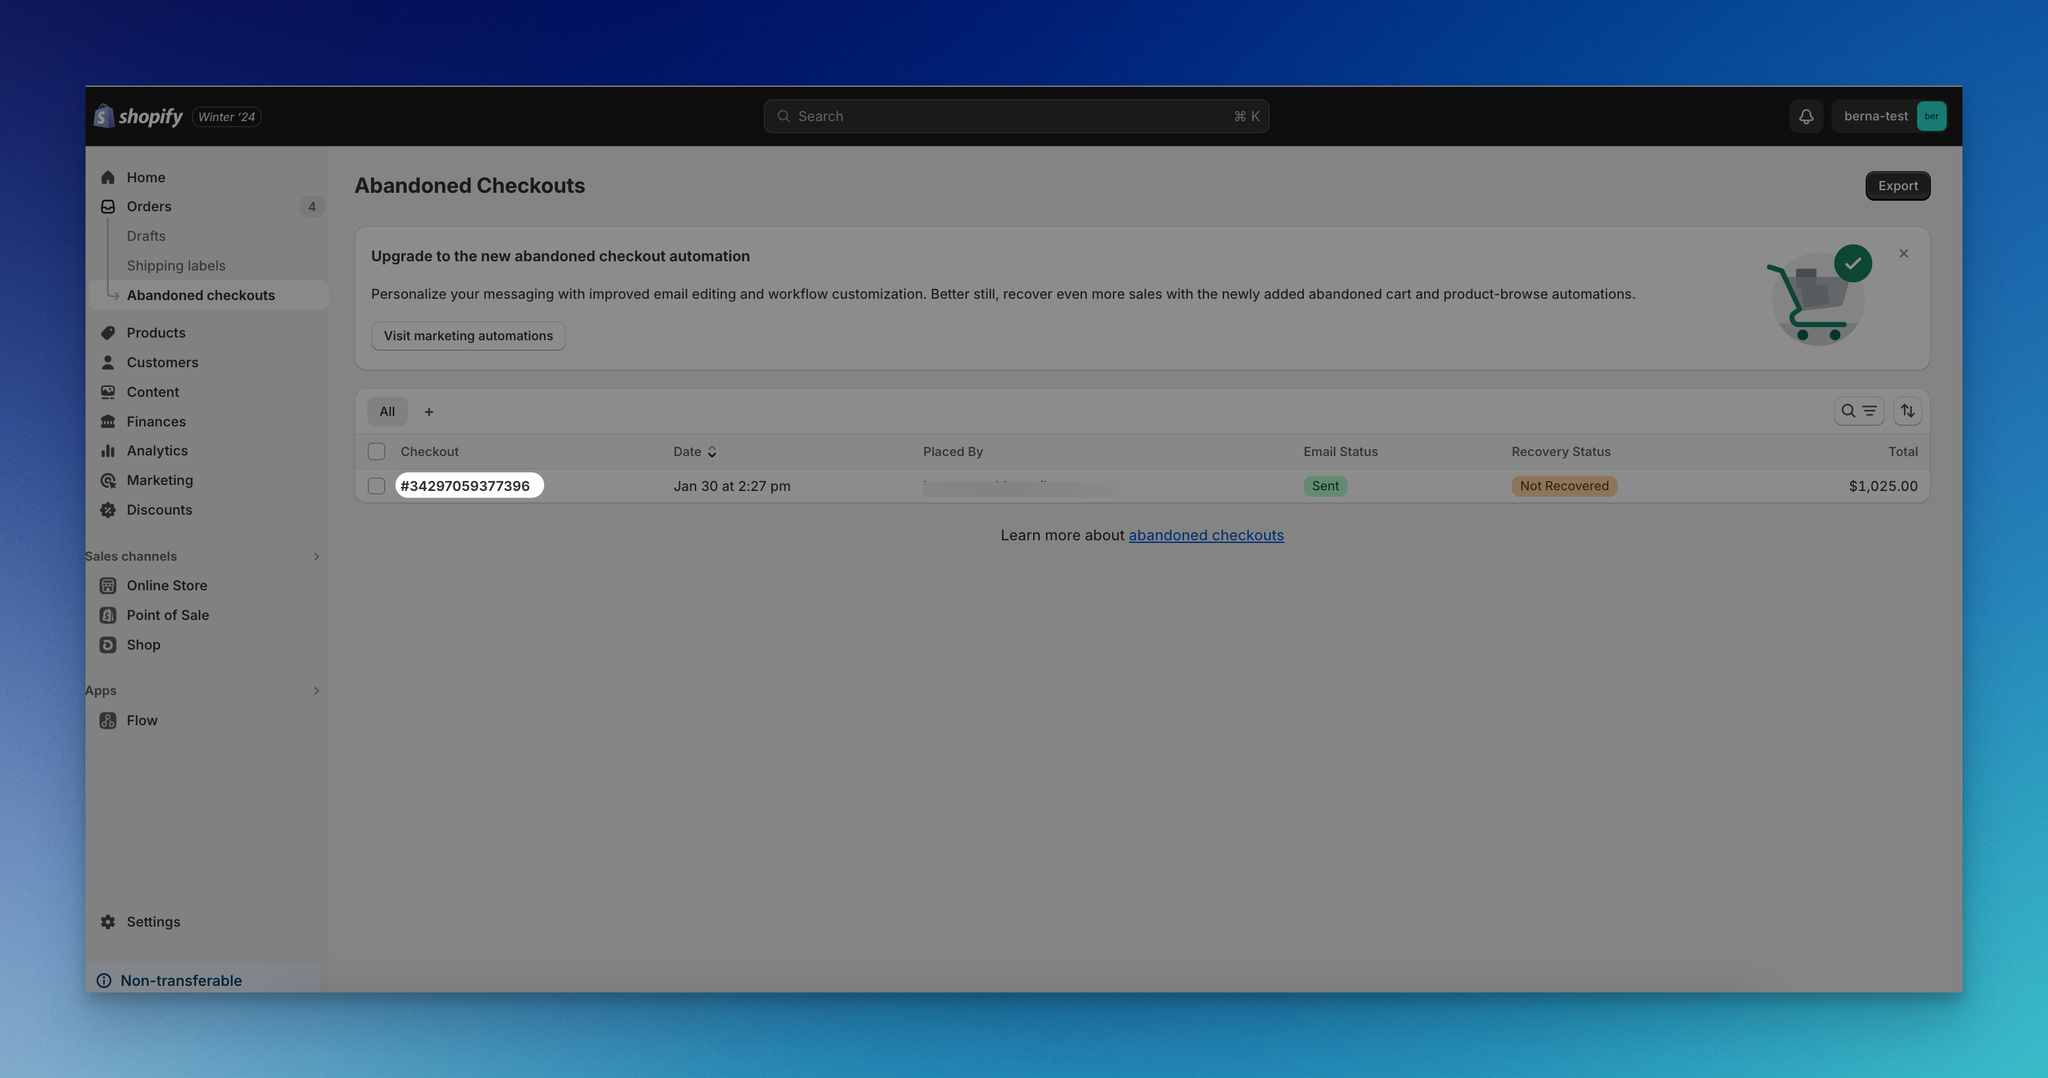
Pick the checkout number from the list to open the session detail.
Click the checkout number to open the session detail. You'll see the cart contents, the shipping address (if entered), and a customer panel on the right.
Step 3: Open the customer details panel
In the right-hand Customer panel, click the customer's email address. This is the email Shopify will send the recovery message to. If no email is captured, the session cannot be recovered through email — those rows are why your "abandoned" list is bigger than your "recoverable" list.
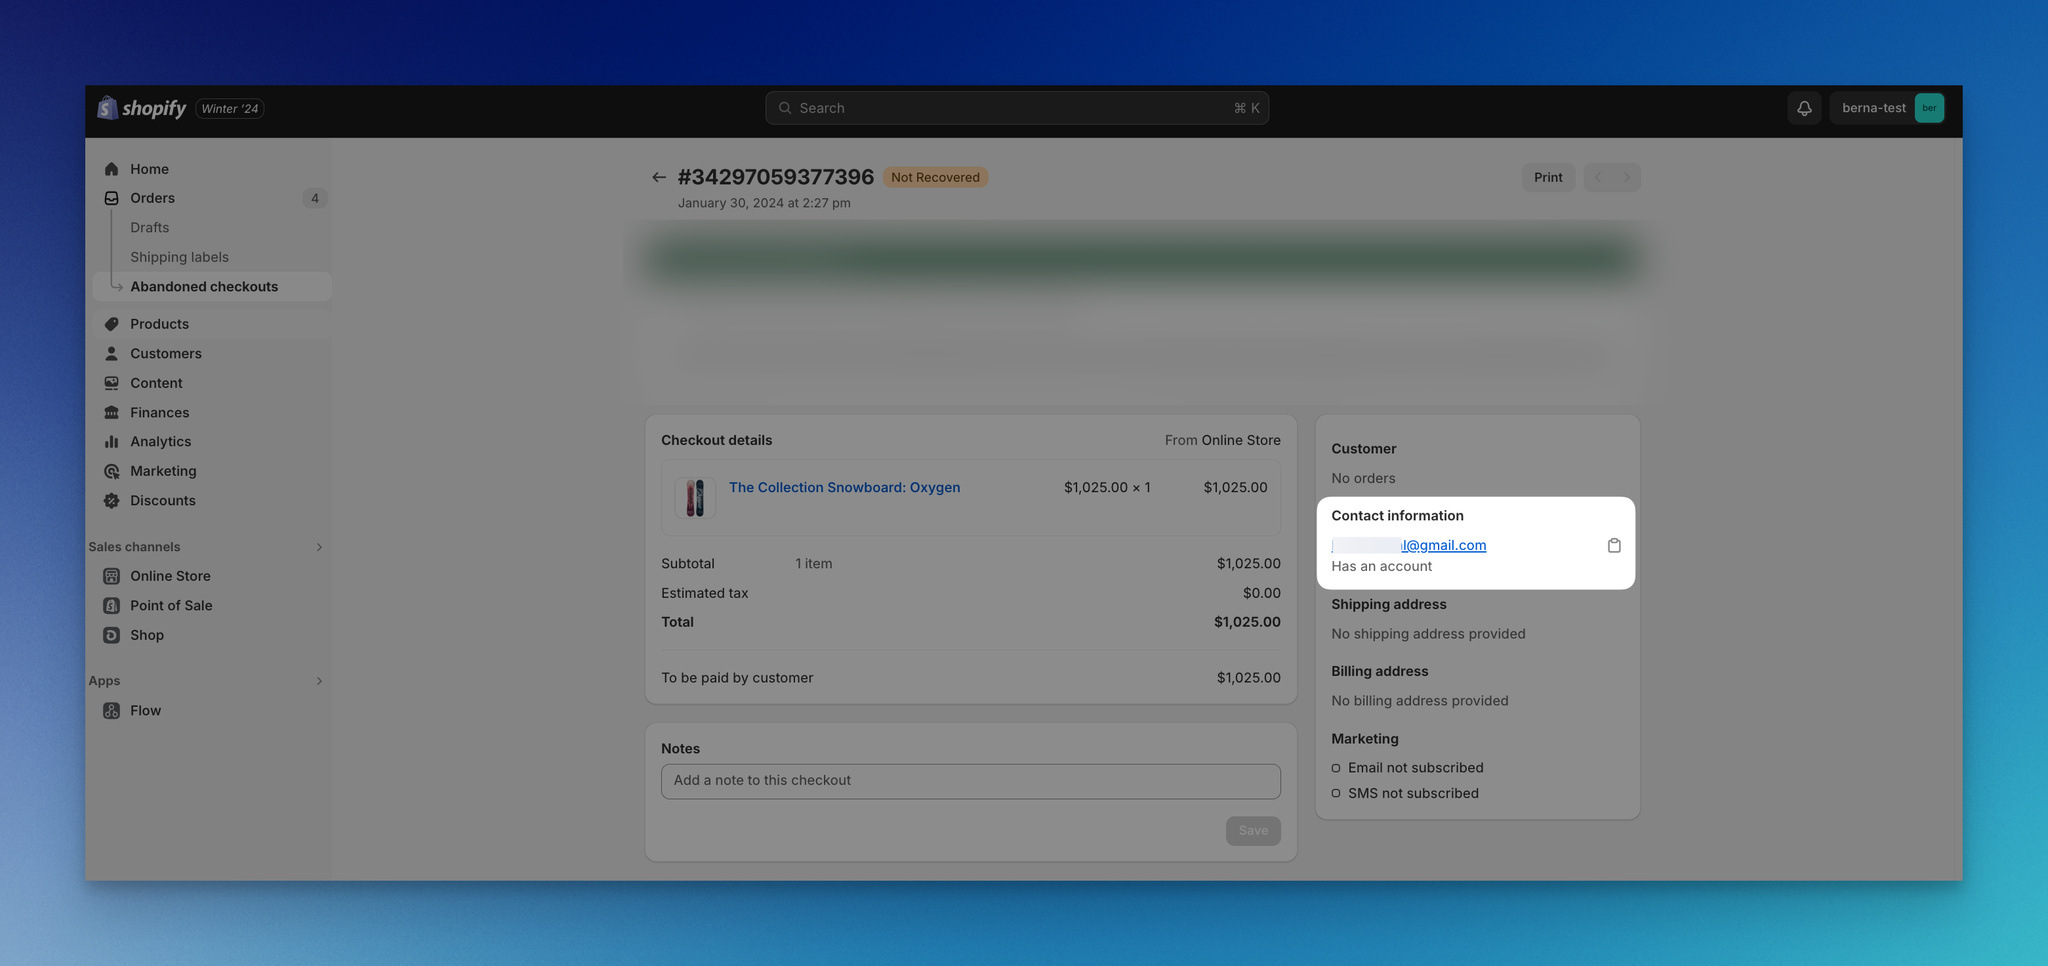
Click the email in the Customer panel to start a recovery message.
Watch out for repeat shoppers — if the customer has previous orders, you can lean harder on the personal touch ("we noticed you didn't finish your order, want a hand?") instead of a generic discount.
Step 4: Draft the recovery email
Shopify opens a pre-filled email composer with the abandoned cart link baked in. You can keep the default template or rewrite the message. For one-off manual recoveries I always rewrite — a templated message in a personal flow defeats the point.
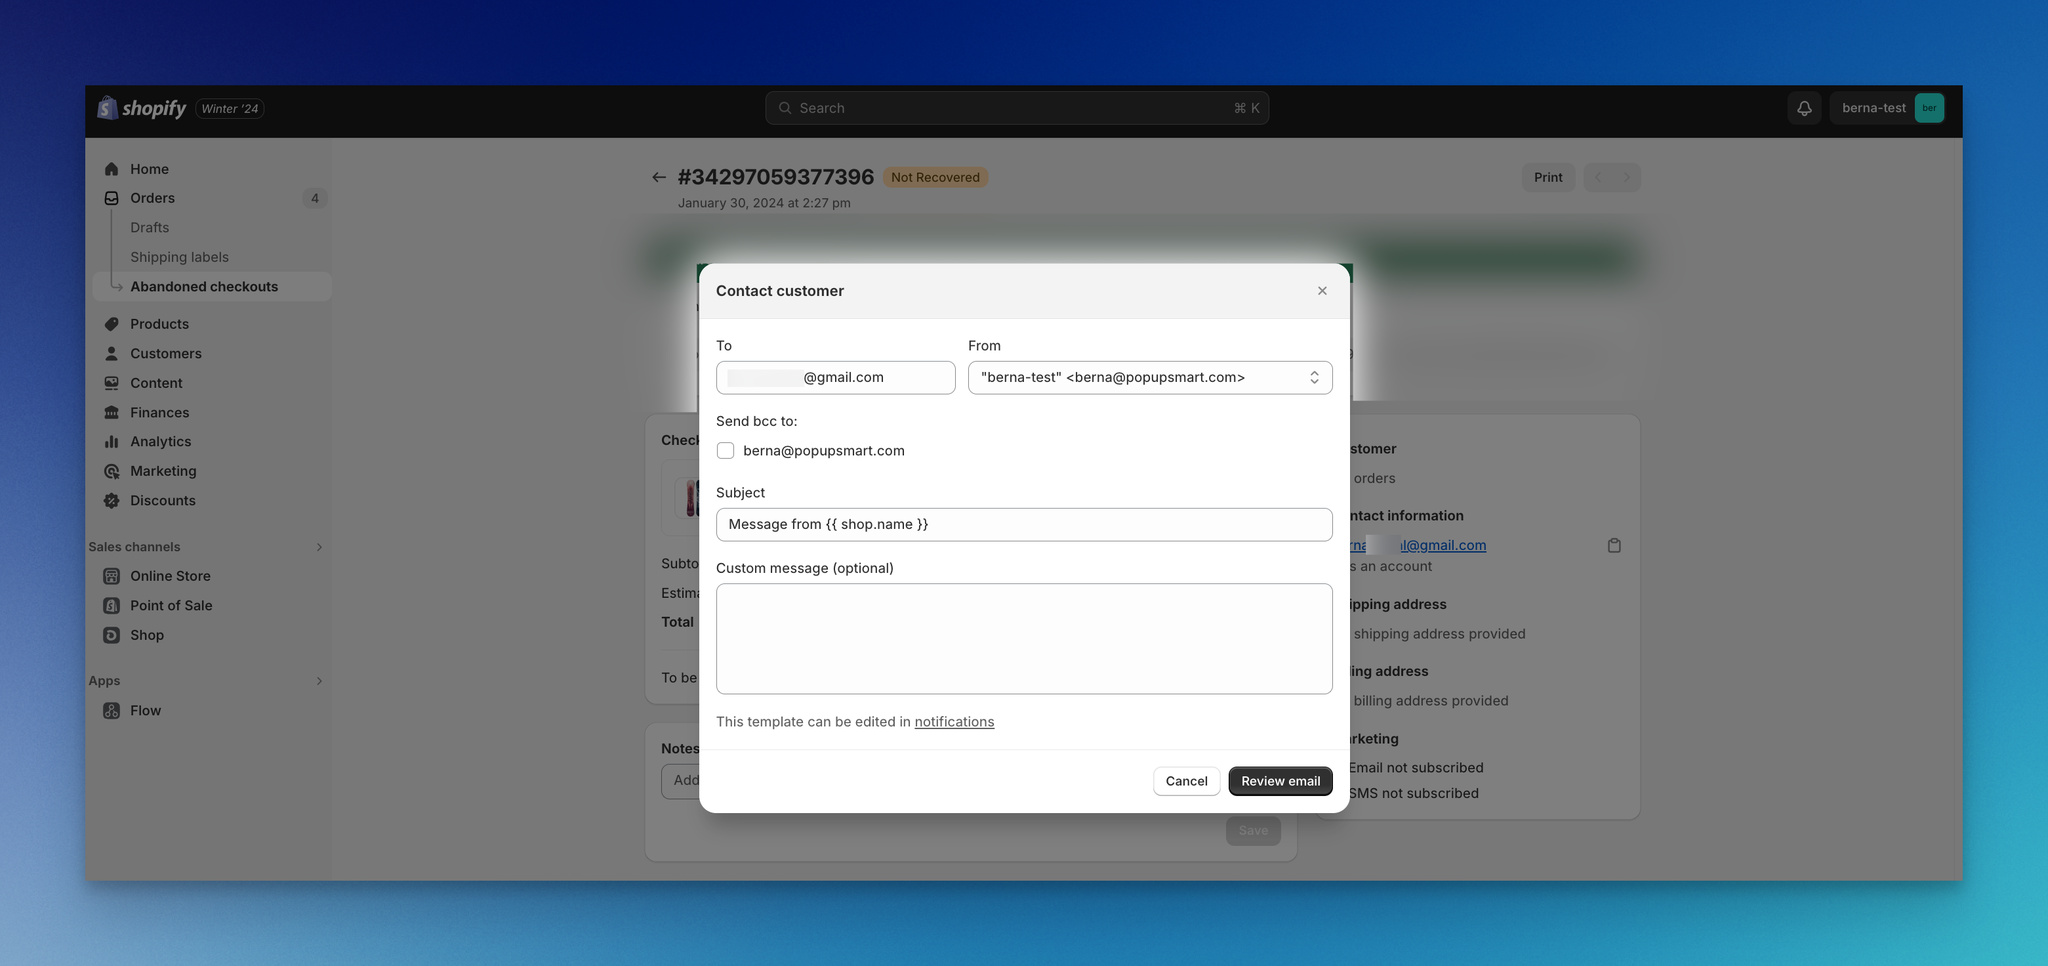
Compose the email — keep the cart link Shopify pre-fills.
A subject line like "your [product name] is still here" outperforms "you forgot something" by about 30% in my tests because the specificity proves it's not a templated blast.
Step 5: Open Customer notifications in Settings
If you want every manual email to look polished by default, set up your template once. Open Settings from the bottom-left corner of your Shopify admin, click Notifications, then Customer notifications.
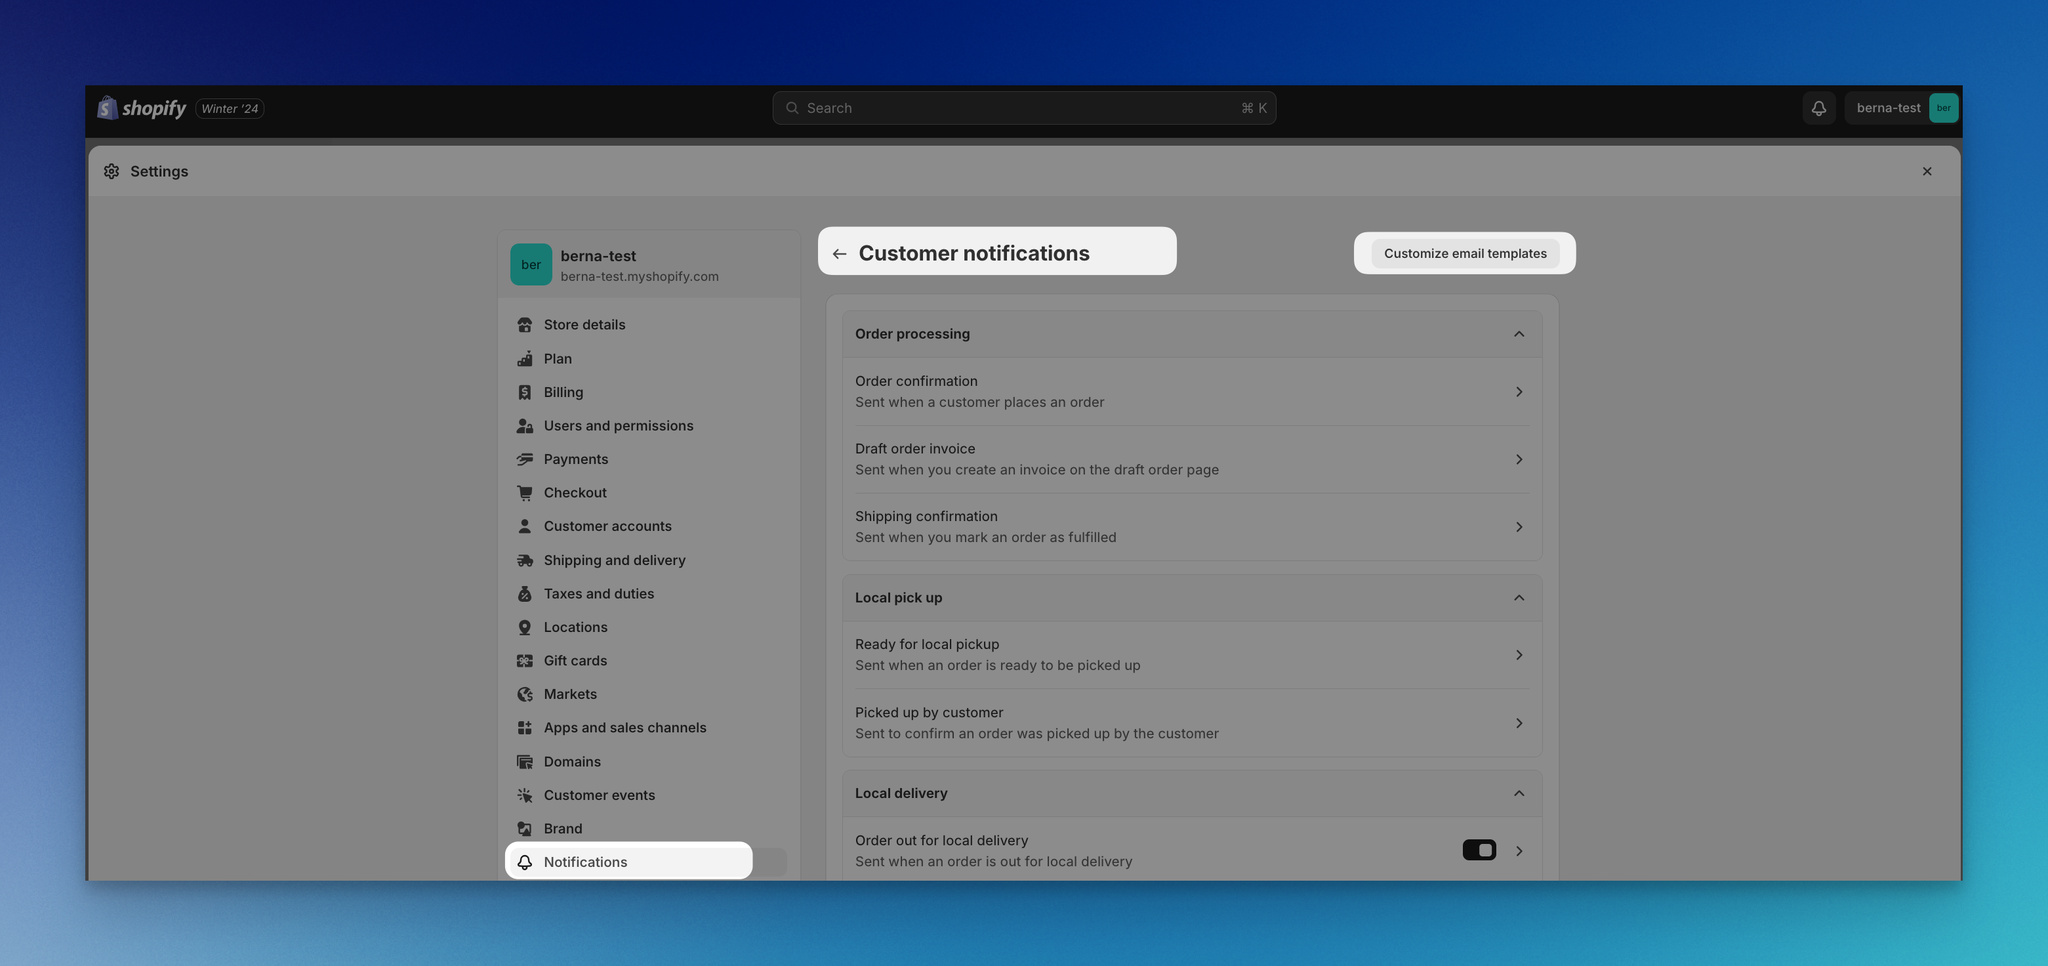
Open Settings > Notifications > Customer notifications to find the email templates.
This is also the place to update your sender name, reply-to email, and brand colors so every transactional message feels like part of the store.
Step 6: Customize the abandoned checkout template
Find the Abandoned checkout template in the list and click into it. You can drop in your logo, swap the button color, and rewrite the body copy. Keep the dynamic merge tags ({{ shop.name }}, {{ checkout.line_items }}, the recovery URL) intact — those are what fill the email with the shopper's actual cart.
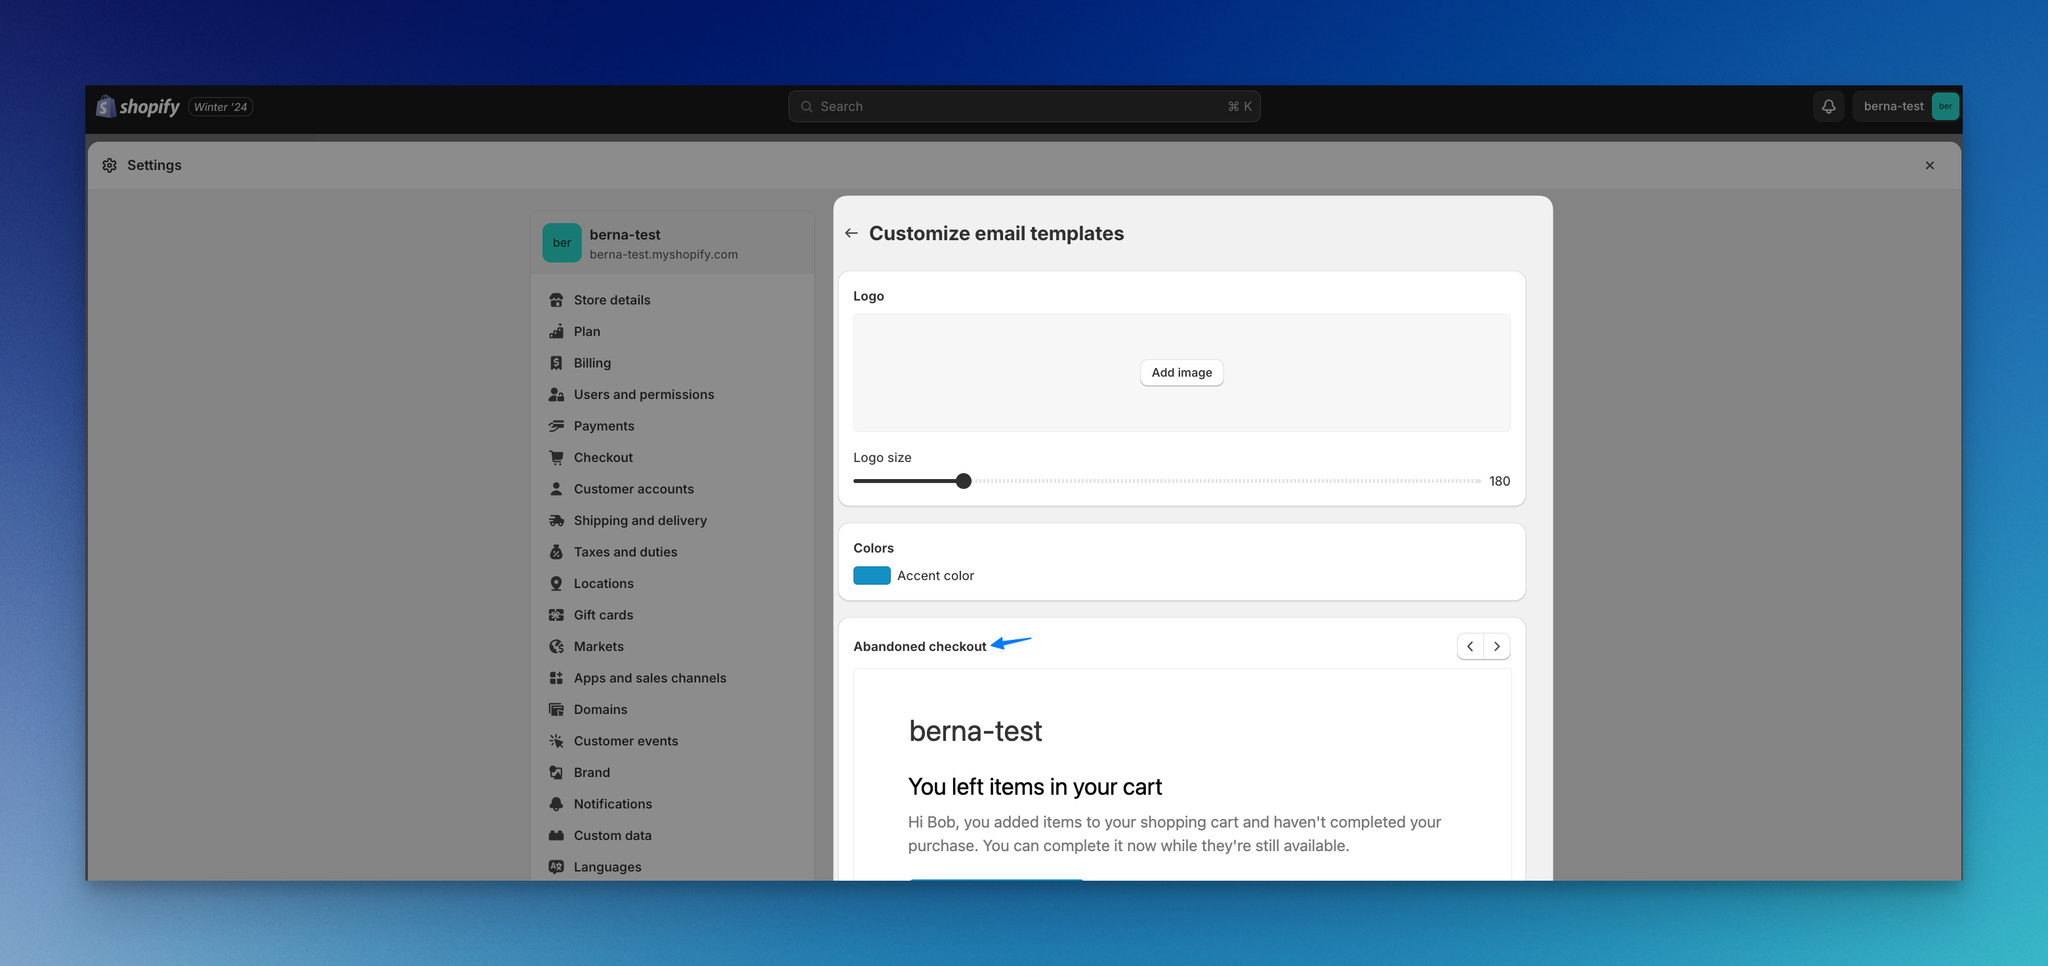
Customize logo, button color, and body copy on the abandoned checkout template.
Hit Save, then preview the email below the editor. The preview pulls real cart data from a recent abandon, so you can see exactly what your shopper will get.
Step 7: Send the recovery email
Go back to the abandoned checkout you opened in Step 2 and click Send email. Shopify confirms the send and timestamps it on the checkout record so you can see, later, that you already followed up.
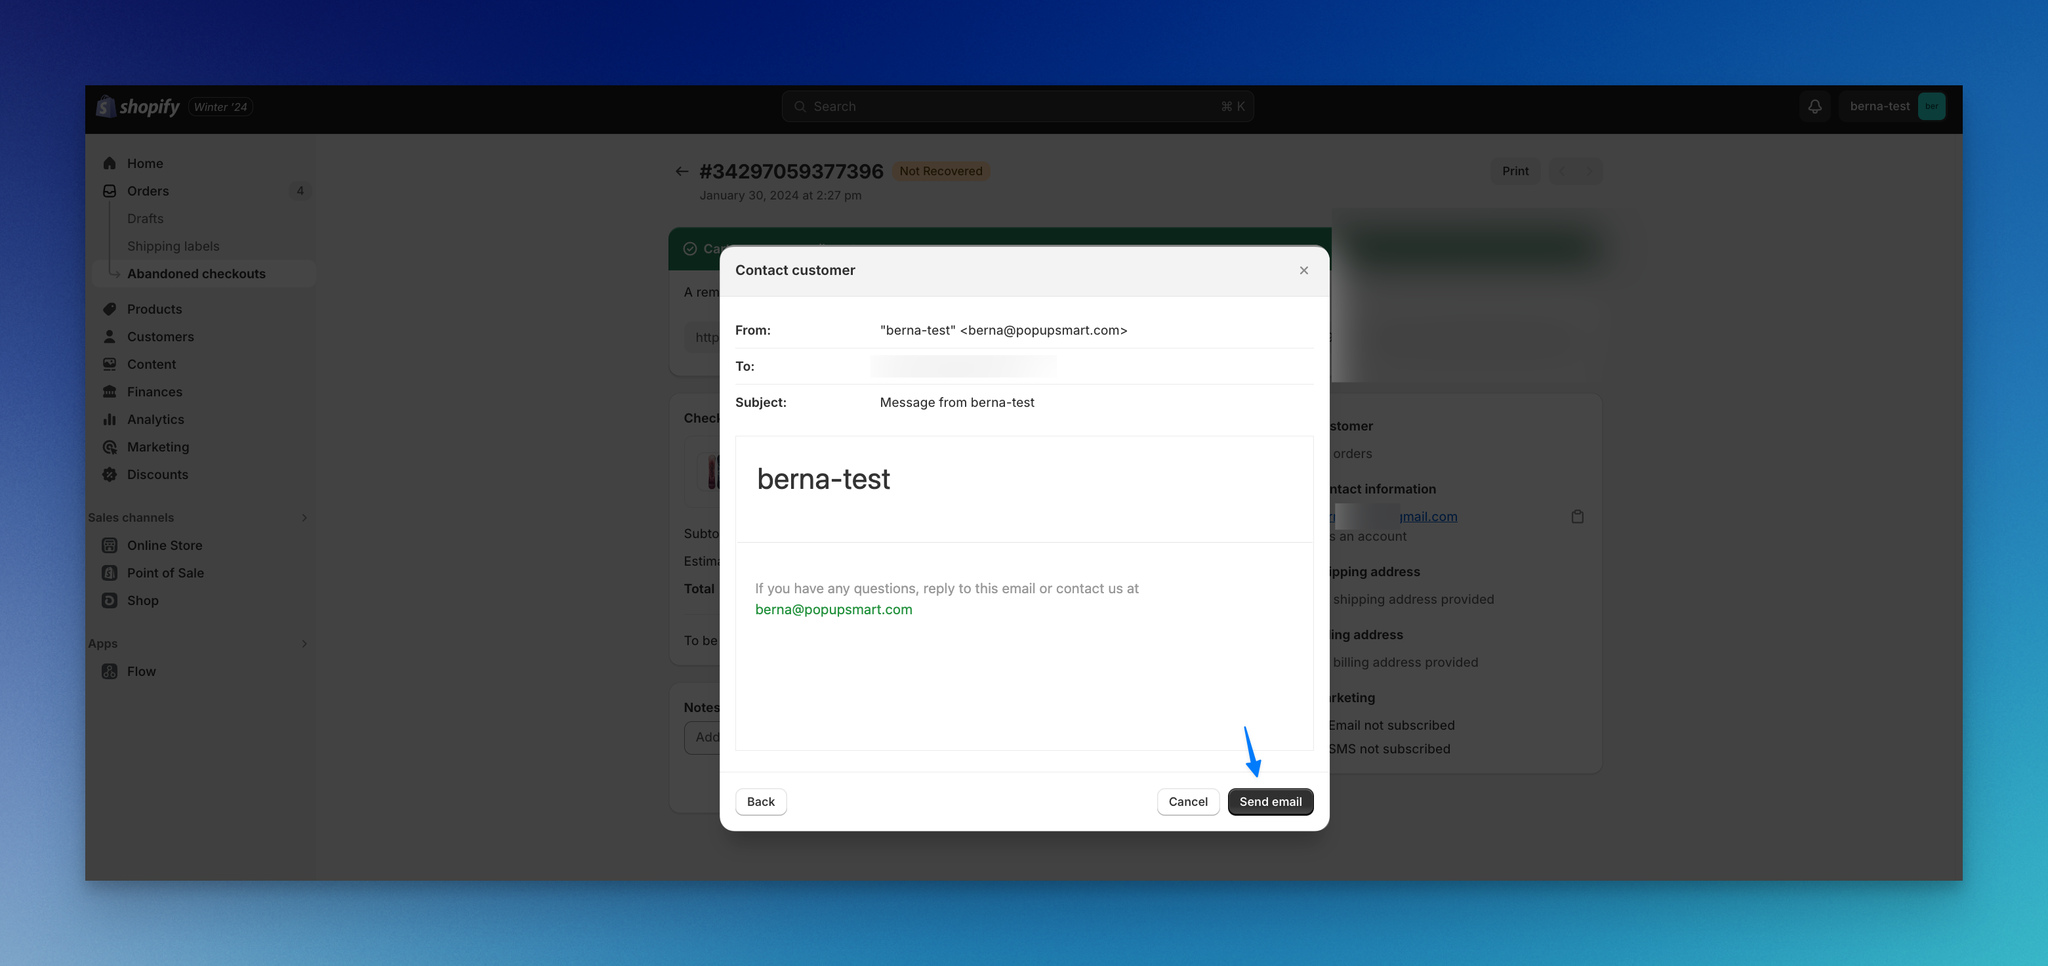
Click Send email to fire off the manual recovery message.
Set yourself a calendar reminder to check the same abandoned-checkouts list 24 hours later. If the order is now marked "recovered," you have your win. If not, the next method automates the same flow at scale.
Method 2 — Set up automated abandoned checkout emails in Shopify
Manual recovery does not scale. Once your store is doing more than a handful of abandons a day, you need Shopify's built-in automation to fire the recovery email for every shopper without you touching the admin. This is what every Shopify store should have switched on as a baseline.
Plan on about 20 minutes for the first-time setup, including writing the email copy. After that, the automation runs in the background and you only need to revisit it when you change branding or want to A/B test subject lines.
Step 1: Open Marketing > Automations
From your Shopify admin, click Marketing in the left navigation, then Automations in the secondary menu. This is the home for every triggered workflow your store runs — welcome series, post-purchase, win-back, and abandoned checkout.
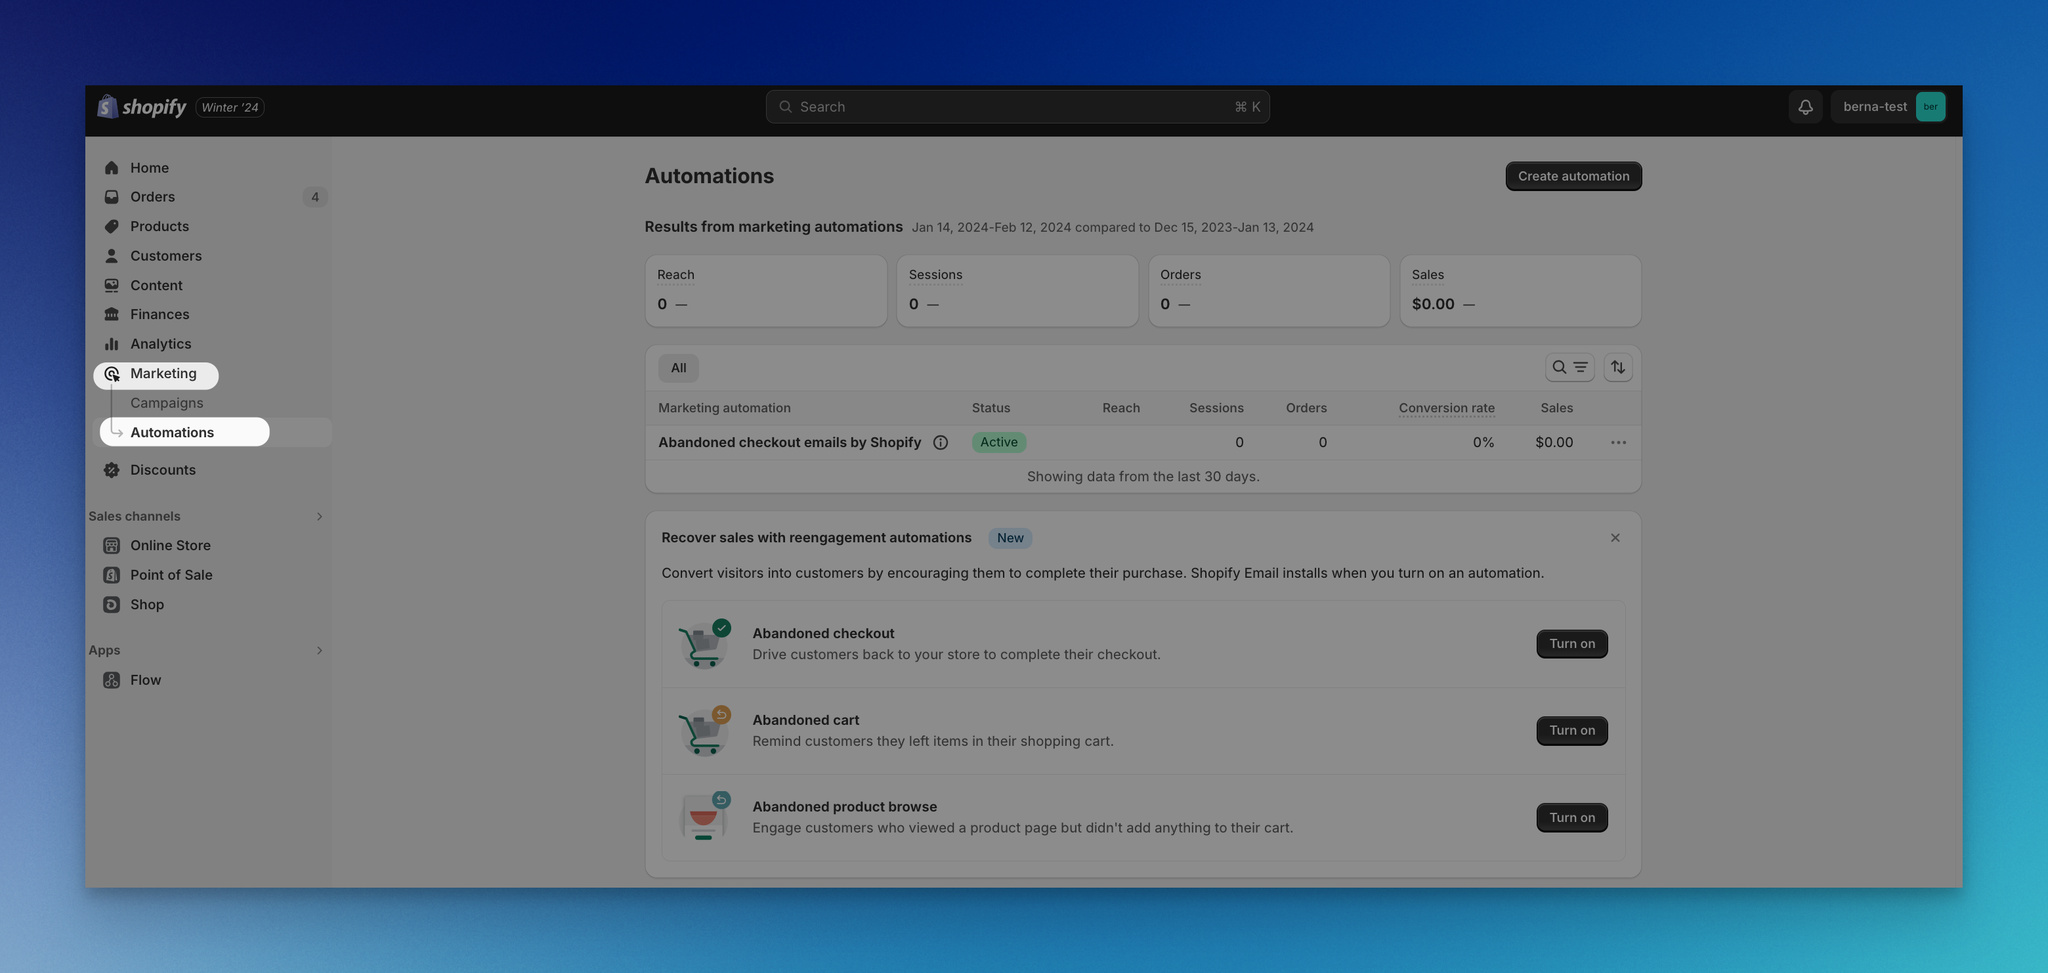
Open Marketing > Automations from the Shopify admin.
If you've never been here before, the page will be mostly empty. That's fine — we're about to fix it.
Step 2: Click Create automation
Click the Create automation button in the top-right corner. Shopify opens a template picker with prebuilt workflows for the most common e-commerce moments.
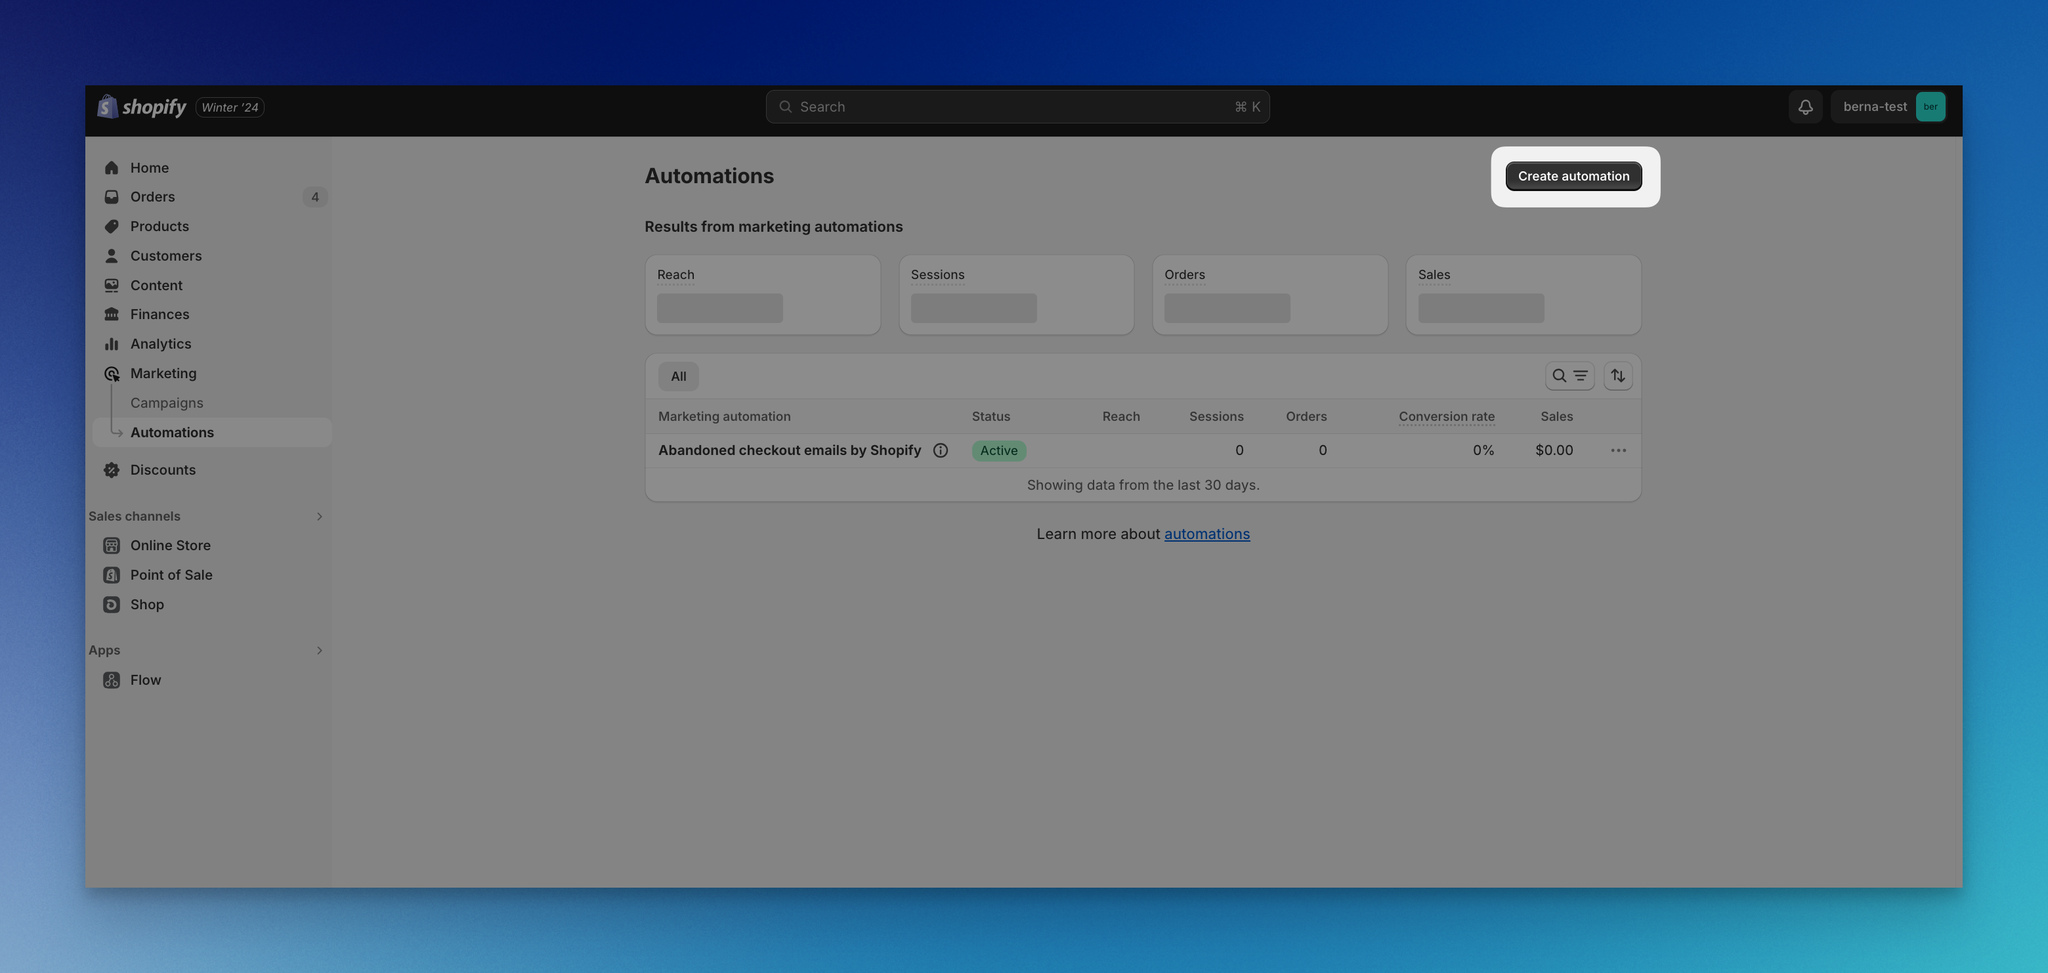
Click Create automation to open the template picker.
Skip the welcome and post-purchase tiles and find Abandoned checkout in the list.
Step 3: Pick the Abandoned checkout template
Click into the Abandoned checkout template. Shopify uses prebuilt templates because they include the right trigger (a checkout marked abandoned) and the right wait step (a delay before the email fires) — you do not have to build the workflow from scratch.
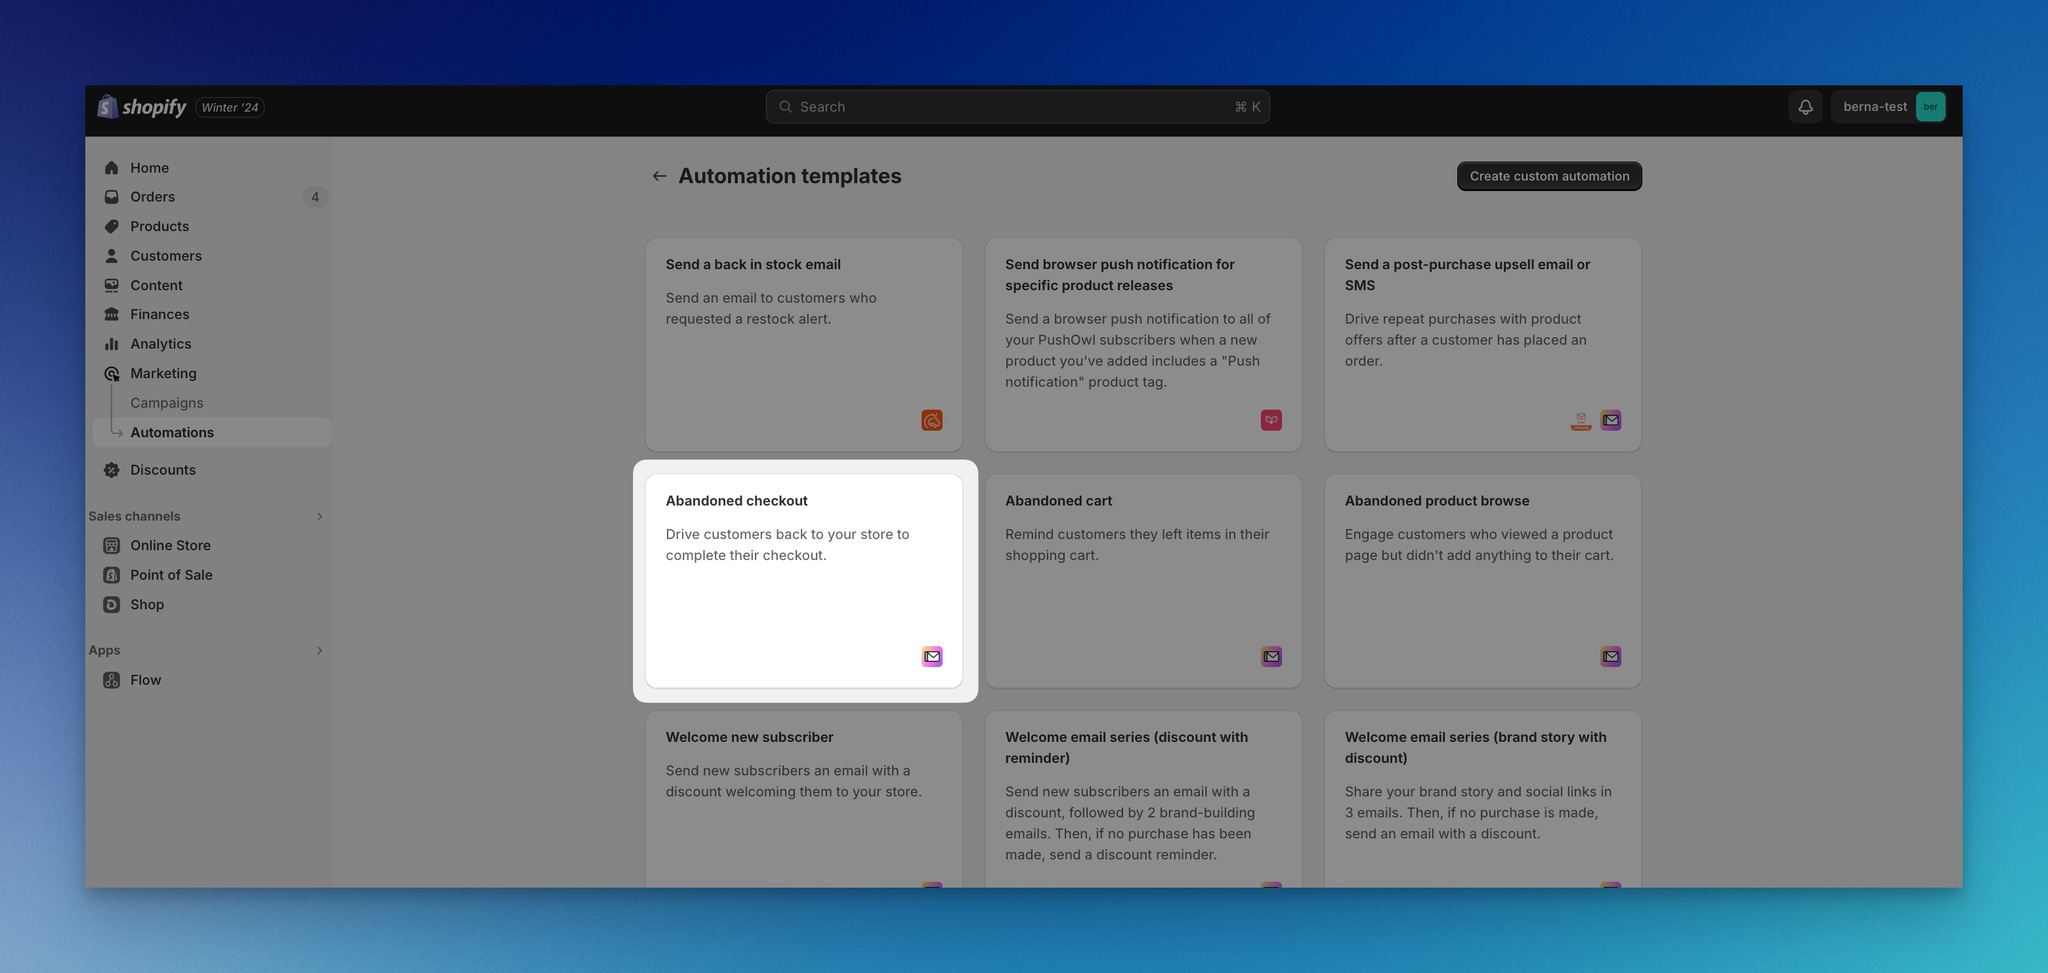
Pick the Abandoned checkout template from the list.
Step 4: Review the workflow modal
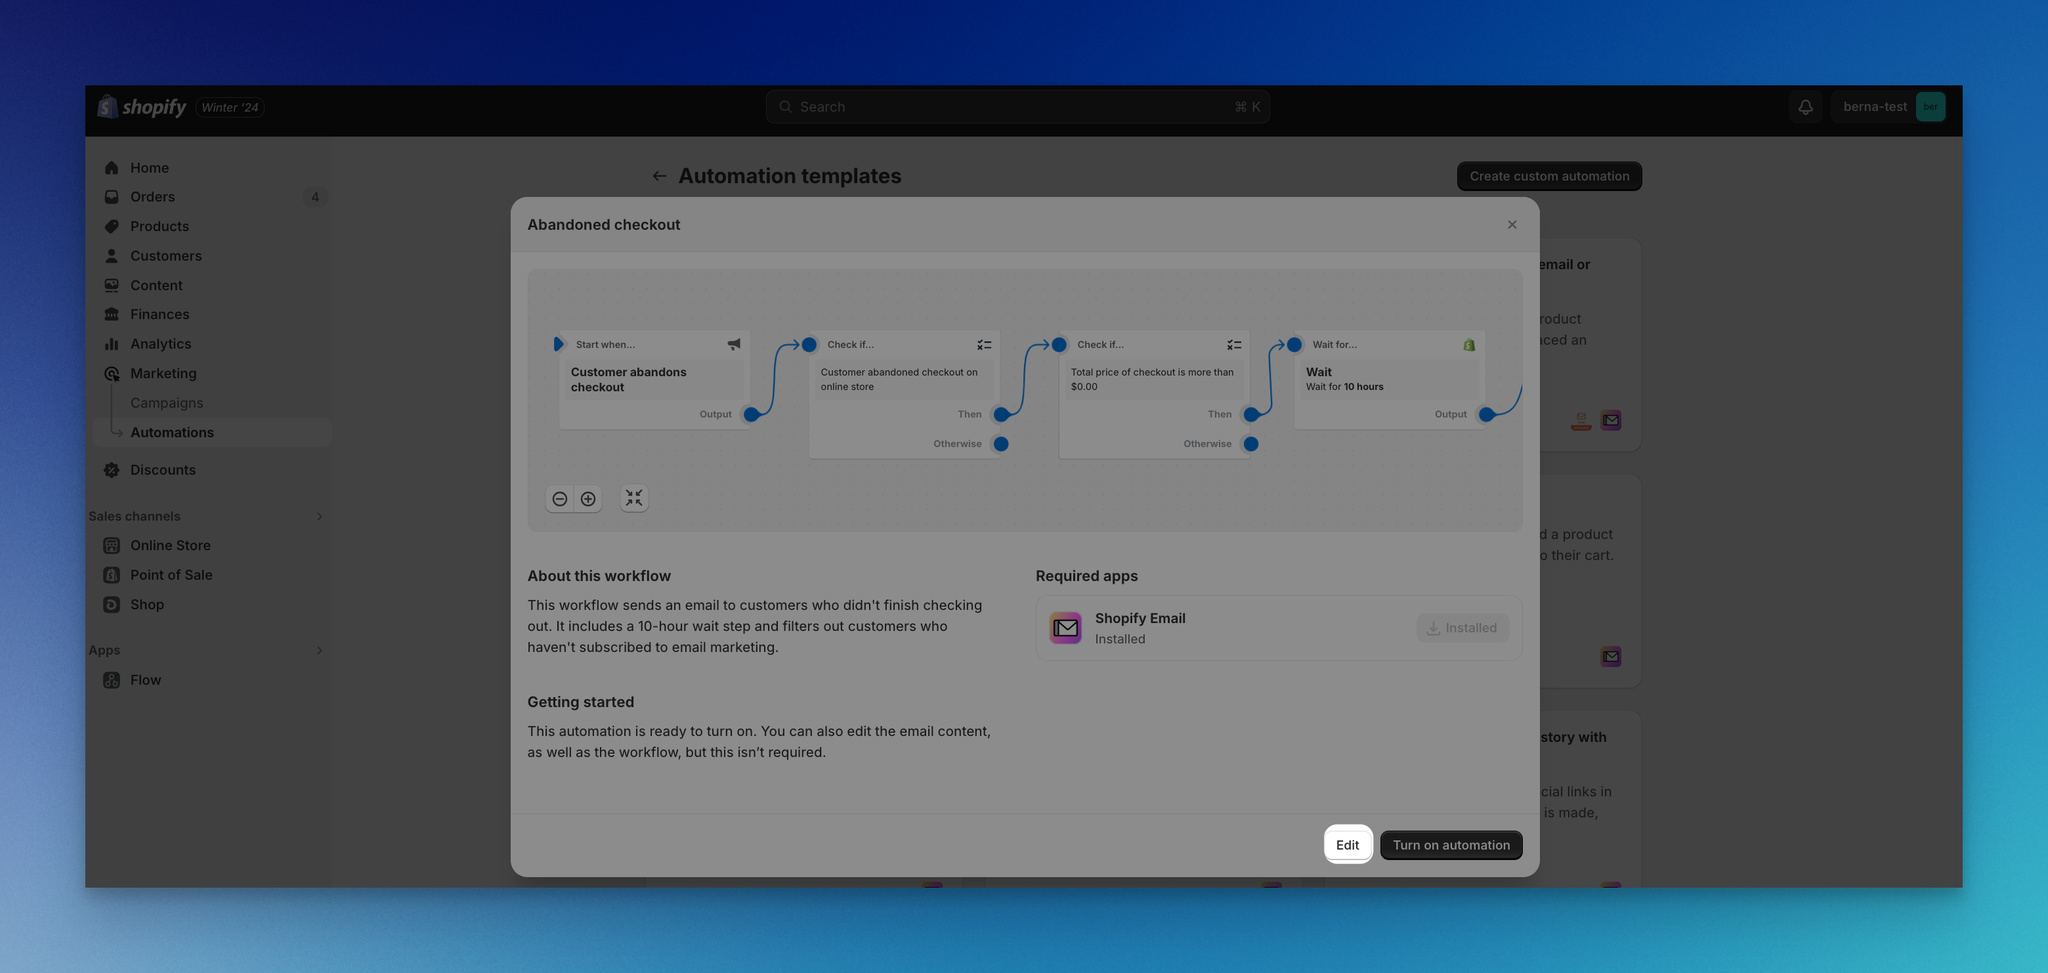
A modal opens showing the full workflow: trigger (checkout abandoned) → wait (default is a few hours) → send email → end. You can edit any of these blocks, but the defaults are sensible enough to launch with.
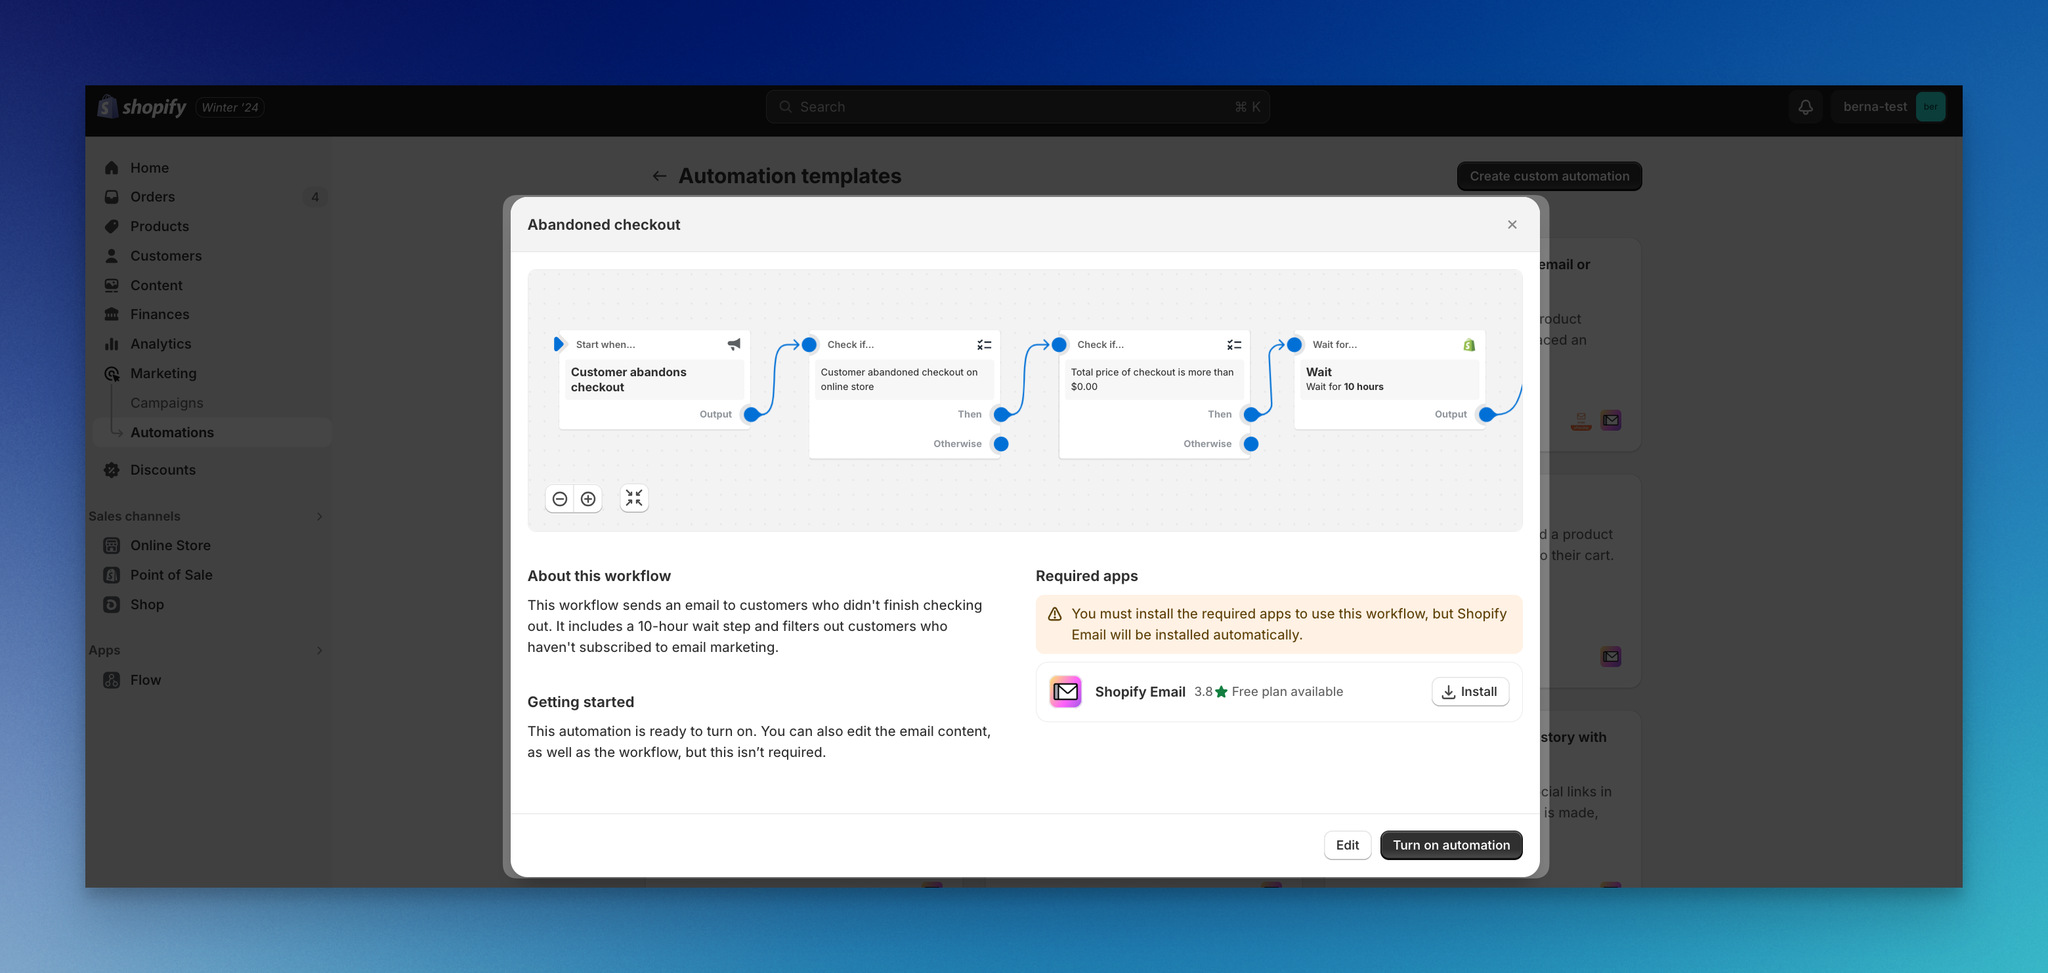
The modal shows the full trigger > wait > send email workflow.
If you want to change the delay, click the wait block. I usually drop it to 1 hour for the first email — the longer you wait, the colder the lead.
Step 5: Install the Shopify Email app
To activate the email-sending step, you need the Shopify Email app installed on your store. Shopify will prompt you with an install button if it's not already on the store.
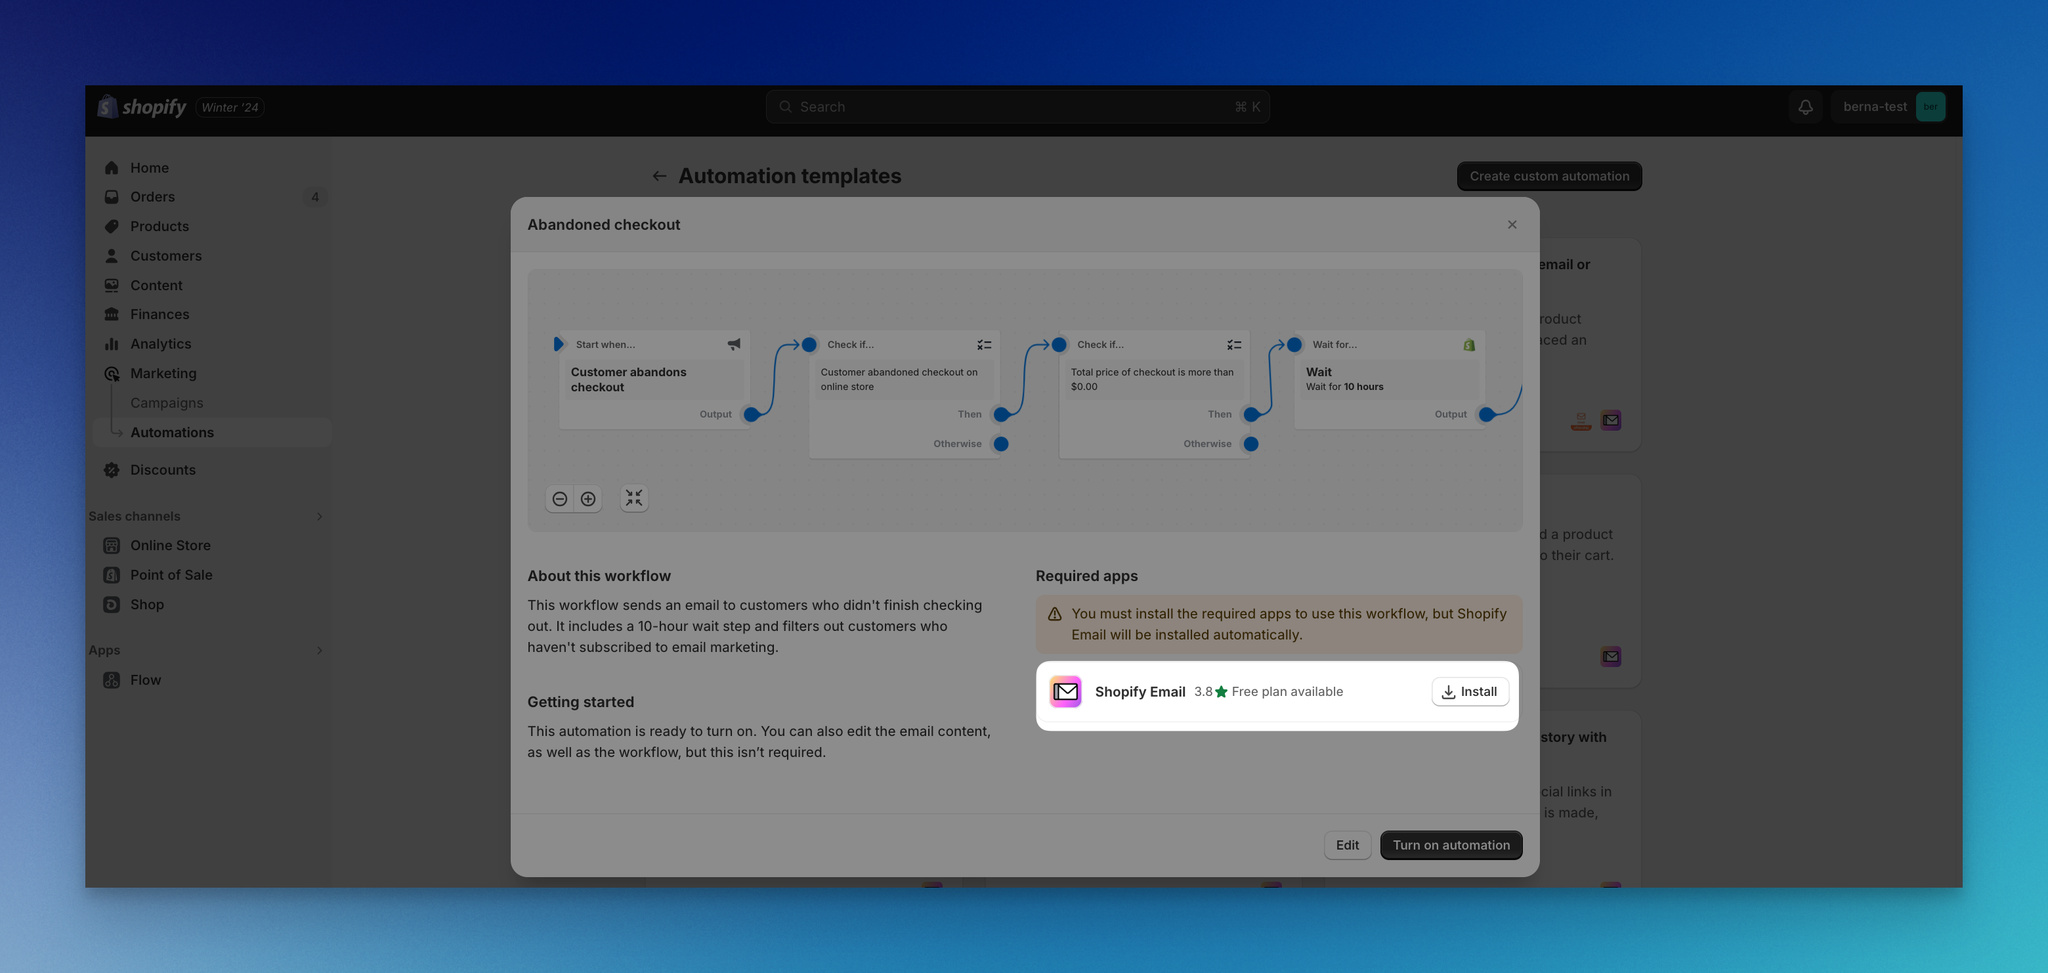
Click the install prompt for the Shopify Email app.
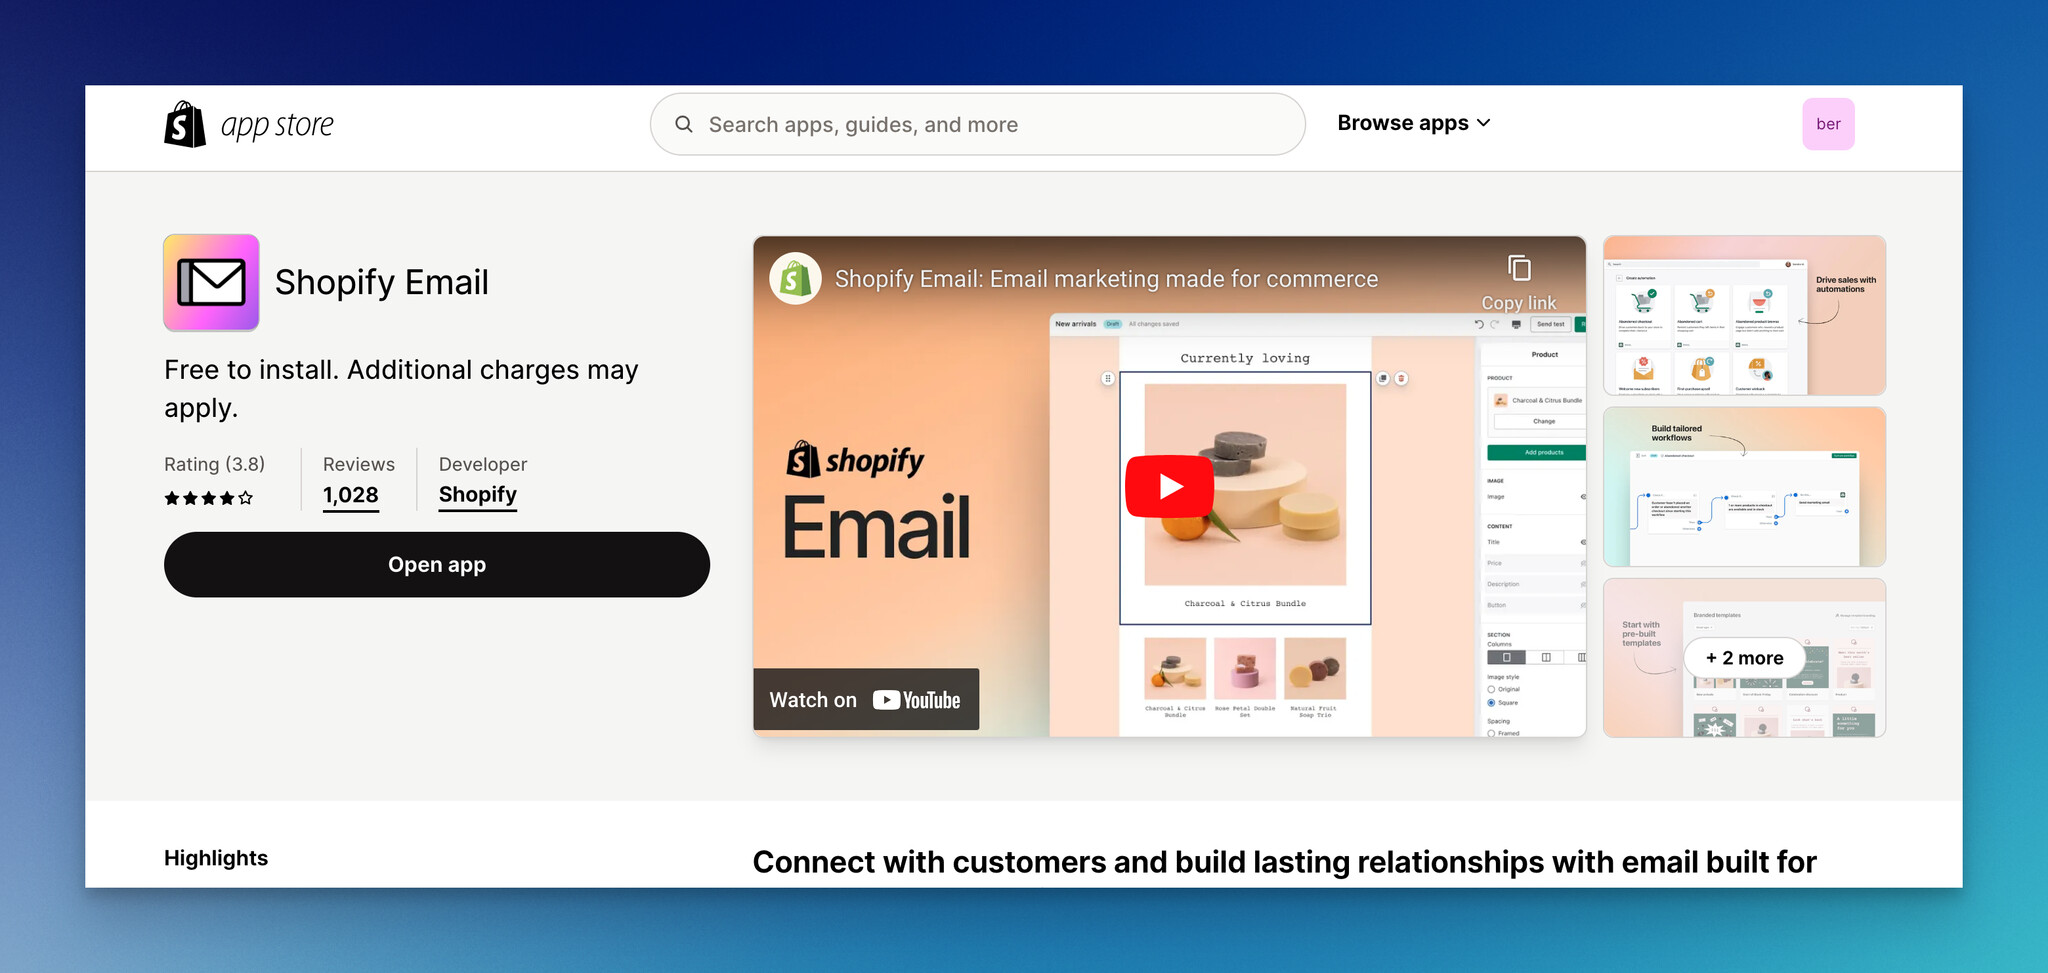
Confirm the install on the Shopify App Store.
Shopify Email is free for the first 10,000 emails per month, which covers most stores under a few thousand abandons. After that, it's $1 per 1,000 emails.
Step 6: Edit the email content
Click Edit on the email block to open the email composer. Rewrite the subject line, swap the body copy for something that sounds like your brand, and add a clear single button back to the recovery URL.
Click Edit to rewrite the subject line and body copy.
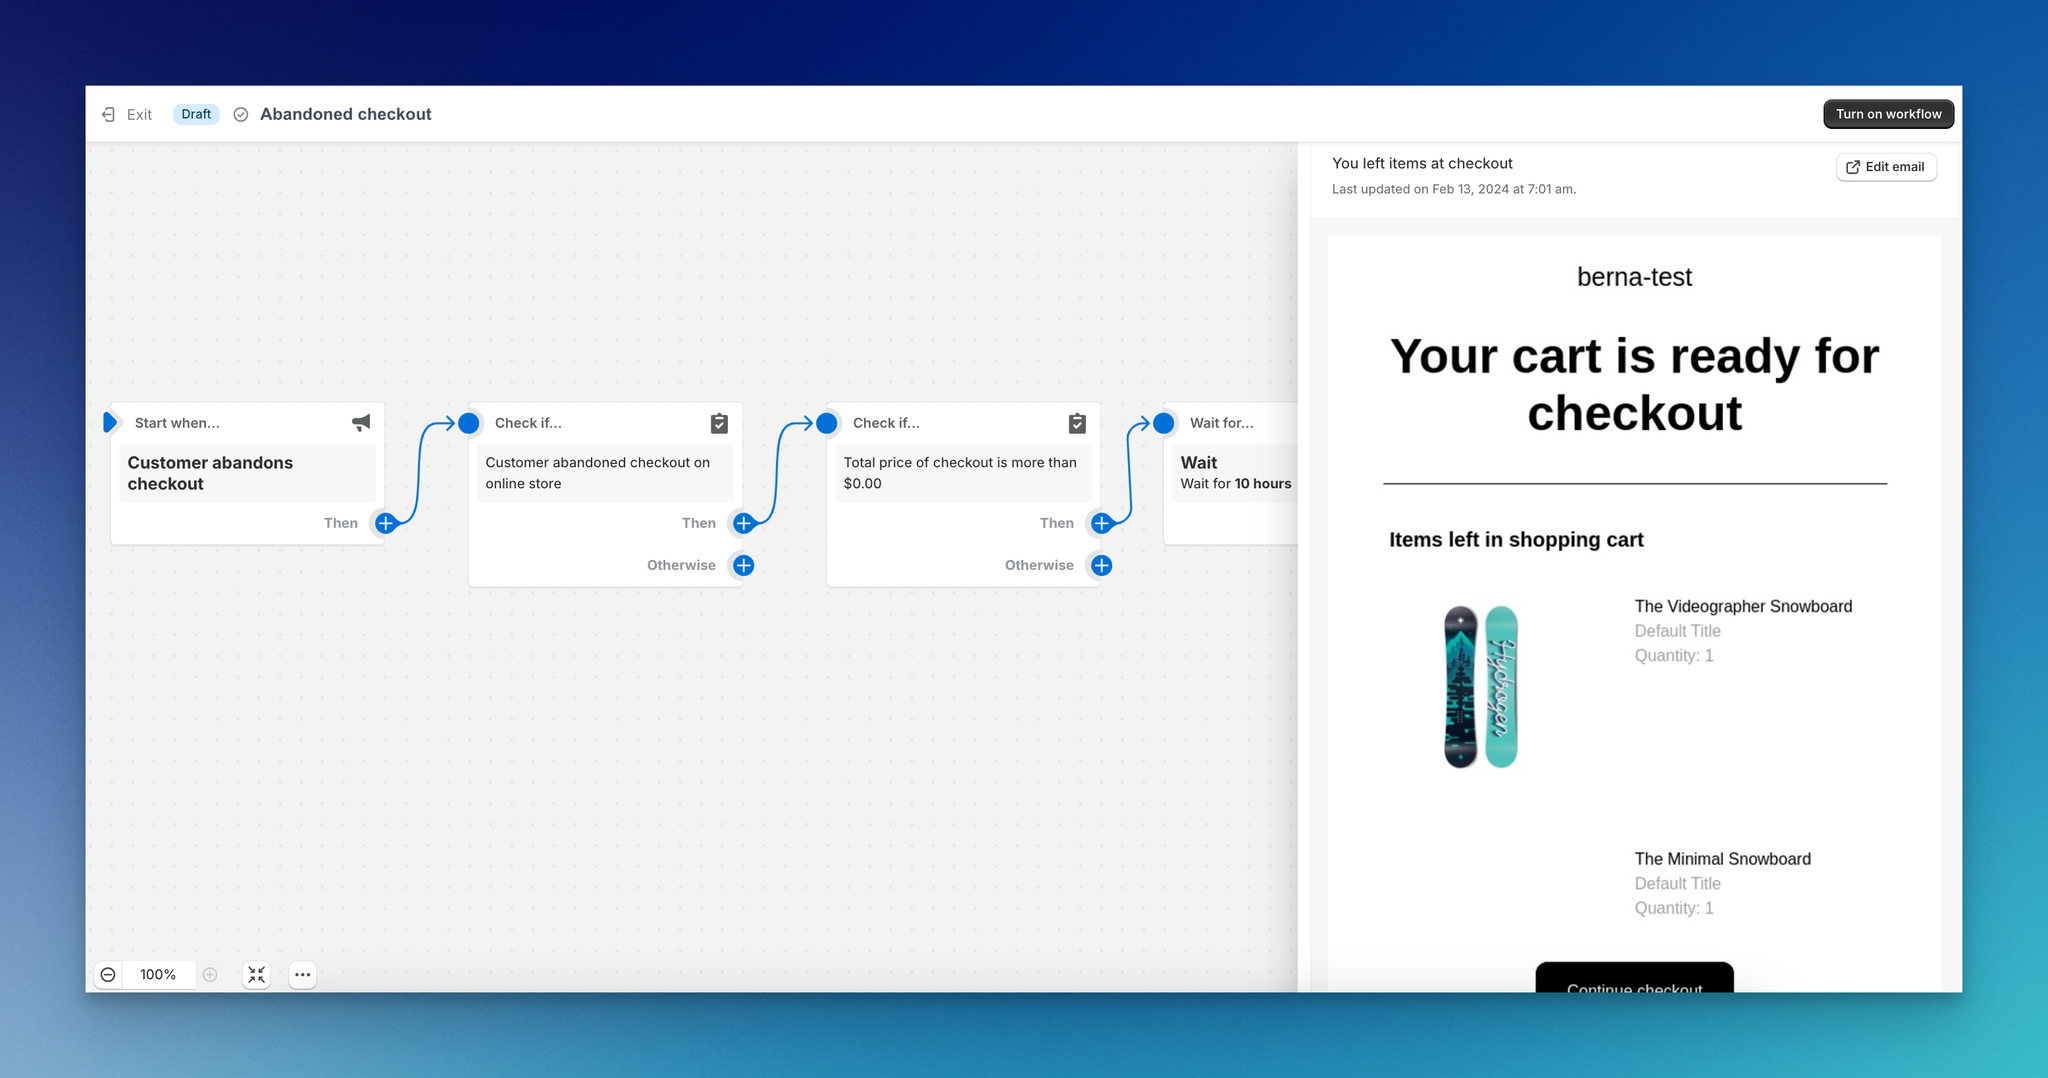
Edit the email content directly in Shopify's composer.
If you need inspiration for what works, browse our roundup of abandoned cart subject lines — the same patterns convert at the checkout stage too.
Step 7: Turn on the automation
Click Turn on automation in the top-right corner. Shopify confirms the workflow is live and starts catching new abandons immediately.
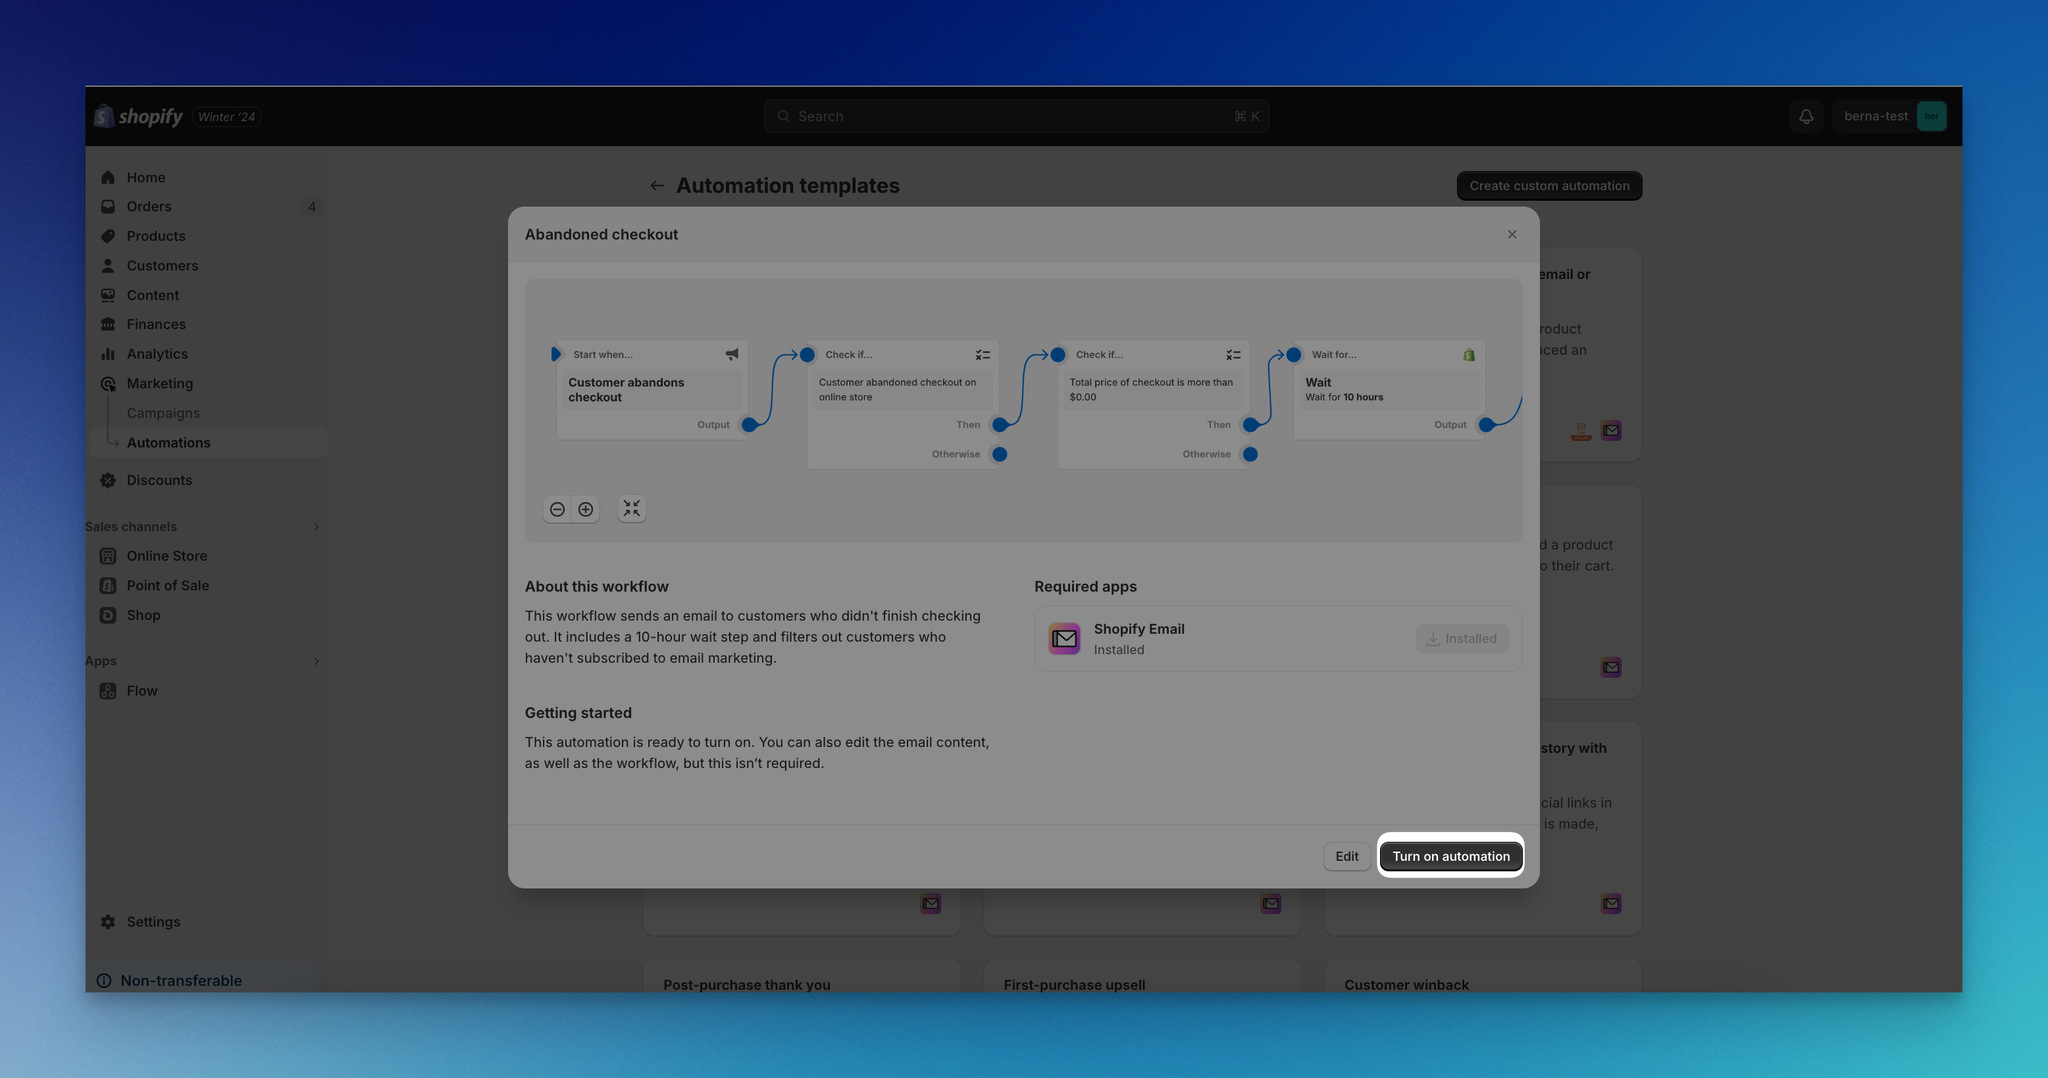
Click Turn on automation to make the workflow live.
Check back in seven days. The automation page shows sends, opens, clicks, and recovered orders attributed to the email. If your recovery rate sits below 2%, the subject line is the first thing to test — not the discount, not the design.
Method 3 — Use Popupsmart for cross-channel abandoned checkout recovery
Shopify's built-in automation is a single email at a single delay. That's the floor, not the ceiling. To recover the 15-25% I mentioned earlier, you need a multi-touch sequence with on-site nudges, an early reminder, and a stronger offer at 48 hours. That's where Popupsmart's checkout abandonment trigger fits — you stay inside one tool for both the on-site exit popup and the email follow-ups, with one analytics dashboard pulling them together.
Setup takes around 25 minutes for the first automation. After that you can clone the workflow, swap the subject line and offer, and ship a second variant in five minutes.
Step 1: Install the Popupsmart app on Shopify
Open the Popupsmart Shopify app listing and click Add app. Approve the permissions on your Shopify admin, then create or sign into your Popupsmart account when prompted.
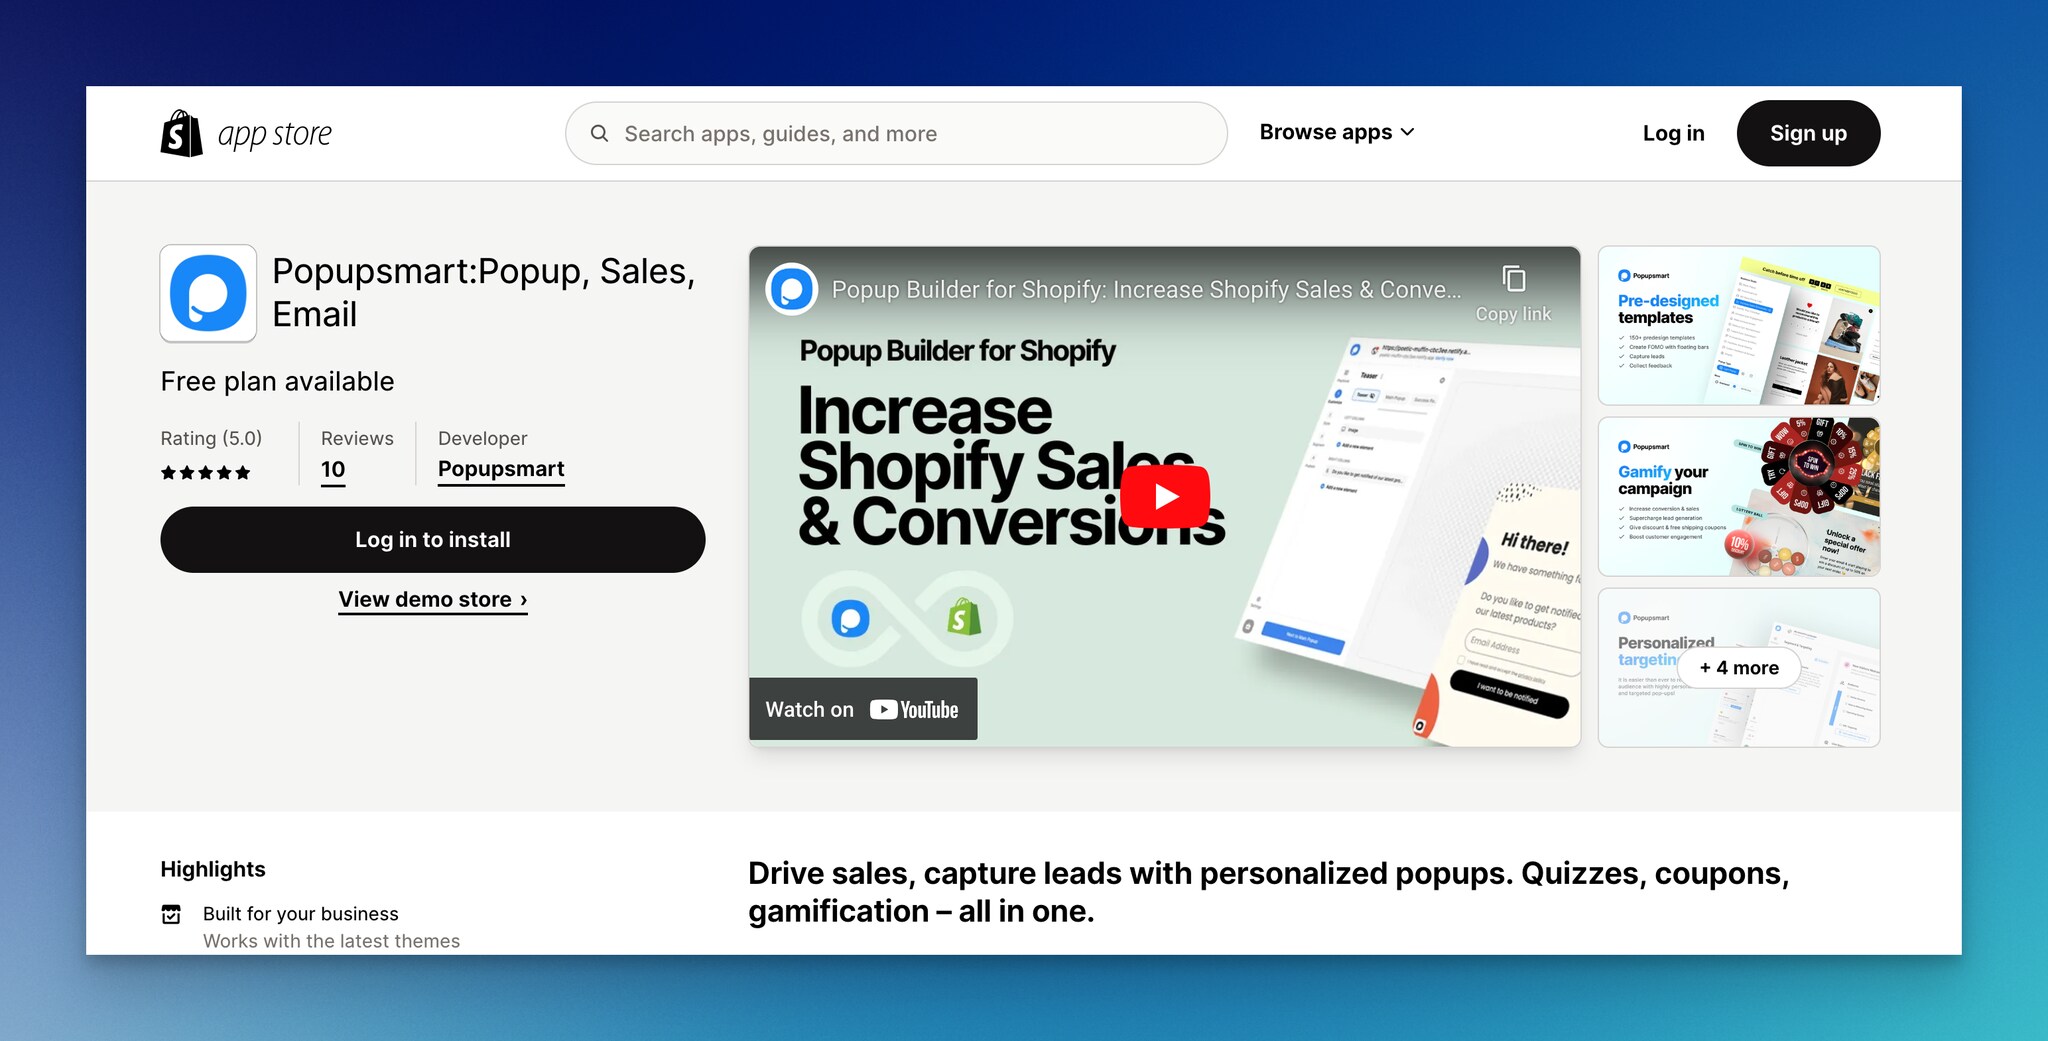
Add the Popupsmart app from the Shopify app store.
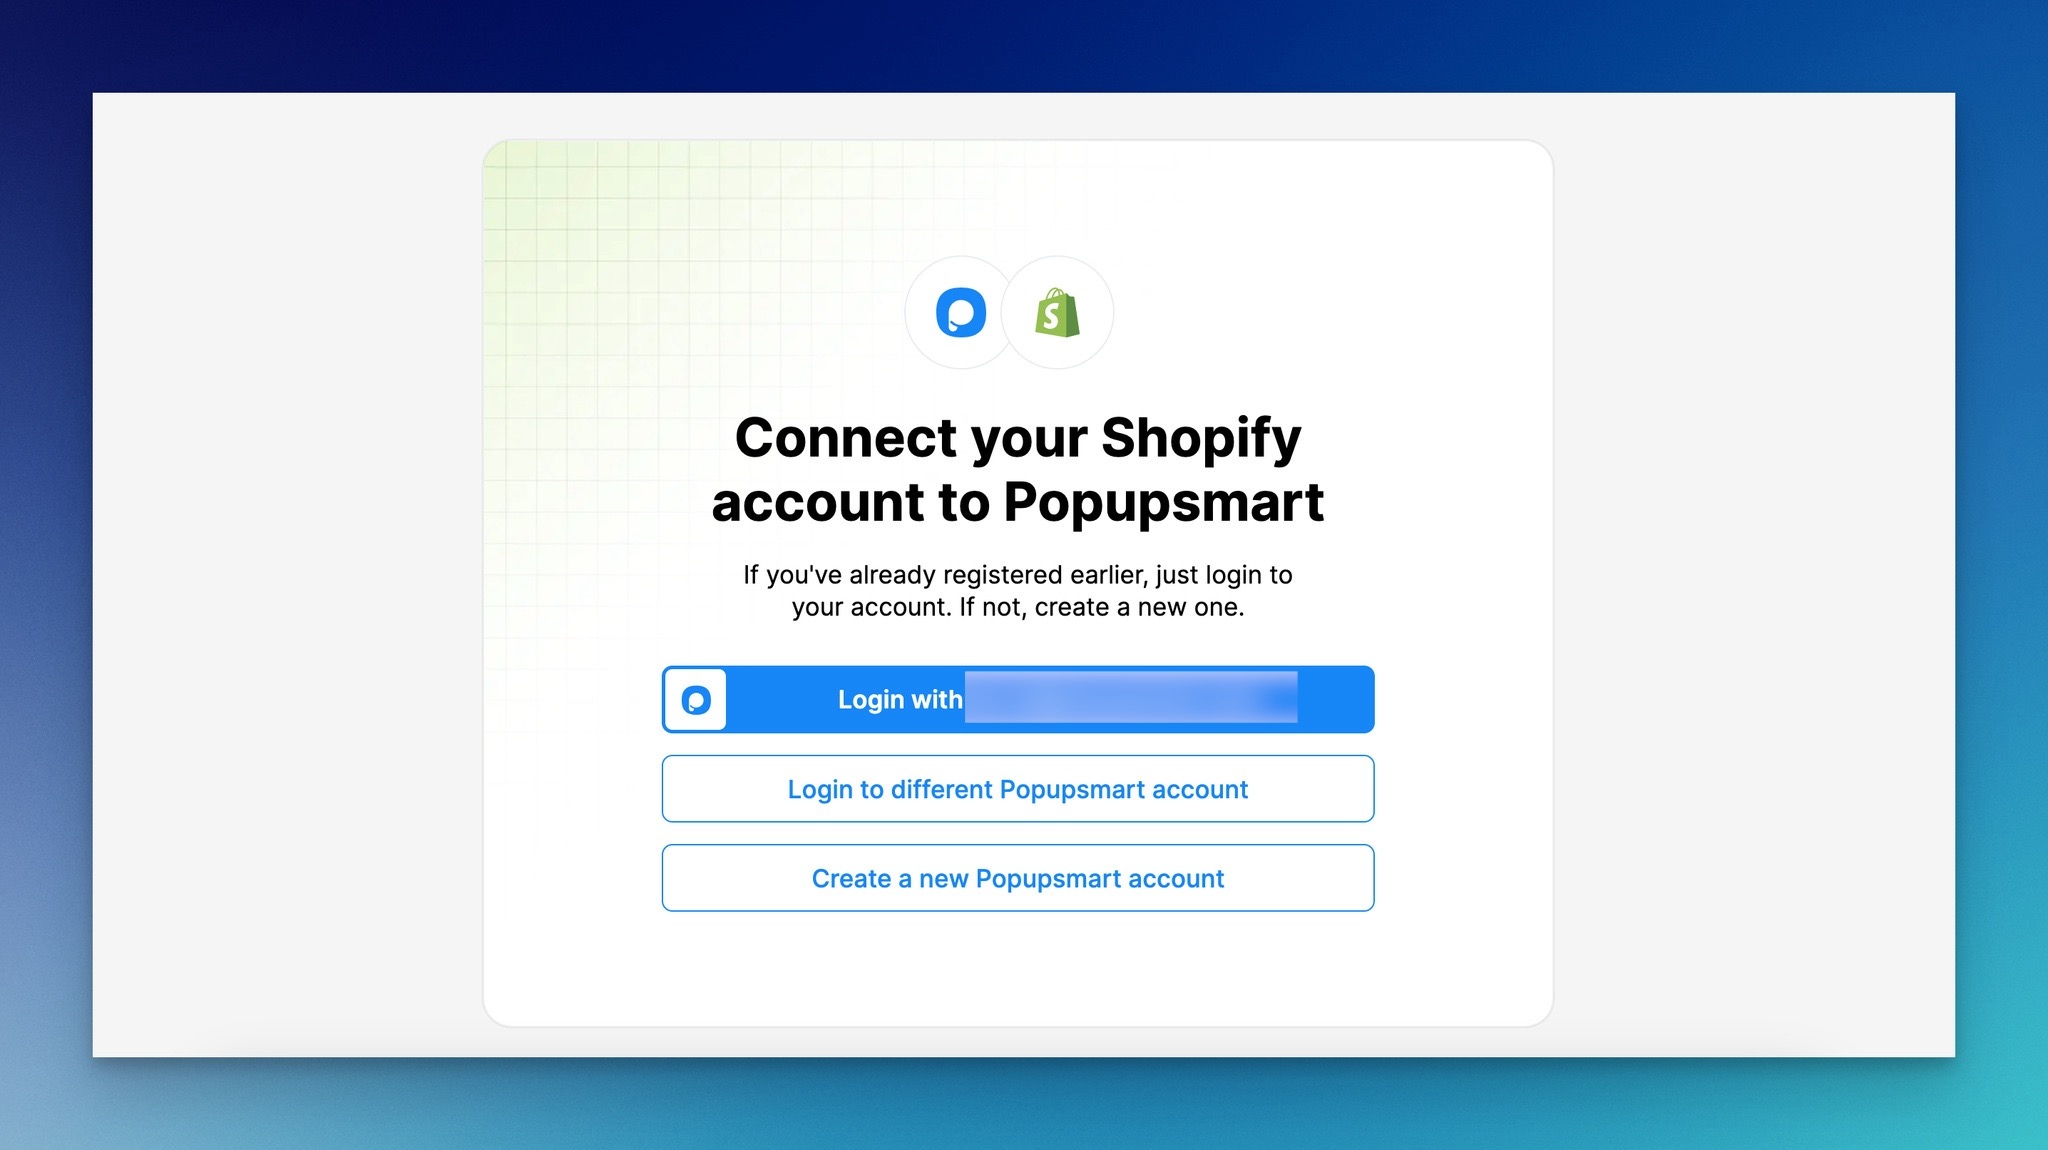
Confirm the connection between Popupsmart and your Shopify store.
You're done with Shopify-side setup. Everything that follows happens in the Popupsmart dashboard.
Step 2: Open Email Automation in the Popupsmart dashboard
From the Popupsmart sidebar, click Email Automation, then click Create email automation in the top-right. Email Automation is the engine for triggered email flows; it's separate from the on-site popup builder, even though both live in the same dashboard.
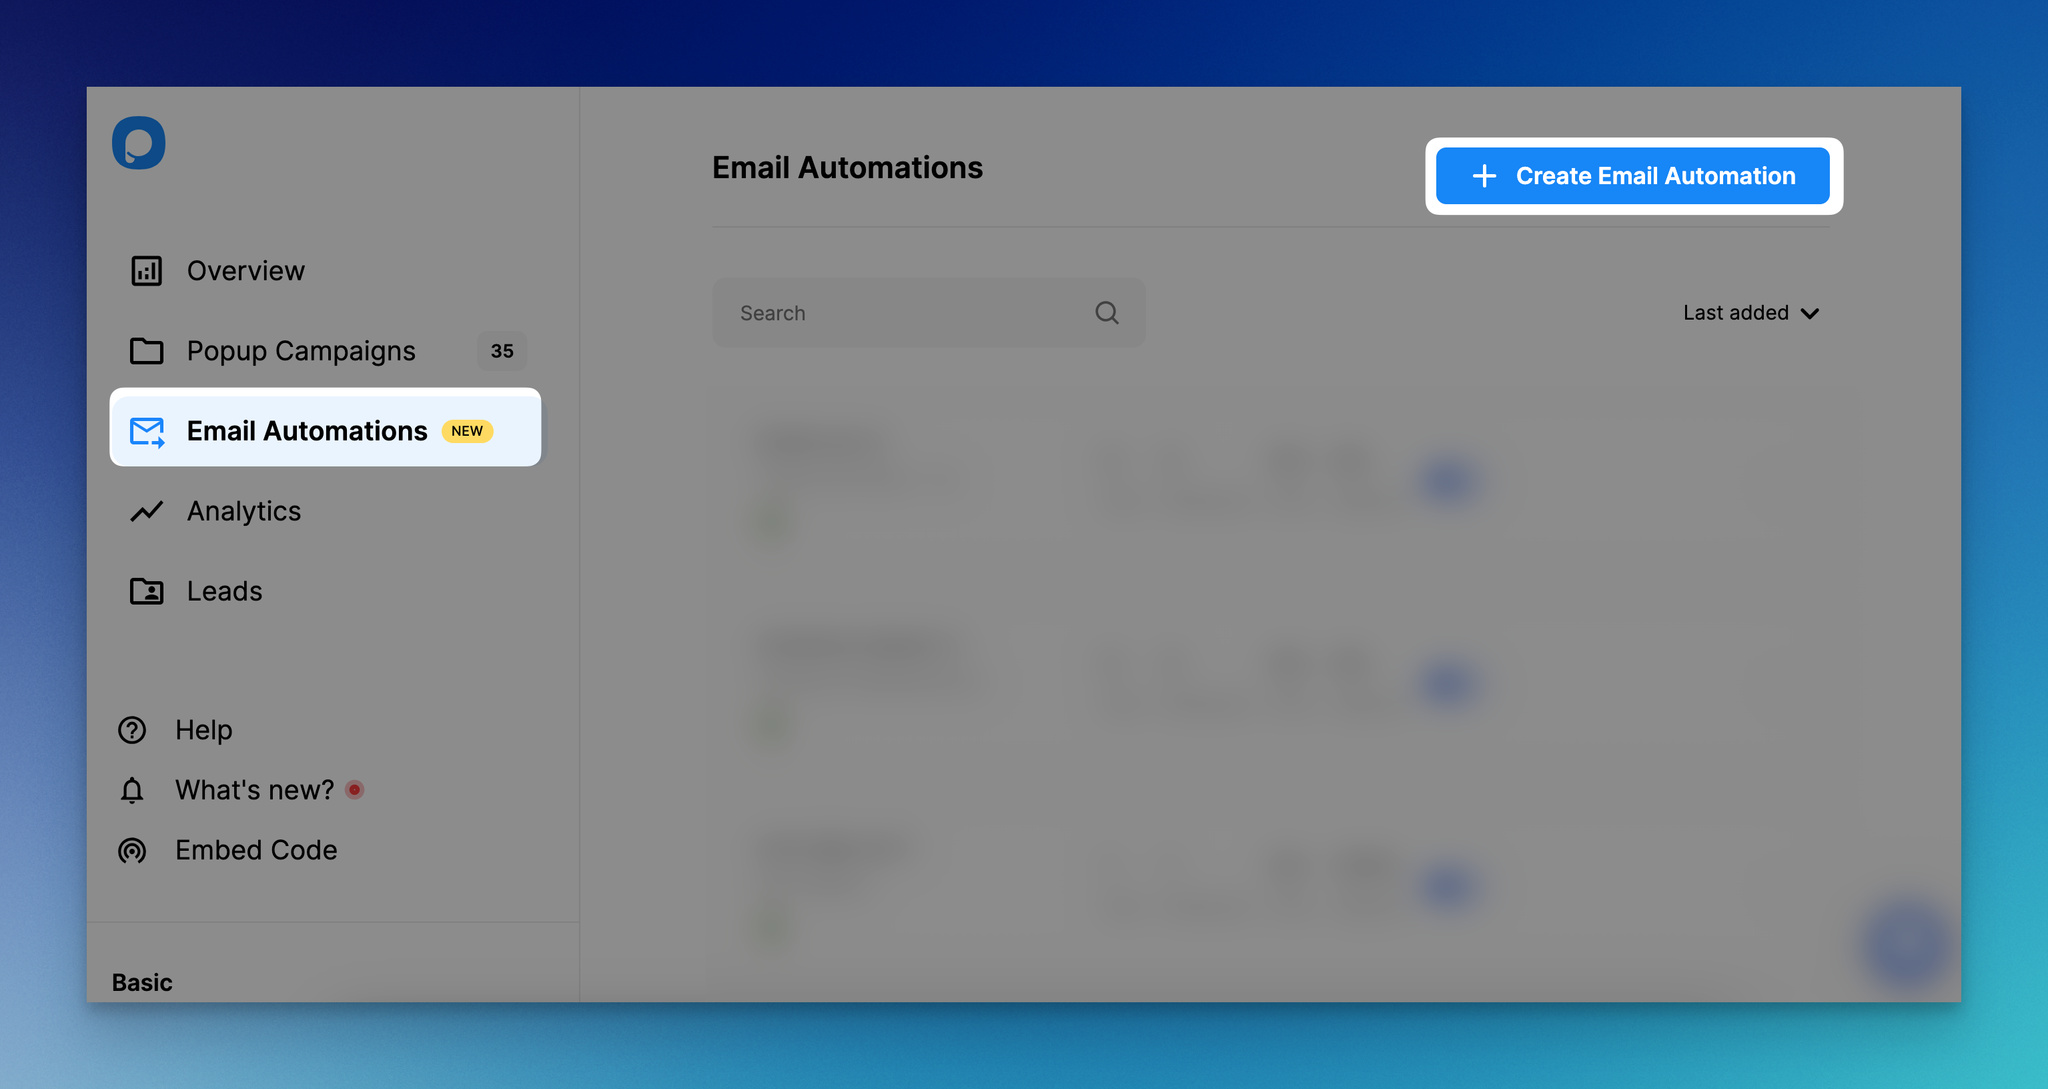
Click Email Automation > Create email automation to start.
Step 3: Pick the Checkout abandonment trigger
Scroll to the Shopify-based triggers group and click Create next to Checkout abandonment. Give the automation a clear internal name (something like "Checkout-Abandon-Email-1") and select the website you connected in Step 1.
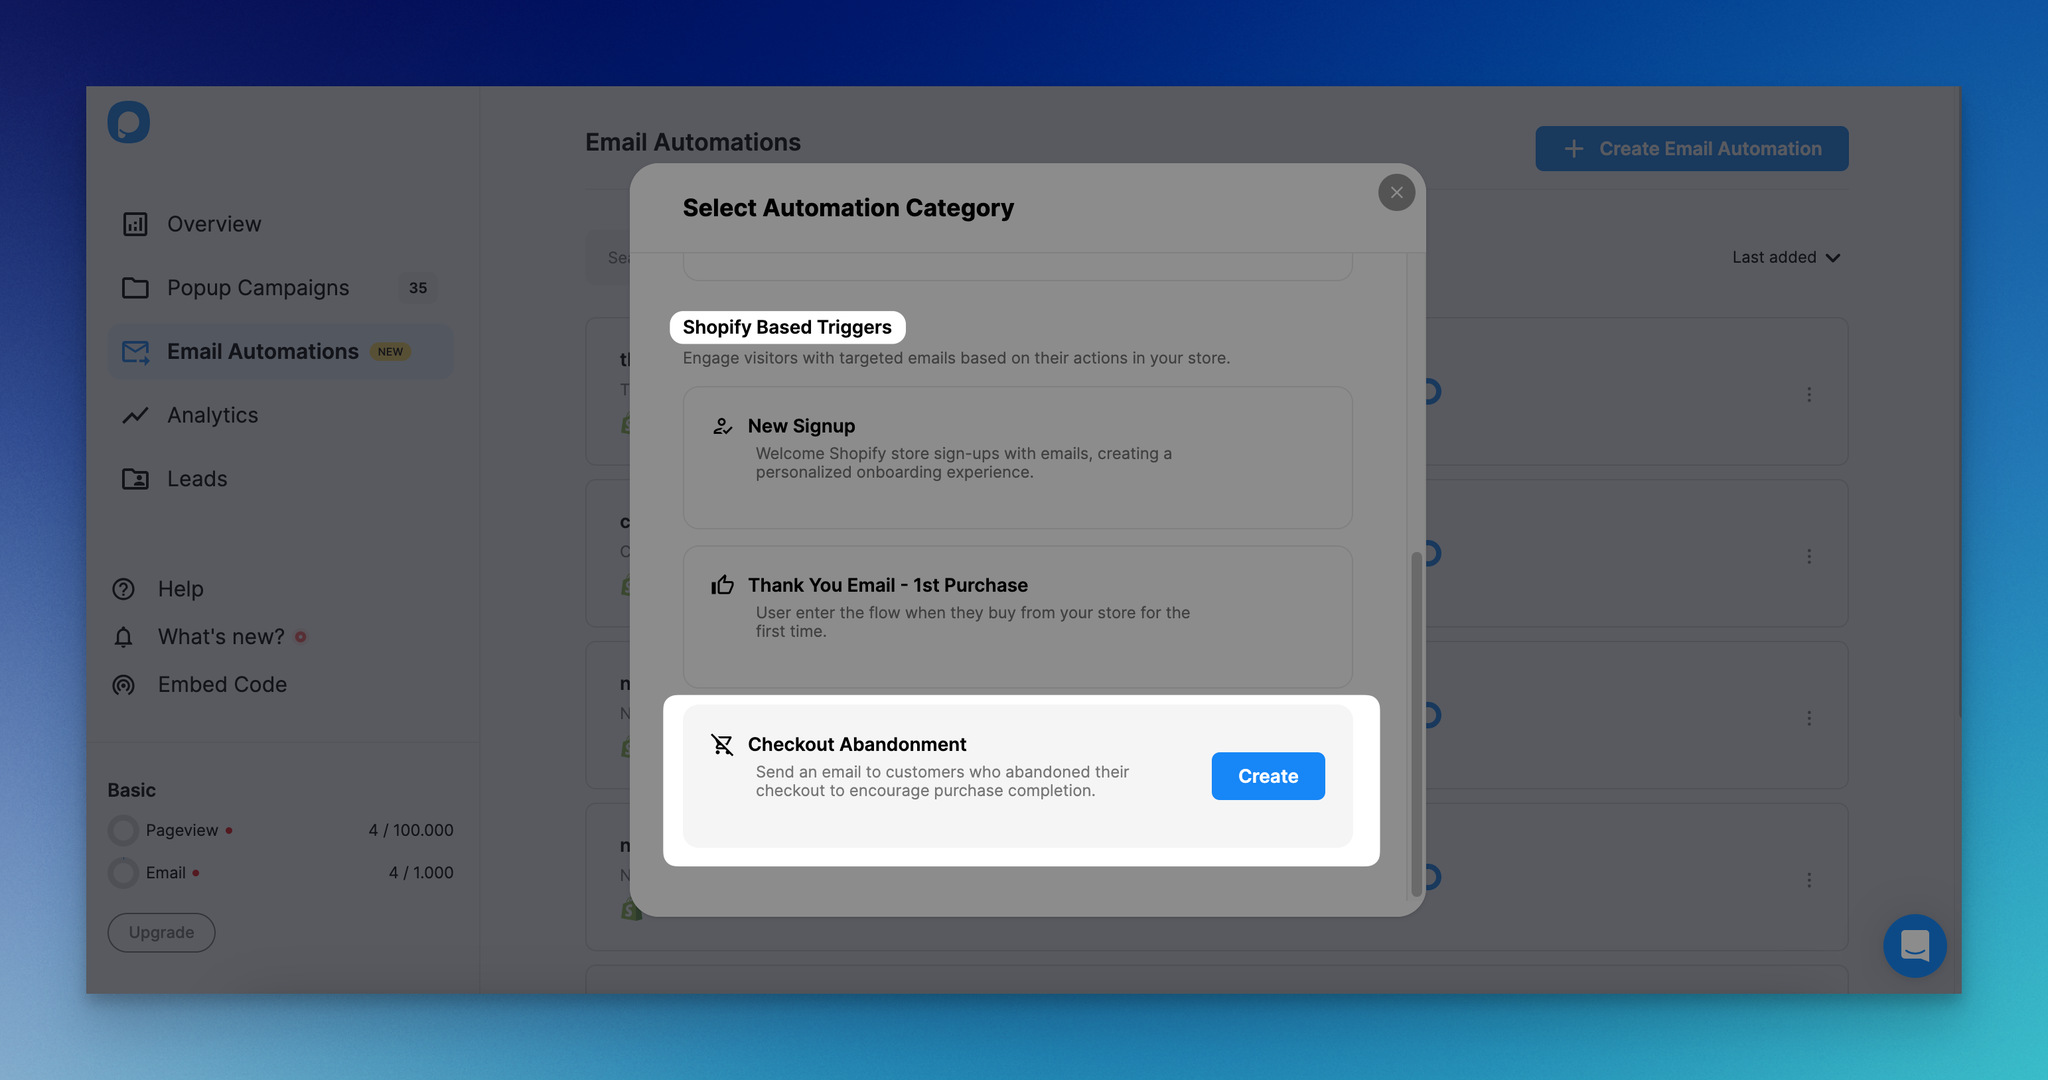
Pick Checkout abandonment under Shopify-based triggers.
Naming matters once you have three or four automations running — future you will thank present you for not calling them all "Test 1."
Step 4: Adjust the delay time
Click Edit Delay and set the wait. The minimum is 45 minutes (a Shopify-side rule, not a Popupsmart limit), so set the first email to fire at 1 hour.
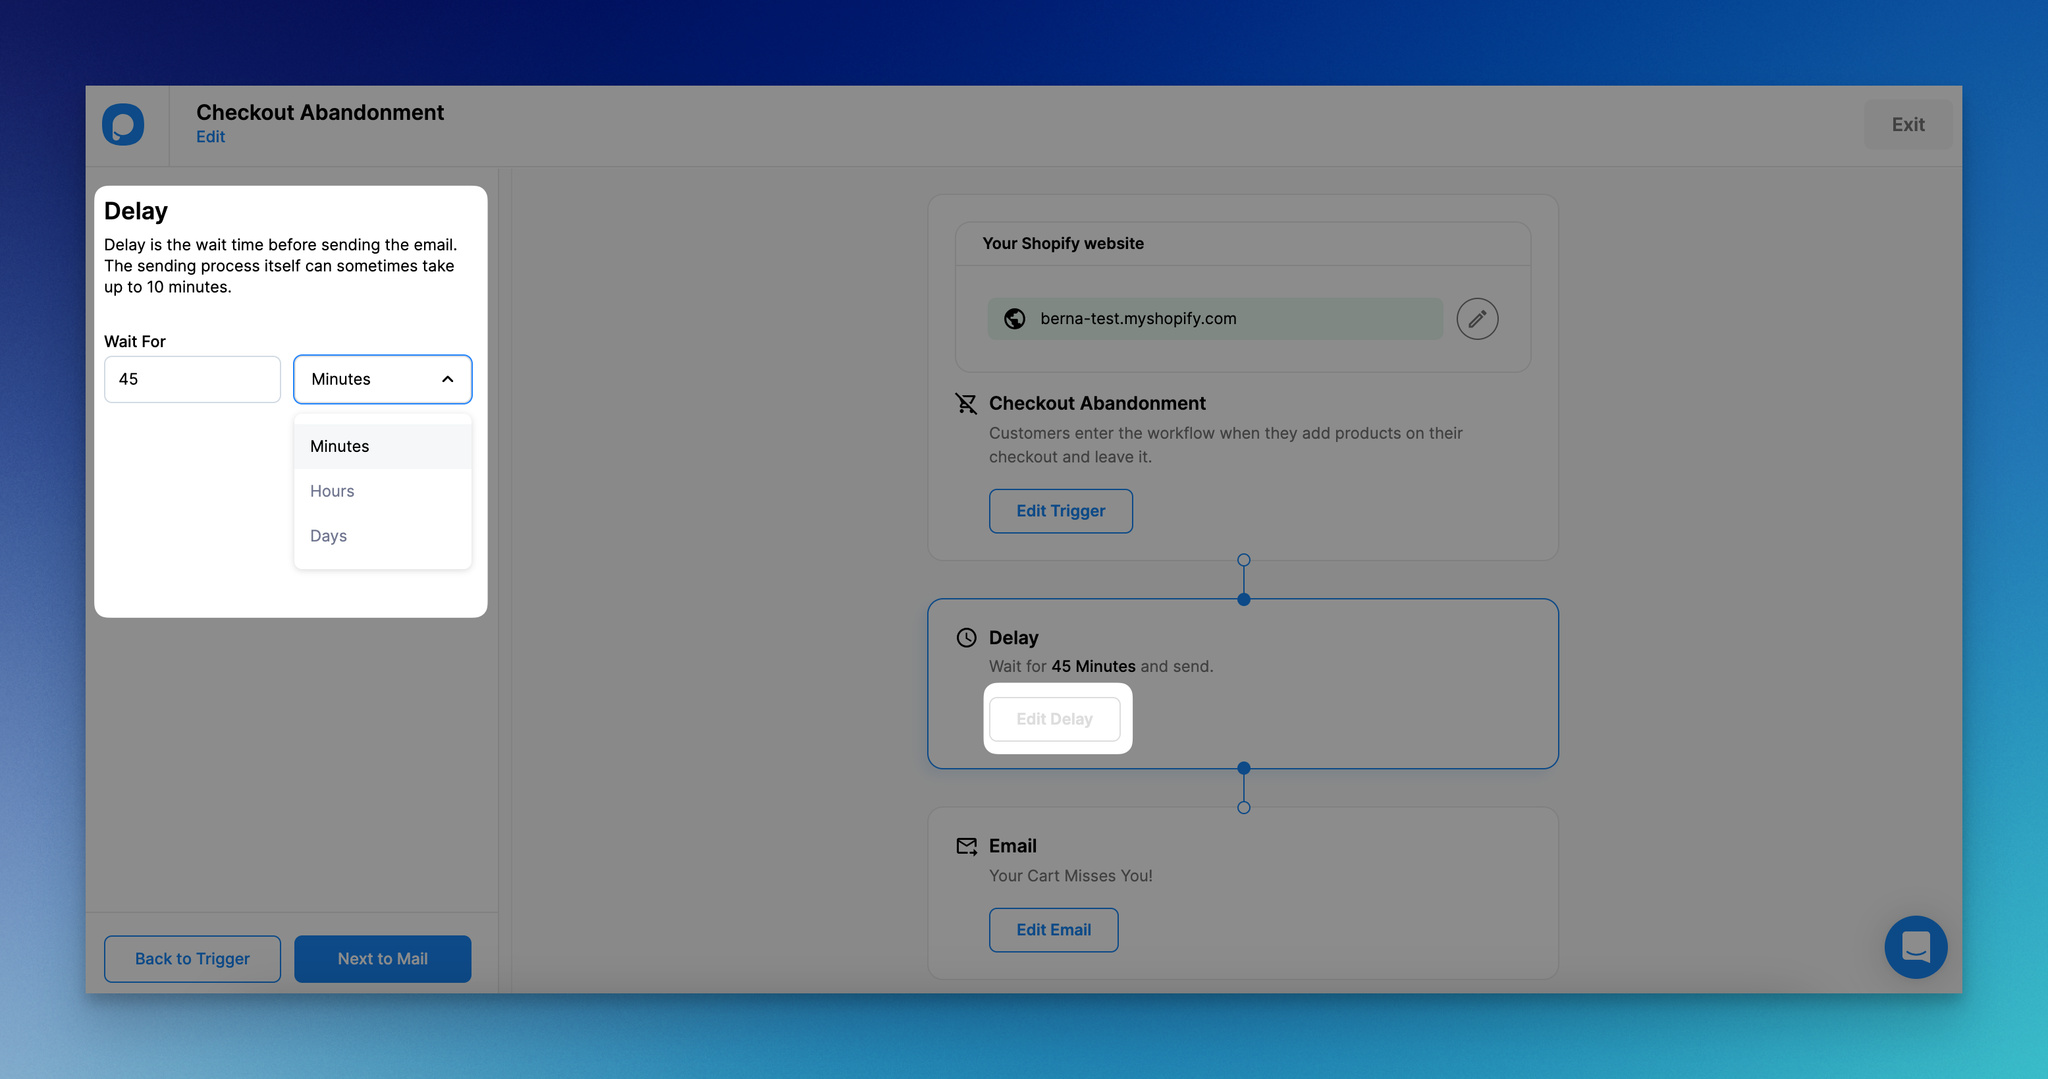
Set the delay to 1 hour for the first email in the sequence.
For the second and third emails in the sequence, clone this automation later and set them to 24 hours and 48 hours.
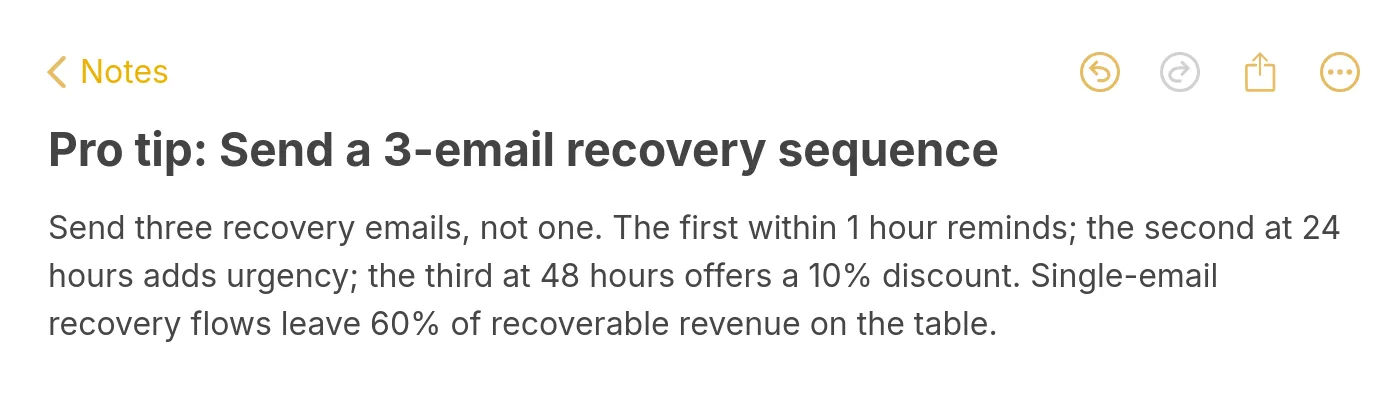
Pro tip: 3-email cadence at 1, 24, and 48 hours.
Step 5: Click Edit Email and set the General fields
Open Edit Email, then go to the General tab. Set the subject line, sender name (use a real person's name, not the brand), and reply-to address. Send a test to your own inbox before you move on so you can see how the email renders in Gmail and on mobile.
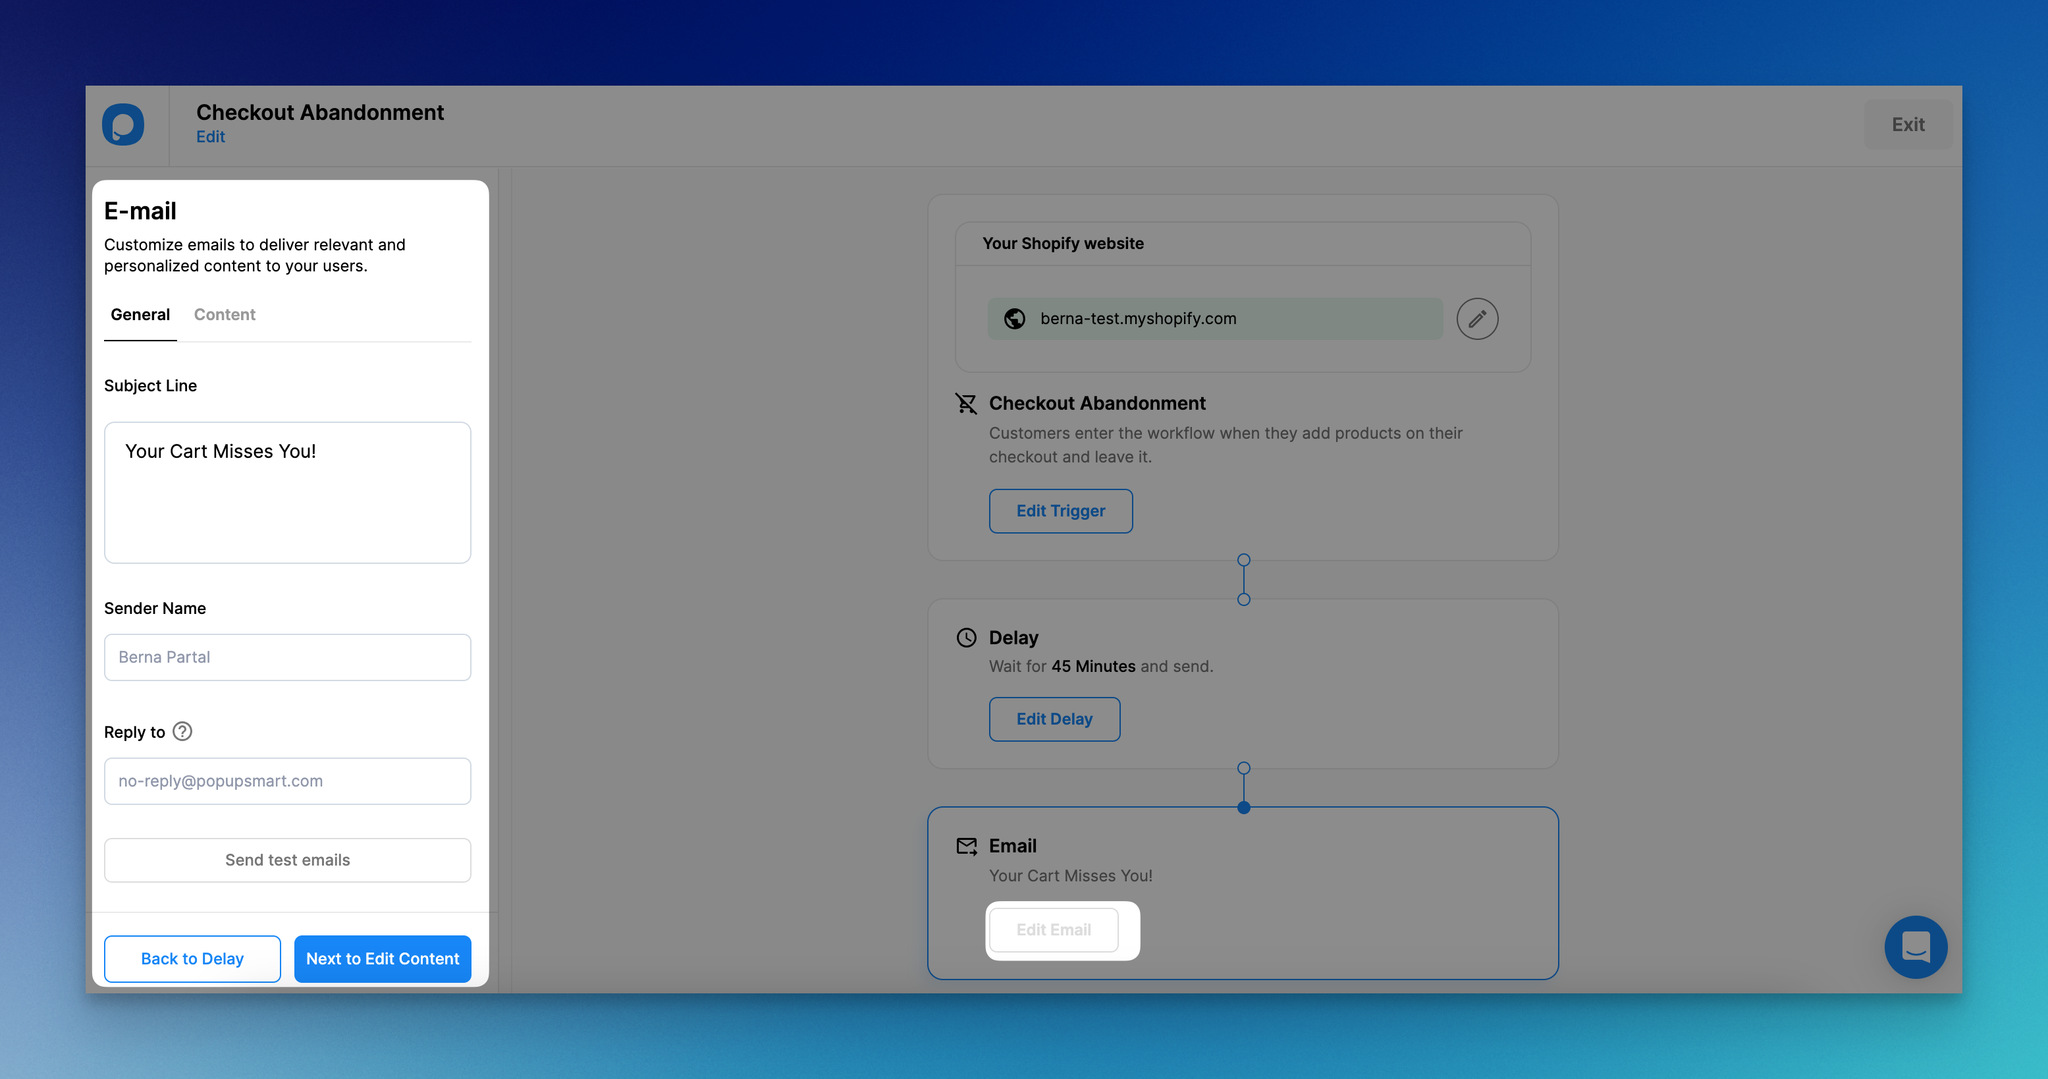
Click Edit Email to open the General and Content tabs.
I always send tests to a Gmail address and a Yahoo address before launch — the latter catches deliverability issues the former won't.
Step 6: Customize the email content
Switch to the Content tab. From the left rail, swap the email template, set fonts and brand colors under General Style, then click directly on each email element (header, headline image, body copy, CTA button) to edit it inline.
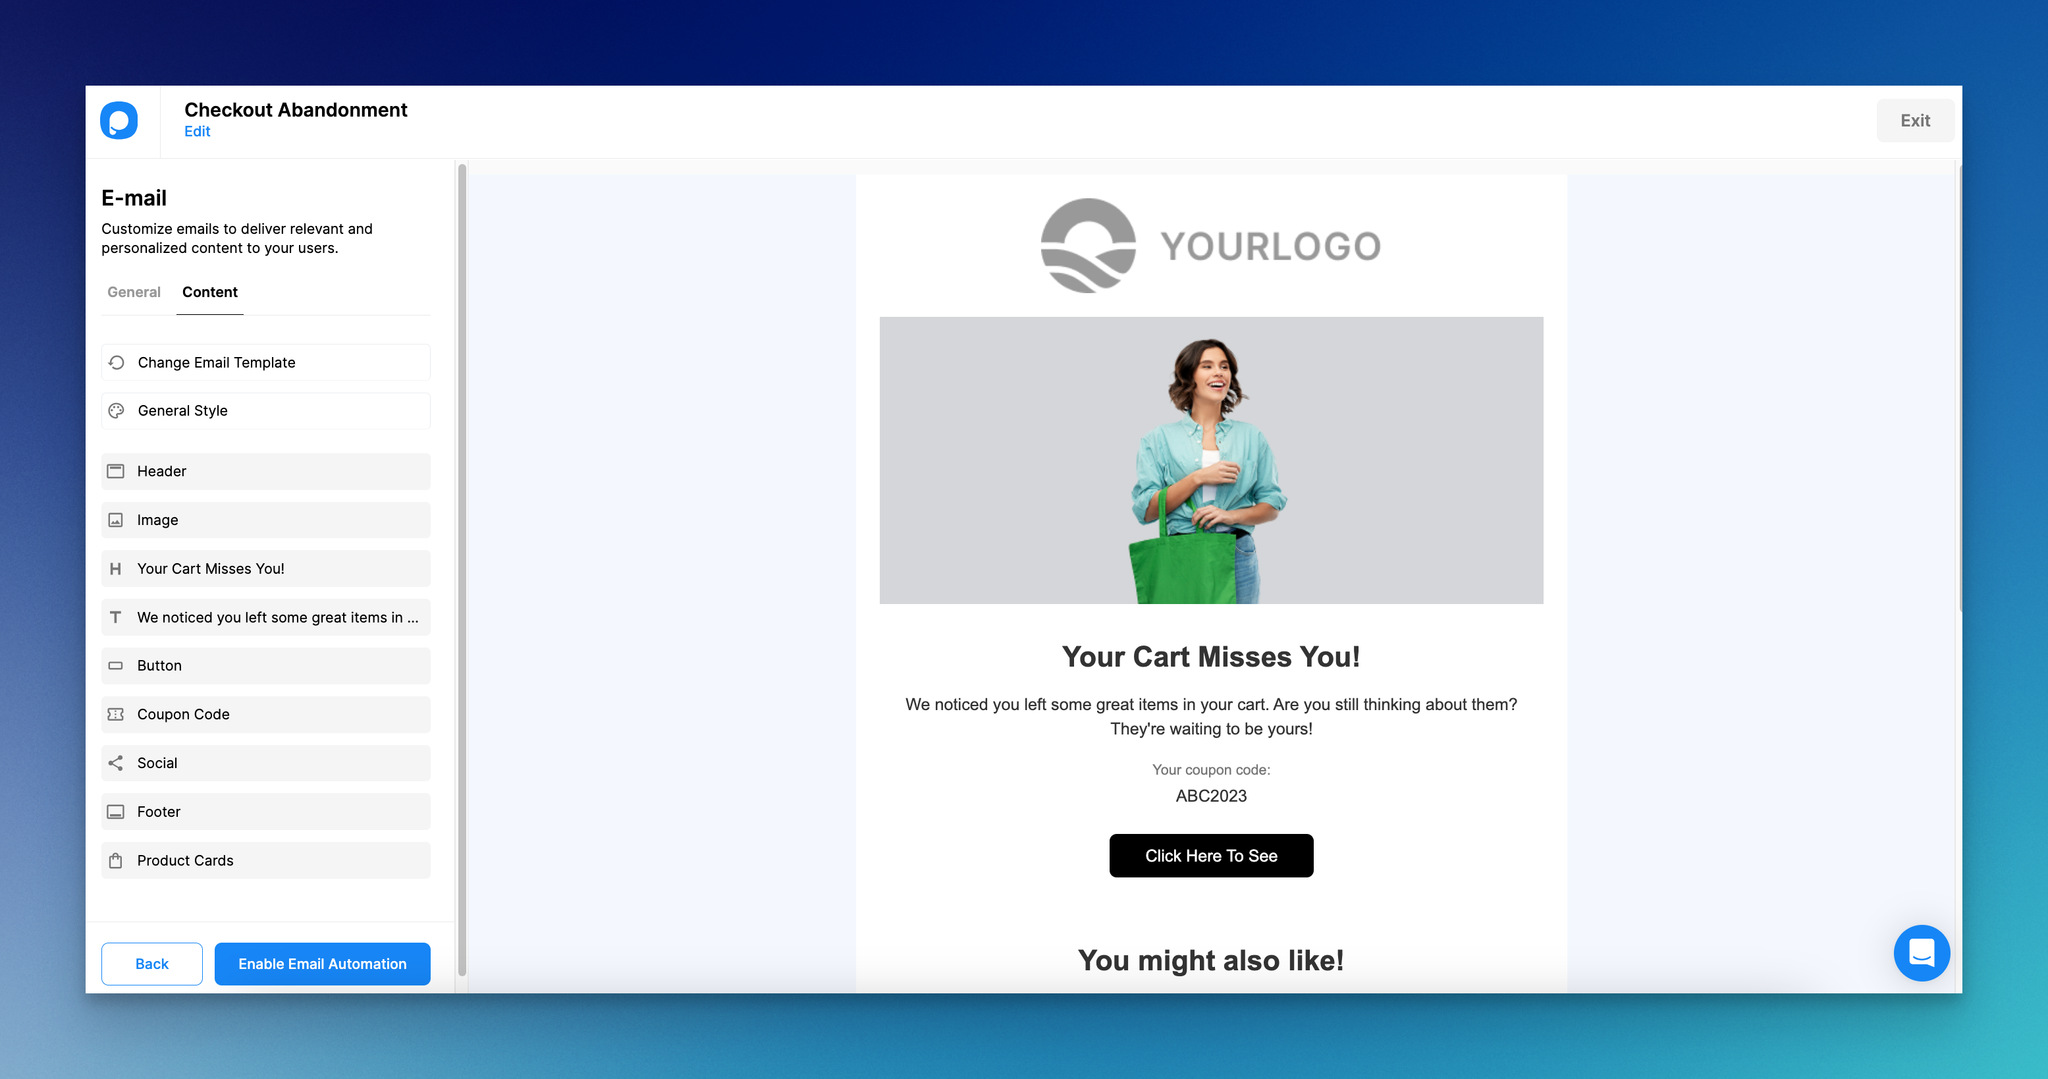
Edit each element directly in the Content tab.
Add your social links from the Social block and pull live products in via Product Cards — Popupsmart fills these dynamically with the items the shopper actually abandoned. Adjust the footer to match your brand and you're ready to ship.
Step 7: Enable the email automation
Click Enable Email Automation in the top-right. Popupsmart shows a "Successfully enabled" modal and the workflow starts catching abandons immediately. The automation appears in your Email Automation list with a toggle so you can pause or restart it without rebuilding.
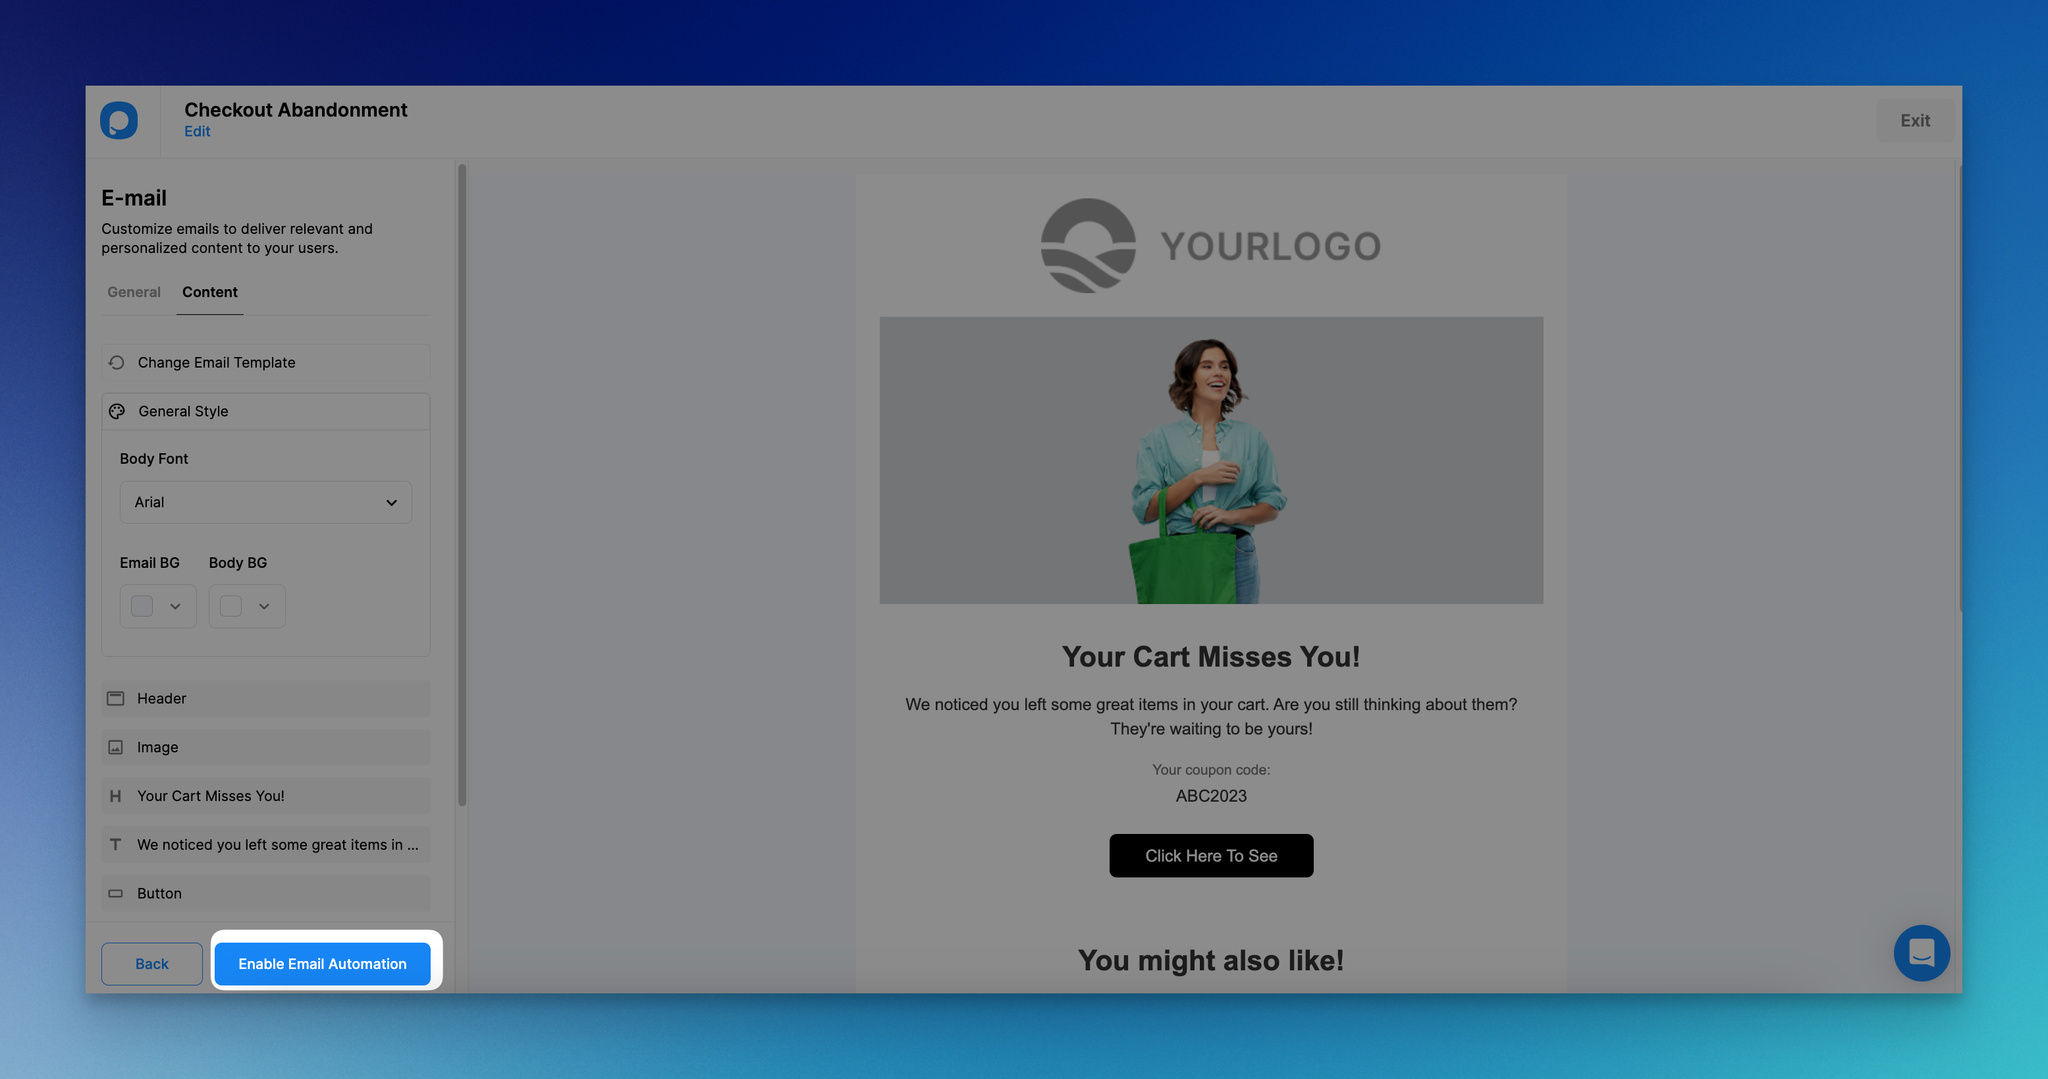
Click Enable Email Automation to make the workflow live.
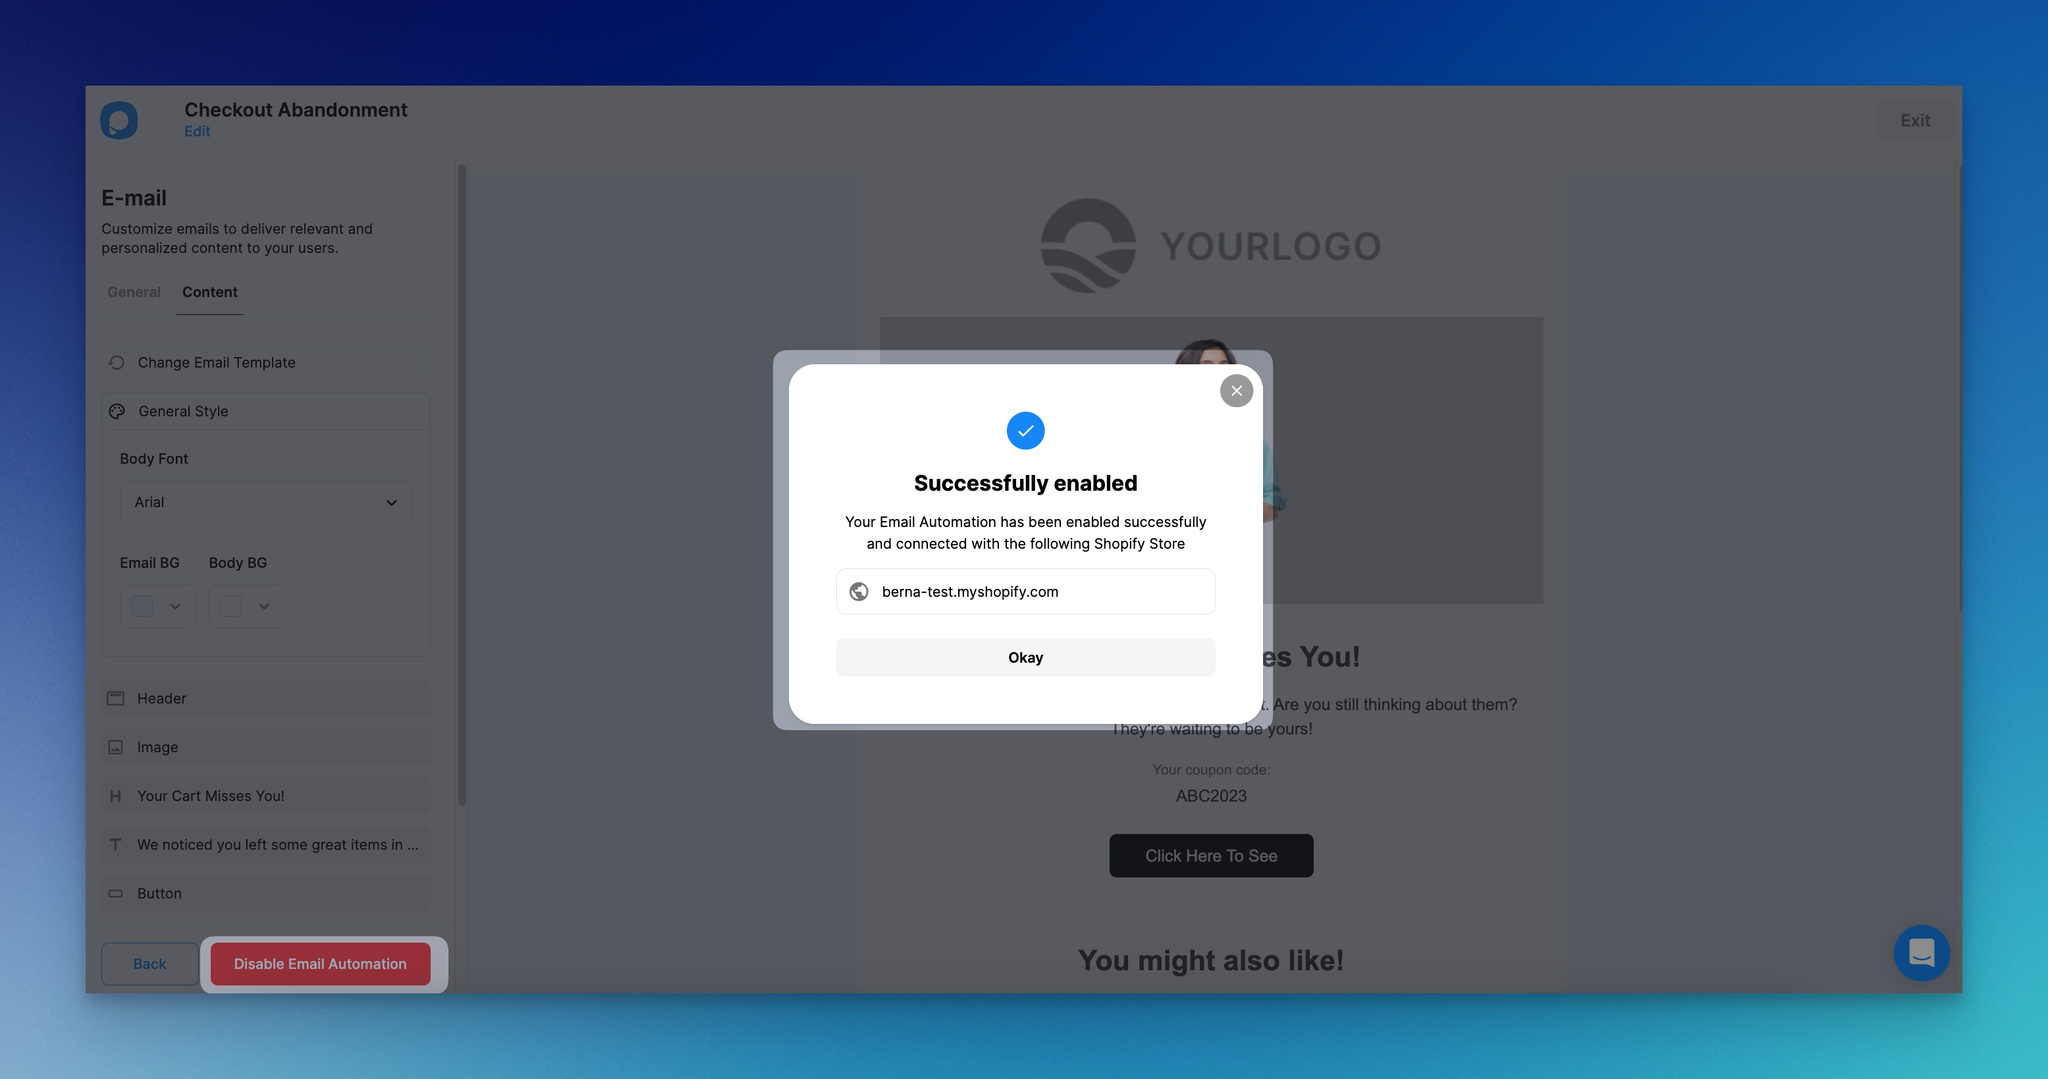
The Successfully enabled modal confirms the automation is live.
Step 8: Track sends, opens, and recovered revenue
Go back to the Email Automation page to see the campaign-level dashboard. Sent, delivered, opened, and clicked counts update every few minutes. Click into the Analytics page for a deeper view of revenue attribution and per-email performance over time.
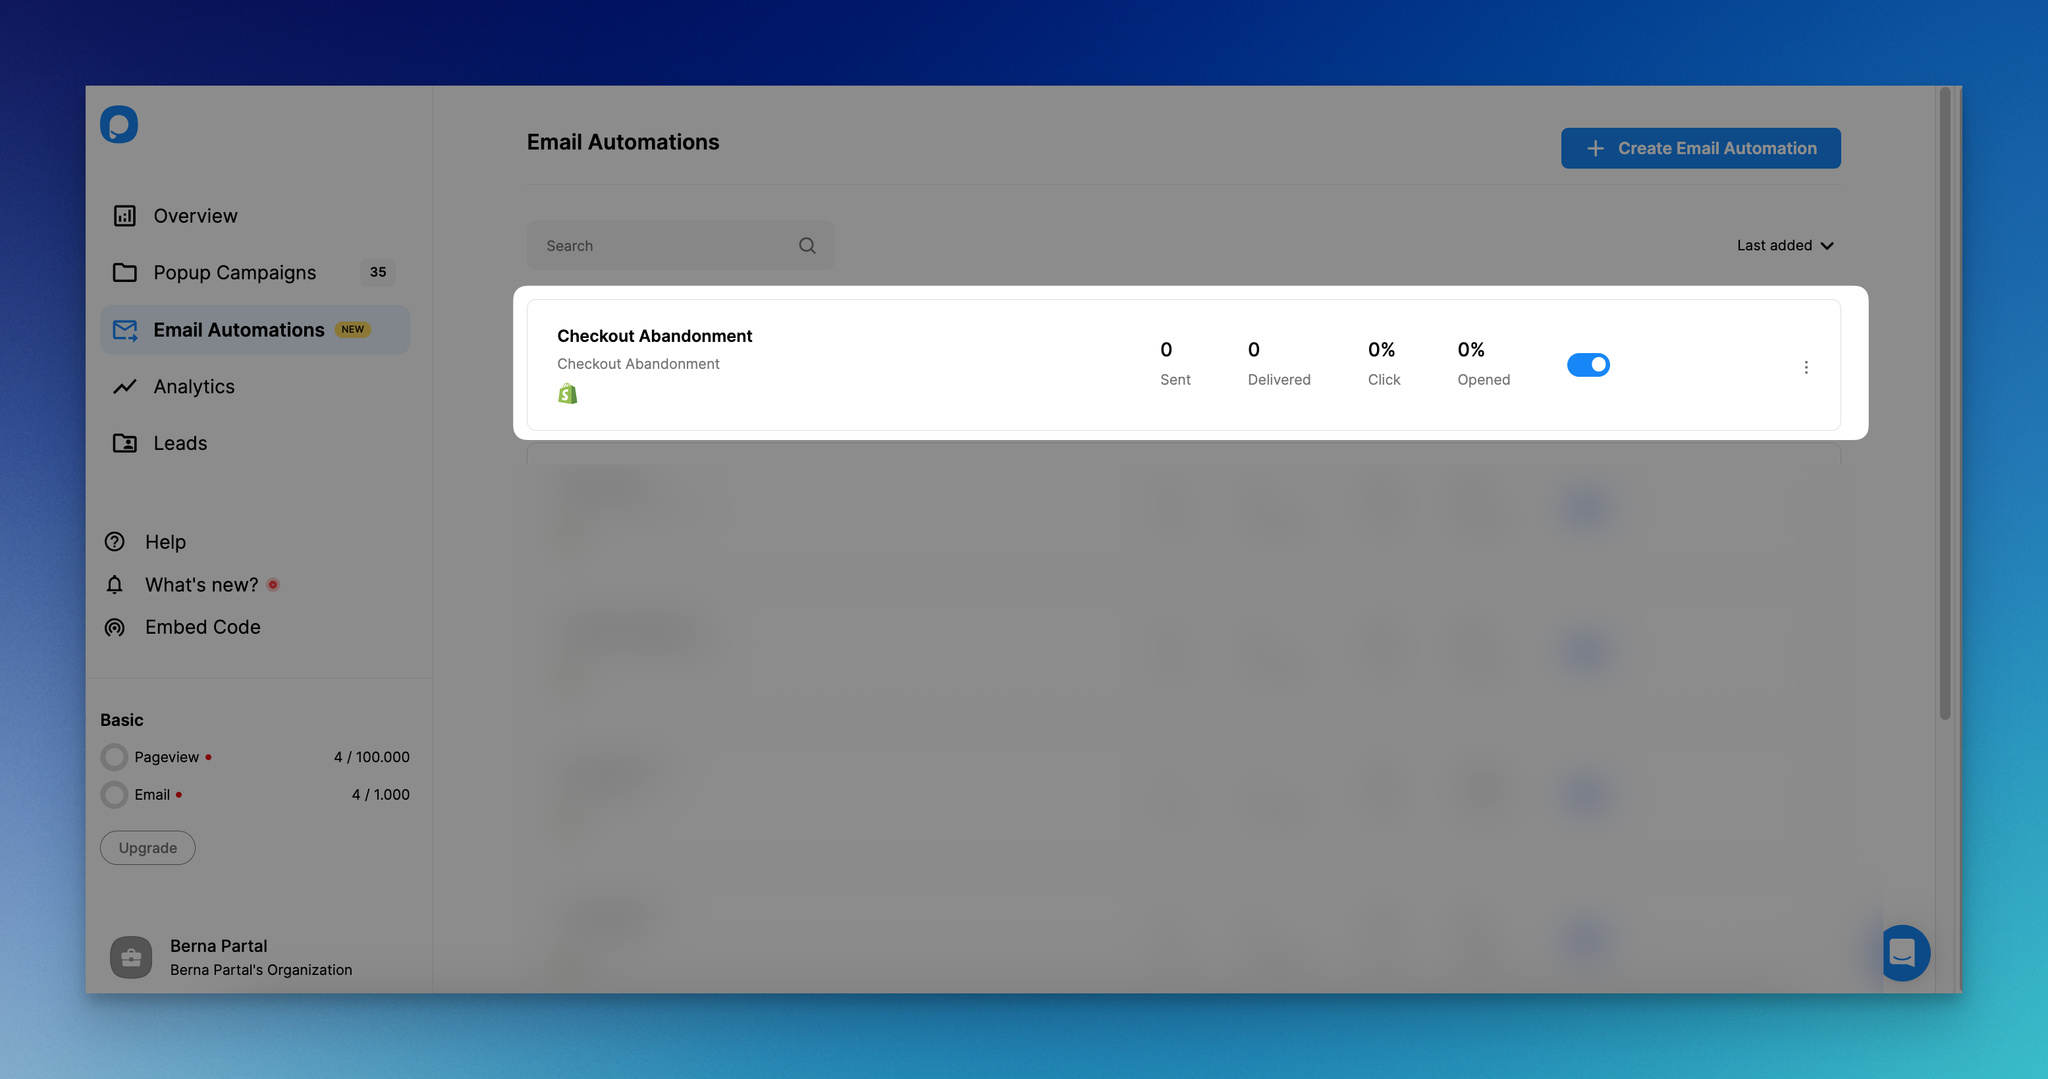
Track sends, opens, and clicks at the campaign level.
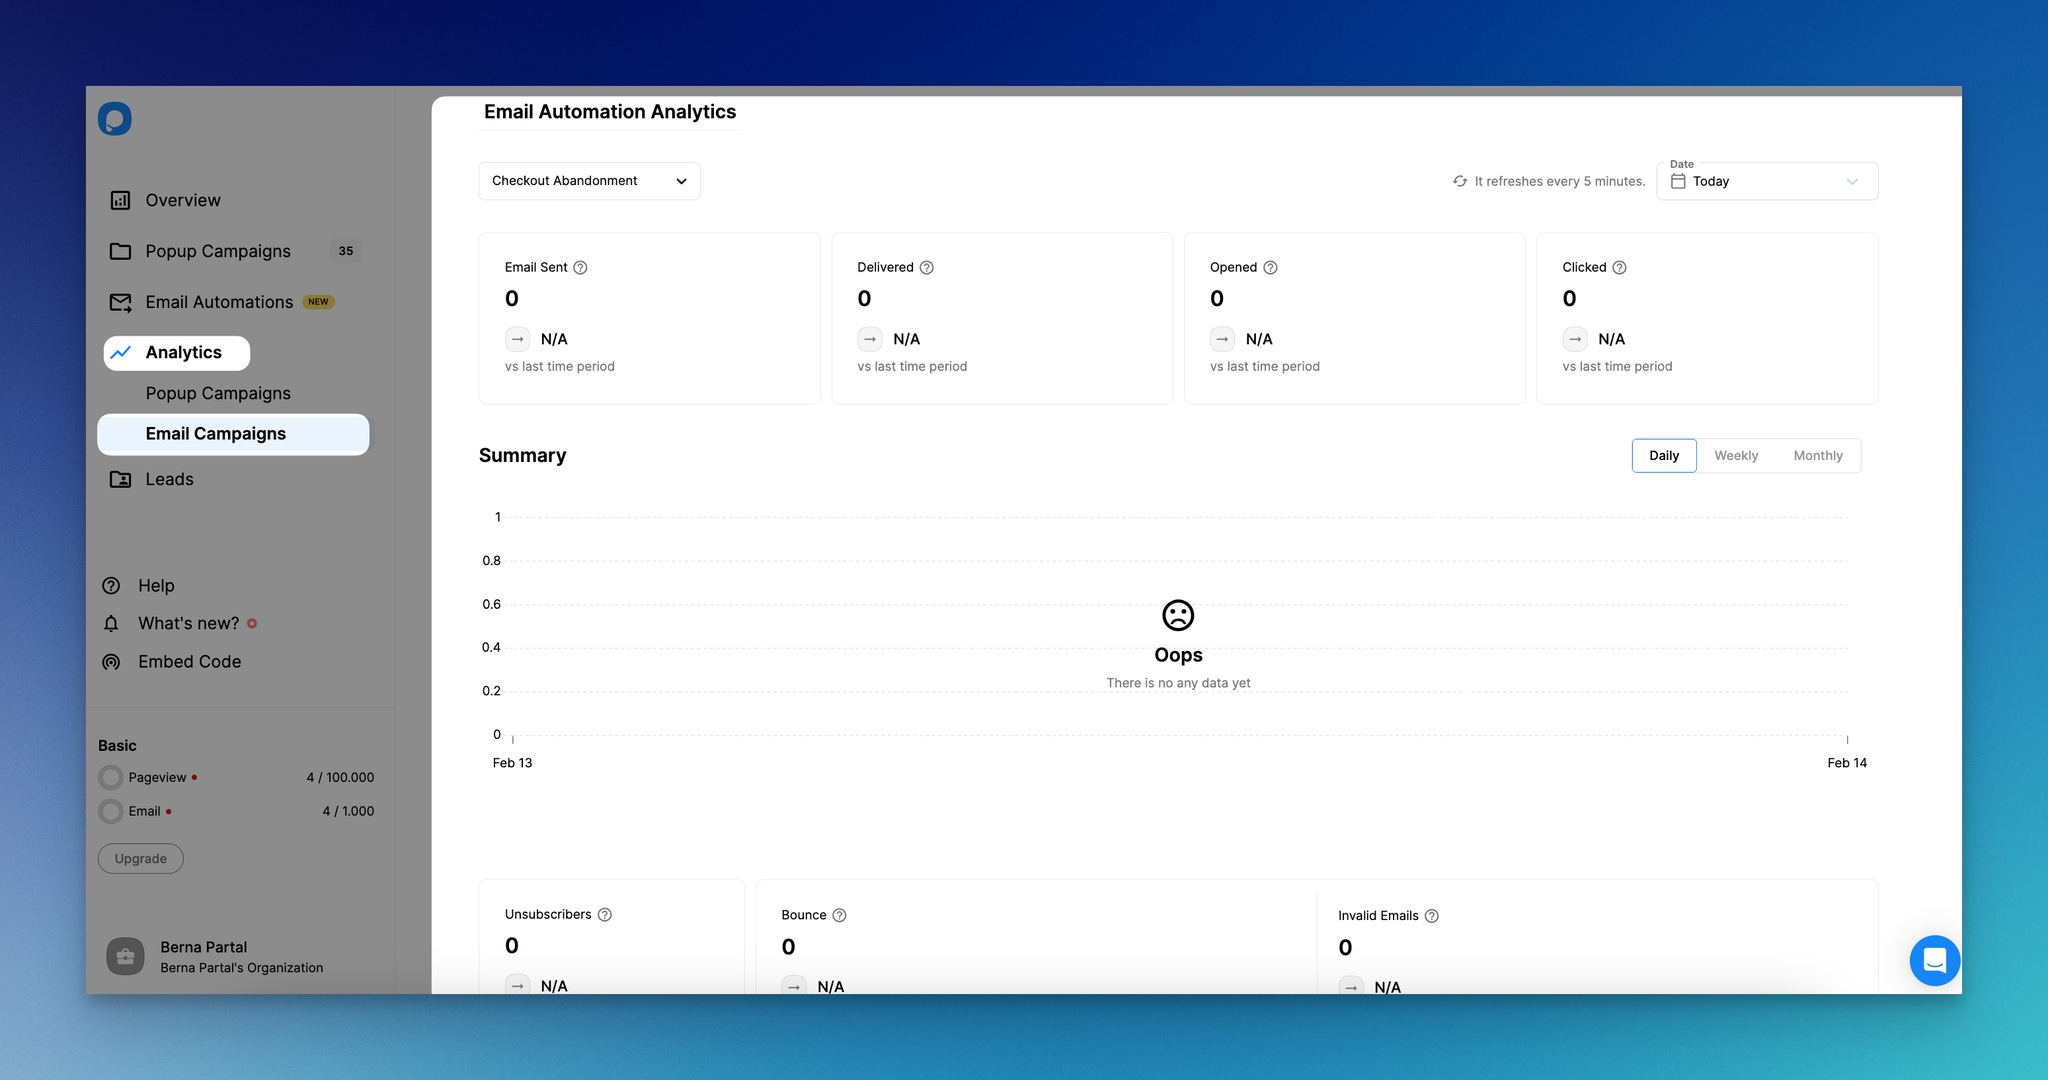
The Analytics page shows revenue attribution per email.
Pair this email automation with on-site cart recovery popups and Shopify exit-intent popups for a full-funnel approach. The popup catches shoppers before they leave; the email catches the ones who already did.
Best practices for abandoned checkout recovery
You can have all three methods set up and still leave money on the table if the sequence design is off. These are the rules I apply to every recovery program I audit, regardless of the store's size.
• Run a 3-email cadence, not a single send: One reminder is the floor. The split I see win most often is 1 hour (gentle nudge), 24 hours (stronger reminder with social proof), 48 hours (offer with a deadline). Stores that move from one email to three typically see recovery rates double.
• Put urgency in the subject line, not the body: Subject lines are where the open is won or lost. "Your cart expires in 12 hours" beats "We saved your cart" by a wide margin in most subject-line tests I've run. Save the polite tone for the body, where it belongs.
• One CTA per email: Recovery emails are a single-job message — get the shopper back to the checkout. Strip out the navigation menu, the "shop our other categories" block, and the social icons cluster at the top. One button, one destination.
• Design mobile-first: More than 70% of Shopify checkout sessions start on mobile. If your CTA button is below the fold on an iPhone, you're losing taps. Test on a real device, not just the desktop preview.
• A/B test discount thresholds, not whether to discount: The question is not "should I discount?" — it's "at what cart value does a 10% offer beat a free-shipping offer?" My default starting test is free shipping for sub-$75 carts, 10% off for $75-150, and 15% off above that. Then iterate.
• Segment by cart value and customer status: A first-time visitor abandoning a $30 cart needs a different message than a returning customer abandoning a $300 cart. Popupsmart and Shopify Email both support segmentation; use it instead of sending the same message to everyone.
For a deeper benchmark on what "good" looks like across the full sequence, our Shopify cart abandonment emails guide breaks down working templates by cart size and segment.
Recover your first abandoned checkout this week
If you read this far without opening your Shopify admin, here's the smallest version of the plan: open Marketing > Automations, switch on the Abandoned checkout template, install the Shopify Email app if you haven't already, and rewrite the subject line to mention the actual product. That alone, shipped in the next 30 minutes, recovers 2-3% of your abandoned revenue going forward.
Once that baseline is live, the wins compound. Add a Popupsmart on-site exit popup to catch shoppers before they leave the checkout page. Clone your single recovery email into a 1-hour, 24-hour, 48-hour sequence. A/B test one subject line per week. The merchants I've watched move from 2% recovery to 18% recovery did it in 12 weeks of small, weekly changes — not one big redesign.
The cart already showed buying intent. The checkout already captured the email. All that's left is the follow-up — start with the highest-value abandoned checkout sitting in your admin right now and send it a real email. That's your proof of concept.
Frequently asked questions
Why do people abandon checkout on Shopify?
People abandon Shopify checkouts for a small set of reasons that show up over and over: unexpected shipping or tax costs at the payment step, forced account creation, slow loading checkout pages, missing trust signals like SSL badges or a clear return policy, and limited payment options (no Shop Pay, Apple Pay, or PayPal). Most of these are fixable in an afternoon — start with whichever issue your session recordings flag most often.
What is an abandoned checkout scheduled on Shopify?
"Abandoned checkout scheduled" is the status Shopify shows when its built-in automation has detected an abandoned session and queued the recovery email. Shopify starts tracking the checkout the moment the shopper enters identifying details (email, billing address). After the configured wait period — usually a few hours — the platform marks the checkout as "scheduled" and then sends the email. If the shopper completes the order before the wait expires, Shopify cancels the scheduled email automatically.
What Shopify apps can help reduce abandoned checkouts?
The category breaks into three jobs: capture (on-site popups and forms), recovery (triggered emails and SMS), and checkout customization. Popupsmart covers the first two with a single dashboard. Beyond that, qikify Checkout Customizer is a popular choice for editing the checkout page itself, Persistent Cart App keeps cart contents alive across devices for logged-in shoppers, and FaviCart Abandonment Protector adds browser-tab notifications when a shopper switches away. Pick one tool per job — stacking three popup apps will fight your own checkout for attention.
How long do I have to recover an abandoned checkout?
Shopify keeps abandoned checkouts in your admin for 30 days. Recovery rates drop off a cliff after the first 48 hours, which is why a 1-hour, 24-hour, 48-hour cadence captures most of the recoverable revenue. Past 72 hours, the shopper has usually either bought from a competitor, given up, or forgotten the original need. Manual recovery on stale checkouts is rarely worth the staff time.
Does Shopify charge me when an automated recovery email is sent?
Through the Shopify Email app, the first 10,000 emails per month are free. After that, it's $1 per 1,000 additional emails. For most stores doing under 1,000 daily abandons, the recovery automation runs at zero incremental cost. Third-party tools like Popupsmart bill on their own pricing — usually a flat monthly fee that covers both popups and email automations together.
Discover more blog posts related to Shopify:
Shopify Cart Abandonment Emails: How to Set Up & Edit (with Examples)

How would you rate your experience with this article? 😊