How to Upload HTML File to the Root of Shopify Store
Shopify “HTML” is edited via Liquid theme files (theme.liquid, templates, snippets, sections). For domain verification (Facebook/Google), disable password protection, then paste the provided meta tag into theme.liquid under the opening <head>, save, and complete verification.
Oftentimes, you may see that some third-party sites ask for uploading an HTML file to the root directory of your Shopify store. This is mainly for verification purposes.
If you are wondering how to upload an HTML file to the root directory of your Shopify store, we got you covered. Here’s what you will learn from this article:

How to Access/Edit the HTML File in Shopify?
In terms of Shopify stores, your HTML files are actually liquid files. There aren’t actual HTML files since it is a Shopify theme.
Depending on your Shopify theme, you can access or edit your HTML files from:
- theme.liquid : This is where you can edit the header and the footer.
- templates/*.liquid : All liquid files located here are the main templates for different pages.
- snippets/*.liquid : Here are the reusable code snippets.
- sections/*.liquid : The files here are usually the ones that are used on the homepage or other pages.
You can go through these files to make changes, depending on the specific change you want to make.
Note that these files may be used on multiply pages. There is a chance that if you make a change in one of them, it may affect other pages as well.
How to Upload HTML File to the Root of Shopify Store
As we mentioned earlier, you need to HTML files to the root directory for the verification purposes of a third-party site such as Facebook, Google Analytics, Google Webmaster, and Pinterest. These third-party services require you to verify your domain to make sure you are the correct owner of your Shopify store.
You need to disable the password protection of your store to verify your domain. If you haven’t launched your store yet, disable password protection and enable it back again after verifying your domain.
To disable password protection in Shopify, follow these steps:
- Head over to your Shopify admin panel, go to Online Store > Preferences.
- Look for the Password page section, uncheck the Enable password page option.
- Tap Save.
To upload an HTML file to Shopify store and verify your domain:
1. Go to the third party and choose the option to verify using a meta tag verification method. For example, in Google Webmasters, you’ll need to select the HTML tag option button on the Alternate methods tab.
2. Copy the full meta tag to your clipboard. Make sure to select all of it, including the < and >.
3. Go to the Shopify app and tap Store.
4. See the Sales channels section and click Online Store > Manage themes.
5. Find the theme you want to edit. Click Actions > Edit code.
6. Type in theme.liquid in the layout search box to open the file in the online code editor.
7. Paste the meta tag you copied from the third-party service directly below the opening tag:
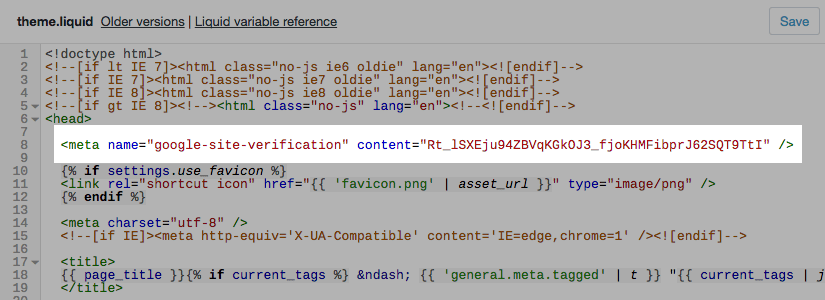
8. Click on the Save button.
9. Complete the remaining verification steps on the third-party site.
How to Upload HTML Verification to Facebook Shopify?
Step 1. Choose using the meta tag verification method.
Go to Facebook Business Manager, and then Business Settings > Brand safety > Domains and add the URL you want to verify.
Step 2. Copy full meta tag to your clipboard, including the < and > with cmd + c on a Mac or ctrl + c on a PC. For example:
Step 3. Open your Shopify admin panel, and then go to the Online Store section > Themes.
Step 4. Select the theme you want to adjust and tap Actions > Edit code.
Step 5. From the Layout section, click theme.liquid to open the file in the online code editor. This is where your
Step 6. Paste the meta tag you copied on a blank line right under the opening tag or just before the first tag.
Step 7. Click on Save.
This way, you can upload an HTML file to Shopify to verify your domain to Facebook.
How to Upload HTML File to Shopify for Google Search Console Verification
1. Log in to your Google Search Console account.
2. Select verification via meta tag or HTML file option. You can find this option under the Alternate Methods section.
3. Copy the full HTML tag to your clipboard, containing tag.
4. Head over to your Shopify admin panel. Go to Online Store > Themes and select the theme you currently use.
5. Click on Actions > Edit Code.
6. Find the Layout section and under that select the theme.liquid file to open the code editor. You can type in theme.liquid in the search box to find it.
7. Paste the copied meta tag under the tag. (You need to make sure you copy and paste the entire HTML tag just exactly as it is on Google Search Console.)
8. Tap Save.
9. Return to Google Search Console. Click Verify to verify the verification process. Once it is complete, you can see the data collected about your domain on Google Search Console.
Recommended articles for Shopify store owners:

How would you rate your experience with this article? 😊